P0410 Code Mercedes: Diagnosis, Causes, and Solutions
The P0410 code Mercedes indicates a malfunction in the secondary air injection system, impacting emissions and potentially leading to further engine complications; CARDIAGTECH.NET offers expert solutions. Understanding the causes, symptoms, and diagnostic procedures is crucial for effective repairs; explore our comprehensive guide. We’ll delve into solutions, repair guides, and Mercedes-specific insights to help you resolve this issue.
1. Understanding the P0410 Code on a Mercedes
The P0410 code, specifically in Mercedes-Benz vehicles, signifies “Secondary Air Injection System Malfunction.” This system is crucial for reducing emissions during cold starts. According to the EPA, such systems help new vehicles meet stringent emissions standards. Here’s a detailed breakdown:
- Definition: The P0410 code indicates that the secondary air injection system is not functioning as expected.
- Function: The secondary air injection system pumps air into the exhaust stream during cold starts to help the catalytic converter reach its optimal operating temperature faster, thereby reducing harmful emissions.
- Importance: Addressing this code promptly is essential for maintaining your Mercedes’ emissions compliance and overall performance.
1.1. What is the Secondary Air Injection System?
The secondary air injection system is designed to lower emissions by injecting fresh air into the exhaust stream during a cold start. This process helps burn any uncombusted fuel, reducing hydrocarbons and carbon monoxide.
- Components: Key components include the air pump, check valve, and control solenoid.
- Operation: The air pump draws in fresh air and injects it into the exhaust manifold. The check valve prevents exhaust gases from flowing back into the pump, while the control solenoid regulates the system’s operation based on signals from the engine control unit (ECU).
- Benefit: This system primarily improves emissions during the initial start-up phase, ensuring the catalytic converter heats up quickly.
1.2. Common Misconceptions About the P0410 Code
Many vehicle owners misunderstand the severity and implications of the P0410 code. Here are some common misconceptions:
- Misconception 1: “It’s just an emissions issue, so it’s not important.”
- Reality: While primarily related to emissions, ignoring the P0410 code can lead to reduced fuel efficiency and potential damage to other engine components.
- Misconception 2: “It will go away on its own.”
- Reality: The P0410 code will persist until the underlying problem is diagnosed and resolved.
- Misconception 3: “It always means the air pump is bad.”
- Reality: While a faulty air pump is a common cause, other issues such as a clogged check valve, faulty solenoid, or wiring problems can also trigger the code.
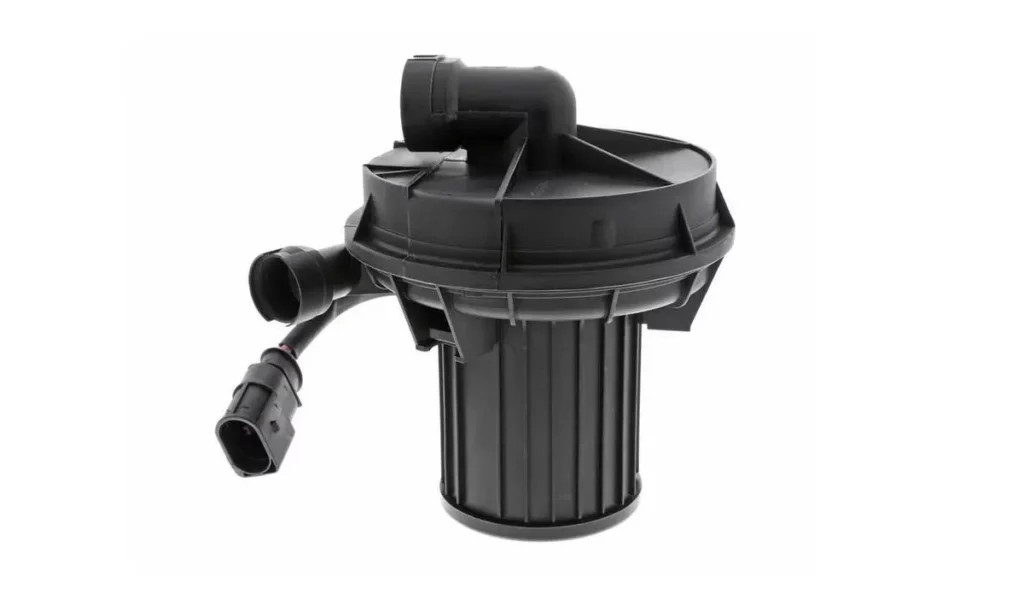
Secondary air injection pump used in BMW cars
2. Common Causes of the P0410 Code in Mercedes Vehicles
Several factors can trigger the P0410 code in your Mercedes. Identifying these causes is the first step toward resolving the issue.
- Faulty Air Pump: The air pump is the heart of the secondary air injection system. If it fails, it cannot supply the necessary air to the exhaust stream.
- Clogged or Faulty Check Valve: The check valve prevents exhaust gases from flowing back into the air pump. If it’s clogged or faulty, it can trigger the P0410 code.
- Defective Control Solenoid: The control solenoid regulates the flow of air into the exhaust system. A defective solenoid can disrupt the system’s operation.
- Wiring and Electrical Issues: Damaged or corroded wiring can disrupt the electrical signals to the air pump and control solenoid, leading to the P0410 code.
- Vacuum Leaks: Vacuum leaks in the system can reduce the air pump’s efficiency, triggering the code.
2.1. Detailed Look at Faulty Air Pump Issues
The air pump is a critical component of the secondary air injection system, and its failure is a common cause of the P0410 code.
- Common Symptoms:
- The pump does not activate during a cold start.
- The pump makes unusual noises, such as grinding or whining.
- The pump shows signs of physical damage, such as cracks or corrosion.
- Diagnostic Steps:
- Visual Inspection: Check the pump for any signs of physical damage.
- Voltage Test: Use a multimeter to check if the pump is receiving voltage during a cold start.
- Continuity Test: Check the pump’s internal wiring for continuity.
- Replacement:
- If the air pump is faulty, replacement is often the best solution. CARDIAGTECH.NET provides high-quality replacement pumps designed specifically for Mercedes vehicles.
2.2. The Role of Clogged or Faulty Check Valves
The check valve prevents exhaust gases from flowing back into the air pump, protecting it from damage. When this valve becomes clogged or malfunctions, it can trigger the P0410 code.
- Symptoms of a Bad Check Valve:
- The air pump becomes excessively hot.
- Exhaust gases flow back into the air pump.
- The air pump fails prematurely.
- Testing the Check Valve:
- Visual Inspection: Check for any signs of corrosion or damage.
- Flow Test: Disconnect the valve and try to blow air through it in both directions. Air should only flow in one direction.
- Cleaning or Replacement:
- If the valve is simply clogged, cleaning it may restore its function. However, if it’s damaged or corroded, replacement is necessary.
2.3. Identifying Defective Control Solenoids
The control solenoid regulates the flow of air into the exhaust system, and a defective solenoid can disrupt the entire system’s operation.
- Common Signs of a Defective Solenoid:
- The air pump runs continuously, even after the engine has warmed up.
- The air pump does not activate during a cold start.
- The solenoid makes clicking noises.
- Diagnostic Procedures:
- Voltage Test: Ensure the solenoid is receiving the correct voltage.
- Continuity Test: Check the solenoid’s internal wiring for continuity.
- Activation Test: Use a diagnostic scanner to activate the solenoid and check if it functions correctly.
- Replacement:
- If the solenoid fails any of these tests, it should be replaced to ensure proper system operation.
2.4. How Wiring and Electrical Issues Contribute to P0410
Wiring and electrical problems can disrupt the signals to the air pump and control solenoid, leading to the P0410 code.
- Common Wiring Problems:
- Corroded or damaged connectors.
- Broken or frayed wires.
- Loose connections.
- Troubleshooting Steps:
- Visual Inspection: Check all wiring and connectors for damage.
- Voltage Test: Use a multimeter to check for proper voltage at the air pump and solenoid connectors.
- Continuity Test: Check the wiring for continuity to ensure there are no breaks.
- Repair Strategies:
- Repair or replace any damaged wiring or connectors.
- Ensure all connections are clean and secure.
2.5. Vacuum Leaks and Their Impact on the System
Vacuum leaks can reduce the efficiency of the air pump, leading to the P0410 code.
- Identifying Vacuum Leaks:
- Listen for hissing sounds near the air pump and related hoses.
- Use a smoke machine to identify the exact location of the leak.
- Spray soapy water on suspected areas and look for bubbles.
- Common Leak Locations:
- Hoses connecting the air pump to the exhaust manifold.
- Connections at the check valve and control solenoid.
- Leak Repair Techniques:
- Replace any cracked or damaged hoses.
- Ensure all connections are tight and secure.
3. Symptoms to Watch For When the P0410 Code Appears
Recognizing the symptoms associated with the P0410 code can help you diagnose the problem quickly and prevent further damage.
- Check Engine Light: The most common symptom is the illumination of the check engine light on your dashboard.
- Rough Idle: The engine may idle roughly, especially during cold starts.
- Poor Acceleration: The vehicle may exhibit poor acceleration or hesitation.
- Increased Emissions: The vehicle may fail an emissions test due to the malfunctioning secondary air injection system.
- Unusual Noises: You may hear unusual noises, such as grinding or whining, coming from the air pump.
3.1. The Check Engine Light as the Primary Indicator
The check engine light is often the first sign that something is amiss with your vehicle.
- How It Works: The ECU monitors various engine systems, including the secondary air injection system. When a malfunction is detected, the ECU illuminates the check engine light.
- Reading the Code: Use an OBD II scanner to read the trouble code and confirm that it is P0410.
- Importance of Prompt Action: Ignoring the check engine light can lead to more severe problems and costly repairs down the road.
3.2. Rough Idle and Its Connection to the P0410 Code
A rough idle can be a symptom of the P0410 code, particularly during cold starts.
- Why It Happens: The secondary air injection system helps stabilize the engine during cold starts by ensuring proper combustion. When the system malfunctions, it can lead to a rough idle.
- Other Potential Causes: While a rough idle can be related to the P0410 code, it can also be caused by other issues such as vacuum leaks, faulty spark plugs, or a dirty mass airflow sensor.
- Diagnosis: Evaluate the secondary air injection system components alongside other potential causes to pinpoint the problem.
3.3. Poor Acceleration and Hesitation Issues
The malfunctioning secondary air injection system can sometimes lead to poor acceleration or hesitation.
- How SAIS Affects Performance: The secondary air injection system ensures optimal combustion during cold starts. When it fails, the engine may not receive the necessary air to burn fuel efficiently, resulting in poor acceleration.
- Ruling Out Other Causes: Before attributing poor acceleration solely to the P0410 code, consider other potential causes such as a clogged fuel filter, faulty fuel injectors, or a failing catalytic converter.
- Comprehensive Evaluation: A comprehensive diagnostic approach is essential to identify the root cause of the problem.
3.4. Increased Emissions and Failing Emissions Tests
One of the primary functions of the secondary air injection system is to reduce emissions. A malfunctioning system can lead to increased emissions and failure to pass an emissions test.
- The Role of SAIS in Emissions Control: The secondary air injection system helps the catalytic converter reach its operating temperature quickly, reducing harmful emissions during cold starts.
- Consequences of Failure: When the system fails, the catalytic converter takes longer to heat up, resulting in higher levels of pollutants being released into the atmosphere.
- Testing for Emissions: A smog test will reveal whether the vehicle is emitting excessive pollutants.
3.5. Recognizing Unusual Noises from the Air Pump
Unusual noises, such as grinding or whining, coming from the air pump can indicate a problem with the secondary air injection system.
- Common Noise Types:
- Grinding: May indicate worn bearings inside the air pump.
- Whining: Could suggest a failing motor or impeller.
- Rattling: May indicate loose components inside the pump.
- Locating the Source:
- Start the engine and listen carefully to pinpoint the source of the noise.
- Use a stethoscope to isolate the sound.
- Addressing the Noise:
- If the air pump is making unusual noises, it likely needs to be repaired or replaced.
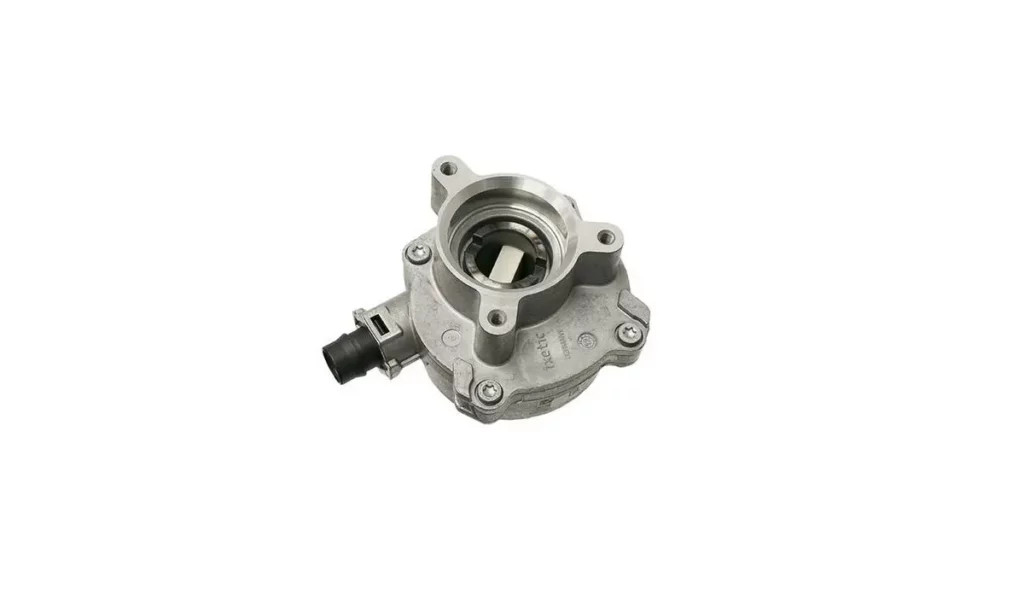
 secondary air injection pump p0410 code
4. Step-by-Step Diagnostic Guide for the P0410 Code
Diagnosing the P0410 code requires a systematic approach. Here’s a step-by-step guide to help you pinpoint the problem:
- Read the Trouble Code: Use an OBD II scanner to read the trouble code and confirm that it is P0410.
- Visual Inspection: Inspect all components of the secondary air injection system for any signs of damage.
- Air Pump Test: Test the air pump to see if it is functioning correctly.
- Check Valve Test: Test the check valve to ensure it is not clogged or faulty.
- Solenoid Test: Test the control solenoid to ensure it is functioning correctly.
- Wiring Inspection: Inspect all wiring and connectors for damage.
- Vacuum Leak Test: Perform a vacuum leak test to identify any leaks in the system.
4.1. Using an OBD II Scanner to Confirm the Code
The OBD II scanner is an essential tool for diagnosing the P0410 code.
- Connecting the Scanner:
- Locate the OBD II port in your vehicle (usually under the dashboard).
- Plug the scanner into the port.
- Reading the Code:
- Turn on the ignition.
- Follow the scanner’s instructions to read the trouble codes.
- Confirm that the code is P0410.
- Clearing the Code:
- After repairing the issue, use the scanner to clear the code.
- Monitor the vehicle to ensure the code does not return.
4.2. Performing a Visual Inspection of System Components
A thorough visual inspection can often reveal obvious problems with the secondary air injection system.
- What to Look For:
- Cracked or damaged hoses.
- Corroded or damaged connectors.
- Signs of physical damage to the air pump, check valve, and solenoid.
- Inspection Checklist:
- Air Pump: Check for cracks, corrosion, and loose connections.
- Check Valve: Look for signs of clogging or damage.
- Solenoid: Inspect for cracks and loose connections.
- Hoses: Check for cracks, leaks, and loose clamps.
- Wiring: Inspect for frayed wires, corroded connectors, and loose connections.
4.3. Testing the Air Pump for Proper Function
Testing the air pump is crucial to determine if it is functioning correctly.
- Voltage Test:
- Locate the air pump connector.
- Use a multimeter to check for voltage at the connector during a cold start.
- The voltage should be approximately 12V.
- Continuity Test:
- Disconnect the air pump connector.
- Use a multimeter to check for continuity across the pump terminals.
- If there is no continuity, the pump is likely faulty.
- Activation Test:
- Use a diagnostic scanner to activate the air pump.
- Listen for the pump to turn on.
- If the pump does not activate, it may need to be replaced.
4.4. Checking the Check Valve for Blockages or Malfunctions
The check valve must be functioning correctly to prevent exhaust gases from flowing back into the air pump.
- Visual Inspection:
- Disconnect the check valve.
- Inspect it for signs of corrosion or damage.
- Flow Test:
- Try to blow air through the valve in both directions.
- Air should only flow in one direction.
- If air flows in both directions or not at all, the valve is faulty.
- Cleaning the Valve:
- If the valve is clogged, try cleaning it with a carburetor cleaner.
- If cleaning does not restore its function, replace the valve.
4.5. Assessing the Control Solenoid for Correct Operation
The control solenoid regulates the flow of air into the exhaust system.
- Voltage Test:
- Locate the solenoid connector.
- Use a multimeter to check for voltage at the connector during a cold start.
- The voltage should be approximately 12V.
- Continuity Test:
- Disconnect the solenoid connector.
- Use a multimeter to check for continuity across the solenoid terminals.
- If there is no continuity, the solenoid is faulty.
- Activation Test:
- Use a diagnostic scanner to activate the solenoid.
- Listen for a clicking sound, indicating that the solenoid is functioning.
- If the solenoid does not activate, it may need to be replaced.
4.6. Inspecting Wiring and Connections for Damage
Damaged wiring and loose connections can disrupt the electrical signals to the air pump and control solenoid.
- Visual Inspection:
- Check all wiring and connectors for signs of damage, such as frayed wires or corroded connectors.
- Ensure all connections are tight and secure.
- Voltage Test:
- Use a multimeter to check for proper voltage at the air pump and solenoid connectors.
- Compare the readings to the manufacturer’s specifications.
- Continuity Test:
- Check the wiring for continuity to ensure there are no breaks.
- Use a multimeter to test the resistance of the wiring.
4.7. Conducting a Vacuum Leak Test to Find Leaks
Vacuum leaks can reduce the efficiency of the air pump, leading to the P0410 code.
- Using a Smoke Machine:
- Connect the smoke machine to the secondary air injection system.
- Introduce smoke into the system and look for leaks.
- Using Soapy Water:
- Spray soapy water on suspected areas.
- Look for bubbles, which indicate a leak.
- Common Leak Locations:
- Hoses connecting the air pump to the exhaust manifold.
- Connections at the check valve and control solenoid.
5. Repairing the P0410 Code on Your Mercedes
Once you’ve diagnosed the cause of the P0410 code, you can begin the repair process.
- Replacing a Faulty Air Pump: If the air pump is faulty, replacement is often the best solution.
- Cleaning or Replacing a Clogged Check Valve: If the check valve is clogged, cleaning it may restore its function. However, if it’s damaged or corroded, replacement is necessary.
- Replacing a Defective Control Solenoid: If the control solenoid is defective, it should be replaced to ensure proper system operation.
- Repairing Wiring and Electrical Issues: Repair or replace any damaged wiring or connectors.
- Addressing Vacuum Leaks: Replace any cracked or damaged hoses and ensure all connections are tight and secure.
5.1. Step-by-Step Guide to Replacing the Air Pump
Replacing the air pump involves several steps.
- Gather Tools and Materials:
- New air pump.
- Socket set.
- Wrench set.
- Screwdrivers.
- Safety glasses.
- Gloves.
- Disconnect the Battery:
- Disconnect the negative battery terminal to prevent electrical shorts.
- Locate the Air Pump:
- Refer to your vehicle’s service manual to find the location of the air pump.
- Disconnect the Electrical Connector:
- Disconnect the electrical connector from the air pump.
- Remove the Hoses:
- Disconnect the hoses from the air pump.
- Remove the Mounting Bolts:
- Remove the mounting bolts that secure the air pump.
- Install the New Air Pump:
- Install the new air pump in the reverse order of removal.
- Reconnect the Battery:
- Reconnect the negative battery terminal.
- Test the System:
- Start the engine and use an OBD II scanner to clear the P0410 code.
- Monitor the vehicle to ensure the code does not return.
5.2. How to Clean or Replace a Clogged Check Valve
Cleaning or replacing the check valve can resolve issues related to exhaust gas backflow.
- Gather Tools and Materials:
- New check valve (if replacing).
- Wrench set.
- Carburetor cleaner (if cleaning).
- Safety glasses.
- Gloves.
- Disconnect the Battery:
- Disconnect the negative battery terminal to prevent electrical shorts.
- Locate the Check Valve:
- Refer to your vehicle’s service manual to find the location of the check valve.
- Disconnect the Hoses:
- Disconnect the hoses from the check valve.
- Remove the Check Valve:
- Remove the check valve from its mounting location.
- Clean the Check Valve (if applicable):
- Spray carburetor cleaner into the valve and allow it to soak.
- Use compressed air to blow out any debris.
- Install the New Check Valve (or reinstall the cleaned valve):
- Install the new check valve (or reinstall the cleaned valve) in the reverse order of removal.
- Reconnect the Battery:
- Reconnect the negative battery terminal.
- Test the System:
- Start the engine and use an OBD II scanner to clear the P0410 code.
- Monitor the vehicle to ensure the code does not return.
5.3. Replacing the Control Solenoid: A Detailed Guide
Replacing the control solenoid is a straightforward process that can restore proper system operation.
- Gather Tools and Materials:
- New control solenoid.
- Socket set.
- Wrench set.
- Screwdrivers.
- Safety glasses.
- Gloves.
- Disconnect the Battery:
- Disconnect the negative battery terminal to prevent electrical shorts.
- Locate the Control Solenoid:
- Refer to your vehicle’s service manual to find the location of the control solenoid.
- Disconnect the Electrical Connector:
- Disconnect the electrical connector from the control solenoid.
- Remove the Hoses:
- Disconnect the hoses from the control solenoid.
- Remove the Mounting Bolts:
- Remove the mounting bolts that secure the control solenoid.
- Install the New Control Solenoid:
- Install the new control solenoid in the reverse order of removal.
- Reconnect the Battery:
- Reconnect the negative battery terminal.
- Test the System:
- Start the engine and use an OBD II scanner to clear the P0410 code.
- Monitor the vehicle to ensure the code does not return.
5.4. Addressing Wiring and Electrical Problems Effectively
Repairing wiring and electrical issues can prevent further problems with the secondary air injection system.
- Gather Tools and Materials:
- Wire strippers.
- Crimping tool.
- Electrical tape.
- New connectors (if needed).
- Multimeter.
- Safety glasses.
- Gloves.
- Disconnect the Battery:
- Disconnect the negative battery terminal to prevent electrical shorts.
- Locate the Damaged Wiring:
- Identify any damaged wiring or loose connections.
- Repair the Wiring:
- Strip the ends of the damaged wires.
- Crimp on new connectors (if needed).
- Connect the wires and secure them with electrical tape.
- Test the Connection:
- Use a multimeter to check for continuity.
- Reconnect the Battery:
- Reconnect the negative battery terminal.
- Test the System:
- Start the engine and use an OBD II scanner to clear the P0410 code.
- Monitor the vehicle to ensure the code does not return.
5.5. Fixing Vacuum Leaks for Optimal System Performance
Addressing vacuum leaks is essential for maintaining the efficiency of the secondary air injection system.
- Gather Tools and Materials:
- New hoses (if needed).
- Hose clamps.
- Screwdrivers.
- Safety glasses.
- Gloves.
- Disconnect the Battery:
- Disconnect the negative battery terminal to prevent electrical shorts.
- Locate the Vacuum Leak:
- Use a smoke machine or soapy water to identify the location of the leak.
- Replace the Damaged Hose (if applicable):
- Disconnect the damaged hose and replace it with a new one.
- Secure the Connections:
- Secure all connections with hose clamps.
- Reconnect the Battery:
- Reconnect the negative battery terminal.
- Test the System:
- Start the engine and use an OBD II scanner to clear the P0410 code.
- Monitor the vehicle to ensure the code does not return.
6. Preventative Maintenance to Avoid Future P0410 Codes
Preventative maintenance can help you avoid future P0410 codes and keep your Mercedes running smoothly.
- Regular Inspections: Periodically inspect the components of the secondary air injection system for any signs of damage.
- Cleaning the Check Valve: Clean the check valve regularly to prevent clogging.
- Checking Hoses and Connections: Inspect hoses and connections for leaks and ensure they are tight and secure.
- Proper Vehicle Maintenance: Follow the manufacturer’s recommended maintenance schedule to keep your vehicle in top condition.
6.1. Importance of Regular System Inspections
Regular inspections can help you identify potential problems before they lead to a P0410 code.
- What to Inspect:
- Air Pump: Check for cracks, corrosion, and loose connections.
- Check Valve: Look for signs of clogging or damage.
- Solenoid: Inspect for cracks and loose connections.
- Hoses: Check for cracks, leaks, and loose clamps.
- Wiring: Inspect for frayed wires, corroded connectors, and loose connections.
- When to Inspect:
- During routine maintenance.
- After any significant engine work.
- If you notice any symptoms of a malfunctioning secondary air injection system.
6.2. Keeping the Check Valve Clean to Prevent Clogging
Cleaning the check valve regularly can prevent clogging and ensure proper system operation.
- Cleaning Frequency:
- Clean the check valve every 12 months or 12,000 miles.
- Cleaning Procedure:
- Disconnect the check valve.
- Spray carburetor cleaner into the valve and allow it to soak.
- Use compressed air to blow out any debris.
- Reinstall the check valve.
6.3. Maintaining Hoses and Connections for Leak Prevention
Maintaining hoses and connections can prevent vacuum leaks and ensure the efficiency of the secondary air injection system.
- Inspection Frequency:
- Inspect hoses and connections every 6 months or 6,000 miles.
- Maintenance Tips:
- Replace any cracked or damaged hoses.
- Ensure all connections are tight and secure.
- Use hose clamps to prevent leaks.
6.4. Adhering to Proper Vehicle Maintenance Schedules
Following the manufacturer’s recommended maintenance schedule can help prevent a wide range of problems, including those related to the secondary air injection system.
- Maintenance Tasks:
- Oil changes.
- Filter replacements.
- Spark plug replacements.
- Fluid checks.
- Belt inspections.
- Benefits of Regular Maintenance:
- Improved fuel efficiency.
- Reduced emissions.
- Extended engine life.
- Fewer unexpected repairs.
7. When to Seek Professional Help for the P0410 Code
While many repairs can be done at home, there are situations where seeking professional help is the best course of action.
- Lack of Diagnostic Experience: If you are not comfortable diagnosing the problem, it’s best to seek professional help.
- Complex Electrical Issues: Complex electrical issues may require specialized tools and expertise.
- Recurring P0410 Code: If the P0410 code returns after multiple attempts to repair the problem, it may indicate a deeper issue that requires professional attention.
7.1. Recognizing the Limits of DIY Repairs
DIY repairs can be rewarding, but it’s important to recognize your limits.
- When to DIY:
- Simple tasks such as replacing a hose or cleaning a check valve.
- If you have experience with automotive repairs.
- If you have access to the necessary tools and equipment.
- When to Seek Professional Help:
- Complex diagnostic procedures.
- Electrical issues.
- Recurring problems.
- If you are unsure about any aspect of the repair.
7.2. Identifying Complex Electrical Issues Requiring Expertise
Complex electrical issues can be difficult to diagnose and repair without specialized tools and expertise.
- Common Electrical Problems:
- Short circuits.
- Open circuits.
- Faulty sensors.
- ECU malfunctions.
- Tools and Equipment:
- Diagnostic scanner.
- Multimeter.
- Oscilloscope.
- Professional Expertise:
- Certified technicians have the training and experience to diagnose and repair complex electrical issues.
7.3. Dealing with Recurring P0410 Codes Despite Repairs
If the P0410 code returns after multiple attempts to repair the problem, it may indicate a deeper issue that requires professional attention.
- Potential Underlying Problems:
- Faulty ECU.
- Intermittent electrical issues.
- Clogged catalytic converter.
- Seeking Professional Help:
- A professional mechanic can perform a thorough diagnosis to identify the root cause of the problem.
- They have access to specialized tools and equipment.
- They can provide a reliable and long-lasting solution.
8. The Role of CARDIAGTECH.NET in Resolving Your P0410 Code
CARDIAGTECH.NET is your trusted partner in resolving the P0410 code on your Mercedes. We offer a wide range of high-quality parts and expert advice to help you get your vehicle back on the road.
- High-Quality Parts: We offer genuine OEM and aftermarket parts for Mercedes vehicles.
- Expert Advice: Our team of experienced technicians can provide expert advice and support.
- Diagnostic Tools: We offer a range of diagnostic tools to help you diagnose the problem.
- Repair Guides: Our step-by-step repair guides can help you perform the repair yourself.
- Customer Support: We offer excellent customer support to answer any questions you may have.
8.1. High-Quality Mercedes Parts Available at CARDIAGTECH.NET
We offer a wide range of high-quality Mercedes parts to help you resolve the P0410 code.
- Air Pumps:
- Genuine OEM air pumps.
- High-quality aftermarket air pumps.
- Designed specifically for Mercedes vehicles.
- Check Valves:
- OEM check valves.
- Aftermarket check valves.
- Ensure proper exhaust gas flow.
- Control Solenoids:
- OEM control solenoids.
- Aftermarket control solenoids.
- Regulate the flow of air into the exhaust system.
- Hoses and Connectors:
- OEM hoses and connectors.
- Aftermarket hoses and connectors.
- Ensure a tight and secure connection.
- Electrical Components:
- Wiring harnesses.
- Connectors.
- Fuses.
- Relays.
8.2. Expert Advice and Support for Mercedes Owners
Our team of experienced technicians can provide expert advice and support to help you resolve the P0410 code.
- Diagnostic Assistance:
- We can help you diagnose the cause of the P0410 code.
- We can provide step-by-step diagnostic procedures.
- Repair Guidance:
- We can provide step-by-step repair instructions.
- We can answer any questions you may have about the repair process.
- Part Selection Assistance:
- We can help you select the right parts for your vehicle.
- We can ensure that the parts are compatible with your Mercedes.
- Technical Support:
- We offer technical support to help you with any issues you may encounter.
- We can provide troubleshooting tips and advice.
8.3. Diagnostic Tools and Repair Guides to Aid Your Efforts
We offer a range of diagnostic tools and repair guides to help you resolve the P0410 code on your Mercedes.
- Diagnostic Tools:
- OBD II scanners.
- Multimeters.
- Smoke machines.
- Vacuum testers.
- Repair Guides:
- Step-by-step repair instructions.
- Detailed diagrams.
- Troubleshooting tips.
- Maintenance schedules.
8.4. Reach Out to CARDIAGTECH.NET for Comprehensive Assistance
Don’t let the P0410 code keep your Mercedes off the road. Contact CARDIAGTECH.NET today for comprehensive assistance.
- How to Contact Us:
- Visit our website: CARDIAGTECH.NET
- Call us at: +1 (641) 206-8880
- Visit our location: 276 Reock St, City of Orange, NJ 07050, United States
- What We Offer:
- High-quality Mercedes parts.
- Expert advice and support.
- Diagnostic tools and repair guides.
- Excellent customer service.
9. Conclusion: Taking Control of Your Mercedes’ P0410 Code
The P0410 code can be a frustrating issue, but with the right knowledge and resources, you can take control of the situation and get your Mercedes back on the road. Remember to diagnose the problem correctly, perform the necessary repairs, and follow preventative maintenance measures to avoid future issues.
9.1. Reviewing the Key Steps for Addressing the P0410 Code
Let’s review the key steps for addressing the P0410 code:
- Diagnose the Problem:
- Use an OBD II scanner to confirm the code.
- Perform a visual inspection of the system components.
- Test the air pump, check valve, and solenoid.
- Inspect wiring and connections.
- Conduct a vacuum leak test.
- Repair the Problem:
- Replace a faulty air pump.
- Clean or replace a clogged check valve.