P1856 Mercedes Fault Code: Diagnosis And Solutions
P1856 Mercedes Fault Code indicates a problem with the shift lever position sensor. Discover effective diagnostic and repair solutions at CARDIAGTECH.NET to resolve this issue and maintain your Mercedes-Benz’s performance. We help you address the issue effectively with reliable tools and guidance.
1. Understanding the P1856 Mercedes Fault Code
The P1856 fault code in a Mercedes-Benz indicates an issue within the Electronic Selector Module (ESM), specifically related to the gear selector lever position detection. This is a crucial component responsible for accurately communicating the driver’s gear selection to the transmission control unit. When this system malfunctions, it can lead to a variety of drivability problems and safety concerns.
What the Code Means
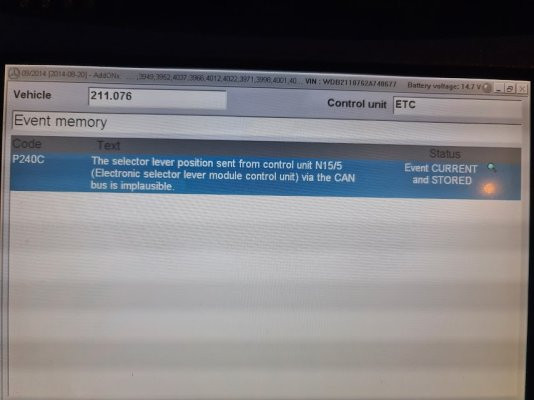
The P1856 code, often described as “Component N110 (Electronic selector lever module control unit) is defective” or “Fault in Position Sensor,” signals that the control unit has detected an irregularity or failure in the signals coming from the gear selector position sensors. The Electronic Selector Module (ESM) is the central control unit for the gear selector, interpreting the driver’s input and transmitting it to the transmission control unit. The position sensors within the ESM are responsible for providing feedback on the exact position of the gear selector lever (P, R, N, D).
Symptoms Associated with P1856
- Inability to Shift Gears: The most immediate and noticeable symptom is the inability to shift the vehicle out of Park or into other gears.
- Gear Selector Stuck: The gear selector lever may become physically stuck in a particular position.
- Erratic Shifting: The transmission may shift erratically or without driver input.
- Limp Mode: The vehicle may enter limp mode, restricting engine power and speed to protect the transmission.
- Dashboard Warning Lights: The malfunction indicator lamp (MIL) or other transmission-related warning lights will illuminate on the dashboard.
- Start-Up Issues: The vehicle may fail to start, as the system cannot confirm the gear selector is in Park or Neutral.
Potential Causes
- Faulty Position Sensor: The position sensors within the ESM may be damaged, worn, or contaminated, leading to inaccurate signals.
- ESM Control Unit Failure: The Electronic Selector Module itself may have an internal electronic fault.
- Wiring and Connections: Damaged, corroded, or loose wiring and connectors in the ESM circuit can disrupt signal transmission.
- Software Issues: Corrupted or outdated software in the ESM control unit.
- Mechanical Issues: Physical damage to the gear selector lever or linkage.
- Low Battery Voltage: Insufficient voltage can cause electronic components to malfunction.
Severity
The P1856 fault code is considered a serious issue due to its potential impact on vehicle safety and drivability. Addressing this problem promptly is essential to prevent further damage to the transmission and ensure safe operation.
2. Diagnosing the P1856 Fault Code
Diagnosing the P1856 Mercedes fault code requires a systematic approach to pinpoint the root cause of the problem. Accurate diagnosis is crucial to avoid unnecessary repairs and ensure the issue is resolved effectively. Here’s a step-by-step guide:
1. Initial Assessment and Code Verification
- Visual Inspection: Begin with a thorough visual inspection of the gear selector lever, linkage, and surrounding area. Look for any signs of physical damage, loose connections, or obstructions.
- Scan for Codes: Use a Mercedes-Benz compatible scan tool to confirm the presence of the P1856 code and check for any other related fault codes. Record all codes present, as they may provide additional clues.
- Clear Codes and Retest: Clear the fault codes and take the vehicle for a short test drive to see if the P1856 code returns. This will help determine if the issue is intermittent or persistent.
2. Inspecting the Electronic Selector Module (ESM)
- Location: The ESM is typically located near the gear selector lever, often under the center console. Consult your vehicle’s service manual for the exact location.
- Visual Inspection: Carefully inspect the ESM for any signs of damage, such as cracks, water damage, or burnt components.
- Connector Inspection: Check the electrical connectors attached to the ESM. Ensure they are securely connected and free from corrosion. Use a contact cleaner to clean the connectors if necessary.
3. Testing the Position Sensors
- Accessing the Sensors: The position sensors are located within the ESM. Accessing them may require disassembling the ESM, so proceed with caution and refer to a service manual.
- Multimeter Testing: Use a multimeter to test the resistance and voltage of the position sensors. Compare your readings to the specifications in the service manual.
- Resistance Test: With the ignition off, measure the resistance between the sensor terminals. Look for any open circuits or unusually high resistance values.
- Voltage Test: With the ignition on, measure the voltage at the sensor terminals. The voltage should vary as the gear selector lever is moved through its positions.
- Oscilloscope Testing: An oscilloscope can be used to visualize the signal patterns from the position sensors. This can help identify intermittent faults or signal irregularities.
4. Checking Wiring and Connections
- Continuity Testing: Use a multimeter to perform continuity tests on the wiring between the ESM and the transmission control unit. Look for any breaks or shorts in the wiring.
- Voltage Drop Testing: Perform voltage drop tests on the power and ground circuits to the ESM. Excessive voltage drop indicates a problem with the wiring or connections.
- Harness Inspection: Carefully inspect the wiring harness for any signs of damage, such as chafing, cuts, or melted insulation.
5. Software and Control Unit Testing
- Software Update: Use a Mercedes-Benz compatible scan tool to check for any available software updates for the ESM. Updating the software can sometimes resolve issues caused by corrupted or outdated programming.
- ESM Function Test: Many scan tools offer the ability to perform function tests on the ESM. These tests can help verify the operation of the control unit and its components.
- Control Unit Replacement: If all other tests have been performed and the ESM is still suspected of being faulty, it may be necessary to replace the control unit. This should be done by a qualified technician, as the new control unit will need to be programmed to the vehicle.
6. Additional Diagnostic Tips
- Check Battery Voltage: Ensure the vehicle’s battery is fully charged and in good condition. Low battery voltage can cause various electrical problems.
- Review Technical Service Bulletins (TSBs): Check for any TSBs related to the P1856 code or ESM issues. TSBs often contain valuable diagnostic and repair information.
- Consult a Professional: If you are not comfortable performing these diagnostic steps, or if you are unable to resolve the issue, consult a qualified Mercedes-Benz technician.
By following this systematic diagnostic approach, you can accurately identify the cause of the P1856 fault code and implement the appropriate repairs. Remember to always refer to your vehicle’s service manual for specific instructions and torque specifications.
Mercedes-Benz Gear Selector
3. Common Solutions for P1856 Mercedes Fault Code
Addressing the P1856 Mercedes fault code requires targeted solutions based on the underlying cause identified during the diagnostic process. Here are some of the most common and effective solutions:
1. Cleaning or Replacing the Position Sensor
- Cleaning the Sensor: If the diagnostic tests reveal that the position sensor is contaminated with dirt, debris, or corrosion, carefully cleaning the sensor may resolve the issue.
- Procedure:
- Disconnect the battery to prevent electrical damage.
- Access the position sensor within the Electronic Selector Module (ESM).
- Use a specialized electronic contact cleaner to gently clean the sensor contacts and surrounding area.
- Allow the cleaner to evaporate completely before reassembling the components.
- Reconnect the battery and clear the fault codes.
- Test the vehicle to see if the P1856 code returns.
- Procedure:
- Replacing the Sensor: If cleaning does not resolve the issue, or if the sensor is found to be damaged or worn beyond repair, replacing the position sensor is necessary.
- Procedure:
- Disconnect the battery.
- Remove the old position sensor from the ESM.
- Install a new, genuine Mercedes-Benz position sensor.
- Ensure the sensor is properly aligned and secured.
- Reconnect the battery and clear the fault codes.
- Perform a transmission adaptation reset using a Mercedes-Benz compatible scan tool.
- Test the vehicle to ensure proper shifting and operation.
- Procedure:
2. Repairing or Replacing Wiring and Connectors
- Repairing Wiring: Damaged wiring can cause signal disruptions and trigger the P1856 fault code.
- Procedure:
- Identify any damaged sections of wiring.
- Use appropriate wiring repair techniques, such as soldering and heat-shrinking, to repair the damaged wires.
- Ensure the repaired wires are properly insulated and protected from further damage.
- Procedure:
- Replacing Connectors: Corroded or damaged connectors can also cause issues with signal transmission.
- Procedure:
- Disconnect the faulty connector.
- Clean the connector terminals with a contact cleaner.
- If the connector is beyond repair, replace it with a new connector that matches the original specifications.
- Ensure the new connector is securely connected and properly sealed.
- Procedure:
3. Updating or Reprogramming the ESM Software
- Software Update: Outdated or corrupted software in the Electronic Selector Module (ESM) can cause various issues, including the P1856 fault code.
- Procedure:
- Use a Mercedes-Benz compatible scan tool to check for available software updates for the ESM.
- Follow the scan tool’s instructions to download and install the latest software update.
- Ensure the update process is completed without interruption.
- Clear the fault codes and perform a transmission adaptation reset.
- Test the vehicle to verify proper operation.
- Procedure:
- ESM Reprogramming: In some cases, the ESM may need to be reprogrammed to restore proper functionality.
- Procedure:
- This procedure requires specialized equipment and expertise.
- Take the vehicle to a qualified Mercedes-Benz technician who can reprogram the ESM using the appropriate software and tools.
- Procedure:
4. Replacing the Electronic Selector Module (ESM)
- Procedure: If the diagnostic tests indicate that the ESM itself is faulty, replacing the control unit is necessary.
- Disconnect the battery.
- Remove the old ESM from the vehicle.
- Install a new, genuine Mercedes-Benz ESM.
- The new ESM will need to be programmed to the vehicle using a Mercedes-Benz compatible scan tool.
- Perform a transmission adaptation reset.
- Test the vehicle to ensure proper shifting and operation.
5. Addressing Mechanical Issues
- Gear Selector Linkage: If the gear selector linkage is damaged or misaligned, it can cause issues with gear selection and trigger the P1856 fault code.
- Procedure:
- Inspect the gear selector linkage for any signs of damage, such as bends, breaks, or loose connections.
- Repair or replace any damaged components.
- Adjust the linkage to ensure proper alignment.
- Procedure:
- Gear Selector Lever: If the gear selector lever itself is damaged, it may need to be replaced.
- Procedure:
- Remove the old gear selector lever.
- Install a new, genuine Mercedes-Benz gear selector lever.
- Ensure the lever is properly secured and aligned.
- Procedure:
6. Ensuring Proper Battery Voltage
- Battery Check: Low battery voltage can cause various electrical issues, including problems with the ESM.
- Procedure:
- Use a multimeter to check the battery voltage.
- The battery voltage should be at least 12.6 volts with the engine off.
- If the battery voltage is low, charge the battery or replace it if necessary.
- Ensure the battery terminals are clean and securely connected.
- Procedure:
By implementing these solutions based on the specific diagnosis, you can effectively address the P1856 Mercedes fault code and restore your vehicle’s proper operation. Always use genuine Mercedes-Benz parts and follow the manufacturer’s recommended procedures for the best results.
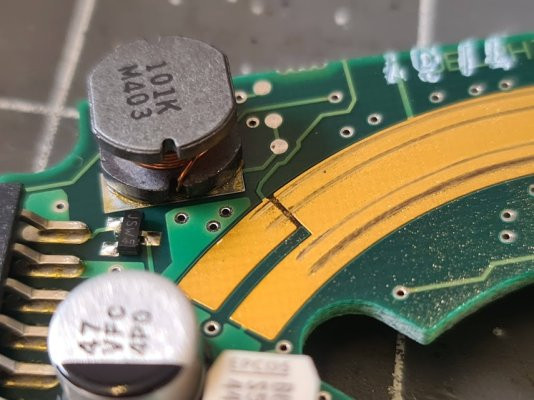 Close-up of ESM Gold Dust
4. Step-by-Step Repair Guide for P1856 Fault Code
This section provides a detailed, step-by-step repair guide to address the P1856 Mercedes fault code. This guide assumes that you have already performed the necessary diagnostic steps and have identified the root cause of the problem.
Tools and Materials Required
- Mercedes-Benz compatible scan tool
- Multimeter
- Socket set and wrench set
- Screwdriver set
- Electronic contact cleaner
- Wiring repair kit (soldering iron, solder, heat shrink tubing)
- New position sensor (if needed)
- New wiring connectors (if needed)
- New Electronic Selector Module (ESM) (if needed)
- Torque wrench
- Vehicle service manual
- Safety glasses and gloves
Step 1: Preparation
- Safety First: Wear safety glasses and gloves to protect yourself from potential hazards.
- Disconnect the Battery: Disconnect the negative terminal of the battery to prevent electrical damage.
- Access the ESM: Locate the Electronic Selector Module (ESM) in your vehicle. It is typically located near the gear selector lever, often under the center console. Consult your vehicle’s service manual for the exact location.
- Remove the Center Console: Depending on the vehicle model, you may need to remove the center console to access the ESM. Refer to the service manual for specific instructions.
Step 2: Inspecting and Cleaning the Position Sensor
- Disconnect Connectors: Disconnect the electrical connectors attached to the ESM.
- Remove the ESM: Remove the ESM from its mounting location.
- Access the Position Sensor: Carefully disassemble the ESM to access the position sensor. Refer to the service manual for detailed instructions on disassembling the ESM.
- Inspect the Sensor: Visually inspect the position sensor for any signs of damage, wear, or contamination.
- Clean the Sensor: If the sensor appears to be contaminated, use an electronic contact cleaner to gently clean the sensor contacts and surrounding area.
- Reassemble the ESM: Carefully reassemble the ESM, ensuring all components are properly aligned and secured.
Step 3: Testing the Position Sensor
- Reconnect Connectors: Reconnect the electrical connectors to the ESM.
- Test Resistance: Use a multimeter to test the resistance of the position sensor. Compare your readings to the specifications in the service manual.
- Test Voltage: With the ignition on, use a multimeter to test the voltage at the sensor terminals as you move the gear selector lever through its positions. The voltage should vary smoothly and consistently.
- If the sensor fails either of these tests, replace the sensor with a new, genuine Mercedes-Benz position sensor.
Step 4: Replacing the Position Sensor (If Necessary)
- Disconnect Connectors: Disconnect the electrical connectors from the ESM.
- Remove the ESM: Remove the ESM from its mounting location.
- Access the Position Sensor: Disassemble the ESM to access the position sensor.
- Remove the Old Sensor: Remove the old position sensor.
- Install the New Sensor: Install the new position sensor, ensuring it is properly aligned and secured.
- Reassemble the ESM: Carefully reassemble the ESM.
Step 5: Inspecting and Repairing Wiring and Connectors
- Inspect Wiring: Inspect the wiring harness connected to the ESM for any signs of damage, such as chafing, cuts, or melted insulation.
- Repair Wiring: If you find any damaged wires, repair them using appropriate wiring repair techniques, such as soldering and heat-shrinking.
- Inspect Connectors: Inspect the electrical connectors for any signs of corrosion or damage.
- Clean Connectors: Clean the connector terminals with an electronic contact cleaner.
- Replace Connectors: If the connectors are damaged beyond repair, replace them with new connectors that match the original specifications.
Step 6: Replacing the Electronic Selector Module (ESM) (If Necessary)
- Disconnect Connectors: Disconnect the electrical connectors from the ESM.
- Remove the ESM: Remove the old ESM from its mounting location.
- Install the New ESM: Install the new ESM, ensuring it is properly aligned and secured.
- Reconnect Connectors: Reconnect the electrical connectors to the ESM.
Step 7: Software Update and Reprogramming (If Necessary)
- Connect Scan Tool: Connect a Mercedes-Benz compatible scan tool to the vehicle’s diagnostic port.
- Check for Updates: Check for any available software updates for the ESM.
- Update Software: If updates are available, follow the scan tool’s instructions to download and install the latest software update.
- Reprogram ESM: In some cases, the ESM may need to be reprogrammed. Follow the scan tool’s instructions to reprogram the ESM.
Step 8: Reassembly and Testing
- Reinstall Components: Reinstall the center console (if removed) and any other components that were removed during the repair process.
- Reconnect Battery: Reconnect the negative terminal of the battery.
- Clear Fault Codes: Use the scan tool to clear any fault codes stored in the vehicle’s computer.
- Perform Adaptation Reset: Perform a transmission adaptation reset using the scan tool.
- Test Drive: Take the vehicle for a test drive to ensure proper shifting and operation.
- Verify Repair: Use the scan tool to verify that the P1856 fault code does not return.
Torque Specifications
Refer to your vehicle’s service manual for specific torque specifications for all bolts and fasteners.
Important Notes
- Always use genuine Mercedes-Benz parts for repairs.
- Follow the manufacturer’s recommended procedures for all repairs.
- If you are not comfortable performing these repairs, consult a qualified Mercedes-Benz technician.
- Always double-check your work to ensure all components are properly installed and secured.
By following this step-by-step repair guide, you can effectively address the P1856 Mercedes fault code and restore your vehicle’s proper operation. Remember to always prioritize safety and consult a professional if you are unsure about any aspect of the repair process.
 Mercedes-Benz Position Switch
5. Preventing Future Issues with the Electronic Selector Module
To minimize the risk of encountering the P1856 fault code and other issues related to the Electronic Selector Module (ESM) in your Mercedes-Benz, consider implementing these preventative measures:
1. Regular Maintenance
- Scheduled Inspections: Follow the manufacturer’s recommended maintenance schedule for your vehicle. This includes regular inspections of the transmission, electrical system, and related components.
- Fluid Checks: Regularly check the transmission fluid level and condition. Low or contaminated fluid can cause various transmission problems, including issues with the ESM.
- Battery Maintenance: Ensure the vehicle’s battery is in good condition and properly maintained. Low battery voltage can cause electrical components to malfunction.
2. Proper Driving Habits
- Smooth Shifting: Avoid abrupt or jerky gear changes. Smooth shifting can help reduce wear and tear on the transmission and ESM.
- Complete Stops: Come to a complete stop before shifting between Drive and Reverse. Shifting while the vehicle is still in motion can damage the transmission and ESM.
- Avoid Overloading: Avoid overloading the vehicle beyond its recommended weight capacity. Overloading can put extra strain on the transmission and other components.
3. Environmental Protection
- Avoid Water Damage: Avoid driving through deep water, as this can damage the ESM and other electrical components.
- Protect from Extreme Temperatures: Park the vehicle in a shaded area or garage to protect it from extreme temperatures. Excessive heat can damage the ESM and other electronic components.
- Keep Interior Clean: Keep the interior of the vehicle clean and free from debris. Dirt and debris can contaminate the ESM and other components.
4. Electrical System Care
- Secure Connections: Ensure all electrical connections to the ESM are secure and free from corrosion.
- Protect Wiring: Protect the wiring harness from damage by keeping it properly secured and away from sharp edges or hot surfaces.
- Avoid Electrical Overloads: Avoid overloading the electrical system by adding aftermarket accessories that draw excessive power.
5. Software Updates
- Stay Updated: Keep the ESM software up to date. Check for available software updates regularly and install them as needed.
- Professional Updates: Have a qualified Mercedes-Benz technician perform software updates to ensure they are done correctly.
6. Professional Inspections
- Regular Check-ups: Have the vehicle inspected by a qualified Mercedes-Benz technician at regular intervals.
- ESM Diagnostics: Request a specific inspection of the ESM to check for any potential issues.
7. Prompt Repairs
- Address Issues Quickly: Address any warning signs or symptoms of ESM problems promptly.
- Professional Repairs: Have a qualified Mercedes-Benz technician perform any necessary repairs to the ESM.
By following these preventative measures, you can help prolong the life of your ESM and minimize the risk of encountering the P1856 fault code and other related issues. Regular maintenance, proper driving habits, and environmental protection are key to keeping your Mercedes-Benz running smoothly and reliably.
6. The Role of Quality Tools in Diagnosing P1856
Using high-quality diagnostic tools is essential for accurately diagnosing and resolving the P1856 Mercedes fault code. The right tools can provide detailed information, streamline the diagnostic process, and ensure that repairs are performed effectively.
1. Mercedes-Benz Compatible Scan Tool
- Functionality: A Mercedes-Benz compatible scan tool is the most critical tool for diagnosing the P1856 fault code. These scan tools can read and clear fault codes, access live data, perform actuation tests, and reprogram control units.
- Benefits:
- Accurate Diagnostics: Provides accurate and specific information about the fault code and related systems.
- Comprehensive Data: Accesses a wide range of data parameters, including sensor readings, voltage levels, and system status.
- Actuation Tests: Allows you to activate and test individual components, such as the position sensor, to verify their operation.
- Reprogramming: Enables you to update or reprogram the ESM software, which can resolve certain issues.
- Recommendations:
- Genuine Mercedes-Benz Scan Tool (e.g., XENTRY): Provides the most comprehensive functionality and compatibility.
- High-Quality Aftermarket Scan Tools (e.g., Autel, Launch): Offer a good balance of functionality and affordability.
2. Multimeter
- Functionality: A multimeter is an essential tool for testing electrical circuits and components. It can measure voltage, resistance, and current.
- Benefits:
- Circuit Testing: Allows you to test the continuity and voltage of wiring and connectors.
- Sensor Testing: Enables you to measure the resistance and voltage of the position sensor.
- Component Testing: Helps you identify faulty components, such as resistors, capacitors, and diodes.
- Recommendations:
- Digital Multimeter: Provides accurate and easy-to-read measurements.
- Auto-Ranging Multimeter: Automatically selects the appropriate measurement range.
- High-Impedance Multimeter: Prevents damage to sensitive electronic components.
3. Oscilloscope
- Functionality: An oscilloscope is a more advanced tool that can visualize electrical signals over time. It can display waveforms, measure signal frequency, and detect intermittent faults.
- Benefits:
- Signal Analysis: Allows you to analyze the signal patterns from the position sensor.
- Intermittent Fault Detection: Helps you identify intermittent faults that may not be detectable with a multimeter.
- Complex Circuit Analysis: Enables you to analyze complex circuits and diagnose challenging electrical problems.
- Recommendations:
- Digital Storage Oscilloscope (DSO): Captures and stores waveforms for analysis.
- Automotive Oscilloscope: Designed specifically for automotive applications, with features such as ignition analysis and sensor simulation.
4. Wiring Repair Kit
- Functionality: A wiring repair kit includes the tools and materials needed to repair damaged wiring and connectors.
- Benefits:
- Effective Repairs: Allows you to repair damaged wiring quickly and effectively.
- Professional Results: Ensures that repairs are performed to a high standard.
- Long-Lasting Repairs: Provides durable and long-lasting repairs.
- Recommendations:
- Soldering Iron: For soldering wires together.
- Solder: For creating a strong and reliable connection.
- Heat Shrink Tubing: For insulating and protecting repaired wires.
- Wire Strippers: For removing insulation from wires.
- Crimping Tool: For crimping connectors onto wires.
5. Electronic Contact Cleaner
- Functionality: Electronic contact cleaner is a specialized cleaner designed to remove dirt, corrosion, and other contaminants from electrical contacts.
- Benefits:
- Improved Connections: Improves the conductivity of electrical connections.
- Reduced Corrosion: Prevents corrosion and oxidation of electrical contacts.
- Enhanced Performance: Enhances the performance and reliability of electrical components.
- Recommendations:
- Residue-Free Cleaner: Leaves no residue behind after cleaning.
- Plastic-Safe Cleaner: Safe to use on plastic components.
- Quick-Drying Cleaner: Evaporates quickly to minimize downtime.
By using these high-quality diagnostic tools, you can accurately diagnose and resolve the P1856 Mercedes fault code. The right tools can provide detailed information, streamline the diagnostic process, and ensure that repairs are performed effectively.
7. The Importance of Genuine Mercedes-Benz Parts
When addressing the P1856 Mercedes fault code, using genuine Mercedes-Benz parts is crucial for ensuring proper fit, function, and longevity of the repair. Genuine parts are manufactured to the exact specifications of the original components, ensuring seamless integration and optimal performance.
1. Guaranteed Compatibility
- Perfect Fit: Genuine Mercedes-Benz parts are designed to fit perfectly into your vehicle, ensuring proper alignment and function.
- Seamless Integration: Genuine parts are engineered to work seamlessly with other components in your vehicle’s system.
- No Modifications Required: Genuine parts require no modifications or adaptations, saving time and effort during installation.
2. Superior Quality
- High-Quality Materials: Genuine Mercedes-Benz parts are made from high-quality materials that are designed to withstand the stresses and demands of automotive use.
- Rigorous Testing: Genuine parts undergo rigorous testing to ensure they meet the highest standards of quality and reliability.
- Long-Lasting Performance: Genuine parts are designed to provide long-lasting performance, reducing the need for frequent replacements.
3. Optimal Performance
- Designed for Mercedes-Benz Vehicles: Genuine parts are specifically designed for Mercedes-Benz vehicles, ensuring optimal performance and efficiency.
- Restored Functionality: Genuine parts restore your vehicle’s functionality to its original specifications.
- Improved Reliability: Genuine parts improve the overall reliability of your vehicle.
4. Warranty Coverage
- Manufacturer’s Warranty: Genuine Mercedes-Benz parts are typically covered by a manufacturer’s warranty, providing peace of mind and protection against defects.
- Extended Warranty Options: Extended warranty options may be available for genuine parts, providing additional coverage and protection.
5. Safety and Reliability
- Ensured Safety: Genuine parts are designed to meet strict safety standards, ensuring the safety of your vehicle and its occupants.
- Reliable Performance: Genuine parts provide reliable performance, reducing the risk of breakdowns and other issues.
6. Maintaining Vehicle Value
- Preserving Value: Using genuine parts helps preserve the value of your vehicle.
- Increased Resale Value: Vehicles with genuine parts installed tend to have a higher resale value.
7. Avoiding Counterfeit Parts
- Authenticity: Genuine parts are guaranteed to be authentic, ensuring that you are getting the quality and performance you expect.
- Avoiding Substandard Parts: Using genuine parts helps you avoid counterfeit or substandard parts, which can be unreliable and potentially dangerous.
When addressing the P1856 Mercedes fault code, be sure to use genuine Mercedes-Benz parts for the best results. Genuine parts provide guaranteed compatibility, superior quality, optimal performance, warranty coverage, and enhanced safety and reliability.
8. Understanding Mercedes-Benz Transmission Systems
To effectively diagnose and repair issues like the P1856 fault code, a solid understanding of Mercedes-Benz transmission systems is essential. These systems are complex, integrating mechanical, electrical, and electronic components to provide smooth and efficient gear changes.
1. Types of Transmissions
- Automatic Transmissions: Most Mercedes-Benz vehicles use automatic transmissions, which automatically shift gears based on vehicle speed, engine load, and other factors.
- Manual Transmissions: Some older or sportier models may have manual transmissions, requiring the driver to manually shift gears using a clutch and gear lever.
- Dual-Clutch Transmissions (DCT): Newer models may feature dual-clutch transmissions, which offer faster and smoother gear changes compared to traditional automatic transmissions.
2. Components of Automatic Transmissions
- Torque Converter: Transfers engine power to the transmission.
- Planetary Gear Sets: Provide different gear ratios for varying driving conditions.
- Clutches and Bands: Engage and disengage the planetary gear sets to change gears.
- Valve Body: Controls the flow of hydraulic fluid to the clutches and bands.
- Transmission Control Unit (TCU): An electronic control unit that monitors various sensors and controls the transmission’s operation.
3. Electronic Selector Module (ESM)
- Function: The ESM is a critical component of the transmission system, responsible for detecting the driver’s gear selection and transmitting this information to the TCU.
- Location: Typically located near the gear selector lever, often under the center console.
- Sensors: The ESM uses position sensors to determine the position of the gear selector lever (P, R, N, D).
4. Transmission Control Unit (TCU)
- Function: The TCU is the brain of the transmission system, monitoring various sensors and controlling the transmission’s operation.
- Sensors: The TCU receives input from various sensors, including:
- Engine Speed Sensor: Measures the engine’s rotational speed.
- Vehicle Speed Sensor: Measures the vehicle’s speed.
- Throttle Position Sensor: Measures the position of the throttle pedal.
- Transmission Fluid Temperature Sensor: Measures the temperature of the transmission fluid.
- Actuators: The TCU controls various actuators, including:
- Solenoids: Control the flow of hydraulic fluid to the clutches and bands.
- Shift Motors: Control the gear selection in some transmissions.
5. Hydraulic System
- Function: The hydraulic system uses transmission fluid to transmit power and control the transmission’s operation.
- Components:
- Transmission Fluid Pump: Circulates transmission fluid throughout the system.
- Valve Body: Controls the flow of hydraulic fluid to the clutches and bands.
- Hydraulic Lines: Carry transmission fluid throughout the system.
6. Transmission Fluid
- Function: Transmission fluid lubricates the transmission’s internal components, cools the transmission, and transmits hydraulic pressure.
- Type: Use only the recommended type of transmission fluid for your vehicle.
- Level: Maintain the proper transmission fluid level.
- Condition: Regularly check the transmission fluid’s condition and replace it as needed.
7. Diagnostic Procedures
- Scan Tool: Use a Mercedes-Benz compatible scan tool to read and clear fault codes, access live data, and perform actuation tests.
- Visual Inspection: Inspect the transmission for any signs of damage, leaks, or worn components.
- Fluid Check: Check the transmission fluid level and condition.
- Component Testing: Test the individual components of the transmission system to verify their operation.
By understanding the components and operation of Mercedes-Benz transmission systems, you can effectively diagnose and repair issues like the P1856 fault code. This knowledge will help you identify the root cause of the problem and implement the appropriate repairs.
9. Understanding CAN Bus Communication
The Controller Area Network (CAN) bus is a critical communication network in modern vehicles, including Mercedes-Benz models. It allows various electronic control units (ECUs) to communicate with each other, sharing data and coordinating functions. Understanding CAN bus communication is essential for diagnosing complex issues like the P1856 fault code.
1. What is CAN Bus?
- Definition: CAN bus is a serial communication protocol that allows microcontrollers and devices to communicate with each other in a vehicle without a host computer.
- Purpose: It reduces wiring complexity and enables efficient data sharing among ECUs.
2. Key Features of CAN Bus
- Two-Wire System: CAN bus uses a two-wire system (CAN High and CAN Low) for data transmission.
- Data Prioritization: CAN bus prioritizes data messages based on their importance, ensuring that critical information is transmitted first.
- Error Detection: CAN bus has built-in error detection mechanisms to ensure data integrity.
- High Speed: CAN bus supports high-speed data transmission, allowing for real-time communication between ECUs.
3. Components of CAN Bus
- ECUs (Electronic Control Units): These are the various control modules in the vehicle, such as the engine control unit (ECU), transmission control unit (TCU), anti-lock braking system (ABS) module, and body control module (BCM).
- CAN Transceiver: This is a physical interface that allows the ECU to send and receive CAN bus messages.
- CAN Controller: This is a microcontroller that handles the CAN bus protocol and manages data transmission.
- Wiring Harness: This is the physical wiring that connects the ECUs to the CAN bus network.
4. How CAN Bus Works
- Data Transmission: An ECU that needs to transmit data sends a CAN bus message onto the network.
- Message Arbitration: If multiple ECUs attempt to transmit data simultaneously, the CAN bus protocol arbitrates the messages based on their priority.
- Message Reception: All ECUs on the network receive the CAN bus message, but only the ECU that is addressed in the message processes the data.
- Error Detection: The CAN bus protocol includes error detection mechanisms to ensure that the data is transmitted correctly.
**5. CAN Bus and the P185