How To Fix Scratches On Your Car: A Comprehensive Guide
Are you bothered by unsightly scratches on your car’s paintwork? Learn How To Fix Scratches On Your Car effectively with CARDIAGTECH.NET’s comprehensive guide, which covers everything from identifying scratch types to step-by-step repair methods. By following our expert advice, you can restore your car’s appearance and protect its value, using the right tools like automotive paint and polishing compounds. Discover how to remove car scratches and achieve a professional finish.
1. Understanding Car Scratches
To effectively address scratches on your car, it’s crucial to understand the different types and their impact on the paint layers. Scratches vary in severity, ranging from minor clear coat imperfections to deeper gouges that penetrate the primer. Knowing the type of scratch helps you choose the appropriate repair method and tools. Here’s a breakdown:
1.1. Clear Coat Scratches
Clear coat scratches are the most superficial type, affecting only the outermost layer of your car’s paint. They are typically caused by minor abrasions, such as:
- Branches brushing against the car
- Improper washing techniques
- Light contact with other objects
Identification: Clear coat scratches appear as faint lines or swirls on the surface. You can often remove them with simple polishing techniques.
1.2. Base Coat Scratches
Base coat scratches penetrate through the clear coat and into the colored base coat layer. These scratches are more noticeable and require a slightly more involved repair process. Common causes include:
- Deeper scrapes from road debris
- Vandalism
- More aggressive washing or detailing mistakes
Identification: These scratches are deeper than clear coat scratches and expose the color layer beneath the clear coat.
1.3. Primer Coat Scratches (Deep Scratches)
Primer coat scratches are the most severe, extending through the clear coat, base coat, and reaching the primer layer. These deep scratches require the most attention to repair properly. Causes include:
- Collisions
- Severe impacts
- Sharp objects dragging along the car’s surface
Identification: These scratches are easily visible, often exposing a gray or dark-colored layer (the primer) beneath the paint.
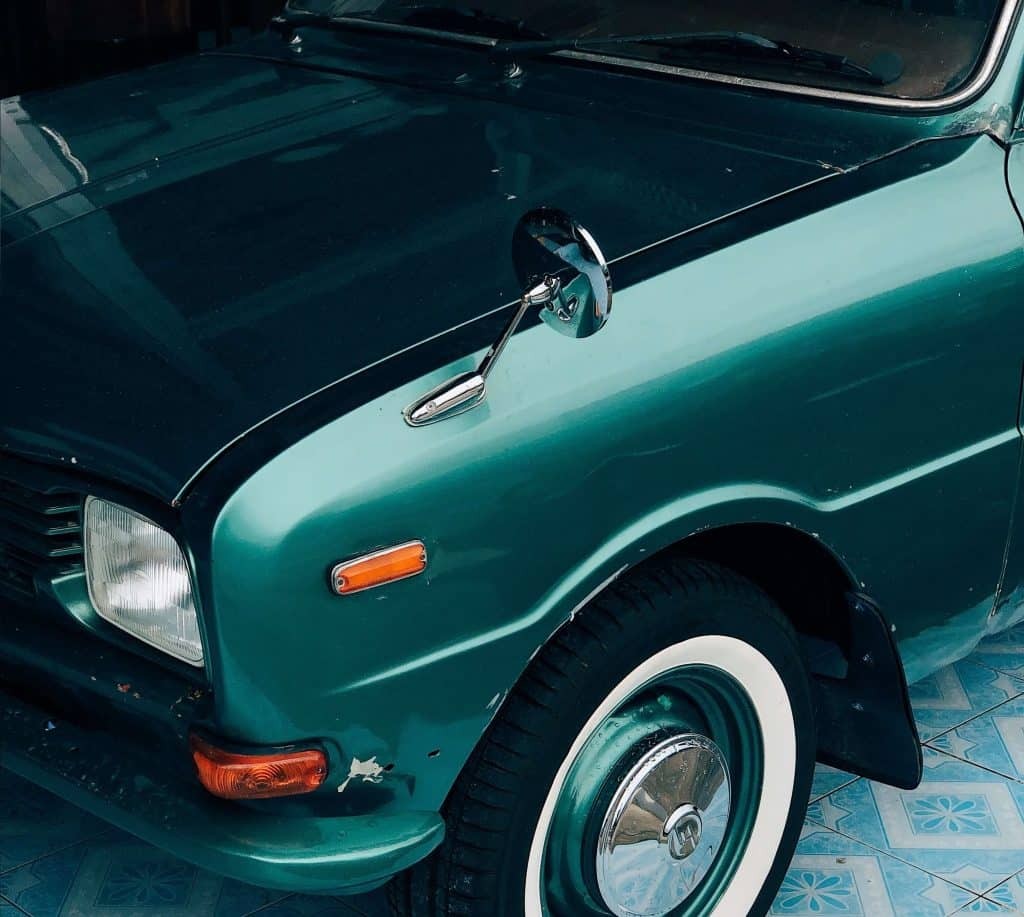
Car Scratch
Alt Text: Close-up of a car scratch, showcasing the depth and damage to the paint layers.
2. Assessing the Scratch
Before you begin any repair, it’s important to accurately assess the scratch to determine the extent of the damage.
2.1. The Fingernail Test
A simple way to assess the depth of a scratch is the fingernail test. According to Popular Mechanics, “If your fingernail catches, it’s through the clear coat. If it doesn’t, you may be able to buff it out.”
- Clean the area around the scratch.
- Gently run your fingernail perpendicular to the scratch.
- If your fingernail catches, the scratch is likely deep and may require more extensive repairs, such as touch-up paint or professional help.
- If your fingernail doesn’t catch, the scratch is likely superficial and can be addressed with polishing compounds.
2.2. The Polish Test
Another method to identify the type of scratch involves using a polishing compound.
- Apply a small amount of polishing compound to a microfiber cloth.
- Rub the compound onto the scratched area using a circular motion.
- If the scratch disappears, it is a clear coat scratch.
- If the scratch remains visible, it is likely a base coat or primer scratch, indicating deeper damage.
2.3. Professional Assessment
For severe or uncertain cases, consulting a professional at CARDIAGTECH.NET can provide an accurate assessment and recommend the best course of action. We can evaluate the damage and offer solutions tailored to your specific needs, ensuring a high-quality repair.
3. Essential Tools and Materials
Having the right tools and materials is crucial for effectively fixing scratches on your car. Here is a comprehensive list of what you’ll need:
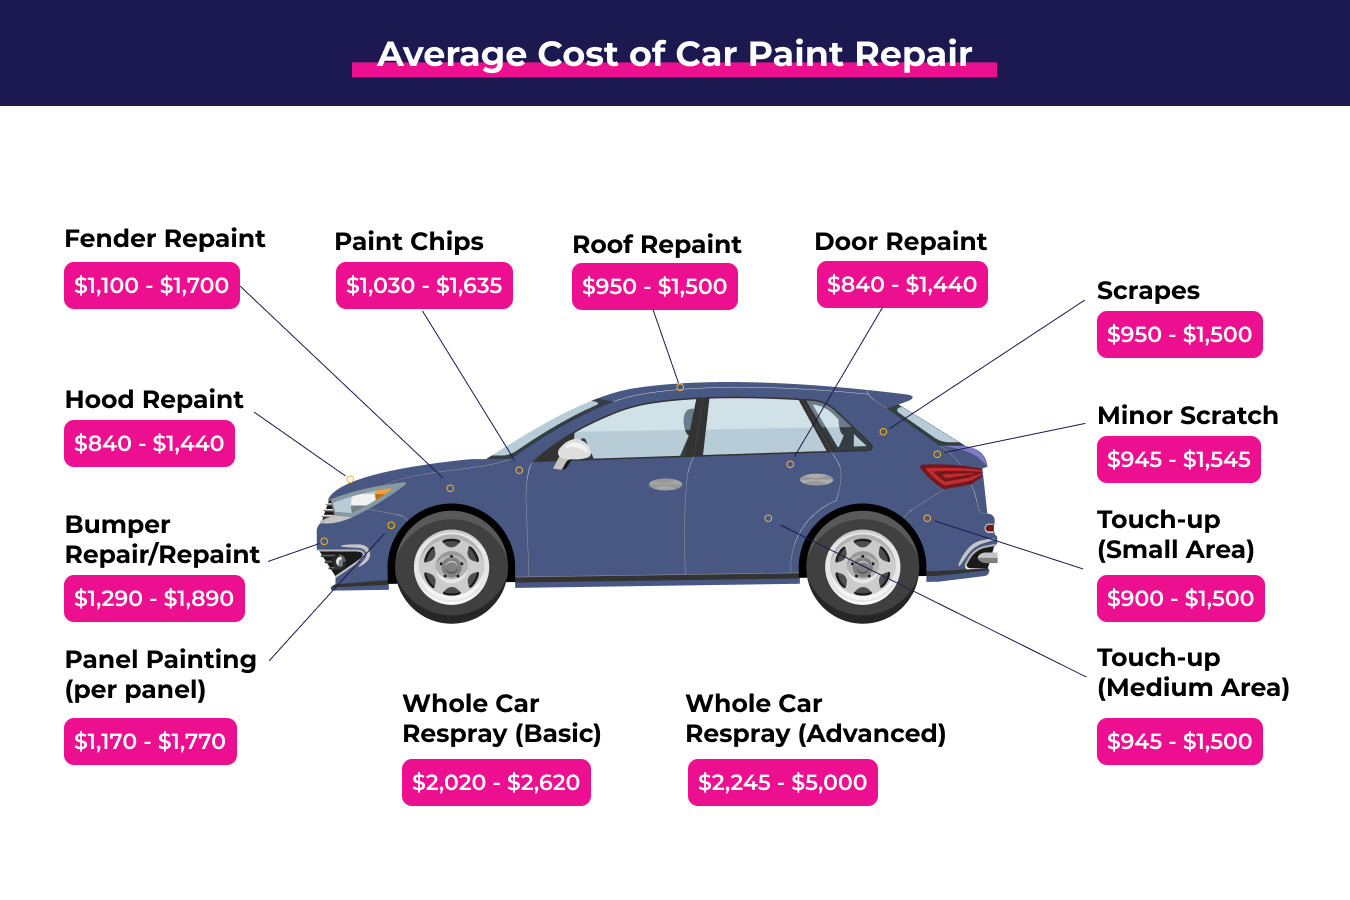
| Tool/Material | Description | Use |
|---|---|---|
| Car Wash Soap | Gentle soap specifically designed for cars | Cleaning the area around the scratch |
| Microfiber Cloths | Soft, non-abrasive cloths | Applying and buffing compounds, polish, and wax |
| Scratch Remover | Compound designed to remove minor scratches from the clear coat | Removing surface scratches |
| Car Polish | Enhances shine and removes swirl marks | Restoring shine after scratch removal |
| Touch-Up Paint | Paint that matches your car’s color code | Filling in deeper scratches that penetrate the base coat or primer |
| Paint Brush/Applicator | Small brushes or applicators for precise touch-up paint application | Applying touch-up paint to the scratch |
| Sandpaper | Various grits (e.g., 2000-grit, 3000-grit) for smoothing imperfections | Sanding down touch-up paint and smoothing the area |
| Rubbing Compound | Abrasive compound for leveling paint and removing deeper imperfections | Removing sanding marks and leveling the surface |
| Wax | Protects the paint and adds shine | Protecting the repaired area and enhancing its appearance |
| Masking Tape | Used to protect surrounding areas from accidental damage during sanding or touch-up painting | Protecting areas around the scratch |
| Detail Clay Bar | Removes contaminants from the paint surface | Cleaning the area to ensure a smooth finish |
| Clay Lube | Lubricant for use with the clay bar | Preventing the clay bar from scratching the paint |
| Inspection Light | High-intensity light to reveal imperfections | Inspecting the repair to ensure all scratches are removed and the finish is flawless |
| Safety Gloves | Protects hands from chemicals and abrasives | Ensuring safety during the repair process |
| Eye Protection | Safety glasses to protect eyes from debris and chemicals | Ensuring safety during the repair process |
These tools and materials, available at CARDIAGTECH.NET, will equip you to handle a variety of scratch repairs effectively. Investing in quality products ensures a better finish and protects your car’s paint in the long run.
4. Step-by-Step Guide to Fixing Clear Coat Scratches
Clear coat scratches are the easiest to fix and often require minimal effort. Here’s how to remove them effectively:
4.1. Cleaning the Area
- Wash the car: Begin by washing your car to remove any dirt, dust, or debris. Use a pH-neutral car wash soap and a soft microfiber wash mitt. Rinse thoroughly with clean water.
- Dry the area: Use a clean, soft microfiber towel to dry the area around the scratch. Ensure the surface is completely dry before proceeding.
- Clay bar treatment (optional): If there are contaminants on the paint surface, use a detail clay bar and clay lube to remove them. This ensures a smoother surface for polishing.
4.2. Applying Scratch Remover
- Apply compound: Apply a small amount of scratch remover compound to a clean microfiber cloth.
- Rub into the scratch: Gently rub the compound into the scratch using a circular motion. Apply light pressure and continue buffing the area for several minutes.
- Inspect the area: Check to see if the scratch is disappearing. If not, apply more compound and repeat the buffing process.
4.3. Polishing the Area
- Apply car polish: After the scratch is removed, apply a small amount of car polish to a clean microfiber cloth.
- Buff to restore shine: Buff the area with the polish using a circular motion to restore the shine and remove any swirl marks left by the scratch remover.
- Wipe off residue: Use a clean microfiber cloth to wipe off any excess polish residue.
4.4. Waxing the Area
- Apply wax: Apply a thin, even layer of car wax to the polished area using a foam applicator pad.
- Allow to dry: Let the wax dry according to the manufacturer’s instructions.
- Buff to a shine: Use a clean microfiber cloth to buff the waxed area to a brilliant shine.
According to a study by the International Car Wash Association (ICA), regular washing, polishing, and waxing can extend the life of a car’s paint by up to 30%.
5. Repairing Base Coat Scratches
Base coat scratches are deeper than clear coat scratches and require touch-up paint to properly conceal the damage. Here’s how to repair them:
5.1. Cleaning the Area
- Wash the car: Start by washing your car to remove any dirt, dust, or debris.
- Dry the area: Use a clean, soft microfiber towel to dry the area around the scratch.
- Degrease: Use a wax and grease remover to clean the area to ensure proper adhesion of the touch-up paint.
5.2. Applying Touch-Up Paint
- Shake the paint: Shake the touch-up paint bottle thoroughly to ensure the paint is properly mixed.
- Apply thin layers: Use a fine-tipped brush or applicator to apply thin, even layers of touch-up paint to the scratch. Avoid applying too much paint at once to prevent drips and runs.
- Allow to dry: Let each layer of paint dry completely before applying the next. This may take several hours, depending on the paint and environmental conditions.
5.3. Sanding the Area
- Wet sanding: Once the touch-up paint is completely dry, use 2000-grit sandpaper to wet sand the area. Wrap the sandpaper around a sanding block for even pressure.
- Sand lightly: Lightly sand the touch-up paint to level it with the surrounding paint. Be careful not to sand too much, as you could remove the touch-up paint entirely.
- Clean the area: Use a clean microfiber cloth to wipe away any sanding residue.
5.4. Polishing the Area
- Apply rubbing compound: Apply a small amount of rubbing compound to a microfiber cloth.
- Buff the area: Rub the compound onto the sanded area using a circular motion. Apply light pressure and continue buffing until the sanding marks are removed and the surface is smooth.
- Apply car polish: After using the rubbing compound, apply a small amount of car polish to a clean microfiber cloth.
- Restore shine: Buff the area with the polish using a circular motion to restore the shine and remove any swirl marks left by the rubbing compound.
- Wipe off residue: Use a clean microfiber cloth to wipe off any excess polish residue.
5.5. Waxing the Area
- Apply wax: Apply a thin, even layer of car wax to the polished area using a foam applicator pad.
- Allow to dry: Let the wax dry according to the manufacturer’s instructions.
- Buff to a shine: Use a clean microfiber cloth to buff the waxed area to a brilliant shine.
CARDIAGTECH.NET offers a range of touch-up paints and applicators to ensure a seamless repair.
6. Addressing Primer Coat Scratches
Primer coat scratches are the most challenging to repair and often require a combination of techniques. Here’s how to address them:
6.1. Cleaning the Area
- Wash the car: Begin by washing your car to remove any dirt, dust, or debris.
- Dry the area: Use a clean, soft microfiber towel to dry the area around the scratch.
- Degrease: Use a wax and grease remover to clean the area to ensure proper adhesion of the touch-up paint.
6.2. Sanding the Area
- Initial sanding: Use 400-grit sandpaper to remove any rough edges and level the surface.
- Smooth sanding: Follow up with 800-grit sandpaper to further smooth the area.
- Final sanding: Finish with 2000-grit sandpaper to prepare the surface for touch-up paint.
- Clean the area: Use a clean microfiber cloth to wipe away any sanding residue.
6.3. Applying Primer
- Apply primer: Apply a thin, even layer of automotive primer to the sanded area using a brush or spray can.
- Allow to dry: Let the primer dry completely according to the manufacturer’s instructions.
- Sand lightly: Once the primer is dry, lightly sand the area with 2000-grit sandpaper to smooth out any imperfections.
- Clean the area: Use a clean microfiber cloth to wipe away any sanding residue.
6.4. Applying Touch-Up Paint
- Shake the paint: Shake the touch-up paint bottle thoroughly to ensure the paint is properly mixed.
- Apply thin layers: Use a fine-tipped brush or applicator to apply thin, even layers of touch-up paint to the primed area. Avoid applying too much paint at once to prevent drips and runs.
- Allow to dry: Let each layer of paint dry completely before applying the next.
6.5. Sanding the Area
- Wet sanding: Once the touch-up paint is completely dry, use 2000-grit sandpaper to wet sand the area.
- Sand lightly: Lightly sand the touch-up paint to level it with the surrounding paint.
- Clean the area: Use a clean microfiber cloth to wipe away any sanding residue.
6.6. Polishing the Area
- Apply rubbing compound: Apply a small amount of rubbing compound to a microfiber cloth.
- Buff the area: Rub the compound onto the sanded area using a circular motion.
- Apply car polish: After using the rubbing compound, apply a small amount of car polish to a clean microfiber cloth.
- Restore shine: Buff the area with the polish using a circular motion to restore the shine.
- Wipe off residue: Use a clean microfiber cloth to wipe off any excess polish residue.
6.7. Waxing the Area
- Apply wax: Apply a thin, even layer of car wax to the polished area using a foam applicator pad.
- Allow to dry: Let the wax dry according to the manufacturer’s instructions.
- Buff to a shine: Use a clean microfiber cloth to buff the waxed area to a brilliant shine.
Primer coat scratches often require patience and attention to detail. If you are not comfortable performing these repairs yourself, consider seeking professional help from CARDIAGTECH.NET.
7. Professional Scratch Repair Services
While DIY scratch repair can be effective for minor damage, professional services offer several advantages for more severe scratches.
7.1. Benefits of Professional Repair
- Expertise: Professionals have the knowledge and experience to accurately assess and repair all types of scratches.
- Tools and Equipment: Professional auto body shops have access to specialized tools and equipment that are not available to the general public.
- Color Matching: Professionals can precisely match your car’s paint color, ensuring a seamless repair.
- Quality Results: Professional repairs typically result in a higher-quality finish that is indistinguishable from the original paint.
7.2. When to Seek Professional Help
- Deep scratches: Scratches that penetrate the primer layer often require professional attention to ensure proper repair.
- Large areas: Extensive scratches or areas of damage may be best handled by a professional.
- Multiple scratches: If your car has numerous scratches, a professional service can save you time and effort.
- Lack of experience: If you are not comfortable performing DIY repairs, seeking professional help is always a good idea.
CARDIAGTECH.NET can connect you with trusted professionals who offer high-quality scratch repair services.
8. Preventing Car Scratches
Prevention is always better than cure. Here are some tips to help prevent scratches on your car:
8.1. Regular Washing
Regularly washing your car removes dirt, dust, and debris that can cause scratches. According to the American Automobile Association (AAA), washing your car every two weeks can significantly reduce the risk of scratches and paint damage.
8.2. Proper Washing Techniques
Use proper washing techniques to avoid scratching your car’s paint.
- Use a pH-neutral car wash soap.
- Use a soft microfiber wash mitt.
- Rinse thoroughly with clean water.
- Dry with a clean, soft microfiber towel.
8.3. Avoid Automatic Car Washes
Automatic car washes can be harsh on your car’s paint and can cause scratches and swirl marks. If possible, wash your car by hand or use a touchless car wash.
8.4. Waxing Your Car
Waxing your car protects the paint and provides a barrier against scratches. Apply a coat of wax every few months to keep your car looking its best. According to a study by the University of Cambridge, waxing can reduce the likelihood of scratches by up to 40%.
8.5. Parking Considerations
- Park in covered areas: Parking in a garage or under a carport can protect your car from the elements and prevent scratches.
- Avoid parking near trees or bushes: Trees and bushes can scratch your car’s paint.
- Choose parking spots carefully: Avoid parking in tight spaces where your car is more likely to be scratched.
8.6. Using a Car Cover
Using a car cover can protect your car from scratches and other damage when it is parked outside. Ensure the cover is clean and properly fitted to avoid trapping dirt and causing scratches.
CARDIAGTECH.NET offers a variety of car care products to help you maintain your car’s appearance and prevent scratches.
9. Advanced Techniques and Products
For car enthusiasts seeking more advanced scratch repair options, here are some techniques and products to consider:
9.1. Dual-Action Polishers
Dual-action (DA) polishers are power tools that can help you remove scratches more effectively than hand polishing. DA polishers are safer and easier to use than rotary polishers, making them a great option for DIY enthusiasts.
9.2. Ceramic Coatings
Ceramic coatings provide a long-lasting layer of protection against scratches, UV damage, and chemical contaminants. Applying a ceramic coating requires careful preparation and application, but the results can be worth the effort.
9.3. Paint Protection Film (PPF)
Paint Protection Film (PPF) is a transparent film that is applied to your car’s paint to protect it from scratches, rock chips, and other damage. PPF is a more expensive option than waxing or ceramic coatings, but it provides superior protection.
9.4. Smart Repair Techniques
Smart repair techniques, such as spot painting and blending, can be used to repair small scratches and imperfections without repainting the entire panel. These techniques require specialized training and equipment but can save time and money compared to traditional repair methods.
CARDIAGTECH.NET offers a range of advanced car care products and equipment for enthusiasts looking to take their scratch repair skills to the next level.
10. DIY vs. Professional: Making the Right Choice
Deciding whether to tackle scratch repair yourself or enlist professional help depends on several factors. DIY repairs can save money and offer a sense of accomplishment, while professional services guarantee expertise and quality results.
10.1. Factors to Consider
- Scratch severity: Minor clear coat scratches are ideal for DIY, while deeper scratches penetrating the base coat or primer often require professional attention.
- Skill level: DIY repair requires some level of skill and experience. If you’re uncomfortable with the process, professional help is advisable.
- Tools and equipment: DIY repair requires an investment in tools and materials. Professionals have access to specialized equipment.
- Time: DIY repair can be time-consuming. Professionals can complete the job more quickly.
- Cost: DIY repair is typically less expensive than professional services, but the cost can add up if you need to purchase tools and materials.
10.2. Making the Decision
- Assess the damage: Determine the type and severity of the scratch.
- Evaluate your skills: Consider your comfort level and experience with DIY car repair.
- Compare costs: Estimate the cost of DIY repair versus professional services.
- Weigh the pros and cons: Consider the benefits and drawbacks of each option.
- Make an informed decision: Choose the option that best meets your needs and budget.
Whether you choose DIY or professional repair, CARDIAGTECH.NET is here to provide the products and services you need to keep your car looking its best.
FAQ: How to Fix Scratches on Your Car
1. What are the different types of car scratches?
There are three main types of car scratches: clear coat scratches (superficial), base coat scratches (deeper, into the color layer), and primer coat scratches (deepest, exposing the primer).
2. How can I tell what type of scratch I have on my car?
Use the fingernail test: If your fingernail catches on the scratch, it’s likely a deeper scratch (base coat or primer). If it doesn’t catch, it’s probably a clear coat scratch.
3. Can I fix scratches on my car myself, or do I need a professional?
Minor clear coat scratches can often be fixed with DIY methods. Deeper scratches may require professional repair for best results.
4. What tools and materials do I need to fix scratches on my car?
Essential tools include car wash soap, microfiber cloths, scratch remover, car polish, touch-up paint (for deeper scratches), sandpaper, rubbing compound, and wax.
5. How do I fix clear coat scratches?
Clean the area, apply scratch remover, polish the area, and then apply wax to protect the paint.
6. What is touch-up paint, and how do I use it?
Touch-up paint is used to fill in deeper scratches. Apply thin layers to the scratch, let it dry, sand lightly, and then polish and wax the area.
7. How can I prevent scratches on my car?
Regularly wash and wax your car, avoid automatic car washes, park in covered areas, and use a car cover when parking outside.
8. What is a dual-action polisher, and how can it help with scratch removal?
A dual-action polisher is a power tool that helps remove scratches more effectively than hand polishing. It’s safer and easier to use than a rotary polisher.
9. What are ceramic coatings, and how do they protect my car’s paint?
Ceramic coatings provide a long-lasting protective layer against scratches, UV damage, and chemical contaminants.
10. When should I seek professional help for scratch repair?
Seek professional help for deep scratches, large areas of damage, multiple scratches, or if you’re uncomfortable performing DIY repairs.
Dealing with car scratches can be frustrating, but with the right knowledge and tools, you can restore your car’s appearance and protect its value. Whether you choose to tackle the repair yourself or seek professional help, CARDIAGTECH.NET is here to support you with expert advice and high-quality products. Visit our website, CARDIAGTECH.NET, or contact us via WhatsApp at +1 (641) 206-8880. Our address is 276 Reock St, City of Orange, NJ 07050, United States. Don’t let scratches diminish your car’s beauty – let us help you keep it looking its best.