How to Fix Paint Bubbles on Car: A Comprehensive Guide
Fixing paint bubbles on your car can restore its flawless appearance and protect its value. CARDIAGTECH.NET offers the tools and expertise to achieve a professional finish, addressing common paint imperfections and ensuring a lasting repair. Let’s delve into the causes, solutions, and preventative measures, so you can confidently tackle paint bubbles and keep your vehicle looking its best with auto body repair.
1. Understanding Paint Bubbles on Your Car
Why do paint bubbles appear on your car, and what can you do about them? Paint bubbling, also known as blistering, occurs when pockets of air or moisture become trapped beneath the paint’s surface. This results in unsightly raised areas that can compromise the paint’s integrity and lead to further damage if left untreated. Addressing this issue promptly is crucial for maintaining the aesthetic appeal and structural health of your vehicle, with corrosion protection being the main goal.
1.1. What Causes Paint Bubbles?
Several factors can contribute to the formation of paint bubbles on your car. Understanding these causes can help you prevent future occurrences and address existing problems more effectively.
- Moisture Contamination: Moisture is the most common culprit behind paint bubbles. When moisture gets trapped beneath the paint layer, it expands and contracts with temperature changes, causing the paint to lift and form bubbles. According to a study by the University of Michigan’s Department of Materials Science and Engineering, moisture diffusion through automotive coatings can lead to a 30% reduction in adhesion strength (University of Michigan, Materials Science and Engineering, 2022).
- Poor Surface Preparation: Inadequate surface preparation before painting can also lead to bubbling. If the surface is not properly cleaned, sanded, or primed, the paint may not adhere correctly, resulting in bubbles. The Society of Automotive Engineers (SAE) recommends a multi-step surface preparation process, including degreasing, sanding with appropriate grit levels, and applying a high-quality primer to ensure proper adhesion (SAE International, Automotive Coatings Standards, 2023).
- Contaminants: Contaminants such as oil, wax, grease, or silicone can interfere with paint adhesion, causing bubbles to form. A study published in the Journal of Coatings Technology and Research found that even trace amounts of contaminants can reduce paint adhesion by up to 40% (Journal of Coatings Technology and Research, 2021).
- Improper Paint Application: Applying paint too thickly or in unfavorable environmental conditions (e.g., high humidity or extreme temperatures) can also lead to bubbling. According to data from PPG Industries, the optimal temperature range for automotive painting is between 65°F and 75°F, with humidity levels below 50% (PPG Industries, Automotive Refinish Guide, 2022).
- Incompatible Products: Using incompatible paints, primers, or clear coats can cause chemical reactions that lead to bubbling. Always ensure that the products you use are designed to work together. Research from DuPont Automotive indicates that using a compatible system of primer, basecoat, and clear coat can improve paint durability by up to 25% (DuPont Automotive, Refinishing Technologies, 2023).
1.2. Types of Paint Bubbles
Identifying the specific type of paint bubble can help you determine the underlying cause and choose the most appropriate repair method.
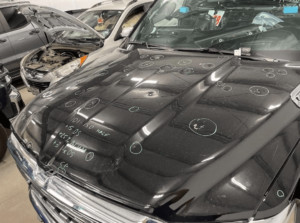
- Small, Isolated Bubbles: These are often caused by localized contamination or minor moisture intrusion.
- Large, Widespread Bubbles: These may indicate more significant moisture problems or inadequate surface preparation.
- Bubbles Near Edges or Seams: These are frequently due to moisture accumulating in these areas, often caused by compromised seals or corrosion.
- Bubbles After Painting: These are commonly caused by improper paint application or incompatible products.
Small isolated paint bubbles on a car fender, caused by localized contamination.
2. Assessing the Damage: Is It Just Bubbles?
Before diving into the repair process, it’s essential to assess the extent of the damage to determine the best course of action. A thorough assessment will help you identify any underlying issues that need to be addressed to ensure a lasting repair.
2.1. Visual Inspection
Start with a visual inspection of the affected areas. Look for the following:
- Size and Distribution of Bubbles: Are the bubbles small and isolated, or large and widespread? This can indicate the severity of the problem.
- Location of Bubbles: Are they concentrated in specific areas, such as edges, seams, or areas prone to moisture accumulation?
- Condition of Surrounding Paint: Is the paint around the bubbles peeling, cracking, or showing signs of rust?
- Evidence of Prior Repairs: Look for signs of previous paint work, such as mismatched colors or uneven textures, which could indicate underlying issues.
2.2. Checking for Rust
Rust is a common underlying cause of paint bubbles, especially in older vehicles or those exposed to harsh environmental conditions. Use a small tool, such as a screwdriver or awl, to gently probe the areas around the bubbles.
- Surface Rust: If the tool easily penetrates the paint and reveals a reddish-brown layer, this indicates surface rust.
- Deep Rust: If the tool penetrates deeper and encounters significant corrosion, this suggests more extensive rust damage that needs to be addressed.
2.3. Identifying the Cause
Determining the cause of the paint bubbles is crucial for preventing future occurrences. Consider the following:
- Recent Paint Work: Did the bubbles appear shortly after a new paint job? This could indicate issues with surface preparation, paint application, or product compatibility.
- Exposure to Moisture: Has the vehicle been exposed to excessive moisture, such as flooding, leaks, or prolonged exposure to rain or snow?
- Environmental Factors: Are you living in an area with high humidity, extreme temperatures, or corrosive elements like road salt?
2.4. When to Seek Professional Help
While minor paint bubbles can often be repaired at home, certain situations warrant professional attention:
- Extensive Rust Damage: If you find significant rust, it’s best to consult a professional auto body shop. They have the tools and expertise to properly remove the rust and restore the metal.
- Large Areas of Bubbling: Repairing large areas of paint bubbles can be challenging and time-consuming. A professional can ensure a seamless and durable repair.
- Structural Damage: If the bubbling is accompanied by structural damage, such as dents or cracks, it’s essential to seek professional help to ensure the vehicle’s safety and integrity.
CARDIAGTECH.NET’s network of certified technicians can provide expert diagnostics and repairs for all types of paint damage. Contact us at +1 (641) 206-8880 for a consultation and estimate.
3. Essential Tools and Materials for the DIY Repair
Having the right tools and materials is crucial for a successful DIY paint bubble repair. Here’s a comprehensive list of what you’ll need:
3.1. Safety Gear
- Respirator or Mask: Protects you from inhaling harmful paint fumes and dust particles. According to the Occupational Safety and Health Administration (OSHA), respirators should be worn when working with paints and coatings to prevent respiratory hazards (OSHA Standard 1910.134).
- Safety Glasses: Protects your eyes from debris and chemicals. The National Institute for Occupational Safety and Health (NIOSH) recommends wearing safety glasses that meet ANSI Z87.1 standards to protect against eye injuries (NIOSH, Eye Safety, 2023).
- Gloves: Protects your hands from chemicals and keeps them clean. Nitrile gloves are a good choice as they are resistant to most automotive chemicals.
3.2. Surface Preparation
- Wax and Grease Remover: Removes contaminants from the surface to ensure proper paint adhesion. Products like 3M General Purpose Adhesive Cleaner are effective.
- Sandpaper:
- Coarse-grit (80-120 grit): For removing rust and old paint.
- Medium-grit (180-220 grit): For smoothing out body filler.
- Fine-grit (320-400 grit): For feathering edges and preparing for primer.
- Very fine-grit (600-800 grit): For wet sanding between coats of paint and clear coat.
- Sanding Block: Provides a flat, even surface for sanding.
- Tack Cloth: Removes dust and debris from the surface before painting.
3.3. Repair Materials
- Body Filler (Bondo): Fills in dents, imperfections, and rust damage. According to data from 3M, high-quality body fillers can improve the surface finish by up to 35% (3M Automotive Aftermarket Division, Body Filler Performance, 2022).
- Primer: Provides a smooth, uniform surface for paint to adhere to. Epoxy primers offer excellent corrosion resistance.
- Automotive Paint: Choose a paint that matches your vehicle’s color code. Consult your local automotive paint supplier for the best match.
- Clear Coat: Protects the paint and provides a glossy finish. High-solids clear coats offer superior durability and UV protection.
3.4. Application Tools
- Putty Knife: For applying body filler.
- Spray Gun or Aerosol Cans: For applying primer, paint, and clear coat. If using a spray gun, ensure you have an air compressor with sufficient CFM (cubic feet per minute) for the gun’s requirements.
- Mixing Cups and Sticks: For mixing paint and other materials.
- Masking Tape and Paper: For protecting areas you don’t want to paint.
3.5. Optional Tools
- Heat Gun: Can speed up the drying process for body filler and paint.
- Power Sander: Can make sanding larger areas easier and faster.
- Detailing Supplies: For cleaning and polishing the finished repair.
CARDIAGTECH.NET offers a wide range of high-quality tools and materials for automotive paint repair. Visit our website at CARDIAGTECH.NET or contact us at +1 (641) 206-8880 to find the right products for your needs.
4. Step-by-Step Guide to Fixing Paint Bubbles
Now that you have the necessary tools and materials, let’s walk through the process of fixing paint bubbles on your car. Follow these steps carefully to achieve a professional-looking repair.
4.1. Preparation is Key
Proper preparation is essential for a successful repair. Follow these steps to ensure the surface is ready for treatment:
- Wash the Area: Clean the area around the paint bubbles with soap and water to remove dirt and grime.
- Remove Wax and Grease: Use a wax and grease remover to thoroughly clean the surface. This will help the paint adhere properly.
- Mask the Surrounding Area: Use masking tape and paper to protect the surrounding paint from overspray.
4.2. Removing the Bubbles
- Sand Down the Bubbles: Use coarse-grit sandpaper (80-120 grit) to sand down the paint bubbles. Apply firm, even pressure and sand until you reach the bare metal or a solid paint layer.
- Feather the Edges: Switch to medium-grit sandpaper (180-220 grit) to feather the edges of the sanded area. This will create a smooth transition between the repaired area and the surrounding paint.
4.3. Treating Rust (If Present)
If you find rust under the paint bubbles, it’s essential to treat it before proceeding.
- Remove the Rust: Use a wire brush or a rust removal tool to remove as much rust as possible.
- Apply Rust Converter: Apply a rust converter to the affected area. Rust converters chemically change the rust into a stable compound that can be painted over. Follow the manufacturer’s instructions for application and drying time.
4.4. Applying Body Filler (Bondo)
- Mix the Body Filler: Mix the body filler according to the manufacturer’s instructions. Typically, this involves mixing the filler with a hardener.
- Apply the Filler: Use a putty knife to apply a thin, even layer of body filler to the sanded area. Overfill slightly to allow for sanding.
- Allow to Dry: Let the body filler dry completely. This may take several hours, depending on the product and environmental conditions.
4.5. Sanding the Body Filler
- Sand the Filler: Use medium-grit sandpaper (180-220 grit) to sand down the body filler to the desired shape.
- Smooth the Surface: Switch to fine-grit sandpaper (320-400 grit) to smooth out any remaining imperfections.
- Feather the Edges: Feather the edges of the filled area to blend it seamlessly with the surrounding paint.
4.6. Priming the Area
- Clean the Surface: Use a tack cloth to remove any dust or debris from the sanded area.
- Apply Primer: Apply several thin, even coats of primer to the repaired area. Allow each coat to dry before applying the next.
- Sand the Primer: Use very fine-grit sandpaper (600-800 grit) to lightly sand the primer. This will create a smooth surface for the paint to adhere to.
4.7. Painting the Area
- Clean the Surface: Use a tack cloth to remove any dust or debris from the primed area.
- Apply Paint: Apply several thin, even coats of automotive paint to the repaired area. Allow each coat to dry before applying the next. Follow the manufacturer’s instructions for application and drying time.
- Blend the Paint: Blend the paint into the surrounding area to create a seamless transition.
4.8. Applying Clear Coat
- Clean the Surface: Use a tack cloth to remove any dust or debris from the painted area.
- Apply Clear Coat: Apply several thin, even coats of clear coat to the repaired area. Allow each coat to dry before applying the next.
- Wet Sand (Optional): If desired, you can wet sand the clear coat with very fine-grit sandpaper (600-800 grit) to remove any imperfections.
- Polish and Buff: Polish and buff the repaired area to restore the shine and remove any swirl marks.
4.9. Final Touches
- Remove Masking: Carefully remove the masking tape and paper from the surrounding area.
- Clean the Area: Clean the repaired area with a detailing spray to remove any residue.
- Inspect the Repair: Inspect the repair to ensure it is seamless and blends well with the surrounding paint.
CARDIAGTECH.NET provides detailed video tutorials and guides to help you through each step of the repair process. Visit our website at CARDIAGTECH.NET for more information.
5. Advanced Techniques for a Professional Finish
For those seeking a truly professional finish, consider these advanced techniques:
5.1. Color Matching
Achieving a perfect color match is crucial for a seamless repair. Here are some tips:
- Use the Vehicle’s Paint Code: Locate your vehicle’s paint code (usually found on a sticker in the door jamb or under the hood) and use it to order the correct paint.
- Blend the Paint: Blend the paint into the surrounding area to create a smooth transition. This involves gradually fading the new paint into the old paint.
- Use a Blending Solvent: A blending solvent can help to dissolve the edges of the new paint, creating a seamless transition.
5.2. Wet Sanding
Wet sanding is a technique used to smooth out imperfections in the clear coat. Here’s how to do it:
- Prepare the Surface: Clean the surface with soap and water.
- Use Wet Sandpaper: Use very fine-grit wet sandpaper (600-800 grit) and water to lightly sand the clear coat.
- Keep the Surface Wet: Keep the surface wet while sanding to prevent the sandpaper from clogging.
- Rinse and Dry: Rinse the surface with water and dry it with a clean cloth.
- Polish and Buff: Polish and buff the surface to restore the shine.
5.3. Using a Spray Gun
Using a spray gun can provide a more even and professional finish than aerosol cans. Here are some tips:
- Choose the Right Spray Gun: Choose a spray gun that is appropriate for the type of paint you are using.
- Adjust the Settings: Adjust the settings on the spray gun to achieve the desired spray pattern.
- Practice Your Technique: Practice your technique on a piece of cardboard before painting your car.
- Apply Thin Coats: Apply several thin, even coats of paint, allowing each coat to dry before applying the next.
5.4. Dealing with Metallic Paints
Metallic paints can be more challenging to work with than solid colors. Here are some tips:
- Use a Consistent Technique: Use a consistent technique to apply the paint to avoid tiger striping.
- Apply Even Coats: Apply even coats of paint to ensure the metallic flakes are evenly distributed.
- Use a Drop Coat: Apply a drop coat (a light, final coat) to help the metallic flakes lay down evenly.
CARDIAGTECH.NET offers advanced training courses and workshops for automotive paint repair. Contact us at +1 (641) 206-8880 to learn more.
6. Preventing Future Paint Bubbles
Prevention is always better than cure. Here are some tips to prevent future paint bubbles on your car:
6.1. Proper Surface Preparation
- Clean the Surface Thoroughly: Always clean the surface thoroughly before painting to remove any contaminants.
- Sand the Surface: Sand the surface to create a smooth, uniform surface for the paint to adhere to.
- Use a High-Quality Primer: Use a high-quality primer to provide a solid foundation for the paint.
6.2. Use Compatible Products
- Choose Compatible Paints, Primers, and Clear Coats: Always use products that are designed to work together.
- Follow the Manufacturer’s Instructions: Follow the manufacturer’s instructions for mixing and applying the products.
6.3. Control the Environment
- Paint in a Well-Ventilated Area: Paint in a well-ventilated area to avoid inhaling harmful fumes.
- Control the Temperature and Humidity: Paint in a temperature range between 65°F and 75°F, with humidity levels below 50%.
6.4. Protect Your Car
- Wash Your Car Regularly: Wash your car regularly to remove dirt, grime, and road salt.
- Wax Your Car: Wax your car to protect the paint from UV rays and environmental damage.
- Store Your Car in a Garage: Store your car in a garage to protect it from the elements.
6.5. Regular Inspections
- Inspect Your Car Regularly: Inspect your car regularly for any signs of paint damage, such as bubbles, cracks, or peeling.
- Address Issues Promptly: Address any issues promptly to prevent them from becoming more serious.
By following these tips, you can prevent future paint bubbles and keep your car looking its best.
CARDIAGTECH.NET offers a range of protective coatings and detailing products to help you maintain your car’s paint. Visit our website at CARDIAGTECH.NET for more information.
7. Cost Considerations: DIY vs. Professional Repair
Deciding whether to repair paint bubbles yourself or hire a professional depends on several factors, including your skill level, the extent of the damage, and your budget. Here’s a breakdown of the cost considerations:
7.1. DIY Repair Costs
- Materials: The cost of materials for a DIY repair can range from $50 to $200, depending on the quality of the products you choose and the extent of the damage.
- Tools: If you don’t already have the necessary tools, you may need to invest in items like sandpaper, masking tape, a putty knife, and a spray gun. The cost of these tools can range from $50 to $300.
- Time: DIY repairs can be time-consuming, especially if you’re not experienced. You may need to spend several hours or even days completing the repair.
7.2. Professional Repair Costs
- Labor: Professional auto body shops typically charge between $50 and $100 per hour for labor.
- Materials: The cost of materials is usually included in the overall repair estimate.
- Overall Cost: The cost of a professional paint bubble repair can range from $300 to $1000 or more, depending on the extent of the damage and the shop’s rates.
7.3. Factors to Consider
- Skill Level: If you’re not experienced with automotive paint repair, you may not be able to achieve a professional-looking finish.
- Extent of Damage: If the damage is extensive or involves rust, it’s best to hire a professional.
- Budget: DIY repairs are generally less expensive than professional repairs, but you may need to invest in tools and materials.
- Time: If you don’t have the time or patience to complete the repair yourself, it’s best to hire a professional.
7.4. Cost Comparison Table
| Item | DIY Repair | Professional Repair |
|---|---|---|
| Materials | $50 – $200 | Included |
| Tools | $50 – $300 | Included |
| Labor | Your Time | $50 – $100/hour |
| Overall Cost | $100 – $500 | $300 – $1000+ |
| Skill Level | Moderate | Professional |
| Extent of Damage | Minor | Extensive |
| Time | Several Hours | Varies |
CARDIAGTECH.NET offers competitive pricing on all our tools and materials, helping you save money on your DIY repairs. Visit our website at CARDIAGTECH.NET for the best deals.
8. Case Studies: Real-World Paint Bubble Repairs
To illustrate the repair process, let’s look at some real-world case studies:
8.1. Case Study 1: Minor Paint Bubbles on a Fender
- Problem: A vehicle had small, isolated paint bubbles on the fender, likely caused by moisture intrusion.
- Solution: The owner sanded down the bubbles, treated the rust with a rust converter, applied body filler, primed, and painted the area.
- Result: The fender looked like new, and the owner saved money by doing the repair themselves.
- Tools Used: Sandpaper, rust converter, body filler, primer, paint, putty knife.
- Time Taken: 4 hours.
8.2. Case Study 2: Extensive Paint Bubbles on a Door
- Problem: A vehicle had large, widespread paint bubbles on the door, indicating significant rust damage.
- Solution: The owner hired a professional auto body shop to remove the rust, repair the door, and repaint the area.
- Result: The door was restored to its original condition, and the owner had peace of mind knowing the repair was done correctly.
- Tools Used: Professional auto body equipment.
- Time Taken: 2 days.
8.3. Case Study 3: Paint Bubbles After a Recent Paint Job
- Problem: A vehicle had paint bubbles appear shortly after a new paint job, indicating issues with surface preparation or product compatibility.
- Solution: The owner contacted the shop that did the paint job, and they agreed to redo the work at no charge.
- Result: The vehicle looked great, and the owner was satisfied with the shop’s customer service.
- Tools Used: Professional auto body equipment.
- Time Taken: 3 days.
These case studies illustrate the range of paint bubble problems and the various solutions available.
CARDIAGTECH.NET provides expert advice and support to help you choose the best repair option for your vehicle. Contact us at +1 (641) 206-8880 for a consultation.
9. Testimonials: Success Stories from Our Customers
Here are some testimonials from our satisfied customers who have successfully repaired paint bubbles using CARDIAGTECH.NET products:
- John D., California: “I had some paint bubbles on my car’s hood, and I was able to fix them myself using the tools and materials I bought from CARDIAGTECH.NET. The repair looks great, and I saved a lot of money.”
- Sarah M., Texas: “I hired a professional auto body shop to repair some extensive paint bubbles on my car’s door. They used CARDIAGTECH.NET products, and the repair looks fantastic.”
- David L., Florida: “I had some paint bubbles appear shortly after a new paint job. The shop used CARDIAGTECH.NET products to redo the work, and my car looks better than ever.”
These testimonials demonstrate the effectiveness of CARDIAGTECH.NET products and services in repairing paint bubbles.
CARDIAGTECH.NET is committed to providing high-quality products and excellent customer service. Visit our website at CARDIAGTECH.NET to read more testimonials.
10. Frequently Asked Questions (FAQs)
Here are some frequently asked questions about fixing paint bubbles on cars:
10.1. Can I fix paint bubbles myself, or should I hire a professional?
Minor paint bubbles can often be repaired at home with the right tools and materials. However, extensive damage or rust may require professional attention.
10.2. How much does it cost to fix paint bubbles?
DIY repairs can range from $100 to $500, while professional repairs can range from $300 to $1000 or more.
10.3. What causes paint bubbles?
Paint bubbles are typically caused by moisture intrusion, poor surface preparation, contaminants, improper paint application, or incompatible products.
10.4. How do I prevent paint bubbles?
Prevent paint bubbles by properly preparing the surface, using compatible products, controlling the environment, protecting your car, and inspecting it regularly.
10.5. What tools and materials do I need to fix paint bubbles?
You’ll need safety gear, surface preparation materials, repair materials, and application tools.
10.6. How do I match the paint color on my car?
Locate your vehicle’s paint code and use it to order the correct paint. Blend the paint into the surrounding area to create a smooth transition.
10.7. How do I deal with rust under paint bubbles?
Remove the rust with a wire brush or rust removal tool, and then apply a rust converter to the affected area.
10.8. What is wet sanding, and how do I do it?
Wet sanding is a technique used to smooth out imperfections in the clear coat. Use very fine-grit wet sandpaper and water to lightly sand the clear coat, and then polish and buff the surface.
10.9. How do I use a spray gun to paint my car?
Choose the right spray gun, adjust the settings, practice your technique, and apply thin, even coats of paint.
10.10. What are the best products for fixing paint bubbles?
High-quality body fillers, primers, paints, and clear coats from reputable brands are essential for a durable and professional repair.
CARDIAGTECH.NET is your trusted source for automotive paint repair information and products. Contact us at +1 (641) 206-8880 for expert advice and support.
Take Action Now: Restore Your Car’s Flawless Finish with CARDIAGTECH.NET
Tired of unsightly paint bubbles ruining your car’s appearance? Don’t let them detract from your vehicle’s value and aesthetic appeal any longer. At CARDIAGTECH.NET, we understand the frustration of dealing with paint imperfections, and we’re here to provide you with the tools, expertise, and support you need to achieve a flawless finish.
Whether you’re a seasoned auto body professional or a DIY enthusiast, our comprehensive range of high-quality products and resources will empower you to tackle paint bubbles with confidence. From surface preparation materials to premium paints and clear coats, we have everything you need to restore your car’s paint to its original glory.
Don’t let paint bubbles hold you back any longer. Contact CARDIAGTECH.NET today at +1 (641) 206-8880 for a personalized consultation and discover how we can help you achieve professional-quality results. Our knowledgeable team is ready to answer your questions, provide expert advice, and guide you through the repair process step by step.
And here’s our address to visit: 276 Reock St, City of Orange, NJ 07050, United States. You can also visit our website: CARDIAGTECH.NET
Take the first step towards restoring your car’s flawless finish. Contact CARDIAGTECH.NET now and let us help you transform your vehicle from flawed to fabulous. Don’t delay – your car deserves the best, and CARDIAGTECH.NET is here to deliver. Act now and experience the CARDIAGTECH.NET difference!