How to Fix My Car Headliner: A Comprehensive Guide

How To Fix My Car Headliner? Restoring your car’s headliner can be a simple task with the right techniques. At CARDIAGTECH.NET, we’ll show you effective methods to repair a sagging headliner, enhancing your car’s interior and overall driving experience. Explore options such as headliner adhesives, twist pins, and fabric repair solutions.
1. Understanding the Car Headliner
The headliner in a car is a crucial component, serving both aesthetic and functional purposes. Essentially, it is the fabric that lines the interior roof of your vehicle. This fabric is typically secured to the roof framing, providing a smooth and finished look.
1.1. Composition and Structure
A standard car headliner consists of multiple layers. The most common material used is a foam backing, often made of polyurethane. This foam is either sprayed or attached to a headliner board, which is then affixed to the inside of the car’s roof. This multi-layered structure serves several important functions:
- Aesthetics: It provides a visually appealing and smooth texture to the car’s interior roof.
- Noise Reduction: The foam layer helps to absorb road noise and vibrations, contributing to a quieter cabin environment.
- Insulation: It acts as an insulator, helping to maintain a comfortable interior temperature by buffering against outside cold and heat.
1.2. Functional Benefits
Beyond aesthetics, the headliner plays a significant role in the overall comfort and functionality of your vehicle. Without this thin layer of insulation:
- The interior temperature of a car parked in the sun can become excessively high.
- Wind noise, especially at higher speeds, can become more noticeable and distracting.
- The acoustics for the car’s audio system can be compromised, affecting sound quality.
In essence, the headliner is more than just a decorative element; it is an integral part of your car’s interior that contributes to a more comfortable and enjoyable driving experience.
Car headliner secured to roof framing
2. Common Causes of Sagging Headliners
A sagging headliner is a common issue that many car owners face. Over time, the fabric can become loose and detached from its backing board, leading to an unsightly and often distracting problem. Several factors contribute to this condition:
2.1. Heat and Sunlight Exposure
Extreme heat is a primary culprit in causing headliners to sag. When a car is exposed to intense sunlight, the heat can melt the adhesive that holds the fabric to the backing board. This is particularly problematic in regions with hot climates, such as California, Texas, and Florida.
2.2. Moisture and Humidity
Moisture is another significant factor. Humidity and leaks can seep into the headliner, causing the foam backing to absorb moisture. This moisture weakens the adhesive and can lead to warping and sagging.
2.3. Poor Initial Installation
Sometimes, the issue stems from the initial installation. If the headliner was not properly installed with sufficient glue or the correct techniques, it is more likely to sag prematurely. Inadequate waterproofing can also allow water to penetrate the roof liner foam, further deteriorating the adhesive.
2.4. Physical Wear and Tear
Physical strain can also contribute to sagging. Drivers with children or pets may find their headliners drooping due to playing, scratching, or pulling on the fabric. These actions put physical stress on the headliner, accelerating the failing process.
Understanding these causes can help you take preventive measures and address the issue effectively. Regular maintenance and care can extend the life of your car’s headliner, maintaining its appearance and functionality.
3. Quick Fixes: Addressing Sagging Without Removal
Repairing a sagging headliner doesn’t always require a full replacement. Several quick and cost-effective methods can restore your car’s interior without the need for extensive work. Here are some practical solutions:
3.1. Applying Adhesive
Using adhesive is a straightforward method to reattach the sagging fabric. This approach works best for minor sagging, such as corners or edges that have come loose.
- Selecting the Right Adhesive: It is essential to use a specialized headliner adhesive, as regular glue may not withstand the temperature fluctuations inside a car. CARDIAGTECH.NET recommends using a high-temperature-resistant spray adhesive for even application.
- Application Process: Spray the adhesive evenly onto the sagging fabric and the corresponding area on the backing board. Allow the adhesive to become tacky before pressing the fabric back into place. Use a clean cloth or roller to smooth out any wrinkles or bubbles.
3.2. Using Twist Pins
Twist pins, also known as “saggy stoppers,” are an inexpensive and simple solution to secure a sagging headliner. These pins are designed to hold the fabric in place without causing damage.
- Installation: Push the twist pins through the fabric and into the foam backing board. The clear heads of the pins make them less noticeable.
- Pattern Arrangement: Arrange the pins in a visually appealing pattern to enhance the overall appearance of the headliner. This method is particularly effective for larger areas of sagging.
3.3. Employing Sequin Pins
Sequin pins offer another quick fix that doesn’t require much investment. These pins can effectively push the headliner back into place, even if a significant portion is detached.
- Application: Push the sequin pins through the fabric and into the foam backing board.
- Aesthetic Arrangement: Arrange the pins in a pattern that complements the interior of your car.
3.4. Utilizing a Steam Cleaner and Paint Roller
A steam cleaner can help reactivate the old adhesive, allowing the fabric to reattach to the frame. Combine this with a paint roller to achieve a smooth, even finish.
- Steam Cleaning: Use a car steam cleaner to gently heat the sagging areas. The steam will help to soften the old glue.
- Rolling: Immediately after steaming, use a paint roller to press the fabric back onto the backing board. This ensures an even set without creases or wrinkles.
These quick fixes are effective for minor to moderate sagging. However, for more extensive damage, a more comprehensive repair or replacement may be necessary.
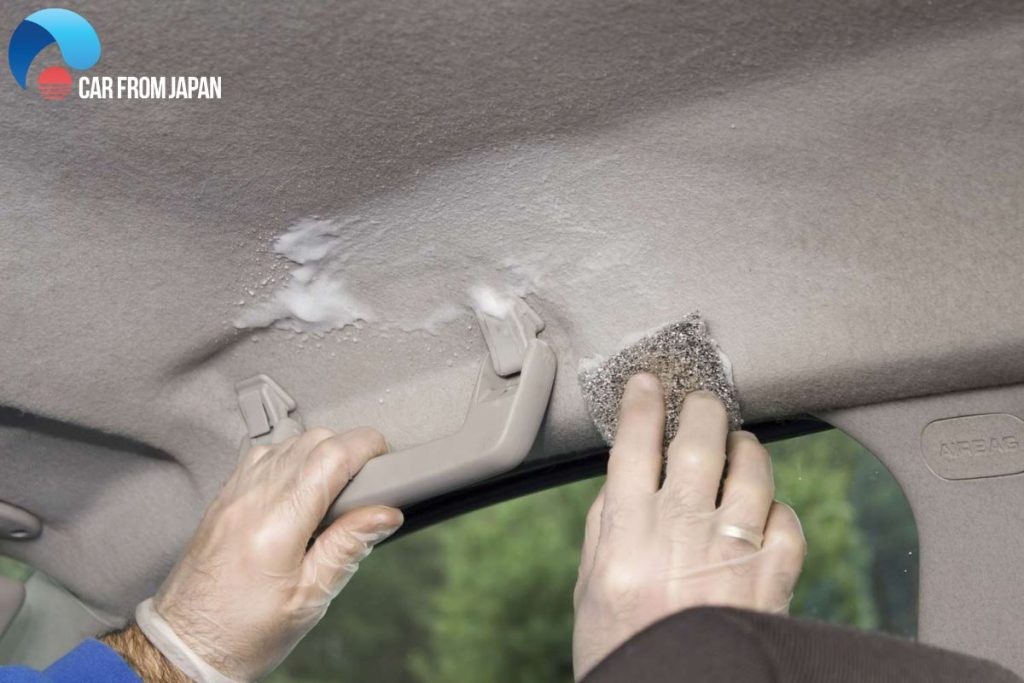 Fix sagging headliner with adhesive
4. Step-by-Step Guide: DIY Headliner Repair
For those who prefer a hands-on approach, repairing a car headliner can be a rewarding DIY project. Here’s a detailed, step-by-step guide:
4.1. Gathering the Necessary Tools and Materials
Before starting, gather all the essential tools and materials. This will streamline the process and ensure you have everything you need at hand.
- New Headliner Fabric: Choose a fabric that matches the original or complements your car’s interior. CARDIAGTECH.NET offers a wide selection of high-quality headliner fabrics.
- Headliner Adhesive: Opt for a high-temperature-resistant spray adhesive designed for automotive headliners.
- Foam Padding (if needed): If the existing foam is deteriorated, replace it with new foam padding.
- Tools:
- Screwdrivers (various sizes)
- Pliers
- Socket set
- Utility knife or scissors
- Wire brush
- Clean cloths
- Paint roller or smoothing tool
4.2. Removing the Old Headliner
Carefully remove the old headliner from the car. This process may vary depending on the make and model of your vehicle.
- Disconnect Battery: Disconnect the negative terminal of the battery to prevent any electrical issues.
- Remove Trim: Remove all trim pieces, visors, dome lights, and other components that hold the headliner in place. Use the appropriate screwdrivers and pliers to avoid damaging the trim.
- Detach Headliner Board: Gently detach the headliner board from the car’s roof. Be careful not to bend or break the board.
4.3. Preparing the Headliner Board
Once the old headliner is removed, prepare the board for the new fabric.
- Remove Old Fabric and Foam: Peel off the old fabric and foam from the headliner board. Use a wire brush to remove any remaining adhesive or foam residue.
- Clean the Board: Clean the board thoroughly with a clean cloth and a mild cleaner to ensure a smooth surface for the new fabric.
4.4. Applying the New Fabric
Applying the new fabric requires patience and attention to detail.
- Cut the Fabric: Cut the new fabric to a size slightly larger than the headliner board to allow for trimming.
- Spray Adhesive: Apply an even coat of headliner adhesive to both the headliner board and the back of the new fabric.
- Attach Fabric: Carefully align the fabric with the board and press it into place. Use a paint roller or smoothing tool to eliminate any wrinkles or bubbles.
- Trim Excess Fabric: Once the adhesive has dried, trim the excess fabric around the edges of the board using a utility knife or scissors.
4.5. Reinstalling the Headliner
Reinstalling the headliner involves reversing the removal process.
- Position Headliner Board: Carefully position the headliner board back into the car’s roof.
- Secure the Board: Secure the board using the original trim pieces, visors, and dome lights. Ensure that all components are properly tightened.
- Reconnect Battery: Reconnect the negative terminal of the battery.
Following these steps will help you restore your car’s headliner, improving its appearance and extending its lifespan.
5. Professional Headliner Replacement: When to Seek Help
While DIY repairs can be effective for minor sagging, certain situations require professional attention. Knowing when to seek help can save you time, money, and potential frustration.
5.1. Extensive Damage
If the headliner is severely damaged or sagging across a large area, a professional replacement is often the best solution. Extensive damage may indicate underlying issues such as water leaks or structural problems that require expert assessment and repair.
5.2. Complex Installations
Some vehicles have complex headliner designs with integrated electronics, sunroofs, or other features. These installations can be challenging to remove and reinstall correctly. Professionals have the experience and tools necessary to handle these complex systems without causing damage.
5.3. Lack of Experience
If you lack experience with automotive repairs or are uncomfortable working on your car’s interior, it’s best to consult a professional. Improper installation can lead to further damage, such as broken trim pieces, damaged wiring, or uneven fabric application.
5.4. Time Constraints
Replacing a headliner can be a time-consuming project, especially for those with limited experience. If you have a busy schedule, hiring a professional can save you valuable time and ensure the job is done efficiently.
5.5. Cost Considerations
While DIY repairs may seem more cost-effective, the cost of materials, tools, and potential mistakes can add up. Professionals can provide an accurate estimate for the job and offer a warranty on their work, giving you peace of mind.
By recognizing when professional help is needed, you can ensure that your car’s headliner is repaired or replaced correctly, maintaining its appearance and functionality for years to come.
6. Preventive Measures: Maintaining Your Car Headliner
Preventing headliner sagging can save you time and money in the long run. Here are some practical tips to maintain your car headliner:
6.1. Park in the Shade
Whenever possible, park your vehicle in the shade or use a car cover to protect it from direct sunlight. Prolonged exposure to sunlight can cause the adhesive to break down, leading to sagging.
6.2. Control Interior Temperature
Use window tinting to reduce heat buildup inside the car. Reflective window shades can also help to keep the interior cooler when the car is parked.
6.3. Address Leaks Promptly
Regularly inspect your car for leaks, especially around the windows, sunroof, and doors. Address any leaks promptly to prevent moisture from damaging the headliner.
6.4. Gentle Cleaning
Clean the headliner regularly using a soft brush or vacuum with an upholstery attachment. Avoid using harsh chemicals or excessive moisture, as these can damage the fabric.
6.5. Avoid Physical Stress
Instruct children and pets to avoid touching or pulling on the headliner. Consider using seat covers or pet barriers to protect the interior from wear and tear.
6.6. Regular Inspections
Periodically inspect the headliner for signs of sagging or damage. Addressing minor issues early can prevent them from becoming major problems.
By following these preventive measures, you can extend the life of your car headliner and maintain its appearance for years to come.
7. Cost Analysis: DIY vs. Professional Replacement
Deciding whether to repair or replace a sagging headliner yourself or hire a professional involves considering several factors, including cost, time, and expertise. Here’s a detailed cost analysis to help you make an informed decision:
7.1. DIY Repair Costs
Repairing a headliner yourself can be a cost-effective option, especially for minor sagging. Here’s a breakdown of potential costs:
- Materials:
- Headliner fabric: $30 – $100 (depending on the quality and type)
- Headliner adhesive: $10 – $20
- Foam padding (if needed): $15 – $30
- Cleaning supplies: $5 – $10
- Tools:
- Screwdrivers, pliers, socket set: (If you don’t already own these) $20 – $50
- Utility knife or scissors: $5 – $10
- Wire brush: $5 – $10
- Paint roller or smoothing tool: $5 – $15
- Total Estimated Cost: $80 – $235
7.2. Professional Replacement Costs
Hiring a professional to replace your headliner can provide a higher quality result, but it comes at a higher cost. Here’s what you can expect to pay:
- Labor Costs: $200 – $500 (depending on the complexity of the job and the shop’s hourly rate)
- Materials Costs:
- Headliner fabric: $50 – $150 (depending on the quality and type)
- Adhesive and other supplies: Included in labor costs
- Total Estimated Cost: $250 – $650
7.3. Cost-Benefit Analysis
- DIY Advantages:
- Lower initial cost
- Flexibility to work on your own schedule
- DIY Disadvantages:
- Requires time and effort
- Potential for mistakes and rework
- May not achieve professional-quality results
- Professional Advantages:
- High-quality workmanship
- Warranty on parts and labor
- Convenience and time savings
- Professional Disadvantages:
- Higher cost
- Scheduling and coordination required
7.4. Additional Factors to Consider
- Vehicle Type: Luxury vehicles or those with complex interiors may require specialized knowledge and tools, making professional replacement a better option.
- Condition of Headliner Board: If the headliner board is damaged, it may need to be replaced, adding to the overall cost.
- Resale Value: A professionally replaced headliner can enhance the resale value of your car, making it a worthwhile investment.
Ultimately, the decision to repair or replace your headliner yourself or hire a professional depends on your budget, skill level, and the condition of your car’s headliner.
8. Choosing the Right Headliner Fabric
Selecting the right fabric for your car’s headliner is crucial for achieving a professional-looking and long-lasting result. Here are some factors to consider when choosing a headliner fabric:
8.1. Material Type
- Foam-Backed Fabric: This is the most common type of headliner fabric. It consists of a fabric layer laminated to a foam backing. The foam provides cushioning and helps to adhere the fabric to the headliner board.
- Knit Fabric: Knit fabrics are more flexible and easier to work with, making them a good choice for DIY repairs. They are also more resistant to wrinkles and creases.
- Woven Fabric: Woven fabrics are more durable and offer a more traditional look. They are often used in luxury vehicles.
8.2. Color and Style
- Match Original: Choose a fabric that closely matches the original headliner color and style. This will maintain the car’s original appearance and resale value.
- Complement Interior: Select a fabric that complements the car’s interior color scheme. Consider using a slightly lighter or darker shade to create contrast and visual interest.
- Personal Preference: Choose a fabric that reflects your personal style and preferences. There are many different colors, patterns, and textures available to customize your car’s interior.
8.3. Durability and Maintenance
- UV Resistance: Choose a fabric that is UV resistant to prevent fading and deterioration from sunlight exposure.
- Stain Resistance: Select a fabric that is stain resistant and easy to clean. This will help to maintain the headliner’s appearance over time.
- Abrasion Resistance: Choose a fabric that is abrasion resistant to withstand wear and tear from passengers and cargo.
8.4. Budget
- Price Range: Headliner fabrics range in price from $10 to $50 per yard, depending on the material type, quality, and style.
- Consider Long-Term Value: Invest in a high-quality fabric that will last for many years. While it may cost more upfront, it will save you money in the long run by reducing the need for frequent replacements.
By considering these factors, you can choose the right headliner fabric that meets your needs and enhances the appearance of your car’s interior.
9. Advanced Techniques for Headliner Repair
For those looking to achieve professional-quality results, here are some advanced techniques for headliner repair:
9.1. Using Heat Guns
A heat gun can be used to soften the adhesive and mold the fabric around complex curves and contours.
- Application: Apply heat evenly to the fabric while pressing it into place. Be careful not to overheat the fabric, as this can cause it to shrink or melt.
- Safety Precautions: Wear heat-resistant gloves and eye protection when using a heat gun.
9.2. Applying Reinforcements
Reinforcements can be added to areas that are prone to sagging, such as around dome lights and visors.
- Materials: Use strips of fabric or adhesive-backed foam to reinforce these areas.
- Application: Apply the reinforcements to the back of the headliner board before attaching the new fabric.
9.3. Custom Stitching and Detailing
Custom stitching and detailing can add a unique touch to your headliner repair.
- Techniques: Use a sewing machine to create custom patterns or add decorative stitching to the fabric.
- Professional Results: Consider hiring a professional upholsterer to create custom detailing for your headliner.
9.4. Sound Dampening Materials
Adding sound dampening materials can improve the acoustics of your car’s interior.
- Materials: Use sound dampening mats or sprays to reduce noise and vibrations.
- Application: Apply the sound dampening materials to the back of the headliner board before attaching the new fabric.
These advanced techniques can help you achieve a professional-quality headliner repair that enhances the appearance and functionality of your car’s interior.
10. Finding Quality Tools and Materials at CARDIAGTECH.NET
At CARDIAGTECH.NET, we understand the importance of having the right tools and materials for any automotive repair. That’s why we offer a wide range of high-quality products to help you fix your car headliner and tackle other automotive projects with confidence.
10.1. Headliner Fabrics
Choose from a variety of headliner fabrics to match your car’s interior and personal style. Our fabrics are durable, UV resistant, and easy to clean, ensuring long-lasting performance.
10.2. Headliner Adhesives
Our high-temperature-resistant spray adhesives are specifically designed for automotive headliners. They provide a strong, reliable bond that withstands extreme temperatures and humidity.
10.3. Specialty Tools
We offer a range of specialty tools to make headliner repair easier and more efficient. Our selection includes:
- Headliner Removal Tools: Safely remove trim pieces, visors, and dome lights without causing damage.
- Smoothing Tools: Eliminate wrinkles and bubbles when applying new fabric.
- Steam Cleaners: Loosen old adhesive and prepare the headliner board for new fabric.
10.4. Customer Support
Our knowledgeable customer support team is available to answer your questions and provide guidance on headliner repair techniques. We can help you choose the right products and offer tips to achieve professional-quality results.
10.5. Convenient Shopping
Shop online at CARDIAGTECH.NET from the comfort of your own home. We offer fast shipping and secure payment options, making it easy to get the tools and materials you need to fix your car headliner.
By choosing CARDIAGTECH.NET, you can be confident that you’re getting the best products and support for your automotive repair projects.
Ready to get started? Contact CARDIAGTECH.NET today at +1 (641) 206-8880 or visit our website at CARDIAGTECH.NET to explore our selection of headliner repair tools and materials. Our address is 276 Reock St, City of Orange, NJ 07050, United States. Let us help you restore your car’s interior and enjoy a comfortable and stylish driving experience.
FAQs: Addressing Common Headliner Concerns
1. How do I know if my headliner is sagging?
Signs of a sagging headliner include:
- Visible drooping of the fabric
- Fabric separating from the headliner board
- Cracking or peeling of the fabric
- Difficulty seeing out of the windshield due to obstruction
2. Is it OK to fix the headliner sagging myself?
Yes, fixing a sagging headliner yourself is possible, especially for minor issues. However, consider your skill level and the extent of the damage before attempting a DIY repair.
3. Can I paint a headliner?
While it may seem appealing, painting a headliner is not recommended. Paint can make the fabric stiff and may not adhere well. It’s better to replace the fabric.
4. Does car insurance cover the cost of car headliner replacement?
Most car insurance policies do not cover headliner replacement due to wear and tear. However, if the damage is caused by a covered event, such as a collision or vandalism, it may be covered.
5. How long does it take to replace a headliner?
Replacing a headliner can take anywhere from 4 to 8 hours, depending on the complexity of the job and your experience level.
6. What is the best adhesive for headliner repair?
The best adhesive for headliner repair is a high-temperature-resistant spray adhesive specifically designed for automotive headliners.
7. How can I prevent my headliner from sagging?
Preventive measures include:
- Parking in the shade
- Using window tinting
- Addressing leaks promptly
- Cleaning the headliner gently
- Avoiding physical stress
8. Can I use staples to fix a sagging headliner?
Using staples is not recommended, as they can damage the fabric and headliner board. Twist pins or adhesive are better options.
9. How much does a professional headliner replacement cost?
Professional headliner replacement can cost between $250 and $650, depending on the vehicle type and the complexity of the job.
10. What are the benefits of replacing my headliner?
Benefits of replacing your headliner include:
- Improved appearance of your car’s interior
- Increased resale value
- Enhanced comfort and noise reduction
- Prevention of further damage
By addressing these common concerns, you can make informed decisions about repairing or replacing your car’s headliner and maintain its appearance for years to come.
