How to Fix Loose Weather Stripping on Car Door Effectively
Weather stripping is the unsung hero of your car, diligently protecting you from the elements. At CARDIAGTECH.NET, we understand how crucial it is to maintain these seals. Let’s explore how to repair, replace, and maintain your car’s weather stripping, ensuring a quiet, comfortable, and dry ride, while also highlighting the tools and equipment we offer to make the job easier.
1. Understanding Car Weather Stripping and Its Importance
Car weather stripping, also known as a gasket, is the rubber or foam lining that seals gaps between your vehicle’s body and its doors, windows, trunk, hood, and windshield. It acts as a barrier against the elements, ensuring a comfortable and protected ride.
1.1. Key Functions of Weather Stripping:
- Keeps Out the Elements: Weather stripping prevents rain, snow, air drafts, and even small critters from entering your car.
- Prevents Mold and Mildew: By keeping moisture out, it helps prevent the growth of mold and mildew inside your vehicle.
- Maintains Air Quality: Weather stripping helps maintain the quality of air inside your car by preventing pollutants and allergens from entering.
- Insulates Against Temperature Extremes: It insulates passengers from extreme hot and cold temperatures, improving comfort.
- Protects Vehicle from Damage: Proper sealing protects your car’s interior from water damage and corrosion.
- Enhances Driving Comfort: By reducing wind noise and vibrations, weather stripping enhances overall driving comfort.
- Maintains Vehicle Appearance and Resale Value: Well-maintained weather stripping contributes to the overall appearance and value of your vehicle.
To test the effectiveness of your weather stripping, try the dollar bill test. Place a dollar bill between the weather strip and the part being sealed. If you feel resistance when pulling the bill out, the seal is good. If not, it’s time to take action.
2. Recognizing When to Replace Weather Stripping
Identifying when to replace your car’s weather stripping is crucial for maintaining your vehicle’s comfort and protection. Here are key signs that indicate it’s time for a replacement:
2.1. Signs of Weather Stripping Damage:
- Visible Dry Rot or Cracks: Inspect the weather stripping for dry rot, cracks, or missing chunks.
- Wind Noise: Increased wind noise inside the car, especially around door frames, indicates a compromised seal.
- Water Leaks: Any sign of water leaking into the car, particularly after rain or washing the vehicle, is a clear indicator.
- Looseness or Detachment: If the weather stripping is loose or peeling away from the door or frame, it needs to be addressed.
Thomas Patterson, Director of New Product Development and Technical Training at Glass Doctor, notes that weather stripping expands and contracts due to temperature changes, which can cause fatigue in the rubber (EPDM) and lead to loosening.
3. Step-by-Step Guide: How to Repair Weather Stripping on a Car
3.1. Gathering the Necessary Tools and Materials
Before you begin, make sure you have the right tools and materials. CARDIAGTECH.NET offers a wide range of high-quality tools to make this task easier and more efficient.
3.1.1. Essential Tools:
- Flathead Screwdriver: For gently prying away old weather stripping.
- 90-Degree Picks: To clean out channel retainer tracks effectively.
- Sandpaper: To smooth rough surfaces before applying adhesive.
- Clean, Dust-Free Rags: For wiping surfaces clean.
- Microfiber Towels: To dry surfaces and apply protectants.
- Utility Knife (Optional): For trimming weather stripping.
3.1.2. Necessary Materials:
- Replacement Weather Stripping: Ensure it matches your vehicle’s specifications.
- Adhesive Remover: To eliminate old adhesive residue.
- Weather Strip Adhesive: For secure bonding.
- Silicone Spray: To lubricate and protect the weather stripping.
- Silicone Gel (Optional): For added protection.
- Low Adhesion Paper Tape or Clamps (Optional): To hold the strip in place while the adhesive dries.
- Foam Backer Rod (Optional): For filling gaps in repairs.
3.2. Step 1: Assessing the Damage
Begin by carefully examining the weather stripping to determine the extent of the damage.
- Minor Tears or Cuts: Small tears or cuts can often be patched with weather strip adhesive.
- Detachment: If the weather strip is merely falling or popping out slightly, a few drops of adhesive can secure it.
- Loss of Shape: If the weather strip has lost its shape or folded over, consider cutting a small opening and inserting a piece of foam backer rod.
3.3. Step 2: Removing the Old Strip
If the damage is beyond repair, you’ll need to remove the old weather stripping.
- Gently peel the old weather stripping from the door or opening.
- Take care to avoid damaging the paint. Use a plastic trim removal tool, available at CARDIAGTECH.NET, to prevent scratches.
3.4. Step 3: Cleaning the Area
Cleaning the area thoroughly is essential for proper adhesion.
- Spray the area where the old weather stripping was with an adhesive remover.
- Use a cloth and 90-degree picks to wipe away adhesive residue and other debris. Bob Lacivita emphasizes that the channel or mounting surface must be spotless for the new adhesive to bond correctly.
- Let all areas dry completely.
3.5. Step 4: Applying New Adhesive
Proper adhesive application ensures a lasting seal.
- Test fit the new weather stripping to ensure it matches the original strip’s size and shape. Trim if necessary.
- If your new weather stripping doesn’t come with pre-coated adhesive, apply a thin and even strip of adhesive to the vehicle surface.
- Adhere to any manufacturer instructions for adhesive application and drying recommendations.
Bob Lacivita recommends using 3M Black Weatherstrip Adhesive, noting that it provides a superior bond compared to the yellow variant.
3.6. Step 5: Installing the Weather Stripping
Careful positioning and firm pressure are key to a successful installation.
- Carefully position the new weather stripping onto the adhesive.
- Press it firmly in place.
- Use tape or clamps to hold the strip in place until the adhesive dries. Applying a bit of silicone underneath the tape can prevent it from ripping the new weather stripping upon removal.
Thomas Patterson advises allowing the adhesive to fully cure and bond to the surface before closing the door to prevent shifting.
3.7. Step 6: Testing and Cleaning Up
Once the adhesive is set, test the new weather stripping.
- Gently open and close the door to test the seal.
- Inspect for any gaps in the adhesion.
- Use a clean cloth to remove any excess adhesive.
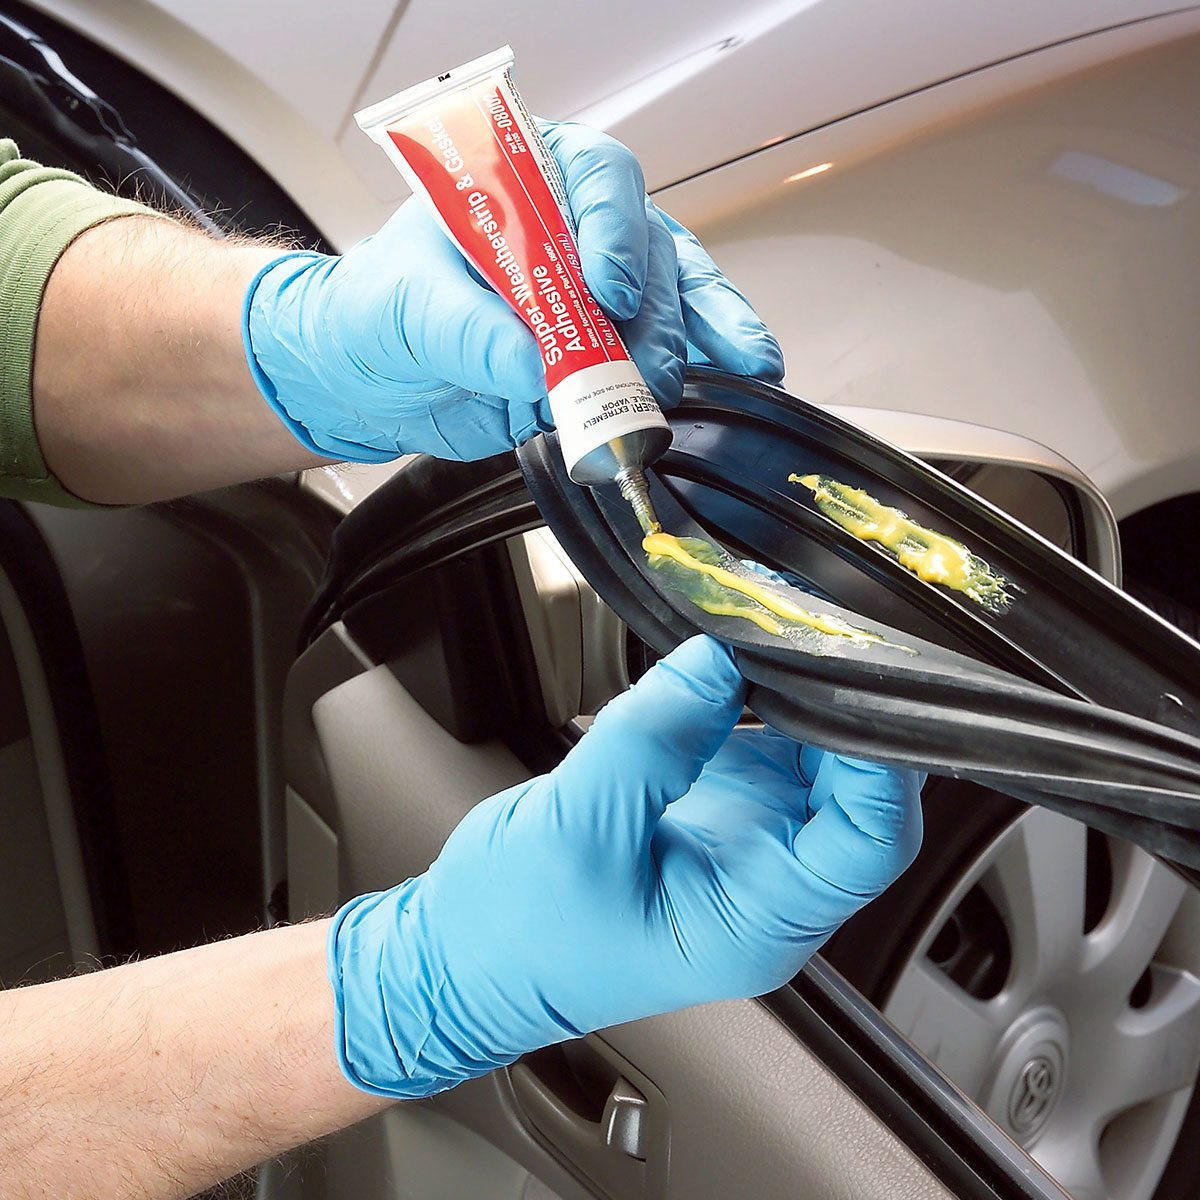
Applying glue on the stripping of the car door
Applying weather strip adhesive to the car door frame for a secure fit, ensuring a tight seal.
4. Maintaining Car Weather Stripping
Regular maintenance will keep your car’s weather stripping soft, flexible, and effective.
4.1. Routine Cleaning
- Use car wash soap and a soft brush to clean the weather stripping regularly. Pay special attention to the back side, where dirt and debris accumulate.
- Clean any vehicle doors or parts that come into contact with the weather stripping.
- Dry thoroughly using a microfiber towel.
4.2. Applying Protectant
- Apply a silicone-based rubber protectant or silicone paste sparingly.
- Ensure the rubber looks slightly wet after application.
- Bob Lacivita suggests using a spray-pump protectant rather than an aerosol-based one, as some aerosol propellants can harm rubber.
- For older, dry weather stripping, apply a second coat of protectant.
Thomas Patterson notes that a good coating of silicone-based protectant can extend the life of the weather stripping. He also recommends using the same protectant on the seals that you use on leather or vinyl trim when detailing the interior of your car.
5. Cost of Replacing Weather Stripping
The cost to replace weather stripping can vary widely. Generic self-stick or friction weather stripping can cost less than $25. However, vehicle-specific weather stripping that requires removing trim or parts like the sunroof can cost up to $800, according to Bob Lacivita.
6. Leveraging CARDIAGTECH.NET for Your Auto Repair Needs
At CARDIAGTECH.NET, we understand the challenges you face in your profession. The physical demands, constant exposure to grease and chemicals, and the need to stay updated with ever-evolving automotive technology can be daunting. That’s why we offer high-quality tools and equipment designed to:
- Enhance your work efficiency and reduce repair times.
- Increase accuracy and safety in your work.
- Help you save on repair and maintenance costs for your customers.
- Boost revenue and profitability for your garage.
We recognize the importance of having reliable tools that stand the test of time. Our products are selected to ensure durability, precision, and ease of use, helping you provide top-notch service to your clients. Contact us via Whatsapp at +1 (641) 206-8880 or visit our website at CARDIAGTECH.NET to explore our wide range of auto repair tools and equipment. Our address is 276 Reock St, City of Orange, NJ 07050, United States.
7. Utilizing Tables for Clear Information
Below are some tables to illustrate costs and maintenance schedules for weather stripping.
7.1. Estimated Costs for Weather Stripping Replacement
| Type of Weather Stripping | Estimated Cost | Notes |
|---|---|---|
| Generic Self-Stick | $15 – $25 | Easy to install |
| Generic Friction Fit | $20 – $30 | Requires proper sizing |
| Vehicle-Specific (Simple) | $50 – $150 | Exact fit, easy to install |
| Vehicle-Specific (Complex) | $200 – $800 | Requires trim removal |
7.2. Weather Stripping Maintenance Schedule
| Maintenance Task | Frequency | Benefits |
|---|---|---|
| Cleaning | Every 3 Months | Removes dirt, debris, and contaminants |
| Protectant Application | Every 6 Months | Keeps rubber soft and flexible |
| Inspection | Annually | Checks for cracks, tears, and wear |
8. Addressing User Search Intent: 5 Key Intentions
To ensure this article fully addresses user search intent, here are five key intentions and how this content caters to them:
- Informational: Users want to understand what weather stripping is and its functions. This article provides a detailed explanation of weather stripping, its purposes, and the benefits of maintaining it.
- DIY Repair Guide: Users seek step-by-step instructions on how to repair loose or damaged weather stripping. The article offers a comprehensive guide with clear steps, tool lists, and material recommendations.
- Troubleshooting: Users need help identifying issues with their weather stripping and determining if it needs repair or replacement. The article includes signs of damage and a testing method.
- Product Recommendations: Users are looking for specific products and brands to use for weather stripping repair and maintenance. The article suggests 3M Black Weatherstrip Adhesive and silicone-based protectants.
- Cost Information: Users want to know the potential costs of repairing or replacing weather stripping. The article provides a cost breakdown for different types of weather stripping.
9. Crafting an Engaging Introduction
Let’s refine the introduction to capture the reader’s attention and highlight the solutions provided by CARDIAGTECH.NET.
Is your car door weather stripping loose, causing annoying wind noise or letting in unwanted moisture? At CARDIAGTECH.NET, we specialize in providing the tools and expertise you need to restore your vehicle’s seals, ensuring a quiet, dry, and comfortable ride. Dive into our comprehensive guide on weather stripping repair, replacement, and maintenance, and discover how our quality products can make all the difference. We cover everything from adhesive selection to protective measures, enhancing vehicle longevity and preventing interior damage. Explore solutions for automotive sealing, weather sealants, and rubber protection today.
10. The AIDA Approach: Attract, Interest, Desire, Action
This article follows the AIDA model to effectively engage readers and drive them towards action.
- Attention: The headline and introduction grab the reader’s attention by addressing a common problem: loose weather stripping.
- Interest: The article provides detailed information on the functions of weather stripping, signs of damage, and the importance of maintenance, sparking the reader’s interest.
- Desire: Step-by-step repair instructions, cost breakdowns, and product recommendations create a desire for a solution. Highlighting the benefits of maintained weather stripping, like a quieter ride and protection from the elements, further enhances this desire.
- Action: The article encourages readers to contact CARDIAGTECH.NET for high-quality tools and expert advice, providing clear contact information and a direct call to action.
11. FAQ Section
Here are ten frequently asked questions about car weather stripping:
11.1. Can you drive without weather stripping?
Yes, but it’s not recommended. Driving without weather stripping exposes you to the elements, increases road noise, and makes your HVAC system work harder.
11.2. How long does weather stripping last?
With proper care, weather stripping can last the lifetime of your vehicle. Regular maintenance is key.
11.3. How do you know what kind of weather stripping to use for your car?
Check your vehicle’s make and model specifications. You can also carefully remove a small piece of the old weather stripping to determine the type you need.
11.4. What is the best adhesive for weather stripping?
3M Black Weatherstrip Adhesive is highly recommended for its strong and durable bond.
11.5. How often should you clean weather stripping?
Clean your weather stripping every three months to remove dirt and debris.
11.6. What type of protectant should you use on weather stripping?
Use a silicone-based rubber protectant to keep the rubber soft and flexible.
11.7. Can I use household products to clean weather stripping?
Avoid using harsh chemicals. Stick to car wash soap and water for cleaning.
11.8. What are the signs of dry rot on weather stripping?
Signs include cracking, crumbling, and a hard, brittle texture.
11.9. Is it difficult to replace weather stripping myself?
With the right tools and a step-by-step guide, it’s a manageable DIY project.
11.10. Where can I buy high-quality weather stripping and tools?
Visit CARDIAGTECH.NET for a wide selection of weather stripping, adhesives, tools, and expert advice.
12. Internal Linking Opportunities
Here are some potential internal links to incorporate into the article:
- Link to a related article on car door maintenance.
- Link to a product page for weather stripping adhesive on CARDIAGTECH.NET.
- Link to a blog post about preventing mold and mildew in your car.
13. Conclusion: Seize the Opportunity with CARDIAGTECH.NET
Maintaining your car’s weather stripping is vital for comfort, protection, and vehicle value. By following this guide, you can effectively repair or replace damaged weather stripping, ensuring a quiet and dry ride. Don’t let worn-out seals compromise your driving experience. Take action now to protect your vehicle, enhance your comfort, and boost your garage’s efficiency. Contact CARDIAGTECH.NET today at +1 (641) 206-8880 or visit our website to explore our range of tools and equipment designed to make your work easier and more profitable. Let us help you elevate your service quality and customer satisfaction. Your success is our priority.