How To Fix Leather In Car: A Comprehensive Guide
Leather car seats, while luxurious and comfortable, are prone to wear and tear. Knowing how to fix leather in your car can save you money and keep your interior looking its best. At CARDIAGTECH.NET, we provide the tools and knowledge you need to restore your leather car seats to their former glory. Discover the best leather repair techniques and high-quality products to achieve professional results and maintain your vehicle’s value and comfort.
1. Understanding Leather Damage in Cars
Leather car seats endure a lot. From daily use to environmental factors, understanding the common types of damage is the first step in learning how to fix leather in your car.
1.1. Common Types of Leather Damage
- Scratches: Usually superficial, caused by keys, pets, or clothing.
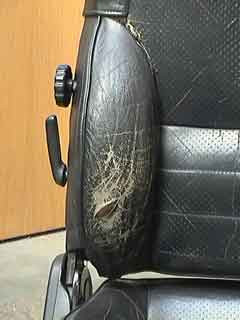
- Scuffs: Result from friction and rubbing, often found on bolsters and entry points.
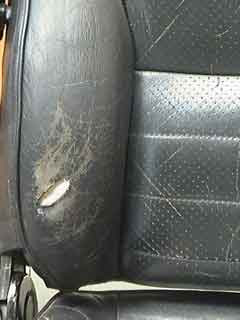
- Cracks: Appear due to dryness and lack of maintenance, leading to the leather splitting.
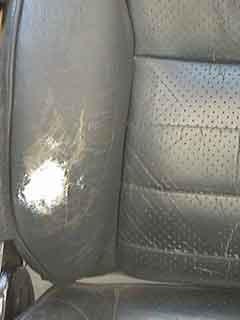
- Fading: Caused by prolonged exposure to sunlight, diminishing the leather’s original color.
- Stains: From spills, food, or dyes from clothing.
- Holes and Tears: More significant damage requiring patching and filling.
1.2. Factors Contributing to Leather Wear
- UV Exposure: Sunlight dries out leather, causing it to crack and fade.
- Temperature Fluctuations: Extreme heat and cold can damage leather’s structure.
- Lack of Maintenance: Neglecting regular cleaning and conditioning accelerates wear.
- Daily Use: Constant friction from getting in and out of the car.
- Spills and Stains: Untreated spills can penetrate and damage the leather.
1.3. Identifying the Severity of Damage
Before you start, assess the damage. Minor scratches and scuffs can be addressed with simple cleaning and conditioning. Cracks and fading might need more intensive treatment. Holes and tears usually require professional-grade repair.
2. Essential Tools and Materials for Leather Repair
Having the right tools and materials is essential for a successful repair. CARDIAGTECH.NET offers a wide range of high-quality products designed for leather car seat repair.
2.1. Cleaning and Preparation
- Leather Cleaner: Removes dirt, oil, and grime without damaging the leather.
- Leather Prep: An abrasive used to remove the manufactured finish, allowing colorant to adhere properly
- Alcohol Cleaner: Removes any remaining dirt or dust after prepping.
- Soft Cloths/Microfiber Towels: For gentle cleaning and application of products.
- Detailing Brushes: For cleaning hard-to-reach areas and crevices.
2.2. Repairing Damage
- Leather Repair Kit: Includes essential items such as leather glue, heavy filler, sub-patch material, and a palette knife.
- Leather Glue: Bonds the backing patch to the underside of the leather.
- Leather Filler/Heavy Filler: Fills in holes, cracks, and deep scratches.
- Backing Patch: Provides a solid foundation for filling holes and tears.
- Palette Knife/Spatula: For applying and smoothing filler.
- Sandpaper (Various Grits): For smoothing and blending repaired areas.
- Scalpel or Scissors: For carefully trimming away any excess leather.
- Tweezers: To help insert the sub-patch under the leather.
2.3. Coloring and Finishing
- Leather Colorant: Matches the original color of your leather seats.
- Leather Finish: Seals and protects the colorant, providing a durable finish.
- Airbrush: For applying colorant and finish in thin, even coats.
- Sponges: For applying colorant to penetrate into the leather’s creases and grain.
2.4. Protective Measures
- Leather Conditioner: Keeps the leather supple and prevents cracking.
- UV Protectant: Shields the leather from harmful UV rays.
3. Step-by-Step Guide: How to Fix Minor Leather Damage in Car
Minor damage like scratches, scuffs, and light stains can often be fixed with basic cleaning and conditioning.
3.1. Cleaning the Leather Surface
- Vacuum: Use a vacuum cleaner with a soft brush attachment to remove loose dirt and debris.
- Apply Leather Cleaner: Spray leather cleaner onto a microfiber towel, not directly onto the leather.
- Wipe Gently: Gently wipe the leather surface in circular motions to lift dirt and grime.
- Wipe Clean: Use a clean, damp microfiber towel to wipe away any remaining cleaner.
- Dry: Allow the leather to air dry completely.
3.2. Addressing Scratches and Scuffs
- Apply Leather Conditioner: Apply a small amount of leather conditioner to a clean microfiber towel.
- Rub into Scratches: Gently rub the conditioner into the scratches and scuffs using circular motions.
- Buff: Buff the area with a clean, dry microfiber towel to blend the conditioner into the leather.
- Repeat: Repeat the process if necessary, until the scratches and scuffs are less noticeable.
3.3. Removing Stains
- Identify the Stain: Determine the type of stain (oil-based, water-based, etc.).
- Apply Stain Remover: Use a specialized leather stain remover appropriate for the type of stain.
- Blot Gently: Blot the stain gently with a clean cloth, working from the outside in.
- Avoid Rubbing: Avoid rubbing the stain, as this can spread it and damage the leather.
- Dry: Allow the area to dry completely, then apply leather conditioner.
3.4. Conditioning the Leather
- Apply Conditioner: Apply a small amount of leather conditioner to a clean microfiber towel.
- Spread Evenly: Spread the conditioner evenly over the leather surface.
- Allow to Absorb: Allow the conditioner to absorb into the leather for 15-20 minutes.
- Buff: Buff the leather with a clean, dry microfiber towel to remove any excess conditioner.
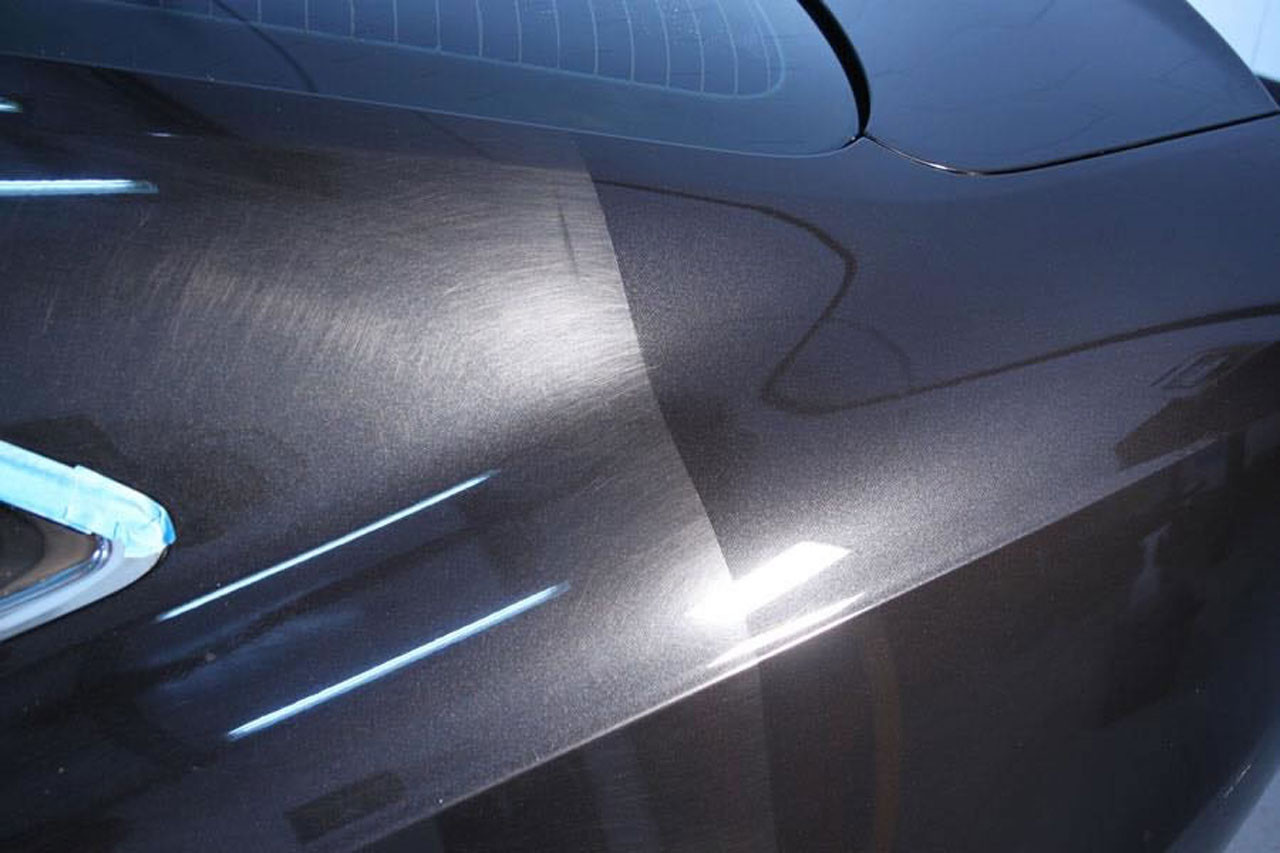
Applying leather conditioner to car seat to repair scratches
4. Repairing Cracks and Holes: A Detailed Guide
More significant damage like cracks and holes requires a more involved repair process. Here’s how to fix leather in your car when dealing with these issues.
4.1. Preparing the Damaged Area
- Clean: Thoroughly clean the area around the crack or hole with leather cleaner and a detailing brush.
- Leather Prep: Gently rub the surface of the leather with Leather Prep and an abrasive pad to remove grease, oils and the manufactured finish.
- Alcohol Cleaner: Wipe the leather down with Alcohol Cleaner to remove any dirt or dust.
- Trim Loose Edges: Use a scalpel or scissors to carefully trim away any loose or frayed edges around the damage.
4.2. Applying a Backing Patch
- Cut Patch to Size: Cut the backing patch slightly larger than the area being repaired (about 1cm extra on each side).
- Insert the Patch: Use tweezers to insert the backing patch under the leather, ensuring it covers the entire damaged area.
- Apply Leather Glue: Put a small amount of Leather Glue onto the spatula and feed this underneath the edges of the hole to coat the underside of the leather surrounding it, taking care not to move the canvas patch.
- Secure the Patch: Press down firmly on the leather around the patch to bond it to the backing.
- Allow to Dry: Allow the glue to dry completely (usually 30-60 minutes).
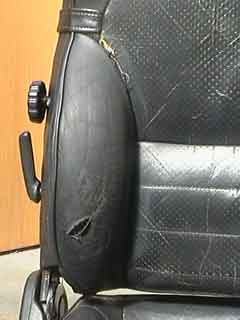
 Inserting a leather backing patch under car seat
4.3. Filling the Crack or Hole
- Apply Filler: Using the palette knife, apply a small amount of leather filler to the damaged area, pressing it into the crack or hole.
- Layering: Apply the filler in thin layers, allowing each layer to dry for about 20 minutes before applying the next. Using a hair dryer can speed up the drying process.
- Smoothing: With the application of each layer, smooth the area over with the sharper edge of the palette knife before drying the layer applied.
- Build Up: Continue applying thin layers until the filler is level with the surrounding leather.
- Final Layer: Apply the final layer of filler to completely fill the hole so that it is on an even level with the surrounding leather on the seat.
- Clean Excess: Remove any unwanted filler and dust from the surrounding area with the Alcohol cleaner.
- Allow to Cure: Allow the final layer to cure properly. This may take several hours.
4.4. Sanding and Smoothing
- Start with Coarse Grit: If the filler is uneven, start with a coarser grit sandpaper (e.g., 400-grit) to remove excess material.
- Use Finer Grit: Switch to a finer grit sandpaper (e.g., 800-grit, then 1200-grit) to smooth the surface.
- Sand Lightly: Sand lightly in circular motions, blending the filler into the surrounding leather.
- Check for Smoothness: Regularly check the surface for smoothness, and continue sanding until it is seamless.
4.5. Coloring the Repaired Area
- Match the Color: Ensure the leather colorant matches the original color of your leather seats.
- Apply Initial Coat of Colorant: Take a sponge and apply a small amount of colourant to it, then rub this into the area of the repair thoroughly. This allows the colourant to penetrate into the creases of the leather and valleys of the grain, giving a better overall finish.
- Spray Colorant: Use an airbrush to spray thin, even coats of colorant over the repaired area.
- Multiple Coats: Apply multiple thin coats, allowing each coat to dry before applying the next. This will help build up an even finish and avoid problems with uncured colorant.
- Blend: Blend the colorant into the surrounding leather to create a seamless transition.
4.6. Applying a Finish
- Spray Finish: Use an airbrush to spray thin, even coats of leather finish over the repaired area.
- Multiple Coats: Apply 4 or 5 thin coats, allowing each coat to dry before applying the next.
- Seal: Ensure the finish seals the colorant in the leather, preventing it from wearing.
- Allow to Cure: Allow the finish to cure for 24 hours before using the seat.
 Applying the final coat of colorant on repaired leather car seat
5. Advanced Techniques for Leather Repair
For more complex repairs, consider these advanced techniques to achieve professional-quality results.
5.1. Grain Matching
- Use Grain Pads: Use grain pads to imprint a texture onto the filler before it dries.
- Match the Texture: Match the texture of the surrounding leather for a seamless repair.
5.2. Recoloring Entire Seats
- Prep the Leather: Thoroughly clean and prep the entire seat.
- Apply Colorant: Apply multiple thin coats of colorant using an airbrush.
- Seal with Finish: Seal the colorant with a leather finish for durability.
5.3. Repairing Bolsters
- Reinforce with Fabric: Reinforce damaged bolsters with fabric before applying filler.
- Shape Carefully: Carefully shape the filler to match the original contours of the bolster.
6. Maintaining Leather Car Seats to Prevent Damage
Preventing damage is as important as knowing how to fix leather in your car. Regular maintenance will keep your leather seats looking new for years.
6.1. Regular Cleaning
- Weekly Vacuuming: Vacuum your leather seats weekly to remove loose dirt and debris.
- Monthly Cleaning: Clean your leather seats monthly with a leather cleaner and a soft cloth.
6.2. Conditioning
- Apply Conditioner: Apply leather conditioner every 3-6 months to keep the leather supple.
- Avoid Over-Conditioning: Avoid over-conditioning, as this can make the leather greasy.
6.3. Protecting from Sunlight
- Park in Shade: Park your car in the shade whenever possible to reduce UV exposure.
- Use Sunshades: Use sunshades to protect your leather seats from direct sunlight.
- Apply UV Protectant: Apply a leather UV protectant regularly to shield the leather from harmful rays.
6.4. Promptly Addressing Spills
- Blot Immediately: Blot spills immediately with a clean, dry cloth.
- Use Stain Remover: Use a leather stain remover to treat stubborn stains.
6.5. Avoiding Sharp Objects
- Be Careful: Be careful when placing sharp objects on your leather seats.
- Use Seat Covers: Consider using seat covers to protect your leather seats from wear and tear.
7. DIY vs. Professional Repair: Making the Right Choice
Deciding whether to tackle a repair yourself or hire a professional depends on the extent of the damage and your comfort level.
7.1. When to DIY
- Minor Damage: Small scratches, scuffs, and light stains are usually manageable with DIY methods.
- Cost Savings: DIY repairs can save you money compared to professional services.
- Personal Satisfaction: Some people enjoy the satisfaction of repairing their own belongings.
7.2. When to Hire a Professional
- Extensive Damage: Large holes, tears, and significant cracking often require professional expertise.
- Color Matching Issues: Matching the exact color of your leather can be difficult without professional equipment.
- Complex Repairs: Repairs to bolsters, seams, or intricate designs may require specialized skills.
- Time Constraints: If you don’t have the time to dedicate to the repair, hiring a professional can be a good option.
8. Common Mistakes to Avoid When Repairing Leather
Knowing what not to do is just as important as knowing how to fix leather in your car. Here are some common mistakes to avoid.
8.1. Using Harsh Chemicals
- Avoid Bleach: Never use bleach or harsh chemicals, as they can damage the leather.
- Use Leather-Specific Cleaners: Always use cleaners specifically designed for leather.
8.2. Over-Saturating the Leather
- Apply Products Sparingly: Apply cleaners and conditioners sparingly to avoid over-saturating the leather.
- Wipe Away Excess: Wipe away any excess product with a clean, dry cloth.
8.3. Rubbing Too Hard
- Gently Clean: Clean and condition the leather gently to avoid damaging the surface.
- Blot Stains: Blot stains instead of rubbing them to prevent spreading.
8.4. Skipping the Prep Work
- Thorough Cleaning: Always clean the leather thoroughly before applying any repair products.
- Proper Preparation: Proper preparation is essential for ensuring the repair adheres correctly.
8.5. Applying Filler Too Thickly
- Thin Layers: Apply filler in thin layers to allow it to dry properly and prevent cracking.
- Allow Drying Time: Allow each layer to dry completely before applying the next.
9. Real-World Examples of Successful Leather Repairs
Seeing how others have successfully repaired their leather car seats can provide inspiration and confidence.
9.1. Case Study 1: Repairing a Cracked Seat
- Problem: A car seat with significant cracks due to age and sun exposure.
- Solution: Thorough cleaning, application of leather filler in thin layers, sanding, coloring with a matching colorant, and sealing with a leather finish.
- Result: The seat looked almost new, with the cracks completely filled and the color restored.
9.2. Case Study 2: Removing a Stubborn Stain
- Problem: A stubborn coffee stain on a light-colored leather seat.
- Solution: Application of a specialized leather stain remover, gentle blotting, and conditioning the leather.
- Result: The stain was completely removed, and the leather was restored to its original condition.
9.3. Case Study 3: Repairing a Tear in a Bolster
- Problem: A tear in the bolster of a driver’s seat due to frequent use.
- Solution: Reinforcing the area with fabric, applying leather filler, shaping the filler to match the bolster’s contours, coloring, and sealing.
- Result: The tear was repaired seamlessly, and the bolster looked as good as new.
 Before and after leather car seat repair
10. Where to Buy Quality Leather Repair Products
Finding the right products is crucial for a successful repair. CARDIAGTECH.NET offers a wide range of high-quality leather repair products.
10.1. Recommended Products from CARDIAGTECH.NET
- Leather Repair Kits: Comprehensive kits that include everything you need for minor to moderate repairs.
- Leather Cleaners: Gentle yet effective cleaners for removing dirt and grime.
- Leather Conditioners: High-quality conditioners to keep your leather supple and protected.
- Leather Colorants: Colorants matched to your vehicle’s interior for a seamless finish.
- Leather Finishes: Protective finishes to seal and protect your repaired leather.
10.2. Why Choose CARDIAGTECH.NET?
- High-Quality Products: Our products are made from the finest materials and are designed to deliver professional results.
- Expert Advice: We offer expert advice and guidance to help you choose the right products and techniques for your repair.
- Customer Satisfaction: We are committed to customer satisfaction and stand behind our products with a satisfaction guarantee.
- Wide Selection: We offer a wide selection of leather repair products to meet all your needs.
- Convenient Shopping: Shop online at CARDIAGTECH.NET for a convenient and hassle-free experience.
11. Expert Tips for Achieving Professional Results
Follow these expert tips to achieve professional-quality results when repairing your leather car seats.
11.1. Take Your Time
- Don’t Rush: Don’t rush the repair process. Take your time to ensure each step is done correctly.
- Allow Drying Time: Allow adequate drying time for cleaners, fillers, and finishes.
11.2. Practice on a Hidden Area
- Test Products: Test any new products on a hidden area of the leather before applying them to the damaged area.
- Refine Technique: Practice your repair technique on a hidden area to refine your skills.
11.3. Work in a Well-Ventilated Area
- Proper Ventilation: Work in a well-ventilated area when using cleaners, colorants, and finishes.
- Wear Gloves: Wear gloves to protect your hands from chemicals.
11.4. Use Proper Lighting
- Good Lighting: Use proper lighting to ensure you can see the damaged area clearly.
- Avoid Shadows: Avoid shadows that can obscure your view and make it difficult to achieve a seamless repair.
11.5. Follow Instructions Carefully
- Read Instructions: Read and follow the instructions on all products carefully.
- Adhere to Guidelines: Adhere to recommended drying times, application methods, and safety precautions.
12. The Science Behind Leather Repair: Understanding the Materials
To truly master leather repair, it helps to understand the science behind the materials you’re working with.
12.1. Leather Composition
- Natural Material: Leather is a natural material made from animal skin.
- Fibers: It consists of fibers that provide strength and flexibility.
- Tanning Process: The tanning process preserves the leather and gives it its unique properties.
12.2. Types of Leather
- Aniline Leather: The most natural type of leather, with no protective coating.
- Semi-Aniline Leather: Similar to aniline but with a light protective coating.
- Protected Leather: The most durable type of leather, with a heavy protective coating.
12.3. Leather Repair Products
- Cleaners: Designed to remove dirt and grime without damaging the leather.
- Conditioners: Replenish the natural oils in the leather to keep it supple.
- Fillers: Fill in cracks and holes, providing a smooth surface for coloring.
- Colorants: Restore the original color of the leather.
- Finishes: Protect the colorant and provide a durable finish.
13. How to Choose the Right Leather Repair Kit
Choosing the right leather repair kit can make all the difference in the success of your repair.
13.1. Assess the Damage
- Identify Damage Type: Determine the type and extent of the damage.
- Choose Appropriate Kit: Choose a kit that is designed for the specific type of damage you need to repair.
13.2. Consider the Contents
- Essential Items: Ensure the kit includes essential items such as cleaner, conditioner, filler, colorant, and finish.
- Additional Tools: Look for kits that include additional tools such as sandpaper, palette knives, and applicators.
13.3. Read Reviews
- Customer Feedback: Read customer reviews to get an idea of the kit’s quality and effectiveness.
- Look for Recommendations: Look for recommendations from experts and other users.
13.4. Check for Color Matching
- Color Options: Ensure the kit offers color matching options to match your vehicle’s interior.
- Custom Matching: Some kits offer custom color matching services for a perfect match.
13.5. Consider the Brand
- Reputable Brands: Choose a kit from a reputable brand with a history of producing high-quality products.
- Warranty: Look for kits that come with a warranty or satisfaction guarantee.
14. Safety Precautions for Leather Repair
Safety should always be a priority when working with leather repair products.
14.1. Wear Protective Gear
- Gloves: Wear gloves to protect your hands from chemicals.
- Mask: Wear a mask to avoid inhaling fumes from cleaners, colorants, and finishes.
- Eye Protection: Wear eye protection to prevent splashes and spills from getting into your eyes.
14.2. Work in a Well-Ventilated Area
- Proper Ventilation: Work in a well-ventilated area to avoid inhaling harmful fumes.
- Open Windows: Open windows and use a fan to circulate air.
14.3. Store Products Safely
- Keep Out of Reach: Keep leather repair products out of reach of children and pets.
- Store Properly: Store products in a cool, dry place away from direct sunlight and heat.
14.4. Dispose of Waste Properly
- Follow Guidelines: Follow local guidelines for disposing of waste materials such as used cloths, sandpaper, and empty containers.
- Avoid Pouring Down Drains: Avoid pouring chemicals down drains, as this can harm the environment.
15. Maximizing the Life of Your Leather Car Seats
Taking the right steps can significantly extend the lifespan of your leather car seats.
15.1. Regular Maintenance Schedule
- Weekly: Vacuum to remove loose dirt.
- Monthly: Clean with a leather cleaner.
- Every 3-6 Months: Apply leather conditioner.
- Annually: Deep clean and apply a UV protectant.
15.2. Use Quality Products
- Invest in Good Products: Investing in high-quality leather care products is worth it in the long run.
- Avoid Cheap Alternatives: Avoid cheap alternatives that can damage the leather.
15.3. Protect from the Elements
- Park Smart: Park in the shade or use sunshades.
- UV Protection: Apply UV protectant regularly.
15.4. Promptly Address Issues
- Act Fast: Address spills and stains promptly.
- Repair Damage Quickly: Repair any damage as soon as possible to prevent it from worsening.
16. Exploring Alternatives to Leather: Sustainable Options
If you’re considering new car seats, exploring sustainable alternatives to leather is a great option.
16.1. Vegan Leather
- Synthetic Material: Vegan leather is a synthetic material made from polyurethane (PU) or polyvinyl chloride (PVC).
- Eco-Friendly Options: Some vegan leathers are made from sustainable materials such as pineapple leaves, apple peels, or recycled plastic.
16.2. Cloth Seats
- Durable and Comfortable: Cloth seats are durable, comfortable, and often more affordable than leather.
- Variety of Options: Available in a variety of colors and patterns.
16.3. Hybrid Materials
- Combination of Materials: Some car manufacturers offer hybrid seating options that combine leather with sustainable materials.
- Eco-Conscious Choice: Provides a balance of luxury and environmental responsibility.
17. Budget-Friendly Leather Repair Solutions
Repairing leather doesn’t have to break the bank. Here are some budget-friendly solutions.
17.1. DIY Cleaning Solutions
- Mild Soap and Water: A mixture of mild soap and water can be used to clean leather.
- Vinegar and Water: A solution of vinegar and water can help remove stains.
17.2. Affordable Repair Kits
- Basic Kits: Look for basic leather repair kits that include essential items at an affordable price.
- Discount Retailers: Check discount retailers for deals on leather repair products.
17.3. Preventative Measures
- Protect Your Investment: Taking preventative measures can save you money in the long run by preventing damage.
- Regular Maintenance: Regular cleaning and conditioning can keep your leather seats looking new for years.
18. The Future of Leather Repair: Innovations and Trends
The field of leather repair is constantly evolving with new innovations and trends.
18.1. Advanced Materials
- Self-Healing Polymers: Self-healing polymers that can repair scratches and cracks automatically.
- Smart Coatings: Smart coatings that can protect leather from UV rays, stains, and wear.
18.2. 3D Printing
- Custom Patches: 3D printing of custom patches that perfectly match the color and texture of your leather.
- Complex Repairs: Allows for more complex and precise repairs.
18.3. AI-Powered Color Matching
- Accurate Matching: AI-powered color matching technology that can precisely match the color of your leather.
- Seamless Repairs: Ensures seamless and invisible repairs.
19. Connecting with the Leather Repair Community
Connect with other leather repair enthusiasts to share tips, ask questions, and get inspired.
19.1. Online Forums
- Dedicated Forums: Join online forums dedicated to leather repair.
- Share Knowledge: Share your knowledge and learn from others.
19.2. Social Media Groups
- Facebook Groups: Join Facebook groups dedicated to leather repair.
- Connect with Experts: Connect with experts and get advice on your projects.
19.3. Local Workshops
- Hands-On Training: Attend local workshops and classes to get hands-on training in leather repair.
- Meet Fellow Enthusiasts: Meet fellow enthusiasts and share your passion for leather repair.
20. Frequently Asked Questions (FAQs) About Leather Car Seat Repair
Here are some frequently asked questions about how to fix leather in your car.
20.1. Can I use household cleaners on leather car seats?
No, household cleaners can damage leather. Always use cleaners specifically designed for leather.
20.2. How often should I condition my leather car seats?
Condition your leather car seats every 3-6 months to keep them supple and protected.
20.3. Can I repair a tear in my leather seat myself?
Yes, small tears can be repaired with a leather repair kit. Larger tears may require professional repair.
20.4. How do I match the color of my leather for a repair?
Use a leather colorant that is specifically matched to your vehicle’s interior. Some kits offer custom color matching services.
20.5. What is the best way to protect my leather seats from sunlight?
Park in the shade, use sunshades, and apply a leather UV protectant regularly.
20.6. Can I use a hair dryer to speed up the drying process?
Yes, a hair dryer can be used to speed up the drying process for cleaners, fillers, and finishes.
20.7. What is the difference between leather cleaner and leather conditioner?
Leather cleaner removes dirt and grime, while leather conditioner replenishes the natural oils in the leather.
20.8. How do I prevent cracks in my leather seats?
Regular cleaning and conditioning can help prevent cracks in your leather seats.
20.9. Can I use steam to clean my leather seats?
Steam cleaning is not recommended, as it can damage the leather.
20.10. Where can I buy quality leather repair products?
You can buy quality leather repair products at CARDIAGTECH.NET.
Knowing how to fix leather in your car is a valuable skill that can save you money and keep your vehicle looking its best. Whether you’re dealing with minor scratches or significant damage, CARDIAGTECH.NET provides the tools, knowledge, and support you need to achieve professional results. Protect your investment and maintain the luxury of your leather car seats with our comprehensive guide and high-quality products.
Are you ready to restore your leather car seats and maintain your vehicle’s value and comfort? Contact CARDIAGTECH.NET today for expert advice and high-quality leather repair products. Call us at +1 (641) 206-8880 or visit our website at CARDIAGTECH.NET. Our address is 276 Reock St, City of Orange, NJ 07050, United States. Let us help you keep your leather car seats looking their best! Contact us via Whatsapp for immediate assistance.