How to Fix Leather in A Car: A Comprehensive Guide
Leather car seats add a touch of luxury and comfort to your vehicle. However, they are susceptible to wear and tear, including cracks, scratches, and holes. Knowing How To Fix Leather In A Car can save you money and keep your interior looking its best. At CARDIAGTECH.NET, we offer a wide range of leather repair kits and tools to help you restore your car’s leather interior to its former glory. You’ll discover cost-effective DIY strategies and top-notch products to keep your leather seats in great condition, along with professional tips to get the best results and extend the life of your car’s leather.
1. Identifying Types of Leather Damage in Cars
Identifying the type of damage is the first step in learning how to fix leather in a car. Different types of damage require different repair methods. Here’s a breakdown of common leather damage types:
1.1. Scratches
Scratches are surface-level damages that can be caused by keys, pets, or everyday wear. They typically affect the top layer of the leather and can often be addressed with simple repair techniques.
1.2. Cracks
Cracks occur when the leather dries out and loses its elasticity. They often appear on areas that experience a lot of movement, such as the seat bolsters.
1.3. Stains
Stains can result from spills, dirt, or improper cleaning. Some stains are easier to remove than others, depending on the staining agent and how long it has been on the leather.
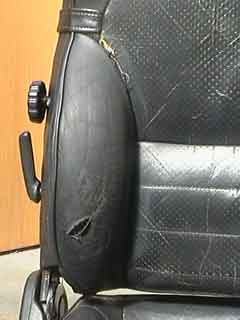
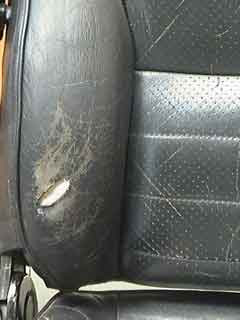
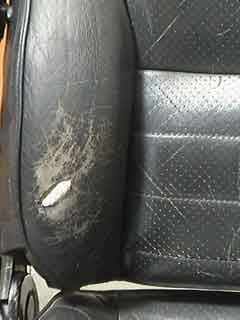
1.4. Holes and Tears
Holes and tears are more severe forms of damage that require patching and filling. These can be caused by sharp objects or significant wear and tear over time.
1.5. Fading
Fading occurs when the leather is exposed to sunlight over a prolonged period. The color can lighten or become uneven, affecting the overall appearance.
2. Essential Tools and Materials for Leather Repair
Before diving into the repair process, it’s essential to gather the necessary tools and materials. Having the right supplies on hand will make the job easier and ensure a professional-looking result.
2.1. Leather Repair Kit
A comprehensive leather repair kit is a must-have. At CARDIAGTECH.NET, our kits include essential items like:
- Leather cleaner
- Leather filler
- Colorant
- Leather sealant
- Applicators
- Mixing cups
2.2. Additional Tools
In addition to the kit, you may need these tools:
- Heat gun or hairdryer: To speed up drying times.
- Sandpaper (various grits): To smooth out rough edges.
- Scissors or a utility knife: To trim repair materials.
- Tweezers: For precise application of patches.
- Gloves: To protect your hands.
- Clean cloths: For wiping and cleaning surfaces.
2.3. Safety Gear
- Safety Glasses: Protect your eyes from splashes and debris.
- Gloves: Shield your hands from chemicals and adhesives.
- Respirator: Use when spraying colorants or sealants to avoid inhaling harmful fumes.
- Ventilation: Ensure the work area is well-ventilated to disperse fumes.
3. Step-by-Step Guide to Fixing Scratches on Car Leather
Scratches are a common issue in car leather. Here’s how to address them effectively:
3.1. Cleaning the Area
- Use a leather cleaner to remove dirt, grime, and oils from the scratched area.
- Apply the cleaner to a clean cloth and gently wipe the surface.
- Allow the area to dry completely.
3.2. Applying Leather Conditioner
- Apply a small amount of leather conditioner to a clean cloth.
- Gently rub the conditioner into the scratched area using circular motions.
- Allow the conditioner to penetrate the leather for about 10-15 minutes.
- Wipe off any excess conditioner with a clean cloth.
3.3. Using Leather Scratch Repair Products
- For deeper scratches, use a leather scratch repair product from CARDIAGTECH.NET.
- Apply a small amount of the repair product to the scratch using an applicator.
- Allow the product to dry according to the manufacturer’s instructions.
- If necessary, apply multiple thin layers for best results.
3.4. Blending and Finishing
- Once the repair product is dry, lightly buff the area with a soft cloth.
- Apply a leather sealant to protect the repaired area and blend it with the surrounding leather.
Leather Car Seat Scratch Repair
Alt text: Preparing a leather car seat for scratch repair by cleaning the surface with leather prep and an abrasive pad to remove grease and oils.
4. Repairing Cracks in Car Leather
Cracks in leather car seats can be unsightly and uncomfortable. Here’s how to repair them:
4.1. Cleaning and Preparing the Area
- Clean the cracked area with a leather cleaner to remove dirt and oils.
- Use a clean cloth to wipe the surface.
- Allow the area to dry completely.
4.2. Applying Leather Filler
- Use a flexible leather filler to fill the cracks. CARDIAGTECH.NET offers high-quality fillers designed for this purpose.
- Apply the filler using a palette knife or applicator, making sure to press it into the cracks.
- Remove any excess filler from the surface.
4.3. Smoothing and Sanding
- Allow the filler to dry completely, as per the product instructions.
- Use fine-grit sandpaper to gently smooth the filled area.
- Be careful not to damage the surrounding leather.
4.4. Coloring and Sealing
- Apply a leather colorant that matches the original color of your car seat.
- Use a sponge or airbrush for even application.
- Apply multiple thin coats, allowing each coat to dry before applying the next.
- Finish with a leather sealant to protect the repaired area.
5. Removing Stains from Leather Car Seats
Stains can be tricky, but with the right approach, you can remove them effectively:
5.1. Identifying the Stain
- Determine the type of stain (e.g., water-based, oil-based, ink).
- Different stains require different cleaning agents.
5.2. General Cleaning
- Start with a mild leather cleaner.
- Apply the cleaner to a clean cloth and gently blot the stain.
- Avoid rubbing, as this can spread the stain.
- Wipe away any excess cleaner with a clean, damp cloth.
5.3. Specific Stain Removal Techniques
- Ink Stains: Use rubbing alcohol on a cotton swab. Gently blot the stain, working from the outside in.
- Oil-Based Stains: Apply cornstarch or baking soda to the stain. Let it sit for several hours to absorb the oil, then vacuum it away.
- Water-Based Stains: Use a damp cloth to blot the stain. Dry the area with a clean, dry cloth.
5.4. Professional Cleaning Products
- For stubborn stains, use a professional leather stain remover from CARDIAGTECH.NET.
- Follow the product instructions carefully.
- Test the cleaner on an inconspicuous area first to ensure it doesn’t damage the leather.
6. Fixing Holes and Tears in Car Leather
Holes and tears require a more involved repair process:
6.1. Preparing the Area
- Clean the area around the hole or tear with a leather cleaner.
- Trim any loose or frayed edges with scissors or a utility knife.
6.2. Applying a Backing Patch
- Cut a piece of leather or canvas slightly larger than the hole or tear.
- Insert the patch under the leather, using tweezers to position it correctly.
- Apply leather glue to the edges of the patch to secure it to the underside of the leather.
 Applying a Leather Backing Patch
Alt text: Applying a leather repair sub-patch to provide a firm backing, using tweezers to insert it under the leather and leather glue to coat the underside edges.
6.3. Filling the Hole or Tear
- Apply leather filler in thin layers, allowing each layer to dry before applying the next.
- Use a palette knife to smooth the filler and ensure it is level with the surrounding leather.
- Apply at least 5-6 thin layers, allowing each layer to dry completely.
 Filling a Hole in Leather Car Seat
Alt text: Filling a hole in a leather car seat with heavy filler in thin layers, using a palette knife to apply and smooth the filler over the backing patch.
6.4. Sanding and Coloring
- Once the filler is dry, gently sand the area with fine-grit sandpaper.
- Apply a leather colorant to match the original color of your car seat.
- Use an airbrush for even application.
- Apply multiple thin coats, allowing each coat to dry before applying the next.
6.5. Sealing and Protecting
- Finish with a leather sealant to protect the repaired area and blend it with the surrounding leather.
- Allow the sealant to dry completely before using the seat.
7. Addressing Fading in Car Leather
Fading can make your car’s interior look old and worn. Here’s how to restore the color:
7.1. Cleaning the Leather
- Start by cleaning the faded area with a leather cleaner.
- This removes any dirt or oils that could interfere with the color restoration process.
7.2. Applying Leather Dye or Colorant
- Choose a leather dye or colorant that matches the original color of your car seat.
- Apply the dye or colorant with a sponge or airbrush, working in thin, even layers.
- Allow each layer to dry completely before applying the next.
7.3. Sealing and Conditioning
- After the dye or colorant is dry, apply a leather sealant to protect the color and prevent further fading.
- Finish with a leather conditioner to keep the leather soft and supple.
8. Maintenance Tips to Prevent Leather Damage
Prevention is always better than cure. Here are some tips to keep your car’s leather in top condition:
8.1. Regular Cleaning
- Clean your leather car seats regularly with a leather cleaner.
- This prevents dirt and grime from accumulating and causing damage.
8.2. Conditioning
- Apply a leather conditioner every few months to keep the leather soft and supple.
- Conditioning prevents the leather from drying out and cracking.
8.3. Sun Protection
- Park your car in the shade or use a sunshade to protect the leather from sunlight.
- Prolonged exposure to sunlight can cause fading and cracking.
8.4. Prompt Spill Clean-Up
- Clean up spills immediately to prevent staining.
- Use a clean cloth to blot the spill, working from the outside in.
8.5. Avoid Sharp Objects
- Be careful when placing sharp objects on the leather seats.
- Keys, tools, and other sharp items can easily scratch or tear the leather.
9. Advanced Leather Repair Techniques
For more severe damage, you may need to employ advanced repair techniques:
9.1. Replacing Leather Panels
- If a leather panel is severely damaged, consider replacing it.
- This involves removing the old panel and installing a new one.
- It’s best to have this done by a professional to ensure a seamless repair.
9.2. Professional Leather Restoration
- For extensive damage or complex repairs, consider hiring a professional leather restoration service.
- Professionals have the expertise and equipment to restore your leather car seats to their original condition.
10. Common Mistakes to Avoid When Fixing Car Leather
Avoiding common mistakes can save you time and money:
10.1. Using the Wrong Products
- Always use products specifically designed for leather.
- Household cleaners and other harsh chemicals can damage the leather.
10.2. Applying Too Much Product
- Apply products in thin, even layers.
- Applying too much product can lead to a sticky or uneven finish.
10.3. Skipping Preparation
- Proper preparation is essential for a successful repair.
- Always clean and prepare the area before applying any repair products.
10.4. Rushing the Process
- Allow each layer of product to dry completely before applying the next.
- Rushing the process can lead to poor results.
10.5. Neglecting Maintenance
- Regular maintenance is essential for keeping your leather car seats in top condition.
- Don’t neglect cleaning and conditioning.
11. Cost-Effective DIY Leather Repair Strategies
Fixing leather in a car doesn’t have to break the bank. Here are some cost-effective strategies:
11.1. DIY Cleaning Solutions
- Create your own mild cleaning solution using water and a small amount of dish soap.
- Test the solution on an inconspicuous area first to ensure it doesn’t damage the leather.
11.2. Purchasing Refurbished Tools
- Consider buying refurbished tools to save money.
- Many refurbished tools are in excellent condition and come with a warranty.
11.3. Focusing on Prevention
- Preventing damage is always cheaper than repairing it.
- Take steps to protect your leather car seats from scratches, stains, and sunlight.
11.4. Buying in Bulk
- If you frequently repair leather items, consider buying repair products in bulk.
- This can save you money in the long run.
12. Choosing the Right Leather Repair Kit for Your Car
Selecting the right leather repair kit is crucial for achieving the best results. Here’s what to consider:
12.1. Type of Damage
- Choose a kit that is designed for the type of damage you need to repair.
- Some kits are specifically for scratches, while others are for holes and tears.
12.2. Color Matching
- Ensure the kit includes a colorant that matches the original color of your car seat.
- Some kits allow you to mix colors to achieve a perfect match.
12.3. Kit Contents
- Check the kit contents to ensure it includes all the necessary tools and materials.
- A comprehensive kit will save you time and money.
12.4. Brand Reputation
- Choose a kit from a reputable brand with positive reviews.
- CARDIAGTECH.NET offers high-quality leather repair kits that are trusted by professionals and DIYers alike.
12.5. Budget
- Consider your budget when choosing a leather repair kit.
- There are kits available at various price points, so you can find one that fits your needs and budget.
13. Professional Leather Repair Services vs. DIY: Which Is Best?
Deciding between professional repair services and DIY depends on the extent of the damage and your skill level:
13.1. Cost Comparison
- DIY repairs are generally more cost-effective for minor damage.
- Professional services can be expensive, but they may be necessary for extensive damage.
13.2. Skill Level
- DIY repairs require some skill and patience.
- If you’re not comfortable working with tools and chemicals, it’s best to hire a professional.
13.3. Time Investment
- DIY repairs can be time-consuming.
- Professional services can save you time, but they may require scheduling an appointment.
13.4. Quality of Results
- Professional services typically offer higher-quality results.
- However, with the right tools and materials, you can achieve excellent results with DIY repairs.
13.5. Extent of Damage
- Minor scratches and stains can often be repaired with DIY methods.
- Extensive damage, such as large tears or fading, may require professional attention.
14. The Science Behind Leather Repair: Understanding Leather Structure and Chemistry
Understanding the structure and chemistry of leather can help you make informed repair decisions:
14.1. Leather Structure
- Leather is made from animal skin, which consists of three layers: the epidermis, the dermis, and the hypodermis.
- The dermis is the layer used to make leather.
14.2. Tanning Process
- The tanning process converts the raw animal skin into durable leather.
- Different tanning methods result in different types of leather.
14.3. Leather Chemistry
- Leather contains proteins, fats, and water.
- Over time, these components can break down, leading to damage.
14.4. Repair Product Chemistry
- Leather repair products are designed to replenish these components and restore the leather.
- Understanding the chemistry of these products can help you choose the right ones for your repair needs.
14.5. Environmental Factors
- Environmental factors, such as sunlight, humidity, and temperature, can affect the leather.
- Protecting the leather from these factors can prolong its life.
15. Eco-Friendly Leather Repair Options
For those concerned about the environment, there are eco-friendly leather repair options available:
15.1. Water-Based Products
- Choose water-based leather repair products that are low in VOCs (volatile organic compounds).
- These products are safer for the environment and your health.
15.2. Natural Cleaners
- Use natural cleaners, such as vinegar and water, to clean your leather car seats.
- Avoid harsh chemicals that can damage the leather and harm the environment.
15.3. Recycled Leather
- Consider using recycled leather patches for repairs.
- This reduces waste and conserves resources.
15.4. Sustainable Brands
- Support brands that are committed to sustainability.
- These brands often use eco-friendly materials and production methods.
15.5. Reducing Consumption
- Reduce your consumption of leather products by taking good care of your existing items.
- Regular cleaning and conditioning can prolong the life of your leather car seats.
16. Leather Care for Different Car Models: Specific Tips
Different car models may have different types of leather, requiring specific care tips:
16.1. Luxury Cars
- Luxury cars often use high-quality leather that requires gentle care.
- Use premium leather cleaners and conditioners.
16.2. Vintage Cars
- Vintage cars may have delicate leather that requires special attention.
- Avoid harsh chemicals and use gentle cleaning methods.
16.3. Sports Cars
- Sports cars often have leather seats that are subject to wear and tear.
- Regular cleaning and conditioning are essential.
16.4. Family Cars
- Family cars may have leather seats that are prone to spills and stains.
- Clean up spills immediately and use stain-resistant products.
16.5. Convertible Cars
- Convertible cars expose leather seats to sunlight and the elements.
- Use sunshades and protectants to prevent fading and cracking.
17. Leather Repair for Car Interiors: Seats, Steering Wheels, and Dashboards
Leather interiors extend beyond seats. Here’s how to care for different leather surfaces:
17.1. Seats
- Follow the repair and maintenance tips outlined above for leather car seats.
- Pay special attention to areas that experience a lot of wear and tear.
17.2. Steering Wheels
- Clean your leather steering wheel regularly to remove dirt and oils.
- Use a leather conditioner to keep the leather soft and supple.
17.3. Dashboards
- Protect your leather dashboard from sunlight to prevent fading and cracking.
- Use a leather protectant to shield the leather from UV rays.
17.4. Door Panels
- Clean your leather door panels regularly to remove dirt and grime.
- Use a leather cleaner and conditioner to keep the leather in good condition.
17.5. Consoles
- Clean your leather console regularly to remove spills and stains.
- Use a leather cleaner and protectant to keep the leather looking its best.
18. Optimizing Leather Repair for Different Climates
Climate can significantly impact leather. Here’s how to adjust your repair and maintenance routine:
18.1. Humid Climates
- In humid climates, leather can absorb moisture and become moldy.
- Use a leather cleaner with antifungal properties.
18.2. Dry Climates
- In dry climates, leather can dry out and crack.
- Condition the leather regularly to keep it hydrated.
18.3. Cold Climates
- In cold climates, leather can become stiff and brittle.
- Warm up the leather gradually before using it.
18.4. Hot Climates
- In hot climates, leather can fade and crack due to sunlight exposure.
- Use sunshades and protectants to shield the leather from UV rays.
18.5. Coastal Climates
- In coastal climates, leather can be exposed to salt and moisture.
- Clean the leather regularly to remove salt and prevent corrosion.
19. The Role of Technology in Modern Leather Repair
Technology is transforming leather repair. Here are some advancements to consider:
19.1. Color Matching Systems
- Advanced color matching systems can precisely match the color of your leather.
- This ensures a seamless repair.
19.2. Airbrush Technology
- Airbrush technology allows for even application of colorants and sealants.
- This results in a professional-looking finish.
19.3. 3D Printing
- 3D printing can be used to create custom leather patches for repairs.
- This allows for precise and durable repairs.
19.4. Laser Technology
- Laser technology can be used to remove scratches and imperfections from leather.
- This results in a smooth and flawless surface.
19.5. AI-Powered Diagnostics
- AI-powered diagnostics can analyze the condition of your leather and recommend the best repair methods.
- This ensures effective and targeted repairs.
20. Future Trends in Leather Car Seat Care and Repair
The future of leather car seat care and repair is evolving. Here are some trends to watch:
20.1. Self-Healing Leather
- Self-healing leather is being developed to automatically repair minor scratches and imperfections.
- This will reduce the need for frequent repairs.
20.2. Smart Leather
- Smart leather can monitor its own condition and alert you to potential problems.
- This will allow you to take proactive steps to prevent damage.
20.3. Sustainable Leather Alternatives
- Sustainable leather alternatives, such as plant-based leather, are becoming more popular.
- These materials are eco-friendly and durable.
20.4. Customized Repair Solutions
- Customized repair solutions will be tailored to your specific needs and preferences.
- This will ensure optimal results.
20.5. Remote Monitoring and Diagnostics
- Remote monitoring and diagnostics will allow professionals to assess the condition of your leather remotely.
- This will make it easier to get expert advice and assistance.
21. Sourcing High-Quality Leather Repair Products from CARDIAGTECH.NET
At CARDIAGTECH.NET, we understand the importance of using high-quality products for leather repair. That’s why we offer a wide range of leather repair kits, tools, and materials that are designed to deliver exceptional results.
21.1. Wide Selection of Products
- We offer a wide selection of leather repair products to meet your specific needs.
- Whether you need a scratch repair kit, a colorant, or a sealant, we have you covered.
21.2. High-Quality Materials
- Our products are made from high-quality materials that are designed to last.
- We source our materials from reputable suppliers to ensure optimal performance.
21.3. Expert Advice
- Our team of experts is available to provide you with advice and guidance on leather repair.
- We can help you choose the right products and techniques for your specific needs.
21.4. Competitive Prices
- We offer competitive prices on all of our leather repair products.
- We believe that everyone should have access to high-quality leather repair solutions.
21.5. Customer Satisfaction
- We are committed to customer satisfaction.
- If you’re not happy with your purchase, we’ll do everything we can to make it right.
Fixing leather in a car can be a rewarding and cost-effective way to maintain your vehicle’s interior. By following the tips and techniques outlined in this comprehensive guide, you can restore your leather car seats to their former glory and keep them looking their best for years to come.
Don’t let damaged leather diminish the appeal and comfort of your car. Take action today to restore your leather seats and keep them looking their best. Contact CARDIAGTECH.NET at 276 Reock St, City of Orange, NJ 07050, United States or reach out via WhatsApp at +1 (641) 206-8880 for expert advice and high-quality leather repair products. Our team is ready to assist you in finding the perfect solutions tailored to your specific needs, ensuring your car’s interior looks as good as new. Visit our website, CARDIAGTECH.NET, to explore our extensive range of leather repair kits and tools. Let us help you bring back the luxurious feel of your car’s leather interior.
Frequently Asked Questions (FAQs) About Leather Repair in Cars
FAQ 1: How do I identify the type of leather in my car?
Check your car’s manual or contact the manufacturer. Common types include aniline, semi-aniline, and protected leather.
FAQ 2: What is the best way to clean leather car seats?
Use a pH-balanced leather cleaner and a soft microfiber cloth. Avoid harsh chemicals.
FAQ 3: How often should I condition my leather car seats?
Every 3-6 months, or more often in dry climates, to prevent cracking.
FAQ 4: Can I use household cleaners on leather car seats?
No, household cleaners can damage leather. Use products specifically designed for leather.
FAQ 5: How do I remove ink stains from leather car seats?
Use rubbing alcohol on a cotton swab, gently blotting the stain from the outside in.
FAQ 6: What is the best way to repair a small tear in a leather car seat?
Use a leather repair kit with a backing patch and leather filler.
FAQ 7: How can I prevent my leather car seats from fading?
Park in the shade, use sunshades, and apply a leather protectant with UV protection.
FAQ 8: Is it worth hiring a professional for leather repair?
For extensive damage or complex repairs, yes. For minor issues, DIY kits can be effective.
FAQ 9: What are the signs that my leather car seats need professional repair?
Large tears, extensive fading, or deep cracks indicate the need for professional help.
FAQ 10: How do I maintain the leather on my steering wheel?
Clean it regularly with a leather cleaner and condition it to prevent drying and cracking.
