How To Fix Falling Car Roof Lining: A Comprehensive Guide

Is your car’s roof lining drooping, detracting from its appearance and potentially indicating deeper issues? This comprehensive guide from CARDIAGTECH.NET explores proven methods for restoring your car’s headliner without the hassle of complete removal. Discover cost-effective solutions and preventative measures to maintain a pristine interior. Learn about headliner repair, roof upholstery fixes, and interior car care to keep your vehicle looking its best.
1. Understanding the Car Headliner
A car headliner, also known as roof lining, is the fabric attached to the interior roof. It provides a smooth, finished look, reduces noise, and helps regulate temperature by insulating against heat and cold. Typically made of layers including foam (often polyurethane) attached to a headliner board, it enhances the vehicle’s aesthetic and comfort.
Beyond aesthetics, the headliner offers functional benefits. It insulates the cabin, reducing heat buildup in sunny conditions and minimizing wind noise, particularly at high speeds. This insulation also improves the acoustics, enhancing the performance of customized audio systems.
Car headliner is a fabric that is secured to the roof framing
2. Common Causes of a Sagging Headliner
A sagging headliner can significantly impact your car’s interior. Over time, the adhesive weakens, causing the fabric to separate from the backing board. Understanding the causes is crucial for effective repair and prevention.
Several factors contribute to this issue:
- Heat and Sunlight: Prolonged exposure to extreme heat can melt the adhesive, causing the fabric to loosen and sag.
- Moisture: Humidity and leaks can penetrate the headliner, leading to foam deterioration and loss of shape, resulting in warping and sagging.
- Poor Installation: Inadequate glue or improper techniques during the initial installation can cause premature sagging.
- Waterproofing Issues: Some vehicles have poor waterproofing, allowing water to damage the adhesive.
- Physical Strain: Children or pets can pull or scratch the headliner, accelerating its deterioration.
3. Economical Solutions: How to Fix Falling Car Roof Lining Without Removing It
Replacing the entire headliner can be expensive, especially for older vehicles. Thankfully, several cost-effective methods can restore your headliner without complete removal.
Here are some popular techniques:
3.1. Applying Adhesive Glue
Using adhesive is a straightforward way to repair a partially sagging headliner, particularly around edges or corners.
To achieve the best results:
- Select a Specialized Adhesive: Ordinary glue won’t suffice. Use a headlining adhesive spray for even distribution. CARDIAGTECH.NET recommends high-temperature-resistant adhesives.
- Prepare the Area: Clean the sagging area to remove dust and debris.
- Spray the Adhesive: Apply the adhesive to both the fabric and the backing board.
- Reattach the Fabric: Gently press the fabric back into place, ensuring a smooth, wrinkle-free finish.
- Allow Drying Time: Let the adhesive dry completely, following the manufacturer’s instructions.
This method is ideal for minor sagging issues. For more extensive damage, consider other approaches.
3.2. Using Twist Pins
Twist pins, also known as saggy stoppers, are a simple, inexpensive solution for securing a sagging headliner.
Here’s how to use them:
- Purchase Twist Pins: These are available at most automotive supply stores or online at CARDIAGTECH.NET.
- Position the Fabric: Gently push the sagging fabric back into place.
- Insert the Pins: Insert the twist pins through the fabric and into the headliner board.
- Twist to Secure: Twist the pins to secure the fabric.
- Space Evenly: Space the pins evenly across the sagging area for uniform support.
Twist pins are a practical solution for larger sagging areas. They are easy to install and minimize damage to the headliner.
3.3. Utilizing Sequin Pins
Sequin pins offer another quick, cost-effective fix for a sagging headliner.
Follow these steps:
- Gather Supplies: You’ll need sequin pins and a steady hand.
- Position the Fabric: Gently push the sagging fabric back into place.
- Insert the Pins: Push the pins through the fabric into the foam backing board.
- Arrange in a Pattern: Arrange the pins in a visually appealing pattern for a neat look.
Sequin pins are suitable for smaller areas and can add a decorative touch while securing the fabric.
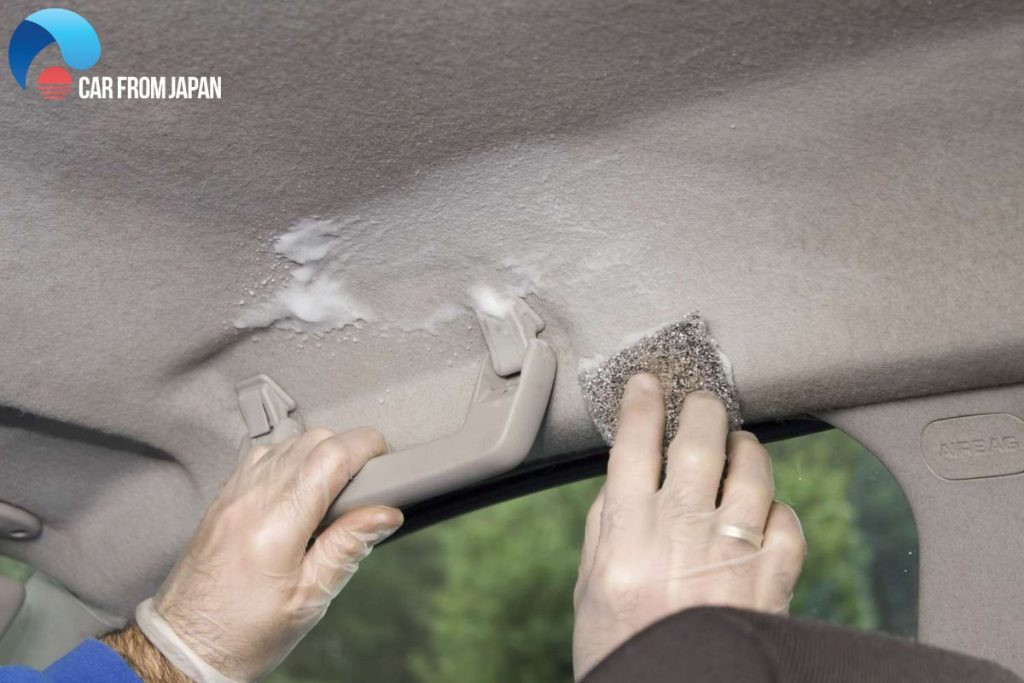
3.4. Employing Steam Cleaner and Paint Roller
The combination of a steam cleaner and paint roller can effectively reattach the headliner fabric, particularly around the edges.
Here’s the process:
- Steam the Area: Use a steam cleaner to gently heat the adhesive and soften the fabric. CARDIAGTECH.NET offers a range of steam cleaners suitable for automotive use.
- Roll the Fabric: Use a paint roller to smooth the fabric back into place, ensuring even contact and eliminating creases.
- Apply Even Pressure: Apply steady, even pressure to secure the fabric to the backing board.
- Allow to Dry: Let the area dry completely, allowing the adhesive to re-bond.
This method works best when the fabric is sagging around the edges. Ensure you have a high-quality steam cleaner to avoid damaging the headliner.
 How to fix sagging headliner
4. Comprehensive Guide: Step-by-Step Repair Process
For a more detailed approach, follow this step-by-step guide to fix your sagging headliner:
4.1. Assessment and Preparation
Before starting any repair, assess the extent of the damage and gather the necessary tools and materials.
- Evaluate the Damage: Identify the areas where the headliner is sagging.
- Gather Supplies: You’ll need headliner adhesive, twist pins or sequin pins, a steam cleaner (optional), a paint roller, a clean cloth, and safety glasses. CARDIAGTECH.NET offers complete repair kits for your convenience.
- Protect the Interior: Cover seats and other interior surfaces to protect them from adhesive or debris.
- Ensure Ventilation: Work in a well-ventilated area to avoid inhaling adhesive fumes.
4.2. Cleaning the Sagging Area
Cleaning the area is essential for ensuring proper adhesion.
- Remove Debris: Use a soft brush or vacuum to remove any loose debris or dirt from the sagging area.
- Wipe Clean: Wipe the area with a clean cloth dampened with mild detergent.
- Dry Thoroughly: Allow the area to dry completely before proceeding.
4.3. Applying the Adhesive (Detailed Instructions)
Applying adhesive correctly is crucial for a lasting repair.
- Spray Adhesive: Apply an even coat of headliner adhesive to both the fabric and the backing board.
- Allow Tacking Time: Let the adhesive tack for a few minutes, as directed by the manufacturer.
- Reattach Fabric: Carefully press the fabric back into place, working from the center outwards to avoid wrinkles.
- Smooth Out Wrinkles: Use a clean cloth or paint roller to smooth out any wrinkles or bubbles.
- Secure Edges: Pay special attention to the edges, ensuring they are securely attached.
4.4. Using Twist Pins or Sequin Pins (Detailed Instructions)
If using twist pins or sequin pins, follow these steps:
- Position Fabric: Gently push the sagging fabric back into place.
- Insert Pins: Insert the pins through the fabric and into the headliner board.
- Space Evenly: Space the pins evenly across the sagging area for uniform support.
- Adjust as Needed: Adjust the pins as needed to ensure the fabric is taut and smooth.
4.5. Using Steam Cleaner and Paint Roller (Detailed Instructions)
For steam cleaning and rolling, follow these steps:
- Steam the Area: Use a steam cleaner to gently heat the adhesive and soften the fabric.
- Roll the Fabric: Use a paint roller to smooth the fabric back into place, ensuring even contact and eliminating creases.
- Apply Even Pressure: Apply steady, even pressure to secure the fabric to the backing board.
- Allow to Dry: Let the area dry completely, allowing the adhesive to re-bond.
4.6. Final Inspection and Touch-Ups
After the repair, conduct a final inspection to ensure the headliner is securely attached.
- Check for Sagging: Inspect the repaired area for any remaining sagging or wrinkles.
- Apply Touch-Ups: Apply additional adhesive or pins as needed to address any problem areas.
- Clean Up: Remove any excess adhesive or debris from the interior.
5. Preventing Headliner Sagging: Proactive Measures
Preventing headliner sagging can save you time and money in the long run. Here are some effective tips:
- Park in the Shade: Avoid parking in direct sunlight to minimize heat exposure.
- Use Sunshades: Use sunshades to reflect sunlight and reduce heat buildup inside the car.
- Regularly Check Seals: Ensure that rubber seals are intact to prevent water leaks.
- Control Interior Climate: Use air conditioning to regulate the interior temperature and reduce humidity.
- Gentle Cleaning: When cleaning the headliner, use a gentle touch and avoid excessive pressure.
6. Choosing the Right Tools: Recommendations from CARDIAGTECH.NET
Selecting the right tools is essential for an effective headliner repair. CARDIAGTECH.NET offers a range of high-quality tools and materials to meet your needs.
Here are some recommended products:
| Tool/Material | Description | Benefits |
|---|---|---|
| Headliner Adhesive Spray | High-temperature-resistant adhesive spray designed specifically for headliners. | Provides a strong, durable bond that withstands extreme temperatures. |
| Twist Pins (Saggy Stoppers) | Clear-headed pins designed to secure sagging headliners without damaging the fabric. | Easy to install, inexpensive, and effective for securing large areas of sagging fabric. |
| Sequin Pins | Small, decorative pins that can be used to secure smaller areas of sagging fabric. | Adds a decorative touch while providing support. |
| Car Steam Cleaner | Portable steam cleaner designed for automotive use. | Effectively loosens adhesive and softens fabric for reattachment. |
| Paint Roller | Soft paint roller for smoothing fabric and ensuring even contact with the backing board. | Ensures a smooth, wrinkle-free finish. |
| Headliner Repair Kit | Complete kit containing all the necessary tools and materials for headliner repair. | Convenient and cost-effective, providing everything you need in one package. |
| Trim Removal Tools | Set of tools designed to safely remove interior trim panels without causing damage. | Essential for accessing the headliner and ensuring a clean repair. |
| Protective Covers | Seat covers and floor mats to protect the interior from adhesive and debris. | Prevents damage to other interior surfaces during the repair process. |
7. Understanding the Costs: Replacement vs. Repair
Deciding whether to repair or replace your car’s headliner depends on the extent of the damage and your budget.
7.1. Cost of Replacement
Replacing a headliner can be costly, with prices ranging from $300 to $1,000 or more, depending on the vehicle model and complexity. Luxury vehicles with intricate designs and high-quality materials can cost even more.
7.2. Cost of Repair
Repairing a sagging headliner is typically much cheaper, especially if you do it yourself. The cost of materials like adhesive, pins, and cleaning supplies can range from $20 to $100. Even if you hire a professional, the labor costs are usually lower than a full replacement.
7.3. Cost Comparison Table
| Vehicle Type | Replacement Cost | Repair Cost (DIY) | Repair Cost (Professional) |
|---|---|---|---|
| Sedan/Hatchback/Coupe | $300 – $750 | $20 – $50 | $150 – $400 |
| SUV/Crossover | $500 – $900 | $30 – $70 | $250 – $500 |
| Luxury Vehicle | $1,000 – $6,000 | $50 – $100 | $500 – $1,500 |
Choosing to repair your headliner can save you a significant amount of money while still restoring your car’s interior.
8. Professional Assistance: When to Seek Expert Help
While DIY repairs are often effective, certain situations warrant professional assistance.
Consider seeking expert help if:
- The sagging is extensive and covers a large area.
- The headliner is severely damaged or torn.
- You are not comfortable performing the repair yourself.
- You lack the necessary tools or experience.
Hiring a professional ensures a high-quality repair and can prevent further damage to your vehicle’s interior. CARDIAGTECH.NET can connect you with trusted automotive professionals in your area. Contact us at +1 (641) 206-8880 for expert advice and recommendations.
9. Addressing Common Concerns: FAQs
Here are some frequently asked questions about sagging headliners:
9.1. How do I know if my ceiling is sagging?
Signs of a sagging car ceiling include:
- A cracking sound when the car shakes or when slamming doors.
- Drooping plasterboard sheeting or cornice.
- Visible cracking.
- Tiny circles or blisters forming as lines produced by nails or screws.
9.2. Is it okay to fix the headliner sagging myself?
Yes, you can fix many minor headliner issues yourself. DIY kits are readily available and can save you money.
9.3. Can I paint a headliner?
Painting a headliner is not recommended. Paint can crack and peel due to temperature changes and may not adhere properly to the fabric.
9.4. Does car insurance cover the cost of car headliner replacement?
Most standard car insurance policies do not cover headliner replacement due to wear and tear.
9.5. What are the best products for cleaning a car headliner?
Use a mild detergent and a soft cloth to gently clean the headliner. Avoid harsh chemicals or abrasive cleaners.
9.6. How often should I clean my car headliner?
Clean your car headliner every 3-6 months, or as needed, to remove dust and stains.
9.7. Can humidity cause a headliner to sag?
Yes, humidity can seep into the headliner, causing the foam backing to deteriorate and the fabric to sag.
9.8. Are there any preventative products I can use?
Consider using fabric protectors to repel moisture and stains. Regularly inspect and maintain your car’s seals to prevent water leaks.
9.9. What if the headliner board is damaged?
If the headliner board is damaged, you may need to replace it along with the fabric.
9.10. How can CARDIAGTECH.NET help me with my car headliner issues?
CARDIAGTECH.NET offers a wide range of tools, materials, and expert advice to help you repair or replace your car headliner. Contact us at +1 (641) 206-8880 for personalized assistance.
10. Maintaining Your Car’s Interior: Tips and Tricks
Maintaining your car’s interior is crucial for preserving its value and comfort. Here are some additional tips:
- Regular Vacuuming: Vacuum the interior regularly to remove dust, dirt, and debris.
- Use Protective Mats: Use floor mats to protect the carpets from dirt and stains.
- Clean Spills Immediately: Clean spills immediately to prevent staining.
- Condition Leather Seats: Condition leather seats regularly to keep them supple and prevent cracking.
- Protect Dashboard: Use a dashboard protectant to shield it from UV damage.
By following these tips, you can keep your car’s interior looking its best for years to come.
11. Conclusion: Restore Your Car’s Interior Today
A sagging headliner can detract from your car’s appearance and value, but with the right tools and techniques, you can restore it to its former glory. Whether you choose to repair it yourself or seek professional assistance, CARDIAGTECH.NET is here to help.
Don’t let a sagging headliner ruin your driving experience. Contact CARDIAGTECH.NET today at +1 (641) 206-8880 or visit our website at CARDIAGTECH.NET for all your automotive repair needs. Our team is ready to assist you with expert advice, high-quality products, and exceptional customer service. Restore your car’s interior and enjoy a comfortable, stylish ride.
Ready to take action? Contact CARDIAGTECH.NET now for a consultation and discover how we can help you fix your sagging car roof lining! Call us at +1 (641) 206-8880 or visit our store at 276 Reock St, City of Orange, NJ 07050, United States. Let us help you restore your car’s interior today!