How to Fix Emblem on Car: A Comprehensive Guide

Fixing an emblem on your car can significantly enhance its appearance and reflect your personal style. At CARDIAGTECH.NET, we understand the importance of maintaining your vehicle’s aesthetics. This guide provides step-by-step instructions on emblem removal, adhesive removal, rebadging, and cleaning, ensuring a professional finish every time. Enhance your car’s look with our expert tips, ensuring a lasting impression. Need tools for the job? Contact us at +1 (641) 206-8880. Learn about auto emblem repair, car badge replacement, and automotive logo installation.
1. Understanding Car Emblem Removal Techniques
Removing car emblems safely is crucial to avoid damaging the vehicle’s surface. There are several methods to accomplish this task, each with its own set of advantages and disadvantages. When rebadging, use masking tape around the emblem to keep the spacing right and keep all the pieces. Whether you’re a seasoned mechanic or a DIY enthusiast, understanding these methods will ensure a clean and damage-free removal.
1.1. The Gentle Floss Method for Emblem Removal
The floss method is a safe and effective way to remove car emblems, although it may require some patience. This technique minimizes the risk of damaging the vehicle’s paint.
Step-by-Step Guide:
- Steam the Emblem: Place a container of hot (not boiling) water near the emblem to loosen the adhesive. Carefully pour the water over the emblem, allowing it to penetrate the gap between the emblem and the car’s surface.
- Use Floss or String: Take a piece of floss, string, or cheese wire and gently slide it between the emblem and the car’s surface.
- Work Through the Adhesive: Use a side-to-side motion to work your way through the adhesive, gradually separating the emblem from the vehicle. To speed up the process, dip the floss or string in an adhesive remover.
- Remove Residue: Use a plastic scraper to gently remove any remaining adhesive.
Close up of an emblem removal using floss
1.2. Heat Method for Efficient Emblem Removal
The heat method is quicker but requires careful handling to prevent paint damage. Applying heat softens the adhesive, making it easier to remove the emblem.
Important Note: If not done carefully, this method can damage the paint and deeper layers of the surface of the car. It melts the glue with heat, similar to the way it was done before.
Step-by-Step Guide:
- Apply Heat: Use a heat gun on its lowest setting and apply it over the emblem.
- Loosen the Emblem: Once the emblem is heated thoroughly, use a putty knife or floss to gently loosen it from the car’s surface.
- Proceed with Caution: Avoid excessive heat, as it can melt paint layers. If unsure, start with the floss method.
Comparative Analysis:
| Method | Speed | Safety | Complexity | Tools Required |
|---|---|---|---|---|
| Floss | Moderate | High | Moderate | Floss, hot water, adhesive remover, plastic scraper |
| Heat Gun | Fast | Moderate | Moderate | Heat gun, putty knife or floss |
2. Selecting the Right Adhesive Remover for Car Emblems
Choosing the correct adhesive remover is essential to ensure the vehicle’s surface remains undamaged. The goal is to remove the glue without harming the paint.
2.1. Safe Removal of Adhesive with JTAPE Clear Logo Tape
Using heat and cheese wire is the best way to get rid of our JTAPE Clear Logo Tape. After that, use a low-grit orbital sanding tool to sand off the remaining glue. This makes sure that you only get rid of the extra foam that’s still on the car’s surface and doesn’t hurt the paint job.
2.2. Applying Adhesive Removal Solutions Effectively
Adhesive removal solutions can be used to gently loosen any remaining adhesive. Here’s how to apply them properly:
Step-by-Step Guide:
- Apply Solution: Dip a cloth in an adhesive removal solution.
- Rub Gently: Apply the solution in circular motions using gentle pressure.
- Inspect the Surface: Ensure all adhesive residue is removed without damaging the paint.
Recommended Adhesive Removal Solutions:
| Solution Type | Key Ingredients | Benefits | Drawbacks |
|---|---|---|---|
| Commercial Removers | Citrus-based solvents | Effective, readily available | Can be harsh on some paint finishes |
| Isopropyl Alcohol | Alcohol | Mild, safe for most surfaces | May require more effort for stubborn residue |
| WD-40 | Petroleum-based | Lubricates and loosens adhesive | Can leave an oily residue |
3. How to Prepare a Car for Rebadging Properly
Preparing the car for rebadging is a critical step in ensuring the new emblem adheres correctly and looks seamless. This involves cleaning and prepping the surface to remove any lingering residue.
3.1. Cleaning the Surface with Panel Wipe
Using a panel wipe is the first and most crucial step. This not only removes any stubborn glue residue but also ensures the area is clean and free from dust, dirt, or debris.
Step-by-Step Guide:
- Apply Panel Wipe: Use a clean, lint-free cloth to apply the panel wipe to the area where the emblem will be placed.
- Wipe Thoroughly: Ensure the surface is completely clean and dry before proceeding.
3.2. Ensuring a Clean Surface for Emblem Application
Applying the emblem to a clean surface is essential. Dirt or debris trapped under the adhesive can cause premature lifting and affect the overall appearance.
Additional Tips:
- Use a clay bar to remove any embedded contaminants.
- Apply a wax or sealant to protect the paint.
- Ensure the surface is completely dry before applying the new emblem.
4. Step-by-Step Guide to Rebadging a Car
Rebadging a car involves carefully attaching a new emblem to the vehicle. This process requires precision to ensure the emblem is correctly aligned and securely fastened.
4.1. Utilizing JTAPE Clear Logo Tape for Easy Rebadging
Our JTAPE Clear Logo Tape simplifies the rebadging process, ensuring perfect application every time. This innovative tape solution makes mounting car emblems straightforward.
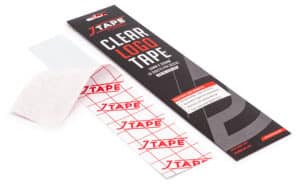 JTAPE clear logo tape
Step-by-Step Guide:
- Expose the Adhesive: Peel away the printed liner to expose the adhesive.
- Apply to Badge: Apply the back of the badge to the adhesive side.
- Apply Pressure: Turn it over and apply pressure to the printed liner side. The badge should be sandwiched between the two layers.
- Peel Away Printed Layer: Peel away the printed layer and carefully remove the badge from the adhesive side, ensuring it stays attached to the guide tape.
- Place on Car: Place the emblem on the surface of the car using the guide masking tape to help with achieving the correct placement.
- Secure in Place: Apply pressure to the badge to secure it in place before removing the guide tape.
4.2. Traditional Method for Rebadging with Adhesive
If you don’t have JTAPE Clear Logo Tape, you can use automotive-grade adhesive for rebadging.
Step-by-Step Guide:
- Apply Adhesive: Apply a thin, even layer of automotive-grade adhesive to the back of the emblem.
- Position the Emblem: Carefully position the emblem on the car, using the masking tape as a guide.
- Apply Pressure: Apply firm, even pressure to the emblem for several minutes to ensure a strong bond.
- Allow to Cure: Allow the adhesive to cure for the recommended time, usually 24-48 hours.
Best Practices for Rebadging:
- Work in a clean, well-lit environment.
- Use masking tape to mark the exact position of the old emblem before removal.
- Apply even pressure to ensure a strong bond.
- Avoid washing the car for at least 24 hours after rebadging.
5. How to Clean Car Emblems for Long-Lasting Appearance
Cleaning car emblems is essential for maintaining their appearance over time. Proper cleaning and polishing can prevent damage and keep them looking new.
5.1. Best Practices for Cleaning Car Emblems
Whether you’ve installed new emblems or want to revive the original ones, understanding how to clean emblems can significantly prolong their high-quality appearance.
Key Considerations:
- Adhesive Setting Time: Allow the adhesive to set for about 24 hours before cleaning, ensuring the surfaces are fully bonded.
- UV Protection: Apply UV protection to the emblems, as they are constantly exposed to UV rays.
- Wax and Polish: Use a high-quality wax and polish to protect the emblem from pitting or chipping.
5.2. Avoiding Pressure Washing Around Emblems
Avoid pressure washing these areas, as it can reduce the effectiveness of the adhesive. Hand washing around badges and decals increases their durability and longevity.
Recommended Cleaning Supplies:
| Supply | Purpose | Benefits |
|---|---|---|
| Microfiber Cloths | Gentle cleaning and polishing | Prevents scratches, effective at removing dirt and grime |
| Car Wash Soap | Cleaning without damaging the finish | Formulated to be gentle on car paint, removes dirt effectively |
| Detailing Brushes | Cleaning tight spots and intricate designs | Allows precise cleaning, prevents damage to delicate areas |
| Wax and Polish | Protecting and enhancing the emblem’s appearance | Adds a layer of protection, restores shine |
6. Advanced Tips for Emblem Maintenance
Maintaining car emblems involves more than just cleaning; it requires regular inspection and proactive care to prevent damage and wear.
6.1. Regular Inspection for Damage and Wear
Regularly inspect emblems for signs of damage, such as cracks, chips, or fading. Addressing these issues early can prevent further deterioration.
Checklist for Inspection:
- Cracks and Chips: Look for any physical damage that could compromise the emblem’s integrity.
- Fading: Check for discoloration, which can be caused by UV exposure.
- Loose Adhesion: Ensure the emblem is securely attached to the car.
6.2. Protecting Emblems from Environmental Factors
Protecting emblems from environmental factors such as UV rays, road salt, and extreme temperatures is crucial for their longevity.
Protection Strategies:
- UV Protection: Apply a UV-resistant coating to prevent fading and discoloration.
- Protective Coatings: Use ceramic coatings or paint sealants to protect against road salt and other contaminants.
- Regular Washing: Wash the car regularly to remove dirt and grime that can damage the emblems.
7. Troubleshooting Common Emblem Problems
Even with careful maintenance, car emblems can sometimes encounter problems. Knowing how to troubleshoot these issues can save time and money.
7.1. Addressing Loose or Detached Emblems
If an emblem becomes loose or detached, it’s important to address the issue promptly to prevent further damage or loss.
Troubleshooting Steps:
- Clean the Area: Clean both the emblem and the car’s surface to remove any dirt or debris.
- Reapply Adhesive: Apply a fresh layer of automotive-grade adhesive to the back of the emblem.
- Secure in Place: Press the emblem firmly onto the car, using masking tape to hold it in place while the adhesive cures.
7.2. Repairing Damaged or Faded Emblems
Damaged or faded emblems can detract from the car’s appearance. Repairing or replacing them can restore the vehicle’s aesthetic appeal.
Repair Options:
- Touch-Up Paint: Use touch-up paint to repair minor chips and scratches.
- Polishing: Polish faded emblems to restore their shine.
- Replacement: If the damage is severe, consider replacing the emblem entirely.
8. The Importance of Using Quality Products
Using high-quality products is essential for ensuring the longevity and appearance of car emblems. Investing in quality adhesives, cleaning solutions, and protective coatings can make a significant difference.
8.1. Selecting the Right Adhesives
Choosing the right adhesive is crucial for ensuring a strong and durable bond. Automotive-grade adhesives are specifically formulated to withstand the harsh conditions of the road.
Key Features of Quality Adhesives:
- Weather Resistance: Ability to withstand extreme temperatures and moisture.
- UV Resistance: Protection against fading and discoloration.
- Strong Bond: Ensures the emblem stays securely attached to the car.
8.2. Choosing Effective Cleaning Solutions
Effective cleaning solutions are gentle on the emblem’s finish while effectively removing dirt and grime. Avoid using harsh chemicals that can damage the surface.
Recommended Cleaning Solutions:
- Car Wash Soap: Gentle and effective for removing dirt and grime.
- Detailing Sprays: Provide a quick and easy way to clean and protect emblems.
- Adhesive Removers: Specifically formulated to remove adhesive residue without damaging the paint.
9. DIY vs. Professional Emblem Services
Deciding whether to fix emblems yourself or hire a professional depends on your skills, tools, and the complexity of the job.
9.1. Assessing Your Skills and Resources
Before attempting to fix emblems yourself, assess your skills and resources. Do you have the necessary tools and experience to complete the job successfully?
Considerations:
- Skill Level: Are you comfortable working with tools and adhesives?
- Tools: Do you have the necessary tools, such as a heat gun, floss, and adhesive remover?
- Time: Do you have the time to complete the job properly?
9.2. When to Hire a Professional
If you’re unsure about any aspect of the process, it’s best to hire a professional. Professional emblem services can ensure a high-quality finish and prevent costly mistakes.
Reasons to Hire a Professional:
- Complex Repairs: If the emblem is severely damaged or requires specialized tools.
- Lack of Experience: If you’re not comfortable working with tools and adhesives.
- Time Constraints: If you don’t have the time to complete the job yourself.
10. Where to Buy High-Quality Emblem Repair Tools
Finding the right tools and products is essential for successfully fixing car emblems. CARDIAGTECH.NET offers a wide range of high-quality tools and solutions to meet your needs.
10.1. Exploring CARDIAGTECH.NET for Your Needs
CARDIAGTECH.NET is your one-stop shop for all your emblem repair needs. We offer a wide selection of tools, adhesives, and cleaning solutions to help you achieve a professional finish.
Featured Products:
- JTAPE Clear Logo Tape: Simplifies the rebadging process for perfect application.
- Automotive-Grade Adhesives: Ensures a strong and durable bond.
- Detailing Sprays: Provides a quick and easy way to clean and protect emblems.
10.2. Contacting CARDIAGTECH.NET for Expert Advice
If you’re unsure about which products are right for your needs, contact CARDIAGTECH.NET for expert advice. Our knowledgeable staff can help you choose the right tools and solutions for your specific situation.
Contact Information:
- Address: 276 Reock St, City of Orange, NJ 07050, United States
- WhatsApp: +1 (641) 206-8880
- Website: CARDIAGTECH.NET
FAQ: How to Fix Emblem on Car
-
What is the best way to remove a car emblem without damaging the paint?
The floss method is generally the safest. Use floss or string to gently work through the adhesive after applying some heat.
-
Can I use a hairdryer instead of a heat gun to remove an emblem?
Yes, a hairdryer can be used, but it will take longer. A heat gun is more efficient but requires more caution to avoid overheating the paint.
-
What type of adhesive should I use to reattach a car emblem?
Use automotive-grade adhesive, which is designed to withstand weather and temperature changes.
-
How long should I wait before washing my car after reattaching an emblem?
Wait at least 24-48 hours to allow the adhesive to fully cure before washing your car.
-
Can I reuse an old emblem after removing it from my car?
Yes, but you will need to remove the old adhesive and apply new adhesive before reattaching it. Ensure the emblem is clean and undamaged.
-
What is JTAPE Clear Logo Tape, and how does it help with rebadging?
JTAPE Clear Logo Tape is a specialized tape that simplifies the rebadging process by providing a clear, adhesive layer for easy and precise emblem placement.
-
How do I clean adhesive residue off my car’s paint without damaging it?
Use an adhesive remover specifically designed for automotive paint. Apply it gently with a microfiber cloth and avoid harsh scrubbing.
-
Is it better to have a professional remove and reattach car emblems?
If you are not comfortable with the process or lack the necessary tools, hiring a professional is recommended to avoid damaging your car’s paint or improperly attaching the emblem.
-
What are the signs that my car emblem needs to be replaced?
Signs include fading, cracking, chipping, or if the emblem is loose and cannot be securely reattached.
-
How can I protect my car emblems from fading in the sun?
Apply a UV-resistant coating or wax specifically designed for automotive emblems. Regular cleaning and maintenance can also help prevent fading.
Fixing an emblem on your car can be a rewarding DIY project or a task best left to professionals. At CARDIAGTECH.NET, we provide the tools, products, and expertise to help you achieve the best possible results. Whether you’re removing, replacing, or simply maintaining your car emblems, our comprehensive guide and high-quality products ensure a seamless and professional finish. Contact us today at +1 (641) 206-8880 or visit CARDIAGTECH.NET to discover how we can assist you in enhancing your vehicle’s appearance. Get emblem installation tips, learn about car badge maintenance, and find automotive logo repair services.