How To Fix Dent On Hood Of Car: A Complete Guide
Fixing a dent on the hood of your car can restore its appearance and prevent further damage. CARDIAGTECH.NET offers solutions for both professional repairs and DIY enthusiasts looking to tackle the job themselves. Learn effective techniques, explore paintless dent repair, and discover how to protect your vehicle with preventative measures, ensuring your car looks its best with proper auto body repair.
1. Understanding How Car Hoods Get Dented
Car hoods are particularly susceptible to dents due to their large, flat surface. Various incidents can lead to these unsightly imperfections.
- Falling Objects: Items stored improperly in garages, such as ladders or sports equipment, can fall onto the hood.
- Tree Limbs: Overhanging tree branches, especially during storms, can scratch or dent the hood.
- Animals: Cats or other animals walking or jumping on the hood can cause minor dents or scratches.
- Hail Damage: Severe weather, especially hail storms, can cause numerous small dents across the hood’s surface. According to the National Weather Service, hail causes over $1 billion in damage annually in the United States.
- Minor Collisions: Even a slight impact, such as bumping into a pole or another vehicle, can dent the hood.
- Sitting or Leaning: People sitting or leaning on the hood can cause dents, especially if the hood is older or made of thinner metal.
 Car hood dented by hail
2. Effective Strategies for Preventing Hood Damage
Preventing damage to your car’s hood is crucial for maintaining its appearance and value. Here are some proactive measures you can take:
- Avoid Resting Objects on the Hood: Refrain from placing any items, including groceries, coffee cups, or personal belongings, on the hood. The weight and potential for scratches can lead to dents and paint damage.
- Use a Protective Cover: A car cover can shield the hood from environmental hazards like tree sap, bird droppings, and UV rays, which can damage the paint. It also provides a barrier against minor impacts from debris.
- Park Inside a Garage: Parking your car in a garage protects it from weather-related damage, falling objects, and animal interference.
- Securely Store Nearby Items: Ensure that items stored in your garage, such as tools, sports equipment, and ladders, are securely stored to prevent them from falling onto the hood.
- Install a Carport: If a garage isn’t available, consider installing a carport to provide overhead protection from the elements.
- Apply a Paint Protection Film (PPF): PPF is a transparent film applied to the hood to protect against scratches, chips, and stains. It’s a durable option that can significantly reduce the risk of damage.
- Regular Washing and Waxing: Regularly washing and waxing your car helps maintain the paint’s integrity, making it more resistant to minor scratches and environmental damage. According to the International Carwash Association, regular car washing can extend the life of your car’s paint job.
- Be Mindful of Surroundings: When parking in public areas, be mindful of potential hazards such as shopping carts, other vehicles, and overhead objects.
3. Understanding Problems Caused by Dented Car Hoods
Addressing dents on your car hood promptly is essential for preventing further issues and maintaining your vehicle’s overall condition.
- Aesthetic Issues: Dents detract from the vehicle’s appearance, reducing its resale value and curb appeal.
- Rust Formation: Dents can compromise the paint’s protective layer, exposing the metal underneath to moisture and air, leading to rust. Rust can spread and cause significant structural damage if left untreated. According to the National Association of Corrosion Engineers (NACE), corrosion costs the U.S. economy billions of dollars annually.
- Paint Damage: The impact that causes a dent can also crack or chip the paint, exacerbating the risk of rust and further diminishing the car’s appearance.
- Compromised Structural Integrity: In severe cases, a dent can weaken the hood’s structural integrity, making it more vulnerable to further damage in future incidents.
- Difficulty Closing the Hood: A significant dent can distort the hood’s shape, making it difficult to close properly. This can lead to latching problems and potential safety issues.
- Reduced Aerodynamics: While minor dents may not significantly affect aerodynamics, larger dents can disrupt airflow, potentially impacting fuel efficiency and handling.
- Water Pooling: Dents can create areas where water accumulates, leading to corrosion and potential water damage to underlying components.
- Interference with Moving Parts: If a dent is deep enough, it may interfere with the engine or other mechanical parts located beneath the hood, potentially causing operational problems.
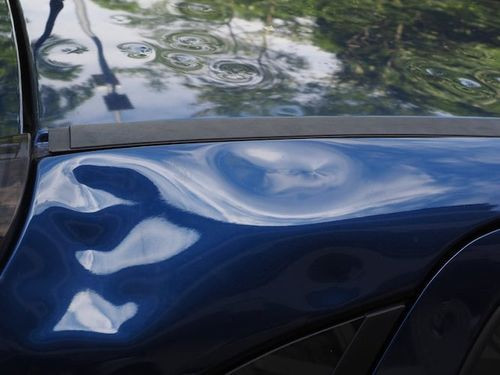
 Dented car hood
4. Professional Repair Options for Dented Car Hoods
When dealing with a dented car hood, professional repair services offer expertise and precision to restore your vehicle’s appearance and structural integrity.
4.1. Paintless Dent Repair (PDR)
Paintless Dent Repair (PDR) is a specialized technique used to remove minor dents and dings from a vehicle’s body without affecting the paint finish. PDR is ideal for dents that have not stretched the metal or damaged the paint.
Process:
- Assessment: A technician assesses the dent to determine its size, depth, and location, as well as the accessibility of the area.
- Access: The technician gains access to the back of the dented panel by removing interior panels, lights, or other components as necessary.
- Tool Insertion: Specialized PDR tools, such as rods, picks, and hammers, are carefully inserted through access points to reach the back of the dent.
- Manipulation: Using precise movements, the technician gently massages and manipulates the metal from behind, gradually pushing the dent back to its original shape.
- Finishing: The technician uses blending hammers and tap-down tools to fine-tune the repair, ensuring a smooth and seamless finish.
Benefits of PDR:
- Cost-Effective: PDR is typically less expensive than traditional dent repair methods because it doesn’t require sanding, filling, or painting.
- Time-Saving: PDR can often be completed in a matter of hours, compared to the days or weeks required for traditional repairs.
- Preserves Original Paint: Because PDR doesn’t involve painting, the vehicle’s original paint finish is preserved, maintaining its value and appearance.
- Environmentally Friendly: PDR is an environmentally friendly repair option because it doesn’t involve the use of chemicals or materials that can harm the environment.
4.2. Traditional Dent Repair
Traditional dent repair involves more extensive techniques to fix larger or more complex dents that cannot be addressed with PDR. This method includes body filler, sanding, and painting to restore the panel to its original condition.
Process:
- Assessment: The technician assesses the dent to determine the extent of the damage and the necessary repair procedures.
- Metal Work: The dented area is hammered and pulled back to its original shape as closely as possible using specialized tools.
- Body Filler Application: Body filler is applied to the dented area to fill in any remaining imperfections and create a smooth surface.
- Sanding: The body filler is carefully sanded to match the surrounding contours of the panel, ensuring a seamless transition.
- Priming: A primer is applied to the repaired area to create a smooth surface for painting and to protect the metal from corrosion.
- Painting: The repaired area is painted to match the vehicle’s original color, using a color-matching system to ensure a perfect blend.
- Clear Coat Application: A clear coat is applied to protect the paint and provide a glossy finish.
- Polishing: The repaired area is polished to remove any imperfections and blend the finish with the surrounding paint.
Considerations for Traditional Dent Repair:
- Cost: Traditional dent repair is typically more expensive than PDR due to the additional materials and labor involved.
- Time: Traditional dent repair can take several days or even weeks to complete, depending on the extent of the damage and the shop’s workload.
- Paint Matching: Achieving a perfect color match can be challenging, especially with older vehicles where the paint has faded over time.
- Potential for Imperfections: Even with skilled technicians, there is a potential for imperfections in the repaired area, such as slight variations in color or texture.
4.3. Hood Replacement
In cases where the damage to the hood is too severe for repair, such as extensive rust, large tears, or significant structural damage, replacing the entire hood may be the most practical solution.
Process:
- Assessment: The technician determines that the hood is beyond repair and recommends replacement.
- Hood Selection: A new hood is selected that matches the vehicle’s make, model, and year. Options include OEM (Original Equipment Manufacturer) hoods, aftermarket hoods, and used hoods.
- Preparation: The new hood is prepared for installation by cleaning and priming the surface.
- Painting: The new hood is painted to match the vehicle’s original color, using a color-matching system to ensure a seamless blend.
- Installation: The old hood is removed, and the new hood is installed, ensuring proper alignment and fit.
- Adjustments: The hood latch and hinges are adjusted to ensure smooth and secure operation.
Factors to Consider When Replacing a Hood:
- Cost: Hood replacement is typically more expensive than dent repair due to the cost of the new hood and the labor involved in installation and painting.
- Hood Quality: The quality of the replacement hood can vary depending on the manufacturer and the materials used. OEM hoods are typically the highest quality but also the most expensive.
- Color Matching: Achieving a perfect color match can be challenging, especially with older vehicles where the paint has faded over time.
- Installation: Proper installation is crucial to ensure that the hood fits correctly and operates smoothly.
4.4. Cost Considerations for Professional Repairs
The cost of professional dent repair can vary widely depending on the extent of the damage, the repair method used, and the location of the repair shop.
Typical Cost Ranges:
- Paintless Dent Repair (PDR): $75 – $200 per dent
- Traditional Dent Repair: $150 – $500 per panel
- Hood Replacement: $500 – $1500 (including the cost of the new hood, painting, and installation)
Factors That Affect Cost:
- Size and Depth of the Dent: Larger and deeper dents require more extensive repair work and therefore cost more to fix.
- Location of the Dent: Dents in hard-to-reach areas may require more time and effort to repair, increasing the cost.
- Paint Damage: If the paint is damaged, additional costs will be incurred for sanding, priming, and painting.
- Repair Method Used: PDR is typically less expensive than traditional dent repair or hood replacement.
- Repair Shop Rates: Labor rates vary depending on the location and reputation of the repair shop.
Insurance Claims:
If the damage to your hood is caused by an accident or other covered event, you may be able to file a claim with your auto insurance company. However, it’s important to consider your deductible and the potential impact on your insurance rates before filing a claim.
5. DIY Methods to Fix a Dented Car Hood
For those who prefer a hands-on approach, several DIY methods can be used to fix a dented car hood. These techniques range from simple to more involved, and it’s essential to proceed with caution to avoid causing further damage.
5.1. Plunger Method
The plunger method is a simple and inexpensive way to attempt to remove shallow dents from a car hood. This technique uses suction to pull the dent back into place and works best on dents with a smooth, rounded shape.
Materials Needed:
- Plunger (a cup-shaped plunger works best)
- Water
- Soft cloths
Step-by-Step Instructions:
- Clean the Area: Thoroughly clean the area around the dent with soap and water to remove any dirt or debris.
- Wet the Plunger and Hood: Lightly wet the rim of the plunger and the area around the dent with water. This will help create a better seal.
- Position the Plunger: Place the plunger directly over the center of the dent, ensuring that the rim is in full contact with the hood’s surface.
- Apply Pressure: Press down firmly on the plunger to create a seal.
- Pull and Push: Grip the handle of the plunger and gently pull and push in a steady, rhythmic motion. Continue this process for several minutes, maintaining a firm seal.
- Check for Improvement: Periodically check to see if the dent is improving. If necessary, reposition the plunger and repeat the process.
- Clean and Dry: Once the dent is removed or as much as possible, clean and dry the area with soft cloths.
Tips and Cautions:
- Use a cup-shaped plunger rather than a flanged plunger for better suction.
- Apply steady, even pressure to avoid damaging the paint or surrounding area.
- This method works best on shallow dents with a smooth, rounded shape.
- If the dent is deep or has sharp edges, this method may not be effective.
5.2. Hair Dryer and Compressed Air Method
This method involves using heat from a hair dryer to soften the metal around the dent, followed by a blast of cold air from a compressed air canister to cause the metal to contract and potentially pop back into place.
Materials Needed:
- Hair dryer
- Compressed air canister (held upside down)
- Soft cloths
- Gloves
Step-by-Step Instructions:
- Clean the Area: Thoroughly clean the area around the dent with soap and water to remove any dirt or debris.
- Heat the Dent: Use the hair dryer to heat the area around the dent for several minutes, keeping the hair dryer moving to avoid overheating the paint.
- Apply Compressed Air: Wearing gloves to protect your hands from the cold, hold the compressed air canister upside down and spray a short burst of cold air directly onto the heated dent.
- Repeat as Needed: Repeat the heating and cooling process several times, checking for improvement after each cycle.
- Clean and Dry: Once the dent is removed or as much as possible, clean and dry the area with soft cloths.
Tips and Cautions:
- Keep the hair dryer moving to avoid overheating the paint.
- Wear gloves to protect your hands from the cold compressed air.
- Hold the compressed air canister upside down to release the cold air.
- This method works best on shallow dents with a smooth, rounded shape.
- If the dent is deep or has sharp edges, this method may not be effective.
- Be cautious when using heat and compressed air, as improper use can damage the paint or surrounding area.
5.3. Boiling Water Method
The boiling water method is a simple technique that uses the heat from boiling water to soften the plastic on bumper covers, allowing them to be pushed back into shape. This method is not suitable for metal car hoods.
Materials Needed:
- Boiling water
- Gloves
- Soft cloths
Step-by-Step Instructions:
- Heat the Dent: Carefully pour boiling water over the dented area of the bumper cover.
- Push the Dent Out: While the plastic is still warm and pliable, reach behind the bumper cover and gently push the dent back into its original shape.
- Cool the Area: Pour cold water over the repaired area to help the plastic retain its new shape.
- Repeat as Needed: Repeat the process if necessary, until the dent is removed or as much as possible.
5.4. Suction Dent Puller
A suction dent puller is a tool designed to adhere to the surface of a dent and use suction to pull it back into shape. These tools are available at most auto parts stores and can be an effective way to remove shallow dents from a car hood.
Materials Needed:
- Suction dent puller
- Soft cloths
- Water
Step-by-Step Instructions:
- Clean the Area: Thoroughly clean the area around the dent with soap and water to remove any dirt or debris.
- Wet the Suction Cup: Lightly wet the suction cup of the dent puller with water. This will help create a better seal.
- Position the Suction Cup: Place the suction cup directly over the center of the dent, ensuring that it is in full contact with the hood’s surface.
- Create a Seal: Press down firmly on the suction cup to create a seal.
- Pull the Dent: Follow the instructions that came with the dent puller to activate the suction mechanism and gently pull the dent back into place.
- Check for Improvement: Periodically check to see if the dent is improving. If necessary, reposition the suction cup and repeat the process.
- Clean and Dry: Once the dent is removed or as much as possible, clean and dry the area with soft cloths.
Tips and Cautions:
- Follow the instructions that came with the dent puller carefully.
- Apply steady, even pressure to avoid damaging the paint or surrounding area.
- This method works best on shallow dents with a smooth, rounded shape.
- If the dent is deep or has sharp edges, this method may not be effective.
5.5. Mallet and Block Method
The mallet and block method involves using a rubber mallet and a wooden or plastic block to gently tap the dent back into shape. This method is more involved and requires caution to avoid damaging the paint or surrounding area.
Materials Needed:
- Rubber mallet
- Wooden or plastic block
- Soft cloths
- Gloves
Step-by-Step Instructions:
- Clean the Area: Thoroughly clean the area around the dent with soap and water to remove any dirt or debris.
- Position the Block: Place the wooden or plastic block over the dent, ensuring that it is in full contact with the hood’s surface.
- Tap the Block: Using the rubber mallet, gently tap the block over the dent, starting at the edges and working your way towards the center.
- Check for Improvement: Periodically check to see if the dent is improving. If necessary, reposition the block and repeat the process.
- Clean and Dry: Once the dent is removed or as much as possible, clean and dry the area with soft cloths.
Tips and Cautions:
- Use a rubber mallet to avoid damaging the paint or surrounding area.
- Use a wooden or plastic block to distribute the force of the mallet evenly.
- Tap the block gently to avoid overcorrecting the dent.
- This method requires patience and precision.
- If the dent is deep or has sharp edges, this method may not be effective.
- Be cautious when using a mallet, as improper use can damage the paint or surrounding area.
 Using a Plunger to Remove a Dent
6. When is Hood Replacement the Best Option?
While repairing a dented car hood is often possible, there are situations where replacing the entire hood is the most practical and cost-effective solution.
- Extensive Rust Damage: If the hood has significant rust, repairing it may be a temporary fix. Replacing the hood ensures long-term protection against further corrosion.
- Severe Structural Damage: In cases of severe impact or collision, the hood may sustain structural damage that compromises its integrity. Replacement is necessary to ensure proper safety and functionality.
- Large Tears or Holes: Dents accompanied by large tears or holes in the metal may be beyond repair, making replacement the only viable option.
- Multiple Dents and Damage: If the hood has numerous dents, scratches, and other types of damage, the cost of repairing each individual imperfection may exceed the cost of replacing the entire hood.
- Difficulty in Achieving a Seamless Repair: In some cases, achieving a seamless repair that matches the original factory finish may be challenging. Replacing the hood ensures a consistent and flawless appearance.
- Availability of a Cost-Effective Replacement: If a used or aftermarket hood is available at a reasonable price, replacement may be a more economical option than attempting to repair a severely damaged hood.
7. Essential Tools and Equipment for DIY Dent Repair
Attempting DIY dent repair requires having the right tools and equipment on hand. Here’s a list of essential items that can help you tackle the job effectively.
- Rubber Mallet: A rubber mallet is used to gently tap the dent back into shape without damaging the paint or surrounding area.
- Wooden or Plastic Block: A wooden or plastic block is used to distribute the force of the mallet evenly and prevent further damage.
- Suction Dent Puller: A suction dent puller is used to adhere to the surface of a dent and use suction to pull it back into shape.
- Plunger: A cup-shaped plunger can be used to attempt to pop out shallow dents from a car hood.
- Hair Dryer: A hair dryer can be used to heat the area around the dent, making it more pliable and easier to manipulate.
- Compressed Air Canister: A compressed air canister can be used to spray a burst of cold air onto the heated dent, causing the metal to contract and potentially pop back into place.
- Soft Cloths: Soft cloths are used to clean the area around the dent and to protect the paint from scratches.
- Gloves: Gloves are used to protect your hands from sharp edges and chemicals.
- Safety Glasses: Safety glasses are used to protect your eyes from debris.
- Work Light: A work light is used to provide adequate lighting for the repair area.
- Body Filler: Body filler is used to fill in any remaining imperfections after the dent has been removed.
- Sandpaper: Sandpaper is used to smooth the body filler and blend it with the surrounding paint.
- Primer: Primer is used to prepare the surface for painting.
- Paint: Paint is used to match the color of the surrounding area.
- Clear Coat: Clear coat is used to protect the paint and provide a glossy finish.
- Polishing Compound: Polishing compound is used to remove any imperfections and blend the finish with the surrounding paint.
8. Tips for Achieving a Professional-Looking DIY Repair
While DIY dent repair can be a cost-effective solution, achieving a professional-looking result requires patience, skill, and attention to detail.
- Take Your Time: Rushing the repair process can lead to mistakes and further damage. Take your time and work carefully.
- Follow Instructions Carefully: Follow the instructions for each repair method carefully.
- Use the Right Tools: Using the right tools for the job is essential for achieving a professional-looking result.
- Practice on a Test Panel: Before attempting to repair a dent on your car hood, practice on a test panel to get a feel for the tools and techniques.
- Work in a Well-Lit Area: Working in a well-lit area will help you see the dent more clearly and avoid making mistakes.
- Keep the Area Clean: Keep the area around the dent clean to prevent dirt and debris from scratching the paint.
- Apply Even Pressure: Apply even pressure when using tools to avoid damaging the paint or surrounding area.
- Check Your Work Frequently: Check your work frequently to ensure that you are making progress and not causing further damage.
- Don’t Be Afraid to Seek Professional Help: If you are not comfortable with any of the repair methods, don’t be afraid to seek professional help.
9. Maintaining Your Car Hood After Dent Repair
After successfully repairing a dent on your car hood, it’s essential to take steps to maintain the repair and prevent future damage.
- Apply a Protective Coating: Apply a protective coating, such as wax or sealant, to the repaired area to protect it from the elements.
- Regular Washing: Wash your car regularly to remove dirt, debris, and contaminants that can damage the paint.
- Avoid Harsh Chemicals: Avoid using harsh chemicals or abrasive cleaners on the repaired area.
- Park in a Garage or Under a Cover: Park your car in a garage or under a cover to protect it from the elements and prevent further damage.
- Be Careful When Closing the Hood: Be careful when closing the hood to avoid slamming it and causing new dents or scratches.
- Inspect Regularly: Inspect the repaired area regularly for any signs of damage or deterioration.
10. Frequently Asked Questions (FAQs) About Fixing Dents on Car Hoods
Q1: How much does it cost to fix a dent on a car hood?
The cost varies depending on the size and location of the dent, as well as the repair method used. Paintless dent repair (PDR) typically ranges from $75 to $200 per dent, while traditional dent repair can cost $150 to $500 per panel. Hood replacement can range from $500 to $1500, including the cost of the new hood, painting, and installation.
Q2: Can I fix a dent on my car hood myself?
Yes, several DIY methods can be used to fix dents on car hoods, including the plunger method, hair dryer and compressed air method, and suction dent puller. However, it’s essential to proceed with caution to avoid causing further damage.
Q3: What is paintless dent repair (PDR)?
Paintless dent repair (PDR) is a technique used to remove minor dents and dings from a vehicle’s body without affecting the paint finish. PDR is ideal for dents that have not stretched the metal or damaged the paint.
Q4: When is hood replacement necessary?
Hood replacement is necessary when the damage to the hood is too severe for repair, such as extensive rust, large tears, or significant structural damage.
Q5: How can I prevent dents on my car hood?
You can prevent dents on your car hood by avoiding resting objects on the hood, using a protective cover, parking inside a garage, and securing nearby items.
Q6: Will a dent on my car hood cause rust?
Yes, a dent can compromise the paint’s protective layer, exposing the metal underneath to moisture and air, leading to rust.
Q7: Can a dent on my car hood affect its value?
Yes, dents detract from the vehicle’s appearance, reducing its resale value and curb appeal.
Q8: What tools do I need for DIY dent repair?
Essential tools for DIY dent repair include a rubber mallet, wooden or plastic block, suction dent puller, plunger, hair dryer, compressed air canister, soft cloths, gloves, and safety glasses.
Q9: How long does it take to fix a dent on a car hood?
The time it takes to fix a dent on a car hood depends on the size and location of the dent, as well as the repair method used. PDR can often be completed in a matter of hours, while traditional dent repair can take several days or even weeks.
Q10: Should I file an insurance claim for a dent on my car hood?
If the damage to your hood is caused by an accident or other covered event, you may be able to file a claim with your auto insurance company. However, it’s important to consider your deductible and the potential impact on your insurance rates before filing a claim.
A dented car hood doesn’t have to be a permanent eyesore. With the right approach, whether professional repair or DIY, you can restore your car’s appearance. Remember, CARDIAGTECH.NET is here to support you with quality tools and expert advice.
Don’t let a dent diminish your car’s appeal! Contact CARDIAGTECH.NET at 276 Reock St, City of Orange, NJ 07050, United States, or via Whatsapp at +1 (641) 206-8880, or visit our website at CARDIAGTECH.NET for expert guidance and premium tools to fix your dented car hood today. Let us help you restore your vehicle to its pristine condition, ensuring it looks its best and maintains its value with professional auto restoration and automotive dent removal.