How to Fix Car Window Tint That Is Peeling Effectively
Is your car window tint peeling, bubbling, or blistering? This not only mars your vehicle’s appearance but also reduces the tint’s effectiveness in shielding you from sunlight. CARDIAGTECH.NET offers expert guidance on how to repair peeling car window tint, saving you money and restoring your car’s sleek look. In this guide, you’ll discover practical, step-by-step methods to address these issues, whether you’re dealing with minor bubbles or more significant peeling. We’ll also highlight the importance of high-quality tools and materials, ensuring a professional finish and long-lasting results, enhancing vehicle aesthetics, UV protection, and interior climate control.
1. Identifying the Causes of Peeling Window Tint
What are the common causes of car window tint peeling?
Several factors can lead to peeling window tint, including:
- Poor Installation: According to a study by the International Window Film Association (IWFA), improper installation is a leading cause of tint failure. Air bubbles and inadequate adhesion can occur if the surface isn’t properly cleaned or the film isn’t correctly applied.
- Low-Quality Tint: Cheaper tints often use inferior adhesives that degrade quickly when exposed to sunlight, as noted in research from the Society of Automotive Engineers (SAE).
- UV Exposure: Prolonged exposure to ultraviolet (UV) rays can break down the adhesive over time, causing the tint to peel or bubble. A study published in the “Journal of Applied Polymer Science” found that UV stabilizers in window films can mitigate this effect but are often lacking in low-quality tints.
- Age: Over time, the adhesive used to bind the tint to the window can degrade, especially after years of sun exposure.
- Environmental Factors: Extreme temperature fluctuations and humidity can also contribute to the breakdown of the adhesive.
Understanding these causes can help you choose the right repair method and prevent future issues. Choosing high-quality window tint and ensuring professional installation are key steps in prolonging the life of your window tint.
2. Assessing the Damage and Deciding on a Solution
How do I determine whether to repair or replace my peeling window tint?
Before you start, assess the extent of the damage to determine the best course of action:
- Check the Warranty: If a professional installed the tint, check if it’s still under warranty. Many installers offer warranties that cover peeling or bubbling.
- Extent of Damage: Small bubbles or minor peeling might be repairable. However, large areas of peeling or significant bubbling often require complete replacement.
- DIY vs. Professional: If you’re comfortable with DIY repairs and the damage is minor, you can attempt the fix yourself. For extensive damage or if you prefer a guaranteed result, consider hiring a professional.
Deciding whether to repair or replace depends on these factors. If the damage is minimal and you have some DIY skills, a repair might suffice. However, for extensive damage, replacement by a professional is often the better option.
3. Essential Tools and Materials for DIY Window Tint Repair
What tools and materials are needed to fix peeling car window tint?
Before you begin, gather the necessary tools and materials. Using the right equipment ensures a smoother, more effective repair. Here’s what you’ll need:
- Spray Bottle: For applying water to loosen the adhesive.
- Distilled Water: Tap water can contain minerals that leave residue.
- Heat Gun or Hair Dryer: To soften the tint and adhesive.
- Straight Edge: A credit card, squeegee, or plastic smoother.
- Safety Pin or Needle: For releasing air from bubbles.
- Razor Blade: For trimming excess tint.
- Microfiber Cloth: For cleaning and drying the window.
- Window Cleaner: To prepare the surface.
- New Tint Film (Optional): For replacing damaged sections.
- Heat-Resistant Gloves: To protect your hands when using a heat gun.
Having these tools on hand will make the repair process more efficient and help you achieve a professional-looking result. Remember, using high-quality tools from CARDIAGTECH.NET can significantly improve the outcome of your DIY repair.
4. Step-by-Step Guide: Fixing Minor Bubbles in Window Tint
How can I fix small air bubbles in my car window tint?
Small air bubbles can often be fixed without replacing the entire tint. Here’s how:
4.1. Park in Sunlight or Use a Heat Source
- Sunlight: Park your car in direct sunlight for a few hours. According to the Skin Cancer Foundation, window tint can block up to 99% of UV rays, but the heat from the sun will also soften the adhesive.
- Heat Gun/Hair Dryer: If it’s not sunny, use a heat gun or hair dryer to warm the window evenly. Hold the heat source a few inches away and move it in a sweeping motion to avoid overheating one spot.
4.2. Prepare the Area
- Clean the Window: Use a window cleaner and a microfiber cloth to clean the tinted area. Remove any dirt or debris that might interfere with the repair.
- Spray with Water: Lightly spray the tinted area with distilled water. This helps to loosen the adhesive and allows the air to escape more easily.
4.3. Puncture the Bubble
- Use a Safety Pin: Carefully puncture the edge of the air bubble with a safety pin or needle. Be gentle to avoid tearing the tint.
4.4. Smooth Out the Bubble
- Apply Pressure: Use a credit card or squeegee to gently push the air towards the pinhole. Start from the center of the bubble and move towards the edge.
- Work Slowly: Take your time to smooth out the bubble completely. If the tint starts to cool, reapply heat to soften the adhesive.
4.5. Final Touches
- Wipe Clean: Once the bubble is gone, wipe the area with a clean microfiber cloth to remove any excess water.
- Inspect: Check the area to ensure no air remains. If necessary, repeat the process.
By following these steps, you can effectively remove small air bubbles and restore the appearance of your window tint.
5. Step-by-Step Guide: Repairing Peeling Window Tint
How can I repair larger sections of peeling car window tint?
For more extensive peeling, a slightly different approach is needed:
5.1. Prepare the Area
- Clean the Window: Thoroughly clean the window with a window cleaner and a microfiber cloth. Remove any dirt, grease, or residue.
- Mark the Area: Use a razor blade to carefully score around the peeling section, creating a clean edge. This helps prevent further peeling during the repair.
5.2. Remove the Peeling Tint
- Lift the Edge: Gently lift the edge of the peeling tint with a razor blade or your fingernail.
- Apply Heat: Use a heat gun or hair dryer to warm the adhesive as you peel back the tint. This makes it easier to remove and reduces the risk of tearing.
- Peel Slowly: Slowly and steadily peel the tint away from the window. If it’s difficult to remove, apply more heat.
5.3. Clean the Exposed Glass
- Remove Adhesive: Use a razor blade to scrape off any remaining adhesive from the glass. Be careful not to scratch the window.
- Apply Adhesive Remover: If necessary, use an adhesive remover to dissolve stubborn residue. Follow the instructions on the product label.
- Clean Again: Clean the window again with window cleaner and a microfiber cloth to ensure it’s completely clean and free of residue.
5.4. Cut a New Tint Patch
- Measure the Area: Measure the size of the removed section and cut a new piece of tint film slightly larger than the opening.
- Prepare the Patch: Peel off the backing from the new tint patch, exposing the adhesive side.
5.5. Apply the New Tint Patch
- Spray the Window: Lightly spray the cleaned area with distilled water.
- Position the Patch: Carefully position the new tint patch over the opening, aligning it with the edges of the surrounding tint.
- Smooth Out the Patch: Use a credit card or squeegee to smooth out the patch, working from the center towards the edges. Remove any air bubbles or wrinkles.
- Trim Excess: Use a razor blade to trim any excess tint film around the edges of the patch.
5.6. Final Touches
- Wipe Clean: Wipe the area with a clean microfiber cloth to remove any excess water.
- Inspect: Check the patch to ensure it’s smooth and free of bubbles. If necessary, repeat the smoothing process.
By following these steps, you can effectively repair peeling window tint and restore the appearance of your car windows.
6. Tips for Preventing Future Peeling
How can I prevent my car window tint from peeling in the future?
Preventing peeling is better than having to repair it. Here are some tips to keep your window tint in good condition:
- Choose High-Quality Tint: Invest in high-quality tint film with UV protection. According to the IWFA, high-quality films are more resistant to peeling and fading.
- Professional Installation: Have the tint professionally installed to ensure proper adhesion and avoid bubbles.
- Regular Cleaning: Clean your windows regularly with a mild window cleaner and a microfiber cloth. Avoid using harsh chemicals that can damage the tint.
- Avoid Extreme Temperatures: Park your car in the shade whenever possible to avoid prolonged exposure to direct sunlight and extreme temperatures.
- Check for Damage: Regularly inspect your window tint for any signs of peeling or bubbling. Address any issues promptly to prevent them from worsening.
By following these tips, you can extend the life of your window tint and keep it looking great for years to come.
7. Choosing the Right Tint Film
What factors should I consider when choosing a new window tint film?
Selecting the right tint film is crucial for both appearance and longevity. Consider these factors:
- Material Quality: Opt for high-quality materials like ceramic or carbon films, known for their durability and UV protection.
- UV Protection: Ensure the film blocks at least 99% of UV rays to protect your car’s interior and your skin.
- Visible Light Transmission (VLT): Check local regulations for VLT limits to ensure compliance.
- Heat Rejection: Choose a film with good heat rejection properties to keep your car cool.
- Warranty: Look for films with a good warranty to cover potential defects or premature wear.
Choosing the right tint film will not only enhance your car’s appearance but also provide long-lasting protection and comfort.
8. The Role of Professional Installation
Why is professional installation recommended for car window tint?
While DIY installation can save money, professional installation offers several advantages:
- Expertise: Professionals have the knowledge and experience to install tint correctly, avoiding bubbles and peeling.
- Tools and Equipment: They use specialized tools for precise cutting and application.
- Warranty: Many installers offer warranties on their work, providing peace of mind.
- Quality Materials: Professionals often use higher-quality films that are not available to the general public.
- Time Savings: Professional installation saves you time and effort, ensuring a perfect finish.
According to a survey by the IWFA, professionally installed window tint has a significantly lower failure rate compared to DIY installations.
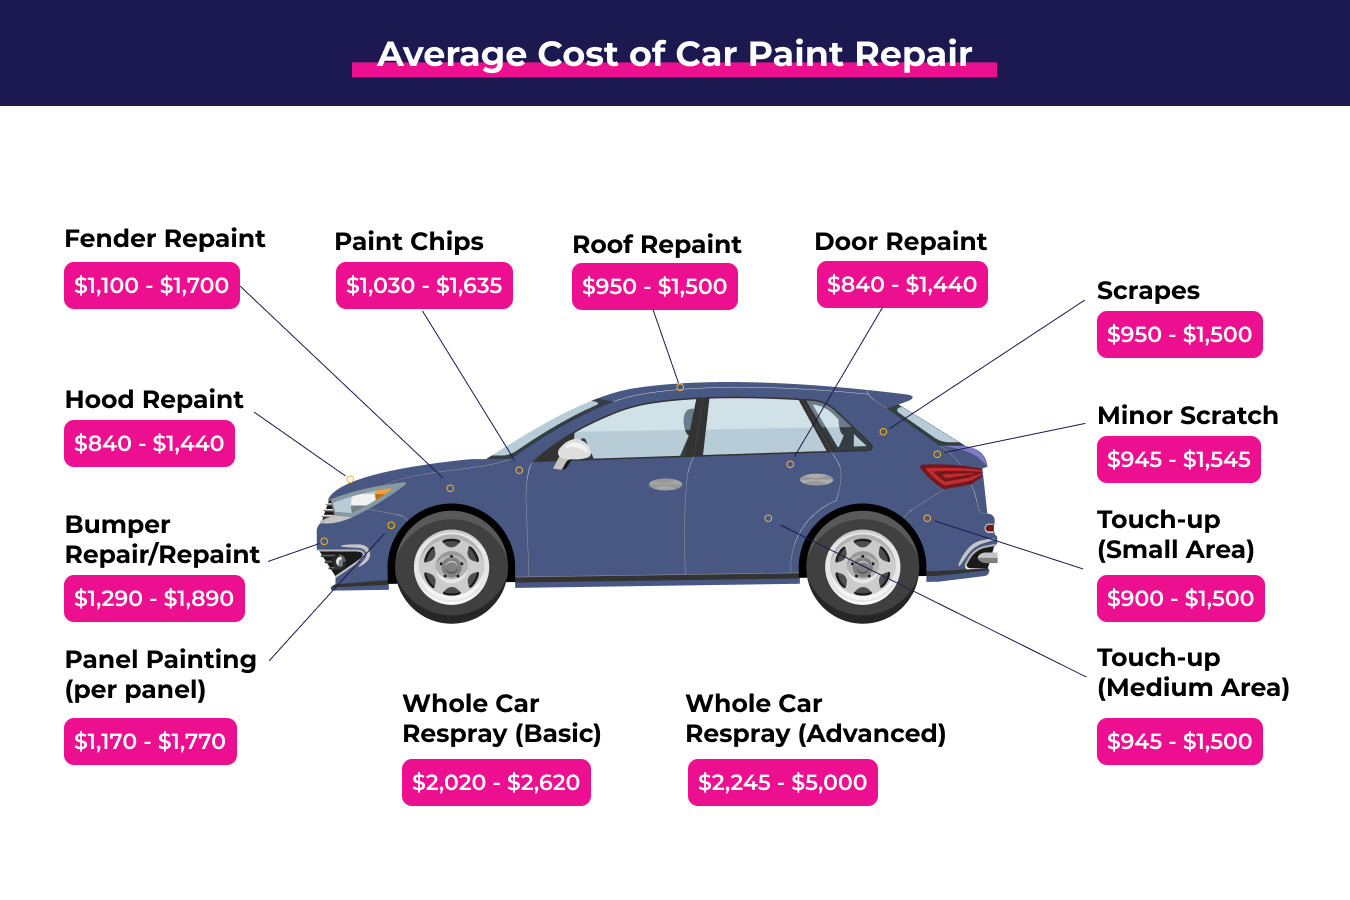
9. Cost Considerations for Repair and Replacement
How much does it cost to repair or replace car window tint?
The cost of repairing or replacing window tint varies depending on several factors:
- Extent of Damage: Minor repairs are generally less expensive than full replacements.
- Type of Film: High-quality films cost more than standard films.
- Vehicle Type: Larger vehicles with more windows will cost more to tint.
- Professional vs. DIY: DIY repairs are cheaper upfront, but professional installation ensures a better result and may save money in the long run.
- Location: Labor costs vary by region.
Here’s a general cost breakdown:
| Service | Average Cost |
|---|---|
| Minor Bubble Repair | $20 – $50 |
| Patch Repair | $50 – $100 |
| Full Window Replacement | $100 – $300 |
| Professional Installation | $200 – $500 (per car) |
Investing in professional installation and high-quality film can be more cost-effective in the long term, avoiding frequent repairs or replacements.
10. Maintaining Your Car Windows After Tinting
What are the best practices for maintaining car windows after tinting?
Proper maintenance is essential for prolonging the life of your window tint. Follow these guidelines:
- Wait Before Cleaning: Wait at least 48-72 hours after tinting before cleaning the windows to allow the adhesive to cure properly.
- Use Gentle Cleaners: Use a mild, ammonia-free window cleaner. Ammonia can damage the tint.
- Soft Cloths: Use a soft microfiber cloth to clean the windows. Avoid abrasive materials that can scratch the tint.
- Avoid Harsh Chemicals: Do not use harsh chemicals, solvents, or abrasive cleaners on the tint.
- Regular Cleaning: Clean your windows regularly to remove dirt and debris.
- Inspect Regularly: Check the tint regularly for any signs of damage, such as peeling or bubbling.
By following these maintenance tips, you can keep your window tint looking great and prolong its lifespan.
11. Understanding Local Window Tint Laws
What should I know about window tint laws in my area?
Window tint laws vary by state and can impact your choice of tint film. Key factors include:
- Visible Light Transmission (VLT): This specifies the percentage of light that must pass through the tinted window. Most states have minimum VLT requirements.
- Reflectivity: Some states restrict the use of reflective tints.
- Color: Certain colors may be prohibited.
- Rear Window Restrictions: Some states have different rules for rear windows.
According to the American Automobile Association (AAA), it’s crucial to be aware of and comply with local tint laws to avoid fines or the need to remove non-compliant tint.
12. Addressing Common Window Tint Problems
What are some common problems with car window tint and how can I fix them?
Besides peeling, other common issues include:
- Bubbling: Use the safety pin and smoothing method described earlier.
- Fading: Fading is often a sign of low-quality film. Consider replacing the tint with a higher-quality product.
- Scratches: Minor scratches can sometimes be buffed out with a specialized tint cleaner. Severe scratches may require replacement.
- Purple Tint: This indicates that the UV protection has broken down. Replace the tint to restore protection.
Addressing these issues promptly can help maintain the appearance and functionality of your window tint.
13. Advanced Techniques for Tint Repair
Are there any advanced techniques for repairing car window tint?
For complex issues, consider these advanced techniques:
- Heat Shrinking: Professionals use heat guns to shrink the tint film for a seamless fit on curved windows.
- Seam Blending: This technique involves carefully blending the edges of a patch with the surrounding tint for a nearly invisible repair.
- Adhesive Boosters: Specialized adhesive boosters can improve the bond between the tint and the glass, preventing future peeling.
These techniques often require professional skills and equipment but can provide superior results.
14. DIY vs. Professional: Making the Right Choice
How do I decide whether to fix my car window tint myself or hire a professional?
Consider the following factors when deciding between DIY and professional repair:
- Skill Level: Are you comfortable working with tools and handling delicate materials?
- Complexity of the Repair: Is the damage minor or extensive?
- Time Commitment: Do you have the time to dedicate to the repair?
- Budget: What is your budget for the repair?
- Desired Outcome: Do you want a perfect, seamless finish?
If you’re unsure or the damage is significant, hiring a professional is often the best choice.
15. Innovations in Window Tint Technology
What are the latest innovations in car window tint technology?
The window tint industry is constantly evolving. Recent innovations include:
- Ceramic Films: These films offer superior heat rejection and UV protection compared to traditional films.
- Spectrally Selective Films: These films block infrared radiation while allowing visible light to pass through, providing excellent heat control without darkening the windows.
- Photochromic Films: These films automatically adjust their tint level based on the amount of sunlight.
- Self-Healing Films: These films can repair minor scratches and swirl marks.
Staying informed about these innovations can help you choose the best products for your needs.
16. The Environmental Impact of Window Tint
How does car window tint impact the environment?
Window tint can have a positive environmental impact by:
- Reducing Energy Consumption: By reducing heat buildup in your car, window tint can decrease the need for air conditioning, saving fuel.
- Protecting Interior Materials: By blocking UV rays, tint can prevent fading and cracking of interior materials, extending their lifespan.
- Lowering Carbon Emissions: Reduced air conditioning use translates to lower carbon emissions.
Choosing eco-friendly tint films can further minimize your environmental footprint.
17. Exploring Alternatives to Traditional Window Tint
What are some alternatives to traditional car window tint?
If you’re looking for alternatives, consider:
- Clear UV Films: These films provide UV protection without darkening the windows.
- Dyed Films: These are a budget-friendly option that offers some UV protection and tinting.
- Factory Tint: Some cars come with factory-tinted windows, which provide mild tinting and UV protection.
Each option has its own advantages and disadvantages, so choose the one that best meets your needs and preferences.
18. Ensuring Longevity with Proper Care Products
What are the best car window tint care products to ensure longevity?
Using the right care products can significantly extend the life of your window tint. Look for:
- Ammonia-Free Cleaners: These won’t damage the tint.
- Microfiber Cloths: These are gentle and won’t scratch the tint.
- Tint Conditioners: These products can help protect the tint from UV damage and fading.
Regular use of these products will keep your window tint looking its best for years to come.
19. Diagnosing Advanced Tint Failure
How can I diagnose advanced car window tint failure?
Advanced tint failure can manifest in several ways:
- Extensive Peeling: Large sections of tint peeling away from the window.
- Severe Bubbling: Numerous large bubbles that cannot be smoothed out.
- Cracking: Cracks in the tint film.
- Discoloration: Significant fading or color change.
In these cases, replacement is usually the best option.
20. Future Trends in Automotive Window Tinting
What future trends can we expect to see in automotive window tinting?
The future of window tinting looks bright, with trends including:
- Smart Tints: Tints that can be controlled electronically to adjust the level of darkness.
- Improved Materials: New materials that offer even better heat rejection and UV protection.
- Sustainable Films: Eco-friendly films made from recycled materials.
- Enhanced Durability: Films that are more resistant to scratches and damage.
These innovations promise to make window tinting even more effective and convenient in the years to come.
FAQ: Addressing Your Questions About Peeling Window Tint
Frequently Asked Questions
1. Why is my car window tint peeling?
Peeling can result from poor installation, low-quality tint, UV exposure, age, or environmental factors.
2. Can I repair peeling window tint myself?
Yes, minor issues can be repaired DIY, but extensive damage may require professional help.
3. What tools do I need to fix peeling window tint?
You’ll need a spray bottle, distilled water, heat gun/hair dryer, straight edge, safety pin, razor blade, and microfiber cloth.
4. How do I remove air bubbles from window tint?
Puncture the bubble with a safety pin, spray with water, and smooth out with a credit card or squeegee.
5. How can I prevent window tint from peeling?
Choose high-quality tint, ensure professional installation, and maintain regular cleaning.
6. What are the signs of low-quality window tint?
Signs include bubbling, fading, and peeling shortly after installation.
7. What is the best type of window tint for UV protection?
Ceramic films offer the best UV protection.
8. How long does window tint typically last?
High-quality window tint can last 5-10 years or more with proper care.
9. Are there laws regarding window tint darkness?
Yes, most states have regulations regarding visible light transmission (VLT).
10. Can window tint damage my car windows?
No, window tint should not damage your windows if installed and removed properly.
Don’t let peeling window tint detract from your car’s appearance and protection. Whether you choose to tackle the repair yourself or seek professional help, remember that high-quality tools and materials are essential for achieving the best results.
Is your peeling car window tint causing you frustration? Don’t wait any longer! CARDIAGTECH.NET offers a range of tools and equipment perfect for DIY repairs, ensuring a professional finish at a fraction of the cost. Plus, our expert team is ready to provide personalized advice and support, guiding you through every step of the repair process.
Contact CARDIAGTECH.NET today at +1 (641) 206-8880 or visit our website at CARDIAGTECH.NET for a consultation. Our team of experienced professionals can assess your specific needs and recommend the best tools and techniques to restore your car’s windows to their original glory. Located at 276 Reock St, City of Orange, NJ 07050, United States, we’re here to help you achieve a flawless finish with our top-quality products and expert guidance. Let us help you enhance your car’s appearance and protection!