How To Fix Car Window Scratches: A Comprehensive Guide
Fixing car window scratches can restore visibility and maintain your vehicle’s value. At CARDIAGTECH.NET, we offer expert solutions and tools to address these imperfections efficiently, ensuring clarity and safety on the road. Learn effective scratch removal techniques and discover the right tools to achieve professional results with our detailed guide and premium auto repair products.
Table of Contents
- Understanding Car Window Scratches
- Assessing the Damage
- Essential Tools and Materials
- 3.1 Cleaning Supplies
- 3.2 Polishing Compounds
- 3.3 Polishing Tools
- 3.4 Protective Gear
- 3.5 Additional Tools
- Step-by-Step Guide to Fixing Minor Car Window Scratches
- Advanced Techniques for Deeper Scratches
- 5.1 Using Cerium Oxide
- 5.2 Wet Sanding
- Professional Car Window Scratch Repair Services
- Preventive Measures to Avoid Car Window Scratches
- Cost Analysis: DIY vs. Professional Repair
- Troubleshooting Common Issues
- Maintaining Your Car Windows After Scratch Repair
- 10.1 Cleaning and Care Tips
- 10.2 Regular Inspections
- Real-World Examples and Case Studies
- The Science Behind Car Window Scratch Repair
- Future Trends in Car Window Repair Technology
- 13.1 Self-Healing Glass
- 13.2 Advanced Repair Techniques
- Frequently Asked Questions (FAQs)
- Conclusion
1. Understanding Car Window Scratches
Car window scratches are a common issue that can detract from your vehicle’s appearance and, more importantly, compromise visibility. These scratches can range from minor surface blemishes to deeper, more noticeable gouges. Understanding the different types and causes of these scratches is crucial for effective repair.
1.1 Types of Car Window Scratches
-
Surface Scratches: These are light, hairline scratches that typically only affect the surface layer of the glass. They are often caused by minor abrasions, such as dirt particles or improper cleaning techniques.
-
Medium Scratches: These scratches are deeper than surface scratches and can usually be felt with a fingernail. They may be caused by wiper blades, road debris, or slightly more aggressive cleaning methods.
-
Deep Scratches: These are the most severe type of scratches, often caused by vandalism, significant road debris, or accidents. They are easily felt and can significantly impair visibility. According to a study by the National Highway Traffic Safety Administration (NHTSA), impaired visibility due to damaged windshields can increase the risk of accidents by up to 20%.
1.2 Factors Contributing to Car Window Scratches
Several factors can contribute to car window scratches:
-
Environmental Factors: Exposure to dust, dirt, sand, and other airborne particles can cause scratches, especially when these particles are dragged across the glass by windshield wipers.
-
Wiper Blades: Old or worn-out wiper blades can become abrasive and scratch the glass. Additionally, using wipers on a dry windshield can exacerbate the issue.
-
Improper Cleaning: Using abrasive cleaning products or cloths can scratch the glass. Similarly, failing to remove debris before wiping the window can cause scratches.
-
Road Debris: Stones, gravel, and other debris kicked up by other vehicles can impact the windshield and side windows, causing scratches and chips.
-
Vandalism: Intentional scratching with keys or other sharp objects can cause significant damage to car windows.
Understanding these factors can help you take preventive measures to minimize the risk of scratches and maintain the clarity of your car windows.
2. Assessing the Damage
Before attempting to fix car window scratches, it’s essential to accurately assess the extent of the damage. This assessment will help you determine the appropriate repair method and whether professional intervention is necessary.
2.1 Preliminary Inspection
Begin by thoroughly cleaning the window to remove any dirt or debris that might obscure the scratches. Use a high-quality glass cleaner and a microfiber cloth for the best results. Once the window is clean and dry, inspect it under direct sunlight or bright artificial light. This will help highlight the scratches and make them easier to see.
2.2 Depth and Severity Assessment
-
Visual Inspection: Look for the number, size, and pattern of the scratches. Are they isolated incidents or widespread? Are they straight lines or irregular patterns?
-
Tactile Test: Gently run your fingernail across the scratched area. If your nail catches on the scratch, it is likely a medium to deep scratch. If it glides smoothly, it is probably a surface scratch. Be careful not to apply too much pressure, as this could worsen the scratch.
-
The Coin Test: Hold a coin (like a dime or penny) flat against the window and try to move it across the scratch. If the coin easily moves over the scratch without catching, it’s likely a surface scratch. If the coin catches or gets stuck, the scratch is deeper.
Based on these tests, you can categorize the scratches as surface, medium, or deep. Surface scratches can often be addressed with basic polishing techniques, while medium scratches may require more advanced methods. Deep scratches may necessitate professional repair or window replacement.
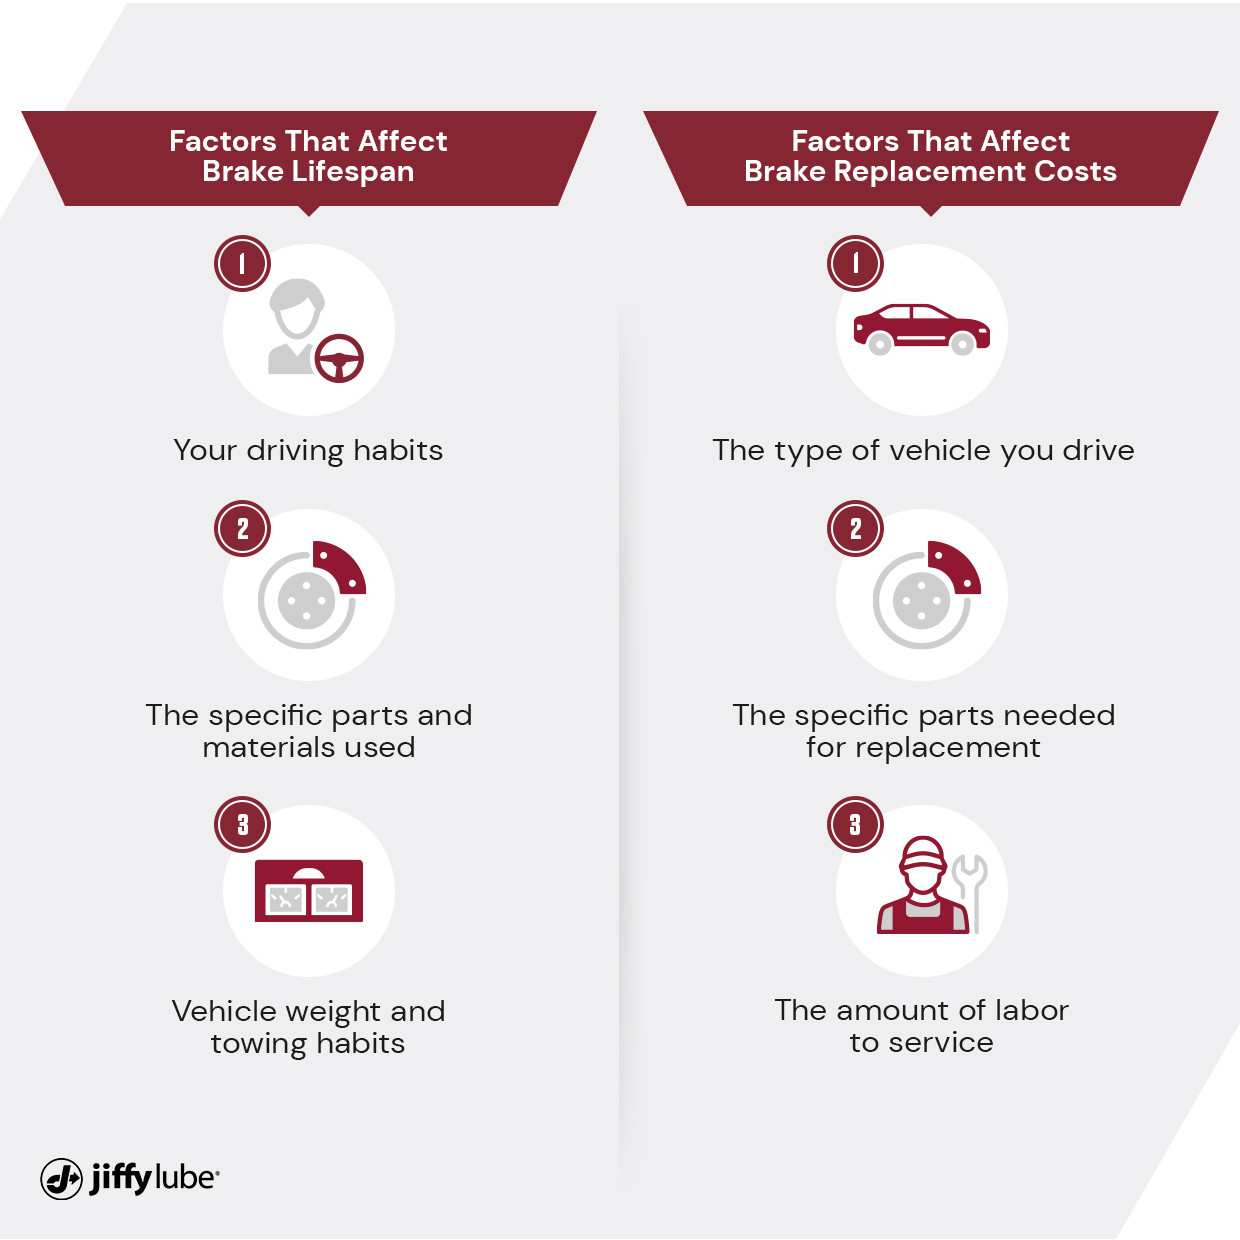
3. Essential Tools and Materials
Having the right tools and materials is crucial for effectively fixing car window scratches. Using quality products ensures a better outcome and minimizes the risk of further damage. Here’s a comprehensive list of essential items:
3.1 Cleaning Supplies
- Glass Cleaner: Use a non-abrasive, ammonia-free glass cleaner to avoid damaging the glass.
- Microfiber Cloths: These are essential for cleaning and polishing. Ensure they are clean and free of any embedded particles that could cause further scratches.
- Isopropyl Alcohol: This can be used to remove any residue from the glass surface.
3.2 Polishing Compounds
- Glass Polishing Compound: Specifically designed for glass, this compound contains fine abrasives that help to smooth out scratches.
- Cerium Oxide Powder: This is a more aggressive polishing compound used for deeper scratches. It must be mixed with water to form a slurry.
3.3 Polishing Tools
- Buffing Pad: A soft, lint-free buffing pad is necessary for applying and working the polishing compound.
- Polishing Machine: A dual-action or rotary polishing machine can significantly speed up the polishing process and provide more consistent results. If you don’t have a machine, you can also polish by hand, but it will require more time and effort.
- Spray Bottle: For keeping the glass surface moist during polishing, especially when using cerium oxide.
3.4 Protective Gear
- Safety Glasses: To protect your eyes from glass particles and polishing compound.
- Gloves: To protect your hands from chemicals and abrasives.
- Mask: To avoid inhaling fine particles, especially when using cerium oxide.
3.5 Additional Tools
- Painter’s Tape: To protect surrounding areas, such as the car’s paint or trim.
- Razor Blade: For carefully scraping off any stubborn residue.
- Heat Gun (Optional): Can be used to gently warm the glass before polishing, but use with caution to avoid cracking the glass.
- Drop Cloths: To protect the surrounding area from polishing compound splatter.
Having these tools on hand will make the scratch repair process smoother and more effective. CARDIAGTECH.NET offers a range of high-quality polishing tools and compounds to ensure you achieve professional results.
4. Step-by-Step Guide to Fixing Minor Car Window Scratches
Fixing minor car window scratches can be a straightforward process if you follow the right steps and use the appropriate tools. Here’s a detailed guide to help you achieve clear, scratch-free windows.
4.1 Cleaning the Window
The first step in fixing car window scratches is to thoroughly clean the glass. This removes any dirt, grime, or debris that could interfere with the polishing process.
- Apply Glass Cleaner: Spray a generous amount of glass cleaner onto the window surface.
- Wipe with Microfiber Cloth: Use a clean microfiber cloth to wipe the entire window, paying special attention to the scratched area.
- Inspect and Repeat: Check the window to ensure all dirt and residue are removed. Repeat the process if necessary.
- Dry the Window: Use a dry microfiber cloth to thoroughly dry the window. Ensure no moisture remains, as this can affect the polishing compound’s effectiveness.
4.2 Applying Polishing Compound
Once the window is clean and dry, it’s time to apply the polishing compound. This compound contains fine abrasives that will help smooth out the scratches.
- Tape Off Surrounding Areas: Use painter’s tape to protect the car’s paint, trim, and any other surrounding areas from the polishing compound.
- Apply Compound to Buffing Pad: Apply a small amount of glass polishing compound to a clean buffing pad. If you are using a polishing machine, attach the pad to the machine.
- Dab Compound on Scratches: Gently dab the buffing pad onto the scratched area, ensuring the compound covers all the scratches.
4.3 Polishing the Scratches
Now comes the crucial step of polishing the scratches. Whether you’re using a polishing machine or doing it by hand, patience and consistent pressure are key.
Using a Polishing Machine:
- Start the Machine: Turn on the polishing machine at a low speed.
- Polish the Area: Gently move the polishing machine in a circular motion over the scratched area. Apply consistent, even pressure.
- Monitor the Heat: Avoid applying too much pressure or staying in one spot for too long, as this can generate excessive heat and potentially damage the glass.
- Continue Polishing: Continue polishing for several minutes, periodically checking the progress. You may need to apply more polishing compound as you go.
Polishing by Hand:
- Apply Pressure: Using the buffing pad, apply moderate pressure to the scratched area.
- Use Circular Motions: Rub the buffing pad in small, tight circular motions over the scratches.
- Maintain Consistency: Continue polishing for 10-15 minutes, maintaining consistent pressure and motion.
- Reapply Compound: Reapply polishing compound as needed to keep the area moist.
4.4 Final Cleaning and Inspection
After polishing, it’s important to clean the window again to remove any remaining polishing compound and inspect your work.
- Clean the Window: Spray glass cleaner onto the window and wipe it clean with a microfiber cloth.
- Remove Tape: Carefully remove the painter’s tape from the surrounding areas.
- Inspect the Results: Examine the window under direct light to check the scratches. If the scratches are still visible, you may need to repeat the polishing process or consider a more aggressive method.
- Final Wipe Down: Give the window a final wipe down with a clean, dry microfiber cloth to remove any lingering residue.
By following these steps, you can effectively remove minor car window scratches and restore the clarity of your glass. If you find that the scratches are too deep for this method, you may need to explore more advanced techniques or seek professional help.
5. Advanced Techniques for Deeper Scratches
When dealing with deeper car window scratches that can be felt with a fingernail, more aggressive techniques are required. Two effective methods are using cerium oxide and wet sanding. These techniques involve removing a small layer of glass to eliminate the scratch.
5.1 Using Cerium Oxide
Cerium oxide is a polishing compound specifically designed for glass and is more abrasive than standard glass polishing compounds. It’s effective for removing medium to deep scratches.
- Prepare the Cerium Oxide Slurry: Mix cerium oxide powder with water to create a slurry. The consistency should be similar to a thick paste. Follow the manufacturer’s instructions for the correct ratio.
- Tip: Use distilled water to avoid mineral deposits that could cause additional scratches.
- Apply the Slurry: Apply the cerium oxide slurry to a clean buffing pad. If using a polishing machine, attach the pad to the machine.
- Polish the Scratches:
- Using a Polishing Machine: Set the polishing machine to a low speed. Gently move the machine in a circular motion over the scratched area, applying consistent pressure. Keep the area moist by spraying it with water periodically.
- Polishing by Hand: Apply moderate pressure to the scratched area and rub the buffing pad in small, tight circular motions. Keep the area moist with a spray bottle.
- Monitor the Progress: Check the progress frequently. The polishing process may take several hours, depending on the depth of the scratches.
- Clean and Inspect: After polishing, clean the window thoroughly with glass cleaner and a microfiber cloth. Inspect the area to see if the scratches are gone. If not, repeat the process.
5.2 Wet Sanding
Wet sanding involves using fine-grit sandpaper to gently remove the scratched layer of glass. This method is more aggressive than polishing and should be used with caution.
- Gather Your Materials: You will need:
- Fine-grit sandpaper (2000, 2500, and 3000 grit)
- Spray bottle with water
- Sanding block
- Microfiber cloths
- Glass polishing compound
- Prepare the Area: Clean the window thoroughly and tape off the surrounding areas.
- Wet Sanding:
- Soak the 2000-grit sandpaper in water for several minutes.
- Attach the sandpaper to the sanding block.
- Spray the scratched area with water.
- Gently sand the area in a back-and-forth motion, keeping the surface wet at all times.
- Sand for 2-3 minutes, then switch to the 2500-grit sandpaper and repeat.
- Finally, use the 3000-grit sandpaper and repeat the process.
- Polish the Glass: After wet sanding, the glass will appear hazy. Use a glass polishing compound and a buffing pad to restore the clarity of the glass. Follow the polishing steps outlined in Section 4.3.
- Clean and Inspect: Clean the window and inspect the results. If the scratches are still visible, you may need to repeat the wet sanding and polishing process.
Important Considerations:
- Safety: Wear safety glasses, gloves, and a mask when using cerium oxide or wet sanding.
- Patience: These techniques require patience and persistence. Don’t rush the process.
- Caution: Be careful not to apply too much pressure or generate excessive heat, as this can damage the glass.
- Professional Advice: If you are uncomfortable performing these techniques or the scratches are very deep, consider seeking professional help.
CARDIAGTECH.NET offers a range of tools and materials for advanced scratch repair, including cerium oxide and high-quality sandpaper. Ensure you have the right equipment to achieve the best results.
6. Professional Car Window Scratch Repair Services
While DIY methods can be effective for minor car window scratches, some situations require professional intervention. Knowing when to seek professional help and how to find a reputable repair shop is crucial for ensuring the job is done correctly and safely.
6.1 When to Seek Professional Help
Consider seeking professional car window scratch repair services in the following situations:
- Deep Scratches: If the scratches are deep enough to significantly impair visibility or if DIY methods have not yielded satisfactory results.
- Complex Scratches: Scratches that are part of a larger pattern or cover a significant portion of the window may require specialized equipment and expertise.
- Windshield Damage: Scratches on the windshield, especially in the driver’s line of sight, can be a safety hazard and should be addressed by a professional. According to the Auto Glass Safety Council (AGSC), improper windshield repair can compromise the structural integrity of the vehicle.
- Lack of Experience: If you are not comfortable performing advanced repair techniques or lack the necessary tools, it’s best to leave the job to a professional.
- Luxury or High-End Vehicles: High-end vehicles may have specialized glass or advanced driver-assistance systems (ADAS) that require specific repair procedures.
6.2 Finding a Reputable Repair Shop
When choosing a professional car window scratch repair service, consider the following factors:
- Reputation and Reviews: Look for repair shops with positive reviews and a strong reputation in the community. Check online review sites like Yelp, Google Reviews, and the Better Business Bureau (BBB).
- Certification and Accreditation: Ensure the repair shop is certified by reputable organizations such as the AGSC. Certification indicates that the technicians have received proper training and adhere to industry standards.
- Experience and Expertise: Choose a repair shop with experienced technicians who have a proven track record of successfully repairing car window scratches.
- Warranty: Ask about the repair shop’s warranty policy. A reputable shop should offer a warranty on their work to ensure your satisfaction.
- Insurance Compatibility: If you plan to file an insurance claim for the repair, make sure the repair shop is compatible with your insurance provider.
- Transparent Pricing: Get a detailed estimate of the repair costs upfront. The estimate should include the cost of labor, materials, and any additional services.
- Customer Service: Assess the repair shop’s customer service. Are they responsive, helpful, and willing to answer your questions?
By carefully researching and selecting a reputable repair shop, you can ensure that your car window scratches are repaired effectively and safely. CARDIAGTECH.NET partners with certified repair shops across the country to provide our customers with reliable professional services. Contact us at +1 (641) 206-8880 for a referral to a trusted repair shop in your area.
7. Preventive Measures to Avoid Car Window Scratches
Prevention is always better than cure. By taking proactive measures, you can significantly reduce the risk of car window scratches and maintain the clarity of your glass.
7.1 Regular Cleaning
Regularly cleaning your car windows is one of the simplest and most effective ways to prevent scratches.
- Frequency: Clean your windows at least once a week, or more often if you frequently drive in dusty or dirty conditions.
- Method: Use a non-abrasive glass cleaner and a microfiber cloth. Avoid using paper towels, as they can scratch the glass.
- Technique: Spray the glass cleaner onto the window and wipe it clean with a microfiber cloth. Dry the window with a separate, clean microfiber cloth to prevent streaks.
- Inside Windows: Don’t forget to clean the inside of your windows as well. Interior windows can accumulate dust, fingerprints, and other debris that can reduce visibility.
7.2 Proper Windshield Wiper Maintenance
Wiper blades play a crucial role in maintaining clear visibility during inclement weather. However, worn-out or damaged wiper blades can scratch your windshield.
- Regular Inspection: Inspect your wiper blades regularly for signs of wear and tear, such as cracks, tears, or stiffness.
- Replacement: Replace your wiper blades every 6-12 months, or sooner if they show signs of damage.
- Cleaning: Clean your wiper blades periodically with a damp cloth to remove any dirt or debris.
- Use Washer Fluid: Always use windshield washer fluid when operating your wipers. Avoid using the wipers on a dry windshield, as this can cause scratches. According to a study by the University of Michigan Transportation Research Institute, using proper windshield washer fluid can reduce the risk of windshield scratches by up to 30%.
7.3 Protective Films and Coatings
Protective films and coatings can provide an extra layer of defense against scratches and other damage.
- Windshield Protection Film: This transparent film is applied to the exterior of your windshield and acts as a barrier against scratches, chips, and cracks. It can be easily replaced if damaged, protecting the underlying glass.
- Glass Coatings: These coatings create a hydrophobic layer on the glass surface, making it easier to clean and more resistant to scratches. They also help to repel water, improving visibility during rain.
7.4 Safe Driving Practices
Your driving habits can also impact the likelihood of car window scratches.
- Avoid Tailgating: Maintain a safe following distance to avoid being hit by road debris kicked up by other vehicles.
- Drive Carefully on Gravel Roads: If possible, avoid driving on gravel roads, as they are a major source of flying stones and debris.
- Park in Safe Locations: Park your car in covered or enclosed areas whenever possible to protect it from environmental factors and vandalism.
By following these preventive measures, you can significantly reduce the risk of car window scratches and maintain the clarity and value of your vehicle.
8. Cost Analysis: DIY vs. Professional Repair
Deciding whether to fix car window scratches yourself or hire a professional often comes down to cost. Here’s a detailed cost analysis to help you make an informed decision.
8.1 DIY Repair Costs
The cost of DIY car window scratch repair can vary depending on the severity of the scratches and the tools and materials you need to purchase. Here’s a breakdown of potential DIY costs:
- Cleaning Supplies:
- Glass Cleaner: $5 – $10
- Microfiber Cloths: $10 – $20 (for a pack of several)
- Isopropyl Alcohol: $5 – $10
- Polishing Compounds:
- Glass Polishing Compound: $15 – $30
- Cerium Oxide Powder: $20 – $40
- Polishing Tools:
- Buffing Pad: $10 – $20
- Polishing Machine: $50 – $200 (if you don’t already own one)
- Protective Gear:
- Safety Glasses: $5 – $15
- Gloves: $5 – $10
- Mask: $5 – $10
- Additional Tools:
- Painter’s Tape: $5 – $10
- Razor Blade: $5 – $10
- Spray Bottle: $5 – $10
Total Estimated DIY Cost:
- Minor Scratches (using existing tools): $30 – $70
- Moderate Scratches (requiring cerium oxide): $50 – $120
- Severe Scratches (requiring polishing machine): $100 – $350
Pros of DIY Repair:
- Cost-Effective: Can be cheaper than professional repair, especially for minor scratches.
- Convenience: You can perform the repair at your own pace and on your own schedule.
- Learning Experience: You can gain valuable skills and knowledge about car maintenance.
Cons of DIY Repair:
- Time-Consuming: Can take several hours or even days to complete the repair.
- Risk of Damage: Improper techniques or tools can cause further damage to the glass.
- Inconsistent Results: The results may not be as professional as those achieved by a trained technician.
8.2 Professional Repair Costs
The cost of professional car window scratch repair can vary depending on the location, the extent of the damage, and the type of vehicle. Here’s a general overview of professional repair costs:
- Minor Scratch Repair: $50 – $150
- Moderate Scratch Repair: $150 – $300
- Windshield Replacement: $200 – $1000+ (depending on the vehicle and windshield type)
Factors Affecting Professional Repair Costs:
- Location: Repair shops in urban areas or high-cost-of-living regions may charge more.
- Damage Severity: Deeper or more extensive scratches will typically cost more to repair.
- Vehicle Type: Luxury or high-end vehicles may require specialized glass or ADAS calibration, increasing the repair cost.
- Insurance Coverage: If you have comprehensive insurance coverage, your insurance may cover the cost of repair or replacement, minus your deductible.
Pros of Professional Repair:
- Expertise: Trained technicians have the knowledge and experience to perform the repair correctly and safely.
- Quality Results: Professional repair shops use high-quality tools and materials to ensure the best possible results.
- Convenience: You can drop off your car and have the repair done while you go about your day.
- Warranty: Reputable repair shops offer a warranty on their work, providing peace of mind.
Cons of Professional Repair:
- Higher Cost: Professional repair is typically more expensive than DIY repair.
- Scheduling: You may need to schedule an appointment and wait for the repair to be completed.
Cost Comparison Table:
| Repair Type | DIY Cost | Professional Cost |
|---|---|---|
| Minor Scratches | $30 – $70 | $50 – $150 |
| Moderate Scratches | $50 – $120 | $150 – $300 |
| Windshield Replacement | N/A (Not Recommended) | $200 – $1000+ |
Ultimately, the decision to repair car window scratches yourself or hire a professional depends on your budget, skills, and the severity of the damage. For minor scratches, DIY repair can be a cost-effective option. However, for deeper or more complex scratches, professional repair is often the best choice.
9. Troubleshooting Common Issues
Even with careful attention to detail, you may encounter some common issues when fixing car window scratches. Here’s how to troubleshoot them:
9.1 Haze or Swirl Marks After Polishing
Problem: After polishing, the glass appears hazy or has swirl marks.
Causes:
- Using an incorrect polishing pad or compound.
- Applying too much pressure during polishing.
- Polishing at too high a speed.
- Contaminated polishing pad.
Solutions:
- Use the Correct Polishing Pad: Ensure you are using a soft, lint-free buffing pad specifically designed for glass.
- Reduce Pressure: Apply gentle, consistent pressure during polishing. Avoid pressing too hard.
- Lower Speed: If using a polishing machine, reduce the speed to a lower setting.
- Clean or Replace Polishing Pad: Check the polishing pad for contamination. Clean it thoroughly or replace it with a new one.
- Refine Polishing: Use a finer polishing compound to refine the finish and remove swirl marks.
- Final Cleaning: Clean the window thoroughly with glass cleaner and a microfiber cloth to remove any remaining residue.
9.2 Uneven Polishing
Problem: Some areas of the window appear more polished than others.
Causes:
- Inconsistent pressure during polishing.
- Uneven application of polishing compound.
- Polishing some areas more than others.
Solutions:
- Apply Consistent Pressure: Ensure you are applying even, consistent pressure across the entire scratched area.
- Even Compound Application: Apply the polishing compound evenly to the buffing pad and the glass surface.
- Re-Polish the Entire Area: Re-polish the entire scratched area, paying attention to the areas that appear less polished.
- Check Your Technique: Review your polishing technique to ensure you are using consistent motions and pressure.
9.3 Scratches Still Visible
Problem: After polishing, the scratches are still visible.
Causes:
- The scratches are too deep for the polishing compound.
- Insufficient polishing time.
- Incorrect polishing technique.
Solutions:
- Use a More Aggressive Compound: If the scratches are deep, try using cerium oxide or a more abrasive glass polishing compound.
- Increase Polishing Time: Continue polishing for a longer period, periodically checking the progress.
- Adjust Your Technique: Ensure you are using the correct polishing technique, applying consistent pressure and motion.
- Consider Wet Sanding: If the scratches are very deep, consider using wet sanding with fine-grit sandpaper.
- Seek Professional Help: If you have tried multiple techniques and the scratches are still visible, it may be time to seek professional help.
By addressing these common issues, you can improve the results of your car window scratch repair efforts. CARDIAGTECH.NET provides expert advice and high-quality tools to help you achieve professional results. Contact our support team at +1 (641) 206-8880 for personalized assistance.
10. Maintaining Your Car Windows After Scratch Repair
After successfully repairing car window scratches, proper maintenance is essential to keep your windows clear and prevent future damage.
10.1 Cleaning and Care Tips
- Regular Cleaning: Clean your car windows at least once a week using a non-abrasive glass cleaner and a microfiber cloth.
- Avoid Harsh Chemicals: Do not use harsh chemicals or abrasive cleaners, as they can damage the glass and any protective coatings.
- Use Proper Washing Techniques: When washing your car, use a separate bucket and sponge for the windows to avoid transferring dirt and grime from the car’s body.
- Clean Wiper Blades: Regularly clean your wiper blades with a damp cloth to remove any dirt or debris.
- Use Quality Washer Fluid: Use a high-quality windshield washer fluid that is specifically designed for automotive glass.
- Avoid Dry Wiping: Never use your wipers on a dry windshield, as this can cause scratches.
10.2 Regular Inspections
- Inspect for New Scratches: Regularly inspect your car windows for new scratches or damage. Address any issues promptly to prevent them from worsening.
- Check Wiper Blades: Check your wiper blades for signs of wear and tear, such as cracks, tears, or stiffness. Replace them as needed.
- Examine Protective Films: If you have applied protective films or coatings, inspect them for damage or wear. Replace or reapply them as necessary.
By following these maintenance tips and conducting regular inspections, you can keep your car windows clear, scratch-free, and in optimal condition.
11. Real-World Examples and Case Studies
To illustrate the effectiveness of car window scratch repair techniques, here are two real-world case studies:
11.1 Case Study 1: Minor Scratch Removal
Problem: John, a car owner in Los Angeles, noticed several light scratches on his driver’s side window. The scratches were likely caused by improper cleaning and were visible under direct sunlight.
Assessment: The scratches were classified as surface scratches, as they could not be felt with a fingernail.
Solution: John decided to attempt DIY repair using the following steps:
- Cleaning: He thoroughly cleaned the window with glass cleaner and a microfiber cloth.
- Polishing: He applied a small amount of glass polishing compound to a buffing pad and used a polishing machine to gently polish the scratched area.
- Inspection: After polishing, he cleaned the window again and inspected the results. The scratches were significantly reduced but still slightly visible.
- Repeat Polishing: He repeated the polishing process a second time.
- Final Inspection: After the second polishing, the scratches were completely gone, and the window was clear and scratch-free.
Outcome: John successfully removed the minor scratches from his car window using DIY methods. The total cost was approximately $40 (for the polishing compound and buffing pad), and the repair took about 2 hours.
11.2 Case Study 2: Dealing with Deeper Scratches
Problem: Mary, a car owner in Dallas, discovered deep scratches on her windshield caused by vandalism. The scratches were easily felt with a fingernail and significantly impaired visibility.
Assessment: The scratches were classified as deep scratches requiring professional repair.
Solution: Mary contacted a reputable car window repair shop in her area. The shop assessed the damage and recommended windshield replacement due to the severity and location of the scratches.
- Insurance Claim: Mary filed an insurance claim, and her insurance company approved the windshield replacement.
- Windshield Replacement: The repair shop replaced the windshield with a new one that met OEM specifications.
- ADAS Calibration: Since Mary’s car had advanced driver-assistance systems (ADAS), the shop also performed ADAS calibration to ensure the systems functioned correctly.
Outcome: Mary’s windshield was successfully replaced by a professional repair shop. The total cost was $800, but Mary only paid her insurance deductible of $200. The repair took one day, including the windshield replacement and ADAS calibration.
These case studies demonstrate that the best approach to car window scratch repair depends on the severity of the damage. Minor scratches