How to Fix Car Scratches: A Comprehensive Guide
Is your vehicle marred by unsightly scratches? Don’t despair! At CARDIAGTECH.NET, we understand the frustration of car scratches and offer effective solutions. This guide provides detailed methods to address various types of car scratches, ensuring your vehicle regains its pristine appearance. Discover the right tools and techniques to achieve professional results, and explore high-quality car repair tools available at CARDIAGTECH.NET to make the process even easier.
1. Understanding Car Scratches
Identifying the type of scratch is crucial for effective repair. There are primarily three types of car scratches: clear coat scratches, base coat scratches, and primer coat scratches. Each type requires a different approach to repair. Recognizing these differences ensures you use the correct method, saving time and effort while achieving the best possible outcome.
1.1. Clear Coat Scratches
Clear coat scratches are the most superficial, affecting only the clear protective layer of your car’s paint. These are often caused by minor abrasions such as branches, light brushes, or improper washing techniques. They appear as faint lines on the surface.
- Characteristics: Shallow and only affect the clear coat layer.
- Causes: Minor scrapes, small rocks, or debris.
- Repair: Easily removed with polishing compounds.
1.2. Base Coat Scratches
Base coat scratches penetrate through the clear coat and into the colored base coat layer. These are more noticeable and result from slightly harsher impacts, like road debris or more aggressive brushing.
- Characteristics: Deeper than clear coat scratches, reaching the color layer.
- Causes: Larger rocks or debris.
- Repair: Requires touch-up paint and more careful polishing.
1.3. Primer Coat Scratches
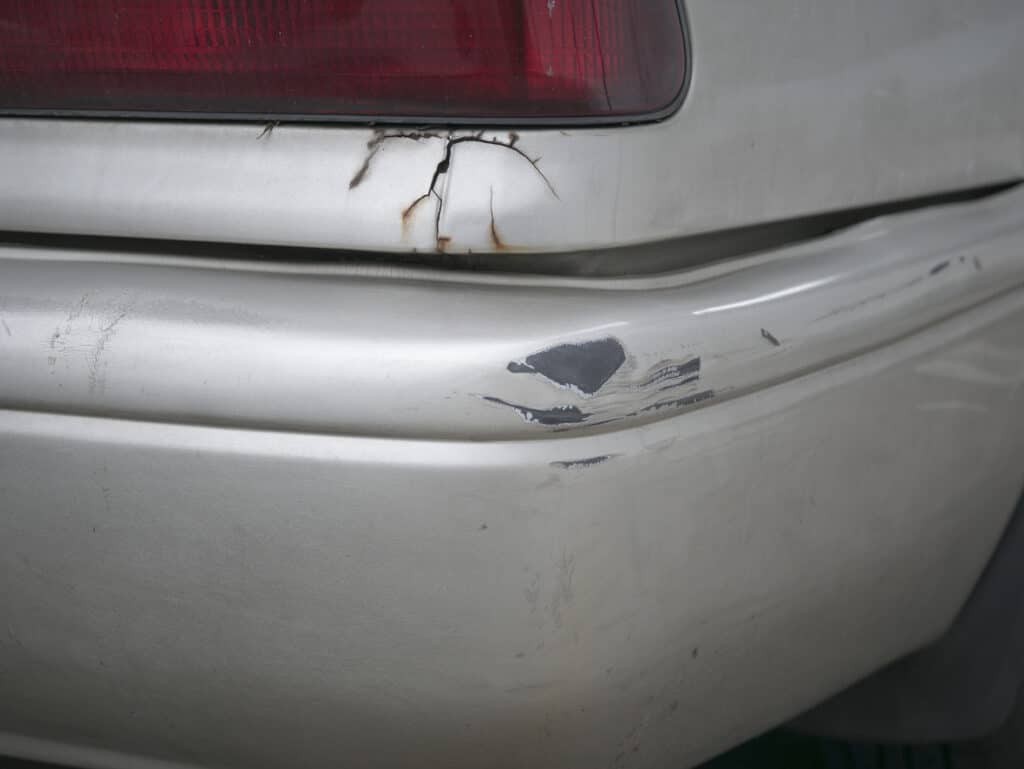
Primer coat scratches are the most severe, extending through the clear coat, base coat, and into the primer layer, which is the undercoat that prepares the metal for paint. These scratches are typically caused by significant impacts, such as collisions or deep scrapes against rough surfaces.
- Characteristics: Deepest scratches, exposing the primer layer.
- Causes: Accidents or serious impacts.
- Repair: May require professional help, involving sanding, filling, and repainting.
Clear coat car scratch
2. Identifying the Type of Car Scratch
Accurately identifying the scratch type is vital for selecting the appropriate repair method. A simple fingernail test can help determine the depth of the scratch.
2.1. The Fingernail Test
Run your fingernail gently across the scratch. If your fingernail catches, it indicates a deeper scratch that has penetrated the clear coat. If it doesn’t catch, the scratch is likely only in the clear coat. This test is a quick and easy way to assess the severity of the damage.
2.2. The Polish Test
Apply a small amount of car polish to a microfiber cloth and rub it onto the scratched area. If the scratch disappears, it’s likely a clear coat scratch. If it remains visible, you’re dealing with a deeper scratch that requires more intensive repair methods. This test provides a practical way to visually confirm the scratch depth.
3. Tools and Materials Needed
Having the right tools and materials is crucial for effectively fixing car scratches. Here’s a comprehensive list to prepare you for the task. CARDIAGTECH.NET offers a wide selection of these tools, ensuring you have everything you need for a professional finish.
3.1. Essential Cleaning Supplies
- Car Wash Soap: To thoroughly clean the area around the scratch.
- Water: For rinsing and cleaning.
- Microfiber Cloths: Soft cloths to avoid further scratching during cleaning and polishing.
3.2. Scratch Removal Products
- Scratch Remover Compound: Specifically designed to buff out clear coat scratches.
- Rubbing Compound: More abrasive, used for deeper scratches.
- Car Polish: To restore shine after removing the scratch.
- Touch-Up Paint: Matching the exact color of your car for filling in deeper scratches.
3.3. Sanding and Application Tools
- 2000-Grit Sandpaper: For smoothing out the surface after applying touch-up paint.
- 1000-Grit Sandpaper: For removing rough edges on deeper scratches.
- Toothpicks or Small Brushes: For precise application of touch-up paint.
- Sanding Block: Provides an even surface for sanding.
3.4. Buffing and Polishing Equipment
- Dual Action Polisher: For efficient and even polishing (optional but recommended).
- Polishing Pads: Different pads for applying rubbing compound and polish.
- Detailing Clay: To remove contaminants before polishing.
3.5. Safety and Protection Gear
- Gloves: To protect your hands from chemicals.
- Mask: To avoid inhaling harmful fumes during sanding and polishing.
- Eye Protection: Safety glasses or goggles to protect your eyes from debris.
4. Step-by-Step Guide to Fixing Car Scratches
Follow these detailed steps to effectively remove scratches from your car, categorized by the type of scratch.
4.1. Fixing Clear Coat Scratches
Clear coat scratches are the easiest to fix, and with the right technique, you can achieve a flawless finish.
Step 1: Clean the Area
Thoroughly clean the area around the scratch using car wash soap and water. This removes any dirt or debris that could interfere with the repair process.
- Use a soft sponge or microfiber cloth to gently wash the area.
- Rinse thoroughly with clean water.
- Dry the area completely with a clean microfiber cloth.
Step 2: Apply Scratch Remover
Apply a small amount of scratch remover compound to a microfiber cloth. Rub the compound into the scratch using a circular motion with light pressure.
- Use a dedicated microfiber applicator pad for best results.
- Work the compound into the scratch for several minutes.
- Continue buffing until the scratch disappears.
Step 3: Apply Car Polish
Once the scratch is gone, apply a small amount of car polish to a clean microfiber cloth. Buff the area to restore the shine.
- Use a fresh, clean microfiber cloth to avoid reintroducing any contaminants.
- Buff the area until the polish is evenly distributed and the shine is restored.
- Wipe off any excess polish with a clean cloth.
4.2. Fixing Base Coat Scratches
Base coat scratches require a more involved process, including the application of touch-up paint to restore the color layer.
Step 1: Clean the Area
Clean the area around the scratch with car wash soap and water. Ensure the area is completely dry before proceeding.
- Use a degreasing agent to remove any wax or sealant from the area.
- Rinse and dry thoroughly.
Step 2: Apply Touch-Up Paint
Apply a small amount of touch-up paint to the scratch using a toothpick or small brush. Allow the paint to dry completely, typically for several hours or overnight.
- Apply the paint in thin layers to avoid drips and runs.
- Use a toothpick for very fine scratches.
- Ensure the paint matches the exact color code of your car.
Step 3: Sand the Area
Lightly sand the area with 2000-grit sandpaper to smooth out the surface. Use a sanding block to ensure even pressure and avoid creating new scratches.
- Wet sand the area by keeping the sandpaper and surface wet.
- Use light, even strokes.
- Sand until the touch-up paint is flush with the surrounding paint.
Step 4: Apply Rubbing Compound
Apply a small amount of rubbing compound to a microfiber cloth. Rub the compound into the scratch using a circular motion with light pressure. Continue buffing the area until the scratch disappears.
- Use a dual-action polisher for more efficient and even buffing.
- Check your progress frequently to avoid removing too much paint.
Step 5: Apply Car Polish
Once the scratch is gone, apply a small amount of car polish to a clean microfiber cloth and buff the area to restore the shine.
- Use a separate, clean microfiber cloth for polishing.
- Buff the area until the polish is evenly distributed and the shine is restored.
- Wipe off any excess polish with a clean cloth.
4.3. Fixing Primer Coat Scratches
Primer coat scratches are the most challenging to repair and often require professional assistance. However, with patience and the right tools, you can achieve satisfactory results.
Step 1: Clean the Area
Clean the area around the scratch with car wash soap and water. Dry the area thoroughly before proceeding.
- Use a degreasing agent to remove any wax or sealant.
- Rinse and dry thoroughly.
Step 2: Sand the Area
Sand the area with 1000-grit sandpaper to remove any rough edges. Then, sand the area again with 2000-grit sandpaper to smooth out the surface.
- Use a sanding block for even pressure.
- Wet sand the area to minimize scratching.
- Ensure the edges of the scratch are smooth and flush with the surrounding paint.
Step 3: Apply Touch-Up Paint
Apply a small amount of touch-up paint to the scratch using a toothpick or small brush. Allow the paint to dry completely.
- Apply the paint in thin layers to avoid drips and runs.
- Use a toothpick for precision.
- Allow sufficient drying time between coats.
Step 4: Sand the Area
Lightly sand the area with 2000-grit sandpaper to smooth out the surface.
- Wet sand the area.
- Use a sanding block for even pressure.
- Sand until the touch-up paint is flush with the surrounding paint.
Step 5: Apply Rubbing Compound
Apply a small amount of rubbing compound to a microfiber cloth. Rub the compound into the scratch using a circular motion, applying light pressure. Continue buffing the area until the scratch disappears.
- Use a dual-action polisher for efficient buffing.
- Check your progress frequently.
Step 6: Apply Car Polish
Once the scratch is gone, apply a small amount of car polish to a clean microfiber cloth and buff the area to restore the shine.
- Use a clean microfiber cloth for polishing.
- Buff the area until the polish is evenly distributed and the shine is restored.
- Wipe off any excess polish with a clean cloth.
Note: If the scratch is too deep to be removed with these steps, it may require professional repair. CARDIAGTECH.NET can connect you with trusted professionals if needed.
5. Advanced Techniques and Tips
For those looking to achieve an even more professional finish, consider these advanced techniques and tips.
5.1. Using a Dual Action Polisher
A dual-action polisher can significantly improve the efficiency and effectiveness of scratch removal. It provides consistent pressure and motion, reducing the risk of swirl marks and ensuring a more even finish.
- Benefits: Consistent pressure, reduced risk of swirl marks, more even finish.
- Technique: Use a low speed setting, apply light pressure, and keep the polisher moving.
- Pads: Use different pads for compounding and polishing.
5.2. Wet Sanding
Wet sanding involves using sandpaper with water to minimize scratching and create a smoother surface. This technique is particularly useful for blending touch-up paint with the surrounding paint.
- Benefits: Reduces scratching, creates a smoother surface, helps blend touch-up paint.
- Technique: Soak sandpaper in water, keep the surface wet during sanding, use light pressure.
- Grit: Use 2000-grit or higher sandpaper.
5.3. Color Matching
Ensuring the touch-up paint matches your car’s exact color is crucial for a seamless repair. Use your car’s color code to purchase the correct paint.
- Location: Found on a sticker inside the driver’s side door or in the owner’s manual.
- Custom Mixing: Consider having paint custom mixed for a perfect match.
6. Preventing Car Scratches
Prevention is always better than cure. Here are several tips to help minimize the risk of scratches on your car.
6.1. Regular Washing and Waxing
Regularly washing your car removes dirt and debris that can cause scratches. Applying a coat of wax provides a protective layer that helps prevent scratches and keeps your car looking shiny.
- Frequency: Wash your car every two weeks, wax every three months.
- Products: Use high-quality car wash soap and wax.
- Technique: Use a microfiber cloth and gentle motions.
6.2. Parking Strategically
Avoid parking your car in areas where it could be scratched, such as near trees, bushes, or shopping carts.
- Covered Parking: Park in a garage or carport whenever possible.
- Open Spaces: Choose parking spots away from potential hazards.
- Avoid Tight Spots: Minimize the risk of door dings.
6.3. Using a Car Cover
A car cover provides a physical barrier that protects your car’s paint from scratches, as well as from the elements.
- Benefits: Protects from scratches, dust, and weather.
- Material: Choose a soft, breathable material.
- Fit: Ensure the cover fits your car snugly.
6.4. Careful Driving Habits
Avoid driving too close to other vehicles and be mindful of road debris that could cause scratches.
- Safe Distance: Maintain a safe following distance.
- Avoid Gravel Roads: Minimize driving on unpaved surfaces.
- Stay Alert: Watch out for road debris.
7. Choosing the Right Products from CARDIAGTECH.NET
Selecting the right products is key to successful scratch repair. CARDIAGTECH.NET offers a wide range of high-quality tools and materials to help you achieve professional results.
7.1. Scratch Repair Kits
These kits include everything you need to remove minor scratches, such as scratch remover compound, polishing pads, and microfiber cloths.
- Benefits: Convenient, cost-effective, includes essential items.
- Consider: Look for kits with high-quality compounds and pads.
7.2. Polishing Compounds
CARDIAGTECH.NET provides a variety of polishing compounds for different types of scratches, from light swirl marks to more severe imperfections.
- Types: Scratch remover, rubbing compound, finishing polish.
- Consider: Choose the appropriate compound based on the severity of the scratch.
7.3. Touch-Up Paint
Find touch-up paint that matches your car’s exact color code to seamlessly repair deeper scratches.
- Matching: Ensure the paint matches your car’s color code.
- Application: Apply in thin layers for best results.
7.4. Buffing and Polishing Tools
From dual-action polishers to microfiber cloths, CARDIAGTECH.NET offers a range of tools to help you achieve a flawless finish.
- Dual-Action Polishers: For efficient and even polishing.
- Microfiber Cloths: Soft cloths for cleaning and polishing.
8. When to Seek Professional Help
While many scratches can be fixed at home, some may require professional attention. Here are situations where seeking professional help is recommended:
8.1. Deep Scratches
Scratches that penetrate through multiple layers of paint and into the metal may require professional repair to prevent rust and ensure a proper finish.
- Severity: Scratches that expose bare metal.
- Reason: Prevent rust and ensure a proper finish.
8.2. Large Areas of Damage
If your car has extensive scratches or damage over a large area, it may be more cost-effective and time-efficient to have it professionally repaired.
- Extent: Extensive scratches or damage.
- Reason: Cost-effective and time-efficient.
8.3. Lack of Experience
If you are not comfortable performing the repairs yourself or lack the necessary tools and experience, it is best to seek professional help.
- Expertise: Lack of experience or confidence.
- Reason: Avoid further damage.
9. Maintaining Your Car’s Paint
Once you’ve fixed the scratches, it’s important to maintain your car’s paint to prevent future damage.
9.1. Regular Detailing
Regular detailing helps to keep your car’s paint in top condition, protecting it from scratches and other damage.
- Frequency: Detail your car every six months.
- Services: Washing, waxing, polishing, and paint protection.
9.2. Paint Protection Film (PPF)
Paint protection film is a clear, protective film that is applied to your car’s paint to protect it from scratches, chips, and other damage.
- Benefits: Protects from scratches, chips, and other damage.
- Installation: Professionally installed for best results.
9.3. Ceramic Coating
Ceramic coating provides a durable, protective layer that helps to prevent scratches and keeps your car looking shiny.
- Benefits: Durable protection, scratch resistance, enhanced shine.
- Application: Professionally applied for best results.
10. Addressing Common Myths About Car Scratch Repair
There are several misconceptions about car scratch repair that can lead to ineffective or even damaging repair attempts. Let’s debunk some of these common myths.
10.1. Myth: Toothpaste Can Remove Scratches
While toothpaste may have some abrasive properties, it is not designed for car paint and can actually cause more damage than it fixes.
- Reality: Toothpaste is not formulated for car paint and can cause further damage.
- Solution: Use dedicated scratch removal compounds.
10.2. Myth: All Scratches Can Be Fixed with a Single Product
Different types of scratches require different approaches and products. Using the wrong product can be ineffective or even damaging.
- Reality: Different scratches require different methods and products.
- Solution: Identify the scratch type and use appropriate products.
10.3. Myth: Professional Repair is Always Expensive
While some repairs can be costly, many professional detailers offer affordable scratch repair services.
- Reality: Many affordable options are available.
- Solution: Get quotes from multiple detailers.
11. Real-World Examples of Car Scratch Repair
To illustrate the effectiveness of these methods, let’s look at some real-world examples of car scratch repair.
11.1. Case Study 1: Removing Clear Coat Scratches from a Black Sedan
A black sedan had several light scratches on the clear coat, caused by improper washing techniques. The scratches were successfully removed using a scratch remover compound and a dual-action polisher, restoring the car’s shine.
- Problem: Clear coat scratches from improper washing.
- Solution: Scratch remover compound and dual-action polisher.
- Result: Restored shine and scratch-free finish.
11.2. Case Study 2: Repairing Base Coat Scratches on a Red Coupe
A red coupe had deeper scratches that penetrated the base coat, caused by road debris. The scratches were repaired using touch-up paint, sanding, and polishing, resulting in a seamless finish.
- Problem: Base coat scratches from road debris.
- Solution: Touch-up paint, sanding, and polishing.
- Result: Seamless finish.
11.3. Case Study 3: Addressing Primer Coat Scratches on a Silver SUV
A silver SUV had deep scratches that reached the primer coat, caused by a minor collision. The scratches were professionally repaired using body filler, sanding, priming, and painting, resulting in a flawless repair.
- Problem: Primer coat scratches from a collision.
- Solution: Professional repair using body filler, sanding, priming, and painting.
- Result: Flawless repair.
12. Understanding the Science Behind Scratch Repair
To truly appreciate the art of scratch repair, it’s helpful to understand the science behind it.
12.1. How Polishing Compounds Work
Polishing compounds contain abrasive particles that gently remove the damaged layer of paint, smoothing out the surface and reducing the appearance of scratches.
- Abrasive Particles: Gently remove damaged paint.
- Smoothing: Smooth out the surface.
12.2. The Role of Clear Coat
The clear coat is the outermost layer of paint that protects the underlying color layers from scratches, UV damage, and other environmental factors.
- Protection: Protects from scratches, UV damage, and environmental factors.
- Appearance: Provides shine and gloss.
12.3. The Importance of Paint Layers
Understanding the different layers of paint—clear coat, base coat, and primer—is crucial for selecting the appropriate repair method.
- Clear Coat: Outermost protective layer.
- Base Coat: Provides color.
- Primer: Prepares the metal surface for paint.
13. Step-by-Step Video Tutorials
For a more visual guide, check out these step-by-step video tutorials on How To Fix Car Scratches.
13.1. Video 1: Removing Clear Coat Scratches
[Link to video tutorial]
- Content: Step-by-step guide on removing clear coat scratches using scratch remover compound and a microfiber cloth.
13.2. Video 2: Repairing Base Coat Scratches
[Link to video tutorial]
- Content: Step-by-step guide on repairing base coat scratches using touch-up paint, sanding, and polishing.
13.3. Video 3: Preventing Car Scratches
[Link to video tutorial]
- Content: Tips on preventing car scratches through regular washing, waxing, and careful parking habits.
14. Staying Updated with the Latest Car Care Trends
The world of car care is constantly evolving, with new products and techniques emerging regularly. Stay updated with the latest trends to keep your car looking its best.
14.1. Following Car Care Blogs and Forums
Follow car care blogs and forums to learn about new products, techniques, and tips.
- Blogs: AutogeekOnline, Detailer’s Domain.
- Forums: Detailing World, Autopia.
14.2. Attending Car Care Seminars and Workshops
Attend car care seminars and workshops to learn from experts and get hands-on experience with new products and techniques.
- Events: SEMA Show, local car care workshops.
14.3. Subscribing to Car Care Newsletters
Subscribe to car care newsletters to receive the latest news, product reviews, and tips directly to your inbox.
- Newsletters: CARDIAGTECH.NET, Autogeek.
15. Frequently Asked Questions (FAQs)
15.1. Can I use household products to remove car scratches?
No, household products are not designed for car paint and can cause further damage. Use dedicated car scratch removal products.
15.2. How do I find my car’s paint code?
Your car’s paint code can be found on a sticker inside the driver’s side door or in the owner’s manual.
15.3. What is the best way to wash my car to prevent scratches?
Use a high-quality car wash soap, a soft microfiber cloth or sponge, and gentle motions. Avoid using automatic car washes with brushes.
15.4. How often should I wax my car?
Wax your car every three months to protect the paint and prevent scratches.
15.5. Can I fix a scratch that has gone down to the metal?
Yes, but it may require professional repair to prevent rust and ensure a proper finish.
15.6. What is the difference between rubbing compound and polishing compound?
Rubbing compound is more abrasive and used for deeper scratches, while polishing compound is less abrasive and used to restore shine.
15.7. Is it necessary to use a dual-action polisher?
No, but it can significantly improve the efficiency and effectiveness of scratch removal.
15.8. How do I properly store car care products?
Store car care products in a cool, dry place away from direct sunlight.
15.9. What is paint protection film (PPF)?
Paint protection film is a clear, protective film that is applied to your car’s paint to protect it from scratches, chips, and other damage.
15.10. How do I choose the right microfiber cloth for car care?
Choose microfiber cloths with a high GSM (grams per square meter) for softness and absorbency. Use different cloths for washing, drying, and polishing.
Don’t let scratches detract from your vehicle’s beauty. With the right tools and techniques, you can effectively fix car scratches and maintain a flawless finish. Explore CARDIAGTECH.NET for high-quality car repair tools and expert guidance. Our extensive range of products and resources ensures you have everything you need to tackle any scratch repair project with confidence.
Ready to restore your car’s pristine condition? Contact CARDIAGTECH.NET today for expert advice and premium car repair tools. Our team is here to help you find the perfect solutions for your needs, ensuring you achieve professional results every time. Reach out to us at 276 Reock St, City of Orange, NJ 07050, United States, or call us at +1 (641) 206-8880. You can also visit our website at CARDIAGTECH.NET for more information. Let CARDIAGTECH.NET be your trusted partner in car care!