How To Fix Car Leather Scratches: A Detailed Guide
Fixing car leather scratches is easier than you think, and CARDIAGTECH.NET is here to show you how. This comprehensive guide will walk you through the process of leather scratch repair, using proven techniques and top-quality products to restore your car’s interior to its former glory. Discover how to tackle scuffs and imperfections, achieving professional results and leather restoration with ease.
1. Understanding Leather Scratches and Scuffs
Before diving into the repair process, let’s understand the types of damage we’re dealing with. Scratches and scuffs on leather car seats are common, resulting from everyday use, friction from clothing, or accidental contact with sharp objects. Recognizing the severity of the damage is crucial for selecting the right repair approach. Minor scuffs often affect only the surface, while deeper scratches can penetrate the leather’s finish and require more extensive treatment.
1.1. Types of Leather Damage
| Damage Type | Description | Repair Complexity |
|---|---|---|
| Minor Scuffs | Surface-level abrasions, often appearing as discoloration. | Low |
| Deep Scratches | Penetrate the leather’s finish, exposing the material underneath. | Medium |
| Cracks | Result from wear and tear or lack of maintenance, leading to visible breaks. | High |
| Fading | Color loss due to UV exposure or aging. | Medium |
| Stains | Discoloration caused by spills or contact with staining agents. | Medium |
1.2. Factors Contributing to Leather Damage
Several factors contribute to the wear and tear of leather car seats. Understanding these can help you take preventive measures:
- Friction: Constant rubbing from clothing, keys, or bags.
- UV Exposure: Sunlight can cause fading and drying, leading to cracks.
- Lack of Maintenance: Neglecting regular cleaning and conditioning.
- Temperature Fluctuations: Extreme temperatures can cause leather to expand and contract, leading to damage.
2. Essential Tools and Materials for Leather Repair
To effectively fix car leather scratches, you’ll need a selection of tools and materials. Investing in quality products ensures a professional finish and prolongs the life of your leather. CARDIAGTECH.NET offers a range of repair kits and individual items designed for DIY enthusiasts and professional detailers alike. Equipping yourself with the right tools can give you the confidence to tackle even the most challenging repairs.
2.1. Recommended Repair Kit Contents
- Leather Cleaner: To remove dirt and contaminants.
- Alcohol Cleaner: For preparing the surface and removing residues.
- Fine Grit Sandpaper (1200 grit): For smoothing rough areas.
- Leather Filler: To fill in deep scratches and imperfections.
- Spatula: For applying filler smoothly and evenly.
- Leather Colorant: To restore the original color of the leather.
- Color Matching Kit: Tints to achieve a perfect color match.
- Leather Finish (Gloss & Matte): To seal and protect the repaired area.
- Measuring Cup: For mixing finishes to the desired sheen.
- Soft Cloths: For cleaning and applying products.
2.2. Additional Useful Tools
- Heat Gun or Hair Dryer: To accelerate drying times.
- Detailing Brushes: For precise application of cleaners and colorants.
- Masking Tape: To protect surrounding areas from accidental staining.
- Gloves: To protect your hands from chemicals.
- Work Light: To ensure clear visibility of the repair area.
3. Step-by-Step Guide to Repairing Car Leather Scratches
This comprehensive guide provides a detailed, step-by-step process for repairing car leather scratches. Following these instructions carefully will help you achieve professional results, restoring your car’s interior to its original condition.
3.1. Step 1: Cleaning the Damaged Area
The first step in any leather repair process is to thoroughly clean the area. This removes dirt, oils, and contaminants that can interfere with the repair. Use a specialized leather cleaner to gently wipe down the damaged area. CARDIAGTECH.NET recommends using a pH-balanced cleaner to avoid damaging the leather.
3.1.1. Detailed Cleaning Instructions
- Apply a small amount of leather cleaner to a soft cloth.
- Gently wipe the affected area, using a circular motion.
- Avoid excessive pressure, which can further damage the leather.
- Use a separate clean cloth to wipe away any excess cleaner.
- Allow the area to dry completely before proceeding to the next step.
3.2. Step 2: Sanding Rough Patches
If the scratch or scuff has created rough edges or raised areas, sanding is necessary. Use fine-grit sandpaper (1200 grit) to gently smooth down the damaged area. This will create a more even surface for the filler to adhere to.
3.2.1. Sanding Techniques
- Wrap the sandpaper around a small sanding block for better control.
- Lightly sand the rough areas, using a back-and-forth motion.
- Avoid applying too much pressure, which can cause further damage.
- Periodically check the surface to ensure it is becoming smooth.
- Wipe away any sanding dust with a clean cloth before moving on.
3.3. Step 3: Applying Leather Filler
For deeper scratches, leather filler is essential to restore the surface to its original level. Apply a small amount of filler to the damaged area, using a spatula to spread it evenly. Build up the filler in thin layers, allowing each layer to dry completely before applying the next.
3.3.1. Filler Application Tips
- Use a flexible spatula to apply the filler smoothly.
- Apply thin layers to prevent cracking and ensure proper drying.
- Allow each layer to dry for 20-30 minutes, using a heat gun or hair dryer to speed up the process.
- Overfill the area slightly to allow for sanding in the next step.
- Remove any excess filler from the surrounding area with a damp cloth.
3.4. Step 4: Sanding the Filler
Once the filler has dried completely, sand it down to create a smooth, even surface. Use the same fine-grit sandpaper (1200 grit) to gently sand the filled area until it is level with the surrounding leather.
3.4.1. Sanding Techniques for Filler
- Use a sanding block to ensure even pressure and a flat surface.
- Sand in a circular motion, gradually blending the filler with the surrounding leather.
- Check the surface frequently to ensure it is becoming smooth and even.
- Wipe away any sanding dust with a clean cloth before proceeding.
3.5. Step 5: Applying Leather Colorant
The next step is to restore the color to the repaired area. Use a leather colorant that matches the original color of your car’s interior. Apply the colorant in thin layers, using a sponge or airbrush, and allow each layer to dry completely before applying the next.
3.5.1. Colorant Application Tips
- Test the colorant on an inconspicuous area first to ensure a perfect match.
- Apply the colorant in thin, even layers to avoid streaks and blotches.
- Use a heat gun or hair dryer to speed up the drying process.
- Apply multiple coats until the repaired area is fully covered and the color is consistent.
- Allow the final coat to dry completely before moving on.
3.6. Step 6: Applying Leather Finish
To protect the repaired area and blend it seamlessly with the surrounding leather, apply a leather finish. This will seal the colorant and provide a protective layer against wear and tear. Choose a finish that matches the original sheen of your leather, whether it’s matte, satin, or gloss.
3.6.1. Finish Application Techniques
- Apply the finish in thin, even layers using a soft cloth or sponge.
- Avoid applying too much finish, which can create a sticky or uneven surface.
- Use a heat gun or hair dryer to speed up the drying process.
- Apply multiple coats for added protection and a seamless finish.
- Allow the final coat to dry completely before using the repaired area.
3.7. Step 7: Final Inspection and Touch-Ups
After completing the repair, carefully inspect the area to ensure that the scratch or scuff is no longer visible and that the repair blends seamlessly with the surrounding leather. If necessary, perform any final touch-ups to achieve a perfect finish.
3.7.1. Touch-Up Tips
- Use a small brush or detailing brush for precise touch-ups.
- Apply additional colorant or finish as needed to blend the repaired area.
- Allow all touch-ups to dry completely before using the repaired area.
- Clean the surrounding area with a leather cleaner to remove any residues.
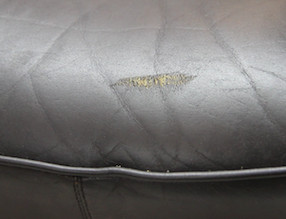
Leather seat with a scuff before repair
4. Advanced Techniques for Complex Leather Repairs
While the step-by-step guide covers most common leather scratch repairs, some situations require more advanced techniques. These include repairing deep gouges, tears, or extensive damage to the leather’s surface. In such cases, consider consulting a professional leather repair specialist or using specialized repair products.
4.1. Repairing Deep Gouges
Deep gouges may require multiple layers of leather filler and careful sanding to restore the surface to its original level. Use a flexible filler that can withstand repeated flexing without cracking.
- Clean the area thoroughly to remove any debris.
- Apply a thin layer of flexible leather filler to the gouge.
- Allow the filler to dry completely before applying the next layer.
- Repeat the process until the gouge is filled to the level of the surrounding leather.
- Sand the filler smooth, using fine-grit sandpaper.
- Apply leather colorant and finish to match the surrounding area.
4.2. Repairing Tears
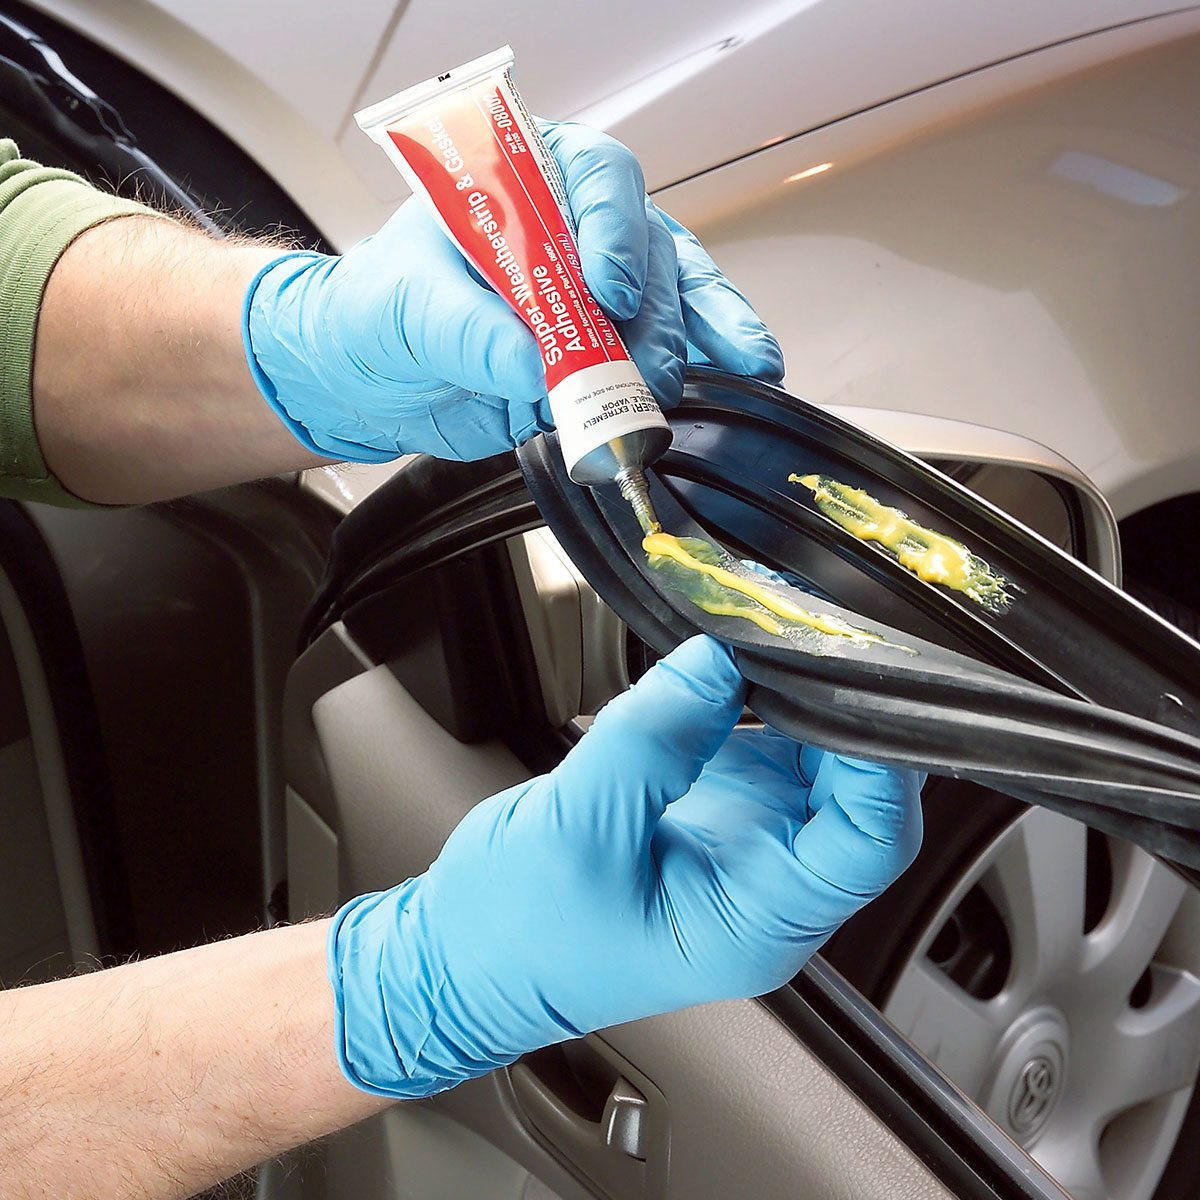
Repairing tears in leather requires a different approach. Use a leather adhesive to bond the torn edges together, and then apply a patch to reinforce the repair.
- Clean the area around the tear thoroughly.
- Apply a thin layer of leather adhesive to the torn edges.
- Carefully align the edges and press them together.
- Allow the adhesive to dry completely.
- Cut a patch of leather that is slightly larger than the tear.
- Apply leather adhesive to the back of the patch.
- Position the patch over the tear and press it firmly into place.
- Allow the adhesive to dry completely.
- Apply leather colorant and finish to blend the patch with the surrounding area.
4.3. Addressing Extensive Damage
For extensive damage, such as large areas of cracking or fading, consider using a leather restoration kit. These kits typically include a range of products designed to rejuvenate and restore the leather’s surface.
- Clean the leather thoroughly to remove any dirt and debris.
- Apply a leather rejuvenator to soften and condition the leather.
- Repair any cracks or tears using leather filler and adhesive.
- Apply leather colorant to restore the original color.
- Apply leather finish to protect the repaired area.
5. Maintaining Your Car’s Leather Interior
Once you’ve repaired the scratches and scuffs on your car’s leather interior, it’s important to take steps to maintain its condition. Regular cleaning and conditioning can prevent future damage and prolong the life of your leather seats. CARDIAGTECH.NET offers a range of leather care products designed to keep your car’s interior looking its best.
5.1. Regular Cleaning
Clean your car’s leather seats regularly to remove dirt, dust, and oils that can cause damage. Use a pH-balanced leather cleaner and a soft cloth to gently wipe down the seats.
- Vacuum the seats to remove any loose debris.
- Apply a small amount of leather cleaner to a soft cloth.
- Gently wipe the seats, using a circular motion.
- Avoid excessive pressure, which can damage the leather.
- Use a separate clean cloth to wipe away any excess cleaner.
- Allow the seats to dry completely before using them.
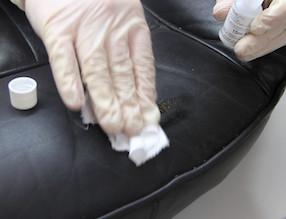 Cleaning the leather area
5.2. Conditioning
Condition your car’s leather seats regularly to keep them soft and supple. Leather conditioners help to replenish the natural oils that are lost over time, preventing the leather from drying out and cracking.
- Apply a small amount of leather conditioner to a soft cloth.
- Gently massage the conditioner into the leather, using a circular motion.
- Allow the conditioner to soak in for 15-20 minutes.
- Wipe away any excess conditioner with a clean cloth.
- Repeat the process every 3-6 months, or as needed.
5.3. Protecting from UV Exposure
Protect your car’s leather interior from UV exposure to prevent fading and damage. Park in the shade whenever possible, and use window tinting to block out harmful UV rays.
- Park in the shade whenever possible.
- Use window tinting to block out harmful UV rays.
- Apply a leather protectant with UV inhibitors to your seats.
- Reapply the protectant every 3-6 months, or as needed.
6. Common Mistakes to Avoid When Repairing Leather
Repairing leather can be a delicate process, and it’s easy to make mistakes that can further damage the material. Avoid these common pitfalls to ensure a successful repair:
6.1. Using Harsh Cleaners
Avoid using harsh cleaners or chemicals that can strip the leather of its natural oils and cause it to dry out. Stick to pH-balanced leather cleaners specifically designed for automotive use.
6.2. Applying Too Much Pressure
When cleaning or sanding leather, avoid applying too much pressure, which can cause further damage. Use a gentle touch and let the products do the work.
6.3. Skipping the Color Matching Step
Failing to properly match the color of the leather can result in a noticeable repair. Always test the colorant on an inconspicuous area first to ensure a perfect match.
6.4. Neglecting to Apply a Finish
Applying a leather finish is essential to protect the repaired area and blend it seamlessly with the surrounding leather. Don’t skip this step, or the repair may not last.
7. Why Choose CARDIAGTECH.NET for Your Leather Repair Needs
At CARDIAGTECH.NET, we understand the importance of maintaining your car’s interior. That’s why we offer a wide range of high-quality leather repair products and tools designed to help you achieve professional results. Our products are carefully selected to ensure they meet the highest standards of quality and performance.
7.1. Quality Products
We offer a comprehensive selection of leather cleaners, conditioners, fillers, colorants, and finishes, all designed to restore and protect your car’s leather interior.
7.2. Expert Advice
Our team of experts is always available to provide advice and guidance on your leather repair projects. Whether you’re a DIY enthusiast or a professional detailer, we can help you find the right products and techniques to achieve the best possible results.
7.3. Competitive Pricing
We offer competitive pricing on all of our leather repair products, so you can get the tools you need without breaking the bank.
7.4. Fast Shipping
We offer fast shipping on all orders, so you can get your leather repair products quickly and start your project right away.
8. Real-Life Examples of Successful Leather Repairs
Seeing is believing. Here are a few real-life examples of successful leather repairs using CARDIAGTECH.NET products and techniques:
8.1. Example 1: Restoring a Scratched Leather Seat
A customer had a deep scratch on their driver’s seat from a misplaced key. Using our leather filler, colorant, and finish, they were able to completely restore the seat to its original condition.
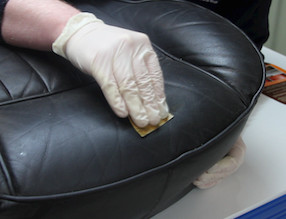 Sanding the leather
8.2. Example 2: Repairing a Torn Leather Armrest
Another customer had a tear in their leather armrest from years of use. Using our leather adhesive and a patch, they were able to repair the tear and make it virtually invisible.
8.3. Example 3: Rejuvenating a Faded Leather Dashboard
A third customer had a faded leather dashboard from years of sun exposure. Using our leather rejuvenator and colorant, they were able to restore the dashboard to its original color and luster.
9. The Science Behind Leather Repair: How It Works
Leather repair isn’t just about covering up damage; it’s about restoring the leather’s structure and appearance. Understanding the science behind the process can help you achieve better results and ensure the longevity of your repairs.
9.1. The Structure of Leather
Leather is a complex material made up of collagen fibers, natural oils, and a protective finish. When leather is damaged, these components are disrupted, leading to scratches, tears, and fading.
9.2. How Leather Repair Products Work
Leather repair products work by replenishing the lost components and restoring the leather’s structure. Cleaners remove dirt and oils, fillers fill in gaps and imperfections, colorants restore the original color, and finishes protect the repaired area.
9.3. The Importance of Proper Technique
Proper technique is essential for achieving successful leather repairs. Applying the products in the correct order, using the right amount, and allowing them to dry properly can all make a difference in the final result.
10. Environmental Considerations for Leather Repair
When repairing leather, it’s important to consider the environmental impact of the products you’re using. Choose eco-friendly products whenever possible, and dispose of waste materials responsibly.
10.1. Eco-Friendly Products
Look for leather repair products that are made from natural, sustainable materials and that are free from harsh chemicals.
10.2. Responsible Disposal
Dispose of waste materials, such as used cloths and sandpaper, responsibly. Follow local regulations for the disposal of hazardous materials.
10.3. Reducing Waste
Reduce waste by using only the amount of product you need and by reusing containers whenever possible.
11. Understanding the Costs of Leather Repair
The cost of repairing leather can vary depending on the severity of the damage, the type of products you use, and whether you hire a professional. Understanding these costs can help you budget for your repair project.
11.1. DIY Repair Costs
DIY leather repair can be a cost-effective option, especially for minor damage. The cost of products can range from $20 to $100, depending on the quality and quantity of materials you need.
11.2. Professional Repair Costs
Hiring a professional leather repair specialist can be more expensive, but it can also provide better results, especially for complex damage. Professional repair costs can range from $100 to $500 or more, depending on the extent of the damage.
11.3. Factors Affecting Costs
Several factors can affect the cost of leather repair, including the severity of the damage, the type of leather, and the location of the repair.
12. The Future of Leather Repair: Innovations and Trends
The field of leather repair is constantly evolving, with new innovations and trends emerging all the time. Staying up-to-date on these developments can help you achieve better results and ensure the longevity of your repairs.
12.1. New Materials
New materials, such as flexible fillers and advanced colorants, are making it easier to repair leather and achieve seamless results.
12.2. Advanced Techniques
Advanced techniques, such as airbrushing and laser repair, are allowing professionals to repair even the most complex damage with precision and accuracy.
12.3. Sustainability
Sustainability is becoming increasingly important in the field of leather repair, with more and more companies developing eco-friendly products and techniques.
13. Repairing Different Types of Leather
Not all leather is created equal. Different types of leather require different repair techniques and products. Understanding the type of leather you’re working with is essential for achieving successful repairs.
13.1. Aniline Leather
Aniline leather is a type of leather that is dyed with soluble dyes without covering the surface with a polymer coating or pigment. Because the surface is not covered with a coating, the leather retains its natural appearance.
13.2. Semi-Aniline Leather
Semi-aniline leather is more durable and stain-resistant than aniline leather, making it a popular choice for car interiors.
13.3. Top-Grain Leather
Top-grain leather is the most common type of leather used in car interiors. It is durable and easy to care for, but it can be prone to scratches and scuffs.
13.4. Bonded Leather
Bonded leather is made from scraps of leather that are bonded together with adhesive. It is less expensive than other types of leather, but it is also less durable and prone to cracking.
14. Safety Precautions for Leather Repair
When repairing leather, it’s important to take safety precautions to protect yourself from harmful chemicals and materials.
14.1. Wear Gloves
Wear gloves to protect your hands from chemicals and materials.
14.2. Work in a Well-Ventilated Area
Work in a well-ventilated area to avoid inhaling harmful fumes.
14.3. Follow Product Instructions
Follow product instructions carefully to avoid accidents and injuries.
14.4. Store Products Safely
Store products safely out of reach of children and pets.
15. Frequently Asked Questions (FAQs) About Leather Repair
Here are some frequently asked questions about leather repair:
15.1. Can I repair leather myself?
Yes, you can repair leather yourself with the right products and techniques.
15.2. How much does it cost to repair leather?
The cost of repairing leather can range from $20 to $500 or more, depending on the severity of the damage and whether you hire a professional.
15.3. What type of leather repair products should I use?
Use leather repair products that are specifically designed for automotive use and that are compatible with the type of leather you’re working with.
15.4. How can I prevent leather damage?
You can prevent leather damage by cleaning and conditioning your leather regularly, protecting it from UV exposure, and avoiding harsh chemicals and cleaners.
15.5. What is the best way to clean leather car seats?
The best way to clean leather car seats is to use a pH-balanced leather cleaner and a soft cloth.
15.6. How often should I condition my leather car seats?
You should condition your leather car seats every 3-6 months, or as needed.
15.7. Can I use household cleaners on leather?
No, you should not use household cleaners on leather. They can strip the leather of its natural oils and cause it to dry out.
15.8. How do I remove stains from leather?
You can remove stains from leather by using a leather stain remover that is specifically designed for the type of stain you’re dealing with.
15.9. Can I repair a tear in leather?
Yes, you can repair a tear in leather using leather adhesive and a patch.
15.10. How do I protect my leather from UV exposure?
You can protect your leather from UV exposure by parking in the shade, using window tinting, and applying a leather protectant with UV inhibitors.
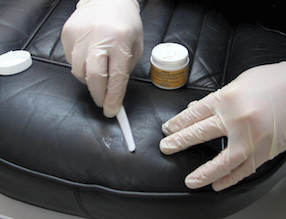 Filling the scratch
16. Conclusion: Restoring Your Car’s Leather to Perfection
Repairing car leather scratches doesn’t have to be a daunting task. With the right tools, techniques, and products from CARDIAGTECH.NET, you can restore your car’s interior to its former glory. Whether you’re dealing with minor scuffs or deep gouges, our comprehensive guide and expert advice will help you achieve professional results. Contact CARDIAGTECH.NET today at 276 Reock St, City of Orange, NJ 07050, United States or via Whatsapp at +1 (641) 206-8880. Visit our website at CARDIAGTECH.NET to explore our range of leather repair products and tools, and let us help you keep your car’s interior looking its best. Don’t let scratches and scuffs detract from your car’s beauty; take action now and experience the satisfaction of a perfectly restored leather interior.