How to Fix Car Center Mirror: A Comprehensive Guide
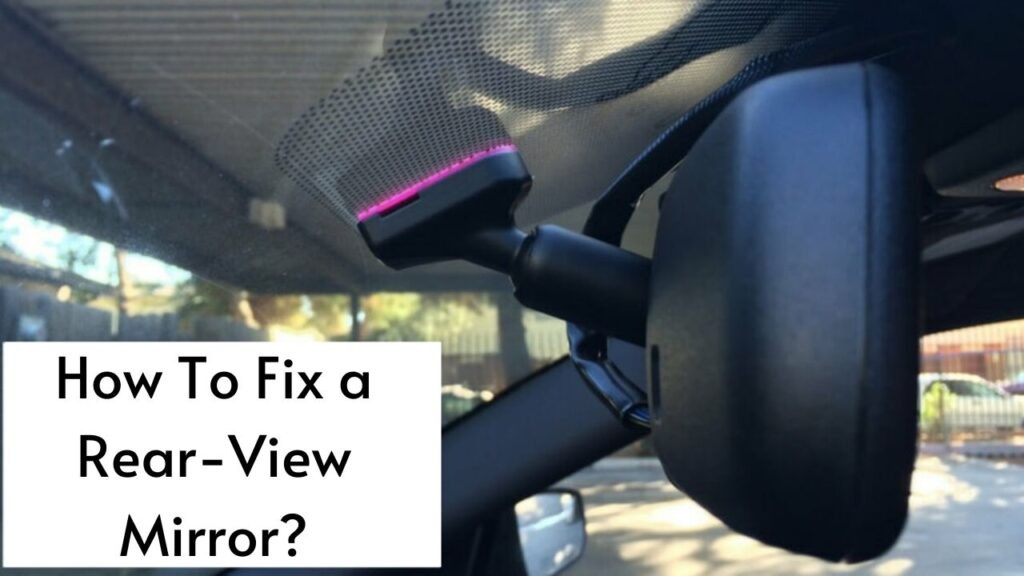
Is your car’s center mirror detached, hindering your rear visibility? This guide from CARDIAGTECH.NET provides effective solutions to restore your mirror, ensuring safer driving. We will also cover how to fix a loose rear view mirror. Learn about reattaching, tightening, or replacing your car center mirror, plus get expert tips and tricks.
1. Understanding the Importance of a Functional Car Center Mirror
Why is a properly functioning car center mirror crucial for road safety?
A functional car center mirror, also known as a rearview mirror, is essential for maintaining optimal rear visibility while driving. According to a study by the National Highway Traffic Safety Administration (NHTSA), drivers make critical decisions based on information gathered from their rearview mirrors, highlighting their role in preventing accidents. Using your car center mirror correctly can greatly improve your safety on the road, but what happens if it falls off? Let’s find out how to get it back in shape.
1.1 What is a Car Center Mirror?
What exactly does a car center mirror do, and how does it work?
A car center mirror is a flat mirror affixed to the top of the windshield inside a vehicle. It is designed to provide the driver with a clear, rearward view through the vehicle’s rear window. Modern car center mirrors often include features like auto-dimming to reduce glare from headlights, enhancing visibility during night driving. This flat mirror usually has a double-swivel mount that allows for easy adjustment to suit the driver’s height and viewing angle. The swivel mount also ensures that the mirror can swing harmlessly out of the way if there’s a collision with an occupant.
1.2 Why Car Center Mirrors Detach
What are the typical reasons for a car center mirror falling off?
Several factors can cause a car center mirror to detach:
- Direct Sunlight: Prolonged exposure to intense sun can weaken the adhesive. A study published in the “Journal of Adhesion and Adhesives” found that UV radiation degrades adhesive polymers over time.
- Persistent Vibration: Constant vehicle vibration can gradually loosen the mirror. Research from the University of Michigan Transportation Research Institute indicates that vibrations can cause fatigue in bonded joints.
- Accidental Bumping: Inadvertent physical impact can dislodge the mirror.
- Temperature Fluctuations: Temperature changes can cause expansion and contraction, affecting the adhesive bond. According to research from MIT’s Department of Materials Science and Engineering, thermal cycling can lead to adhesive failure in automotive applications.
- Age of Adhesive: Over time, the adhesive can degrade and lose its bonding strength.
Car Center Mirror Detached from Windshield
An image of a car center mirror detached from the windshield, highlighting the adhesive residue and the mounting button.
2. Essential Tools and Materials for Car Center Mirror Repair
What equipment is needed to successfully fix a detached car center mirror?
Having the right tools and materials is crucial for a successful repair. Here’s a comprehensive list:
| Tool/Material | Description |
|---|---|
| Rearview Mirror Repair Kit | Contains adhesive, primer/cleaner, and sometimes a new mounting button. Look for kits with high ratings and positive reviews to ensure good adhesion. |
| Razor Blade | For carefully removing old adhesive from the windshield and mirror mounting tab. Using a new blade ensures a clean cut and minimizes the risk of scratching the glass. |
| Glass Cleaner | To thoroughly clean both the windshield and the mirror mounting tab, ensuring a strong bond for the new adhesive. Use a non-ammonia based cleaner to prevent damage to the glass or adhesive. |
| Isopropyl Alcohol | An alternative cleaning agent for removing residue and ensuring a clean surface for adhesion. A concentration of 70% or higher is recommended for effective cleaning. |
| Paper Towels | For wiping surfaces clean and applying cleaning solutions. Opt for lint-free towels to avoid leaving residue on the glass. |
| Dry Erase Marker | To mark the correct position for the mirror on the outside of the windshield. This ensures accurate placement of the mirror after reattachment. |
| Hair Dryer | To warm the windshield if necessary, especially in cold weather, to ensure proper adhesion. Use on a low setting and avoid overheating the glass to prevent cracking. |
| Masking Tape | To hold the mounting button in place while the adhesive cures. This helps maintain consistent pressure and ensures a strong bond. |
| Heat Gun (Optional) | Useful for softening stubborn adhesive residue. Use with caution to avoid overheating the windshield. |
| Gloves | To protect your hands from chemicals and sharp tools. Nitrile gloves are recommended for their resistance to chemicals and durability. |
| Safety Glasses | To protect your eyes from debris and chemicals. Ensure they fit snugly and provide adequate coverage. |
3. Step-by-Step Guide to Reattaching a Car Center Mirror
What is the proper procedure for reattaching a car center mirror to the windshield?
Follow these steps for a secure and lasting repair:
3.1 Preparing the Windshield and Mounting Button
How should you clean the windshield and mounting button before applying adhesive?
- Remove Old Adhesive: Carefully scrape off any old adhesive from the windshield and the mounting button using a razor blade. Hold the blade at a shallow angle to avoid scratching the glass.
- Clean Surfaces: Thoroughly clean the windshield and the mounting button with glass cleaner or isopropyl alcohol. Ensure both surfaces are free from dirt, oil, and residue.
- Mark the Location: Use a dry erase marker to mark the correct position for the mirror on the outside of the windshield. This will serve as a guide for reattaching the mounting button.
3.2 Applying the Adhesive
What is the correct way to apply the adhesive for a strong bond?
- Apply Primer: If your rearview mirror repair kit includes a primer, apply it to the windshield and the mounting button according to the manufacturer’s instructions. Allow it to dry completely.
- Apply Adhesive: Apply a small amount of rearview mirror adhesive to the mounting button. Be careful not to use too much, as excess adhesive can weaken the bond.
- Position the Button: Carefully position the mounting button on the windshield, aligning it with the mark you made earlier. Press firmly for at least one minute to ensure good contact.
3.3 Curing the Adhesive
How long should the adhesive cure before reattaching the mirror?
- Secure with Tape: Use masking tape to hold the mounting button in place while the adhesive cures. This helps maintain consistent pressure and ensures a strong bond.
- Allow to Cure: Allow the adhesive to cure for at least 15 minutes, or according to the manufacturer’s instructions. Avoid touching or moving the mounting button during this time.
- Reattach Mirror: Once the adhesive is fully cured, carefully reattach the car center mirror to the mounting button. Ensure it is securely in place before driving.
4. Addressing Common Issues and Troubleshooting
What should you do if the mirror still falls off or is not properly aligned?
4.1 Mirror Falls Off Again
Why might the mirror detach after reattachment, and how can you prevent this?
- Insufficient Cleaning: Ensure both the windshield and mounting button are thoroughly cleaned before applying adhesive.
- Inadequate Adhesive: Use a high-quality rearview mirror adhesive and apply it according to the manufacturer’s instructions.
- Improper Curing: Allow the adhesive to cure for the recommended time before reattaching the mirror.
- Temperature Extremes: Avoid exposing the reattached mirror to extreme temperatures for at least 24 hours after installation.
4.2 Mirror Misalignment
How can you correct a misaligned mirror after reattachment?
- Immediate Adjustment: If you notice the mirror is misaligned immediately after attaching the mounting button, carefully remove it and clean off the adhesive. Repeat the process, ensuring proper alignment.
- Limited Adjustment: Once the adhesive has fully cured, it may be difficult to adjust the position of the mounting button. In this case, you may need to remove the button and start over.
5. Maintaining and Preventing Future Issues
What steps can you take to extend the life of your car center mirror and prevent future detachments?
5.1 Regular Inspection
How often should you inspect your car center mirror for potential issues?
Regularly inspect your car center mirror for any signs of looseness or instability. Early detection can prevent complete detachment and potential safety hazards.
5.2 Protecting from Extreme Temperatures
How can you shield your car center mirror from extreme temperatures?
- Park in Shade: When possible, park your car in the shade to reduce exposure to direct sunlight.
- Use a Sunshade: Use a sunshade to protect the windshield from extreme heat. According to AAA, sunshades can reduce interior car temperatures by up to 15 degrees Fahrenheit.
- Avoid Direct Heat: Avoid using defrosters or heaters that blow directly onto the windshield near the mirror mounting button.
5.3 Minimizing Vibrations
What can you do to reduce vibrations that might affect the mirror’s adhesion?
- Smooth Driving: Practice smooth driving habits to minimize vibrations.
- Check Suspension: Ensure your car’s suspension is in good condition to absorb shocks and vibrations. Research from J.D. Power indicates that vehicles with well-maintained suspensions offer a smoother and more comfortable ride.
6. When to Consider Professional Repair
When is it necessary to seek professional assistance for car center mirror issues?
6.1 Extensive Damage
What types of damage warrant professional repair or replacement?
If the windshield is cracked or damaged around the mounting area, it’s best to consult a professional. Attempting to reattach the mirror to a damaged windshield can further compromise its structural integrity.
6.2 Complex Mirror Features
When should you consult a professional for mirrors with advanced features?
If your car center mirror has advanced features like auto-dimming or integrated sensors, it’s best to seek professional assistance. These mirrors often require specialized tools and expertise to repair or replace properly.
6.3 DIY Inexperience
When is it advisable to leave the repair to a professional due to lack of experience?
If you’re not comfortable performing the repair yourself, or if you’ve attempted the repair and failed, it’s best to consult a professional. Attempting to fix the mirror without the necessary skills can result in further damage or safety hazards.
7. Exploring Advanced Car Center Mirror Features
What advanced features are available in modern car center mirrors, and how do they enhance driving safety?
7.1 Auto-Dimming Mirrors
How do auto-dimming mirrors work, and what are their benefits?
Auto-dimming mirrors use sensors to detect glare from headlights and automatically darken the mirror to reduce eye strain. According to a study by the Society of Automotive Engineers (SAE), auto-dimming mirrors can significantly improve driver visibility during night driving.
7.2 Integrated Compass and Temperature Display
How do these features enhance convenience and information for drivers?
Some car center mirrors include integrated compass and temperature displays, providing drivers with valuable information at a glance. These features can enhance convenience and awareness while driving.
7.3 HomeLink® Connectivity
What is HomeLink® and how does it integrate with car center mirrors?
HomeLink® is a wireless control system that allows drivers to operate garage doors, gates, and other home automation devices from their car center mirror. This feature enhances convenience and security for drivers.
8. DIY Methods to Tighten a Loose Rear-View Mirror
What are the DIY methods to tighten a loose rear-view mirror?
The Rear-View mirror is often adjusted, especially if the car is driven by several people. This will cause the mirror ball joint to loosen up, but there are a couple of ways to tighten it.
The exact method will vary depending on your vehicle, and if none of the factory-installed methods is applicable, I’ll also provide some DIY methods to solve the problem.
8.1 Tighten The Screw Underneath the Mirror
Some vehicles have a fixed mirror stand and a ball joint that attaches directly to the mirror. Inspect the mirror from underneath, where the flip tab is located. On some models, you’ll find a hex or Phillip’s head screw to tighten and get the mirror back in action.
8.2 Tighten The Screw Inside the Base of The Roof
In some models, the mirror and the rod have a solid connection, with the ball joint connection located within the roof. You’ll have to figure out how to remove the plastic shroud to gain access to the adjustment screw. After that, it’s just a matter of using the right screwdriver to tighten the ball joint.
8.3 Tighten The Screw Within the Mirror
If you can’t locate the tightening screw beneath the mirror or within the base, the last place to look is inside the mirror. At this point, I’d suggest looking up the exact method for your make & model, as disassembling the mirror unnecessarily can only cause more harm than good. Once you’re sure there’s a tightening screw inside, carefully pull off the mirror to gain access to the screw.
9. Sourcing and Installing a Replacement Car Center Mirror
What steps are involved in replacing a car center mirror, and where can you find a suitable replacement?
9.1 Finding a Replacement
Where can you purchase a replacement car center mirror?
You can find a generic replacement mirror at your local auto parts store. While you’re there, purchase a rearview mirror replacement kit – which usually includes the adhesive, cleaning supplies, and hardware.
9.2 Removing Old Mirror
- Apply a small piece of masking tape on the exterior of the glass to mark the original mounting location.
- Unplug the wiring harness if the mirror uses one for an electronic compass or dimming feature.
- Remove the mirror from the glass-mounted hardware – look for a screw to remove or a clip to slide it off.
- Use a heat gun or blow dryer to soften the adhesive that holds the mounting hardware to the glass.
- Apply heat to the exterior of the windshield where the mirror hardware is mounted and gently wiggle the mount free. It’s best to have a helper heat the glass while you remove the hardware inside the vehicle. Note: Too much heat will break the windshield, so exercise caution.
- You may need to use a thin piece of piano wire or fishing line to break the bond between the glass and the mirror mount. Work the wire/line between the glass and the mirror mount using a flossing motion to break it free. Only apply force parallel to the glass, don’t try and tear the hardware off or it might bring a piece of glass with it.
9.3 Prep Surface
Remove old adhesive with a razor blade and glass cleaner or rubbing alcohol; be careful not to scratch the glass. Wipe the surface clean with a rag and glass cleaner and allow it to dry before proceeding. If your windshield replacement kit came with any cleaning or prep wipes, use them now.
9.4 Install the Mirror
- Not all kits are the same; follow the manufactures instructions closely.
- If the kit came with an activator, apply it to the windshield and the mounting hardware. Allow the activator to dry for a few minutes if needed.
- Apply the glue to the mirror mounting hardware, not the windshield itself. Use the tape you placed on the exterior of the windshield to find the original mounting location and install the mirror mount. Refer to the manufacture’s instructions for glue cure times.
- Once the glue is fully cured, install your new rearview mirror
10. Ensuring Road Safety Without a Car Center Mirror
Is it legal and safe to drive without a car center mirror, and what alternatives are available?
10.1 Legality of Driving Without a Rearview Mirror
What are the legal requirements regarding rearview mirrors in different states?
Driving without a rearview mirror is generally legal as long as the vehicle has functional side mirrors. However, some states may have specific requirements, so it’s essential to check local laws.
10.2 Alternative Rear-Vision Systems
What are the alternatives to a traditional car center mirror, and how do they work?
- Side Mirrors: Ensure your side mirrors are properly adjusted to provide adequate rear visibility.
- Backup Cameras: Many modern vehicles come equipped with backup cameras, which provide a clear view of the area behind the vehicle.
- Blind Spot Monitoring Systems: These systems use sensors to detect vehicles in your blind spots, alerting you to potential hazards.
FAQ: Frequently Asked Questions About Car Center Mirror Repair
Q1: What causes a car center mirror to fall off?
Several factors can cause a car center mirror to fall off, including prolonged exposure to direct sunlight, persistent vibration, accidental bumping, temperature fluctuations, and the age of the adhesive. Direct sunlight, according to the “Journal of Adhesion and Adhesives”, weakens the adhesive over time.
Q2: Can I use regular glue to reattach my car center mirror?
No, regular glue is not suitable for reattaching a car center mirror. You should use a specialized rearview mirror adhesive, which is designed to withstand the stresses and temperatures experienced in a vehicle.
Q3: How long does it take for the adhesive to cure when reattaching a car center mirror?
The adhesive typically takes at least 15 minutes to cure, but it’s best to follow the manufacturer’s instructions for specific curing times. Avoid touching or moving the mounting button during this time to ensure a strong bond.
Q4: Is it safe to drive without a car center mirror?
Driving without a car center mirror is generally legal as long as the vehicle has functional side mirrors. However, it’s essential to ensure your side mirrors are properly adjusted to provide adequate rear visibility.
Q5: What should I do if the windshield is cracked around the mirror mounting area?
If the windshield is cracked or damaged around the mounting area, it’s best to consult a professional. Attempting to reattach the mirror to a damaged windshield can further compromise its structural integrity.
Q6: How can I prevent my car center mirror from falling off again?
To prevent your car center mirror from falling off again, regularly inspect it for any signs of looseness, protect it from extreme temperatures, and minimize vibrations by practicing smooth driving habits and maintaining your car’s suspension.
Q7: Can I replace just the mirror glass, or do I need to replace the entire unit?
Usually, you cannot replace just the mirror glass; you must replace the entire unit. If your mirror uses auto-dimming glass or electro-chromatic technology, look for an OEM replacement mirror from your local car dealer.
Q8: What tools do I need to remove old adhesive from the windshield?
You can use a razor blade and glass cleaner or rubbing alcohol to remove old adhesive from the windshield. Be careful not to scratch the glass.
Q9: How do auto-dimming mirrors work?
Auto-dimming mirrors use sensors to detect glare from headlights and automatically darken the mirror to reduce eye strain, improving driver visibility during night driving.
Q10: What is HomeLink® and how does it integrate with car center mirrors?
HomeLink® is a wireless control system that allows drivers to operate garage doors, gates, and other home automation devices from their car center mirror, enhancing convenience and security.
Maintaining a functional car center mirror is crucial for road safety. By following these steps, you can effectively reattach, tighten, or replace your mirror. If you encounter challenges or need professional assistance, don’t hesitate to seek expert help.
Are you looking for high-quality tools and equipment to repair your car center mirror? CARDIAGTECH.NET offers a wide range of rearview mirror repair kits and automotive tools to meet your needs. Contact us today at 276 Reock St, City of Orange, NJ 07050, United States, or reach out via WhatsApp at +1 (641) 206-8880. Visit our website CARDIAGTECH.NET to explore our products and receive expert advice on selecting the right tools for your car repair needs. Let CARDIAGTECH.NET help you ensure your vehicle is safe and well-maintained.