How To Fix Car Ceiling Material: A Comprehensive Guide

Is your car’s ceiling material sagging and ruining the interior’s look? Don’t worry, CARDIAGTECH.NET is here to help! This comprehensive guide provides expert techniques on How To Fix Car Ceiling Material, offering practical solutions to restore your vehicle’s interior without breaking the bank. We’ll cover everything from identifying the causes of sagging headliners to step-by-step repair methods and preventative measures.
1. Understanding Car Ceiling Material (Headliner)
A car’s headliner, also known as car ceiling material, is the fabric lining attached to the interior roof. It serves several crucial purposes: aesthetics, noise reduction, temperature insulation, and providing a smooth, finished look to the cabin. Typically made of fabric bonded to a foam backing, the headliner is attached to a backing board that is then secured to the car’s roof.
Think of it this way: the headliner is like the ceiling in your house, but for your car. It protects you from the elements, reduces outside noise, and makes the interior more comfortable. Without it, a car parked in direct sunlight would quickly become an unbearable sauna, and road noise would be significantly louder. Furthermore, a well-maintained headliner enhances the acoustics, improving your car’s sound system performance.
Car headliner secured to the roof framing
Alt Text: A close-up of a car headliner showcasing its fabric texture and secure attachment to the roof framing, emphasizing its role in aesthetics and insulation.
2. Common Causes of Sagging Car Ceiling Material
Several factors can contribute to the deterioration and sagging of your car’s headliner. Understanding these causes is crucial for effective repair and prevention.
- Heat and Sunlight: Prolonged exposure to high temperatures and direct sunlight can weaken the adhesive bonding the fabric to the foam backing. Over time, the glue melts, causing the fabric to detach and sag.
- Moisture: Humidity, leaks, and condensation can penetrate the headliner, causing the foam to absorb moisture and lose its structural integrity. This leads to warping, sagging, and eventual detachment.
- Age and Deterioration: Like any material, the foam and fabric in your car’s headliner degrade over time. The foam backing becomes brittle and loses its elasticity, while the fabric loses its grip.
- Poor Installation: If the headliner wasn’t installed correctly from the start, using inadequate glue or improper techniques, it’s more likely to sag prematurely.
- Physical Damage: Accidental scrapes, pulls, or impacts can damage the headliner fabric or its attachment points, leading to sagging or tearing.
- Wear and Tear: In vehicles used by families with children or pets, the headliner may experience additional wear and tear, accelerating the sagging process.
3. Identifying the Signs of a Sagging Headliner
Recognizing the early signs of a sagging headliner can help you address the issue before it becomes a major problem. Here are some common indicators:
- Visible Sagging: The most obvious sign is the fabric detaching from the roof and hanging down. This can start in small areas and gradually spread over time.
- Loose Fabric: Touching the headliner reveals loose areas where the fabric has separated from the backing board.
- Bubbling or Wrinkling: Before the fabric starts to sag, you might notice bubbles or wrinkles forming on the surface. This indicates that the adhesive is failing.
- Discoloration or Staining: Moisture damage can lead to discoloration, staining, or mildew growth on the headliner.
- Falling Debris: As the foam backing deteriorates, small particles may start to fall from the headliner, creating a mess inside your car.
4. Essential Tools and Materials for Headliner Repair
Before diving into the repair process, gather the necessary tools and materials to ensure a smooth and efficient job. Purchasing high-quality tools from CARDIAGTECH.NET is the best way to ensure a lasting and professional repair.
- Headliner Adhesive: Specifically designed for automotive headliners, this adhesive provides a strong and flexible bond that can withstand temperature variations.
- Spray Bottle: For applying the adhesive evenly.
- Foam Roller or Brush: To smooth out the fabric and ensure proper adhesion.
- Masking Tape: To protect surrounding areas from adhesive overspray.
- Drop Cloth or Plastic Sheeting: To cover the seats and interior surfaces.
- Scissors or Utility Knife: For trimming excess fabric.
- Screwdriver or Trim Removal Tool: To remove any necessary trim pieces.
- Cleaning Supplies: To clean the headliner surface before applying adhesive.
- Safety Glasses and Gloves: To protect yourself from chemicals and debris.
- Sequin Pins or Headliner Retainers (Optional): For added support and reinforcement.
- Steam Cleaner (Optional): For softening the old adhesive and preparing the surface.
5. Step-by-Step Guide: How to Fix Car Ceiling Material Without Removing It
This section will guide you through several methods to fix your sagging headliner without the hassle of removing it completely. Remember to work in a well-ventilated area and take your time to ensure a professional-looking result.
5.1. Method 1: The Glue and Smooth Technique
This method is ideal for minor sagging or loose areas, particularly around the edges of the headliner.
- Preparation: Cover your seats and interior surfaces with a drop cloth or plastic sheeting. Use masking tape to protect trim pieces and edges surrounding the sagging area.
- Cleaning: Thoroughly clean the sagging area with a soft cloth and a mild interior cleaner. Remove any loose debris or old adhesive.
- Adhesive Application: Shake the headliner adhesive spray can well. Apply a light, even coat of adhesive to both the back of the fabric and the corresponding area on the headliner board. Allow the adhesive to become tacky, usually about 1-3 minutes.
- Reattachment: Carefully press the fabric back onto the headliner board, starting from the center and working outwards. Use a foam roller or brush to smooth out any wrinkles or bubbles. Apply firm, even pressure to ensure good adhesion.
- Reinforcement (Optional): For added support, especially in larger areas, use sequin pins or headliner retainers to hold the fabric in place while the adhesive cures. Insert the pins through the fabric and into the headliner board, spacing them evenly.
- Curing: Allow the adhesive to cure completely according to the manufacturer’s instructions, typically 24-48 hours. Remove the masking tape and any remaining pins.
5.2. Method 2: The Twist Pin Solution
This method is a quick and easy fix for more significant sagging, especially if the fabric is detaching in larger sections.
- Preparation: Gently push the sagging fabric back into place as much as possible.
- Twist Pin Insertion: Insert clear-headed twist pins (also known as headliner repair pins or saggy stoppers) through the fabric and into the headliner board. Space the pins evenly, about 2-4 inches apart, covering the entire sagging area.
- Arrangement: Arrange the pins in a visually appealing pattern.
- Secure and Cut: Once the fabric is securely in place, trim any excess fabric around the edges with scissors or a utility knife.
5.3. Method 3: The Steam and Roll Technique
This method is useful for softening old adhesive and reattaching the fabric, particularly around the edges.
- Preparation: Cover your seats and interior surfaces with a drop cloth or plastic sheeting.
- Steaming: Use a steam cleaner to gently heat the sagging area. Hold the steamer a few inches away from the fabric and move it slowly and evenly. The steam will help soften the old adhesive and make the fabric more pliable.
- Rolling: As you steam the fabric, use a foam roller to press it back onto the headliner board. Apply firm, even pressure to ensure good adhesion.
- Repeat: Repeat the steaming and rolling process until the fabric is fully reattached.
- Curing: Allow the adhesive to cure completely, typically 24-48 hours.
5.4. Detailed Instructions with Specific Metrics and Scenarios
| Method | Scenario | Adhesive Drying Time | Pin Spacing | Steam Distance |
|---|---|---|---|---|
| Glue and Smooth | Minor sagging, edges | 24-48 hours | N/A | N/A |
| Twist Pin Solution | Significant sagging | N/A | 2-4 inches | N/A |
| Steam and Roll Technique | Softening old adhesive | 24-48 hours | N/A | 2-3 inches |
| All Methods | Always ensure the work area is well-ventilated | As per manufacturer | ||
| All Methods | Always wear safety glasses and gloves |
6. Preventing Future Headliner Sagging
Prevention is always better than cure. Here are some tips to help prevent your car’s headliner from sagging in the future:
- Park in the Shade: Whenever possible, park your car in the shade to minimize exposure to direct sunlight and heat.
- Use a Sunshade: When parking in the sun is unavoidable, use a sunshade to protect the interior from excessive heat.
- Ventilate Your Car: On hot days, crack the windows slightly to allow hot air to escape and reduce the temperature inside the car.
- Regular Cleaning: Clean your headliner regularly with a soft cloth and a mild interior cleaner to remove dust and dirt.
- Avoid Harsh Chemicals: Do not use harsh chemicals or abrasive cleaners on your headliner, as they can damage the fabric and adhesive.
- Address Leaks Promptly: If you notice any leaks in your car’s roof or windows, address them promptly to prevent moisture damage to the headliner.
- Gentle Handling: Be gentle when handling the headliner, avoiding excessive pulling or pressure that could damage the fabric or adhesive.
- Keep Pets and Children in Check: Prevent children and pets from climbing on or scratching the headliner.
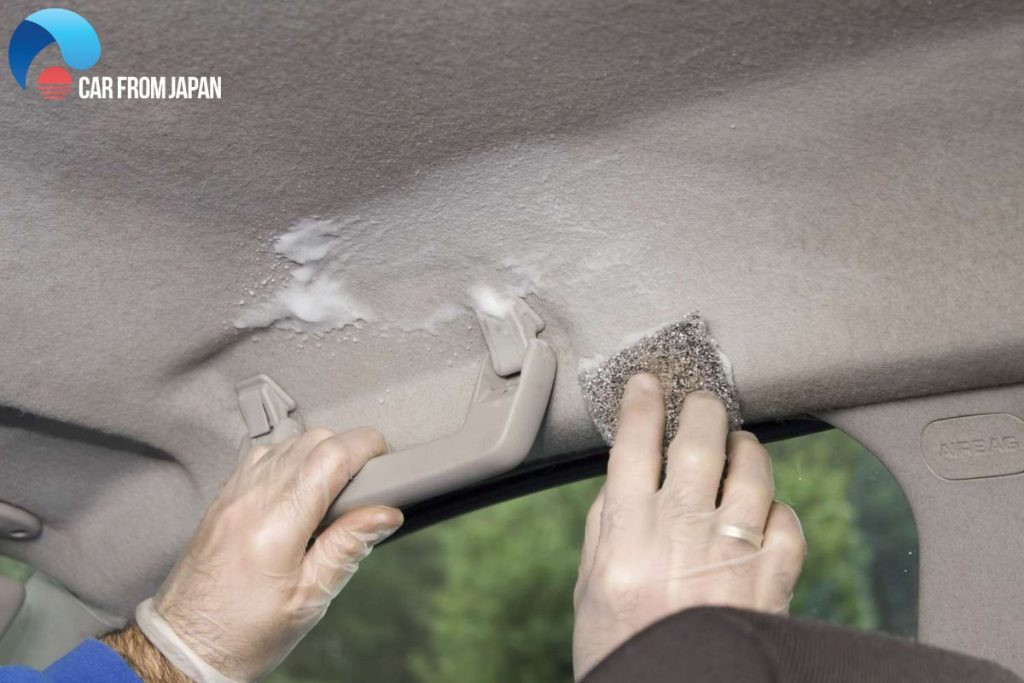 Fix sagging headliner
Alt Text: A visibly sagging car headliner, indicating poor maintenance and the effects of environmental factors on the interior of a vehicle.
7. When to Consider Professional Headliner Replacement
While the DIY methods described above can be effective for minor to moderate sagging, there are situations where professional headliner replacement is the best option:
- Extensive Sagging: If the entire headliner is sagging or severely damaged, it may be more cost-effective to replace it rather than attempt a repair.
- Widespread Damage: If the headliner has significant tears, stains, or mildew growth, replacement is often the only way to restore its appearance.
- Complex Installation: Some vehicles have complex headliner designs with integrated electronics or sunroofs, making DIY replacement challenging.
- Lack of Confidence: If you’re not comfortable tackling the repair yourself, it’s best to leave it to a professional to avoid further damage.
8. The Cost of Professional Headliner Replacement
The cost of professional headliner replacement can vary depending on several factors, including the vehicle’s make and model, the type of headliner material, and the labor rates in your area.
| Vehicle Type | Headliner Cost (USD) | Labor Cost (USD) | Total Cost (USD) |
|---|---|---|---|
| Sedan (e.g., Honda Accord, Toyota Corolla) | $150 – $300 | $200 – $450 | $350 – $750 |
| SUV/Crossover (e.g., Toyota RAV4, Nissan X-Trail) | $200 – $400 | $300 – $500 | $500 – $900 |
| Luxury Vehicle (e.g., BMW, Mercedes-Benz) | $500 – $2,000 | $500 – $4,000 | $1,000 – $6,000 |
Note: These are approximate costs. Contact local auto upholstery shops for accurate estimates.
9. Why Choose CARDIAGTECH.NET for Your Automotive Repair Needs?
At CARDIAGTECH.NET, we understand the importance of quality tools and materials for successful automotive repairs. We offer a wide selection of headliner adhesives, repair kits, and other essential tools to help you tackle your car ceiling material repair with confidence. Our products are sourced from trusted manufacturers and are designed to provide professional-grade results.
Contact CARDIAGTECH.NET today via WhatsApp at +1 (641) 206-8880 or visit us at 276 Reock St, City of Orange, NJ 07050, United States, for expert advice and top-quality automotive repair tools. Our experienced team can help you choose the right products for your specific needs and provide guidance on the repair process.
10. Addressing Customer Challenges and Providing Solutions
We recognize the challenges that automotive technicians and car owners face, including the physical demands of the job, the need for continuous learning, and the pressure to deliver efficient and cost-effective repairs. That’s why CARDIAGTECH.NET is committed to providing solutions that enhance your efficiency, accuracy, and safety.
Our high-quality tools and materials are designed to withstand the rigors of professional use, ensuring long-lasting performance and reliability. We also offer expert support and guidance to help you stay up-to-date with the latest repair techniques and technologies.
Ready to elevate your automotive repair capabilities? Contact CARDIAGTECH.NET now to discuss your needs and discover how we can help you achieve your goals.
FAQ Section
1. How do I know if my car ceiling is sagging?
Signs include visible sagging, loose fabric, bubbling, wrinkling, discoloration, and falling debris.
2. Is it okay to fix the headliner sagging myself?
Yes, for minor to moderate sagging. Use a repair kit and follow instructions carefully.
3. Can I paint a headliner?
Painting is not recommended due to potential issues with temperature changes and uneven finish.
4. Does car insurance cover headliner replacement?
Most standard car insurance policies do not cover headliner replacement due to wear and tear.
5. What type of adhesive is best for headliners?
Use a headliner-specific adhesive spray that is heat-resistant and flexible.
6. How long does it take for headliner adhesive to dry?
Typically, 24-48 hours. Refer to the manufacturer’s instructions for specific drying times.
7. Can I use staples to fix a sagging headliner?
Staples are not recommended as they can damage the fabric and backing board.
8. What is the best way to clean a car headliner?
Use a soft cloth and a mild interior cleaner. Avoid harsh chemicals and excessive moisture.
9. How can I prevent my headliner from sagging?
Park in the shade, use a sunshade, ventilate your car, and clean the headliner regularly.
10. Where can I purchase quality headliner repair tools and materials?
Visit CARDIAGTECH.NET or contact us via WhatsApp at +1 (641) 206-8880 for a wide selection of automotive repair tools and expert advice.