How To Fix A Sagging Car Ceiling Liner Effectively

Is your car’s ceiling liner drooping? A sagging car ceiling liner isn’t just an eyesore; it can also signal underlying problems. At CARDIAGTECH.NET, we’ll guide you through simple yet effective methods on How To Fix Car Ceiling Liner without complete removal, saving you time and money. Discover how to restore your vehicle’s interior to its former glory. Address issues like adhesive failure and fabric detachment while restoring the aesthetic appeal of your car’s interior with headliner repair solutions.
1. Understanding Car Headliners
A car headliner, or headlining, is the fabric attached to the roof’s interior. It provides a smooth finish, reduces noise, and helps maintain a comfortable temperature by insulating against heat and cold. Typically constructed with layers of foam, often polyurethane, adhered to a headliner board, it softens the interior and insulates against external elements. Beyond aesthetics, headliners improve acoustics for car audio systems and reduce wind noise, especially at high speeds. Think of it as a crucial part of your car’s comfort system.
Car headliner secured to the roof framing
2. Common Causes of Sagging Headliners
Headliners can sag over time due to various factors. Understanding these causes is the first step in knowing how to fix car ceiling liner effectively.
- Heat and Sunlight: Exposure to intense heat melts the adhesive, causing the fabric to detach from the backing board.
- Moisture: Humidity and leaks can seep into the headliner, causing the foam backing to absorb moisture and lose its shape, leading to warping and sagging.
- Poor Installation: Inadequate glue or improper techniques during the initial installation can cause premature sagging. Some vehicles may also lack proper waterproofing.
- Physical Damage: Children or pets can pull, scratch, or otherwise damage the headliner, accelerating its deterioration.
| Cause | Description |
|---|---|
| Heat and Sunlight | High temperatures degrade the adhesive, causing fabric detachment. |
| Moisture | Humidity and leaks lead to foam breakdown and sagging. |
| Poor Installation | Insufficient glue or improper techniques result in premature failure. |
| Physical Damage | Actions by children or pets can physically damage and weaken the headliner. |
3. Quick Fixes: How To Fix Car Ceiling Liner Without Removal
For those looking for a budget-friendly option, repairing the sagging headliner without removing it can be the ideal solution. Here are several methods:
3.1. Gluing Method
Gluing is most effective for partial sagging, like corners or edges. You’ll need a specialized headlining adhesive spray. Ordinary glue won’t do the trick.
Steps:
- Clean the sagging area.
- Spray the adhesive evenly on both the fabric and the backing board.
- Press the fabric firmly back into place.
- Allow it to dry completely, following the adhesive’s instructions.
3.2. Pinning Method
This is a quick and inexpensive fix. Use sequin pins or any similar pins to push the headliner back into place.
Steps:
- Push the pins through the fabric into the foam backing board.
- Arrange the pins in a visually pleasing pattern.
- Ensure the pins are securely in place.
3.3. Twist Pins
Also known as saggy stoppers, these clear-headed pins are an inexpensive and easy way to secure a sagging headliner.
Steps:
- Push the twist pins through the fabric and into the headlining board.
- Twist to secure them in place.
- Distribute them evenly across the sagging area.
3.4. Steam Cleaner and Paint Roller
This method works best when the fabric sags around the edges. The steam cleaner melts the old adhesive, while the paint roller helps to smooth the fabric back into place.
Steps:
- Use a car steam cleaner to gently heat the sagging area, melting the old glue.
- Use a paint roller to smooth the fabric evenly without creases or wrinkles.
- Allow it to dry completely.
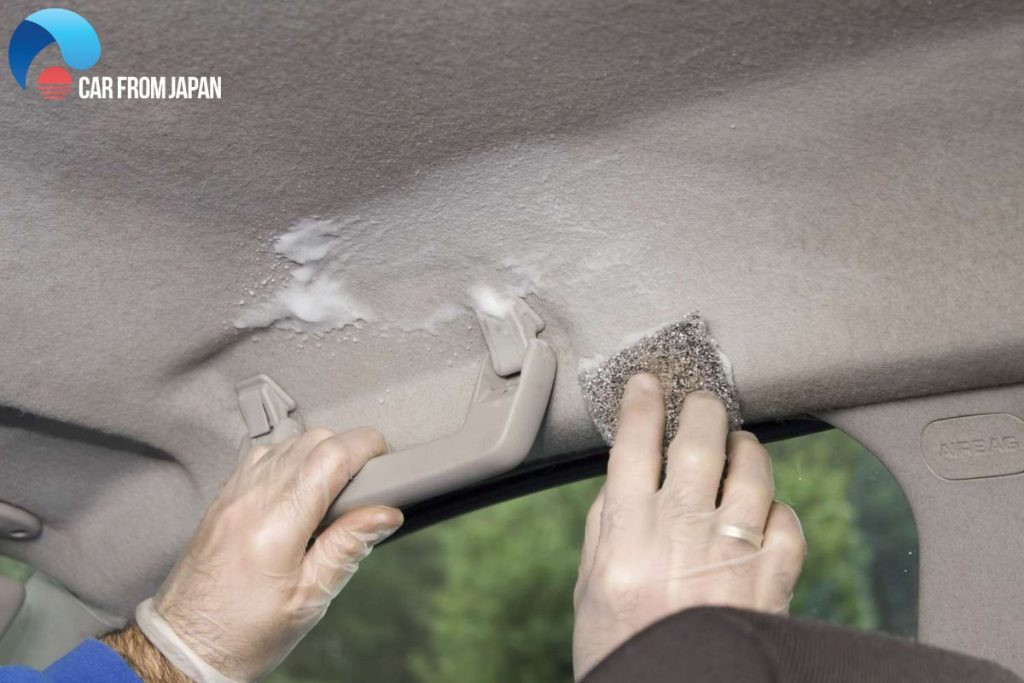 Fixing sagging headliner with glue
4. Preventing Headliner Sagging
Prevention is better than cure. Here are some tips to protect your car’s headliner:
- Avoid Direct Sunlight: Park your car in the shade to prevent the adhesive from melting.
- Control Interior Conditions: Use sunshades and keep the car well-ventilated.
- Regular Inspections: Check rubber seals to prevent water from entering the vehicle.
- Careful Cleaning: Use a gentle steam cleaner with minimal pressure.
- Protect from Physical Damage: Keep children and pets from pulling or scratching the headliner.
5. When to Consider Professional Replacement
If the sagging is extensive or the fabric is severely damaged, professional replacement might be necessary. Consider this option if:
- Quick fixes are ineffective.
- The fabric is torn or heavily stained.
- You lack the time or confidence to perform the repair yourself.
6. Headliner Replacement Costs
Replacing a headliner can vary in cost, depending on the car model and complexity. Here’s a general breakdown:
- Sedan/Hatchback/Coupe: $300 – $750
- SUV/Crossover: $500 – $900
- Luxury Vehicle: $1,000 – $6,000
| Vehicle Type | Average Replacement Cost |
|---|---|
| Sedan/Hatchback/Coupe | $300 – $750 |
| SUV/Crossover | $500 – $900 |
| Luxury Vehicle | $1,000 – $6,000 |
Prices may vary based on the complexity of the design and the presence of ceiling accessories like sunroofs.
7. Step-by-Step Guide: DIY Headliner Repair
For those who prefer a hands-on approach, here’s a detailed guide on how to fix car ceiling liner:
7.1. Materials and Tools
- Headliner adhesive spray
- Sequin pins or twist pins
- Car steam cleaner
- Paint roller
- Cleaning supplies (mild detergent, microfiber cloths)
- Safety glasses and gloves
7.2. Preparation
- Park the car in a well-ventilated area.
- Cover the seats and interior surfaces to protect them from adhesive.
- Wear safety glasses and gloves.
7.3. Gluing Method
- Clean the sagging area with a mild detergent and microfiber cloth.
- Spray the adhesive evenly on both the fabric and the backing board.
- Press the fabric firmly back into place, working from the center outwards.
- Allow it to dry completely, following the adhesive’s instructions.
7.4. Pinning Method
- Push the pins through the fabric into the foam backing board.
- Arrange the pins in a visually pleasing pattern.
- Ensure the pins are securely in place.
7.5. Twist Pin Method
- Push the twist pins through the fabric and into the headlining board.
- Twist to secure them in place.
- Distribute them evenly across the sagging area.
7.6. Steam Cleaner and Paint Roller Method
- Use a car steam cleaner to gently heat the sagging area, melting the old glue.
- Use a paint roller to smooth the fabric evenly without creases or wrinkles.
- Allow it to dry completely.
8. Benefits of Maintaining Your Car Headliner
Maintaining your car headliner offers several benefits:
- Aesthetic Appeal: A well-maintained headliner enhances the interior appearance of your vehicle.
- Increased Comfort: Proper insulation reduces noise and maintains a comfortable temperature.
- Preserved Value: A clean and intact interior can increase the resale value of your car.
- Prevention of Further Damage: Addressing sagging early can prevent more extensive and costly repairs.
9. Why Choose CARDIAGTECH.NET for Your Automotive Needs
At CARDIAGTECH.NET, we understand the importance of maintaining your vehicle’s interior. We offer a wide range of automotive tools and equipment to help you tackle any repair, including headliner sagging. Our high-quality products ensure you get the job done right, saving you time and money.
We provide:
- Expert Advice: Our team of experienced technicians can guide you through the repair process.
- Quality Products: We offer top-of-the-line adhesives, pins, and steam cleaners.
- Competitive Pricing: Get the best value for your money.
Don’t let a sagging headliner detract from your driving experience. Contact CARDIAGTECH.NET today at +1 (641) 206-8880 or visit our website at CARDIAGTECH.NET for all your automotive repair needs. Our address is 276 Reock St, City of Orange, NJ 07050, United States. We’re here to help you keep your car in top condition.
10. Real-World Examples of Headliner Repair
Consider these scenarios where understanding how to fix car ceiling liner can be incredibly beneficial.
- Scenario 1: The DIY Enthusiast: John, a car enthusiast, noticed his headliner sagging around the edges. Armed with a steam cleaner and paint roller from CARDIAGTECH.NET, he successfully smoothed out the fabric, saving hundreds of dollars.
- Scenario 2: The Budget-Conscious Owner: Maria’s headliner was slightly sagging in the corners. Using adhesive spray from CARDIAGTECH.NET, she quickly reattached the fabric, avoiding a costly replacement.
- Scenario 3: The Proactive Preventer: David regularly inspects his car’s interior. Spotting early signs of sagging, he adjusted his parking habits to avoid direct sunlight, preventing further damage.
11. The Role of Proper Tools in Headliner Repair
Having the right tools is crucial for effective headliner repair. Here’s why CARDIAGTECH.NET tools stand out:
- Precision: Our tools are designed for precise application, ensuring even coverage and a professional finish.
- Durability: Made from high-quality materials, our tools are built to last, providing long-term value.
- Ease of Use: Ergonomic designs make our tools comfortable and easy to handle, even for beginners.
12. Addressing Customer Concerns with Expert Solutions
We understand the challenges you face when dealing with a sagging headliner. Here’s how CARDIAGTECH.NET addresses common concerns:
- Concern: “I’m not sure which adhesive to use.”
- Solution: Our experts recommend specific headliner adhesives that offer strong bonding and heat resistance.
- Concern: “I’m worried about damaging the fabric.”
- Solution: We provide gentle steam cleaners and soft paint rollers to minimize the risk of damage.
- Concern: “I don’t have the time for a full repair.”
- Solution: Our quick fixes, like twist pins, offer a temporary solution while you plan a more comprehensive repair.
13. Long-Term Headliner Care Tips
Extend the life of your headliner with these care tips:
- Regular Cleaning: Use a vacuum with a soft brush attachment to remove dust and debris.
- Avoid Harsh Chemicals: Use mild detergents and avoid abrasive cleaners.
- Promptly Address Leaks: Fix any leaks to prevent moisture damage.
- Use Sunshades: Protect your headliner from UV damage.
14. Advanced Techniques for Difficult Cases
For severe sagging or damage, consider these advanced techniques:
- Replacing the Headliner Board: If the backing board is damaged, replace it along with the fabric.
- Using Heat Guns: For stubborn adhesive, use a heat gun to soften it before removal.
- Custom Fabric Options: Upgrade your headliner with custom fabric for a unique look.
15. The Environmental Impact of Headliner Repair
Choosing to repair your headliner instead of replacing it has environmental benefits:
- Reduced Waste: Extends the life of your existing materials.
- Lower Carbon Footprint: Reduces the need for new manufacturing and transportation.
- Sustainable Practices: Aligns with eco-friendly automotive care.
16. Call to Action: Transform Your Car Today
Ready to say goodbye to that sagging headliner? Contact CARDIAGTECH.NET now at +1 (641) 206-8880 or visit our website at CARDIAGTECH.NET. Our expert team is ready to assist you with the best tools and advice to restore your car’s interior to its former glory. Don’t wait—transform your driving experience today! Our address is 276 Reock St, City of Orange, NJ 07050, United States.
Don’t let a sagging headliner ruin your driving experience. Contact CARDIAGTECH.NET today for expert advice and quality products!
FAQs About Car Headliner Repair
1. How do I know if my ceiling is sagging?
Signs of a sagging car ceiling include cracking sounds when the car shakes, drooping plasterboard, visible cracks, and tiny blisters or circles forming along nail or screw lines.
2. Is it OK to fix the headliner sagging myself?
Yes, you can fix minor sagging issues yourself. Headliner repair kits are readily available online and at auto parts stores, allowing you to secure the inner layer of a sinking headliner.
3. Can I paint a headliner?
While it might seem appealing, painting a headliner is not recommended. It requires significant preparation to avoid getting paint on the trim and glass, and the paint is unlikely to withstand temperature-related expansion and contraction inside the car.
4. Does car insurance cover the cost of car headliner replacement?
Unfortunately, most car insurance policies do not cover the cost of headliner replacement, as it is considered part of the vehicle’s interior upholstery.
5. What causes a car headliner to sag?
Common causes include heat, sunlight, moisture, poor installation, and physical damage.
6. How long does it take to fix a sagging headliner?
The time required varies depending on the method and severity of the sagging. Quick fixes like pinning can take less than an hour, while more extensive repairs like gluing or steaming may take several hours.
7. Can I use any type of glue for headliner repair?
No, you should use a specialized headliner adhesive spray that is designed to withstand high temperatures and bond to the fabric and backing board.
8. Will a sagging headliner affect my car’s performance?
While a sagging headliner primarily affects the aesthetics and comfort of your car, it can also reduce insulation, potentially affecting the efficiency of your car’s climate control system.
9. What are the best ways to prevent headliner sagging?
To prevent headliner sagging, park your car in the shade, control interior conditions with sunshades, regularly inspect rubber seals, use a gentle steam cleaner, and protect the headliner from physical damage.
10. Where can I buy quality headliner repair tools and materials?
You can find a wide range of high-quality headliner repair tools and materials at CARDIAGTECH.NET. Visit our website or contact us at +1 (641) 206-8880 for expert advice and assistance.
Address your sagging headliner today with CARDIAGTECH.NET! We’re here to help you maintain and improve your vehicle’s interior. Contact us now!