How To Fix Car Ceiling Felt: A Comprehensive Guide

Fixing a sagging car ceiling felt can refresh your vehicle’s interior and prevent further damage. CARDIAGTECH.NET provides expert solutions to restore your car’s headliner using effective techniques and quality tools. Discover methods to repair and maintain your car’s ceiling felt, ensuring a comfortable and stylish ride with these headliner repair tips.
1. Understanding Car Ceiling Felt (Headliner)
The headliner, or car ceiling felt, is the fabric lining the interior roof of your vehicle. It enhances the interior’s aesthetics, absorbs noise, and provides insulation against external temperatures. Typically made of multiple layers, including a foam backing (often polyurethane) attached to a headliner board, it’s crucial for both comfort and acoustics.
Car headliner
2. Why Car Ceiling Felt Sags: Common Causes
Sagging occurs when the fabric detaches from the backing board due to several factors. Extreme weather conditions exacerbate this issue, leading to an unsightly and inconvenient problem.
2.1. Heat and Sunlight
Intense heat causes the adhesive to break down, leading the fabric to loosen and sag. Parking in direct sunlight accelerates this process, making it a primary cause of sagging.
2.2. Moisture
Humidity and leaks can seep into the headliner, causing the foam to absorb moisture, lose shape, and eventually sag. Proper sealing and ventilation are essential to prevent moisture buildup.
2.3. Installation Issues
Improper installation with insufficient glue or incorrect techniques often results in premature sagging. Factory defects in waterproofing can also allow water to infiltrate, further deteriorating the adhesive.
2.4. Physical Damage
Children and pets can physically strain the headliner by scratching or pulling, which accelerates the sagging process. Protecting the headliner from physical stress is crucial for its longevity.
3. Initial Assessment: Is DIY Repair Right for You?
Before diving into repairs, evaluate the extent of the damage. Minor sags or looseness around the edges are easier to fix. However, extensive sagging may require professional attention. Consider your comfort level with DIY projects and the tools available.
4. Essential Tools and Materials for Car Ceiling Felt Repair
Having the right tools and materials is crucial for a successful repair. CARDIAGTECH.NET offers a range of tools perfect for automotive interior repairs.
| Tool/Material | Description | Use |
|---|---|---|
| Headliner Adhesive Spray | High-strength adhesive designed for automotive headliners. | Bonding fabric back to the headliner board. |
| Sequin Pins | Small, decorative pins. | Temporarily holding fabric in place while the adhesive cures. |
| Clear-Headed Twist Pins | Also known as “saggy stoppers,” these pins secure the headliner without causing damage. | Long-term solution for holding up sagging fabric. |
| Steam Cleaner | Emits hot steam to reactivate the old adhesive. | Reattaching fabric, especially around edges. |
| Paint Roller | Smooth, even pressure on the fabric. | Smoothing out the fabric after steaming. |
| Microfiber Cloths | Soft cloths. | Cleaning the headliner and applying adhesive. |
| Safety Glasses | Protective eyewear. | Protecting eyes from adhesive spray and debris. |
| Gloves | Disposable gloves. | Protecting hands from adhesive. |
| Mask | Filter the air. | Protecting against breathing in harmful fumes. |
5. Step-by-Step Guide: How to Fix Sagging Car Ceiling Felt Without Removing It
These methods offer practical solutions for fixing a sagging headliner without the hassle of complete removal.
5.1. Method 1: Old-Fashioned Gluing
This method is best for minor sags around edges or corners.
Step 1: Preparation
Clean the sagging area with a microfiber cloth to remove dirt and debris.
Step 2: Applying Adhesive
Spray headliner adhesive evenly onto the loose fabric and the corresponding area on the headliner board. Allow it to tack for a few minutes, as per the product instructions.
Step 3: Reattaching Fabric
Gently press the fabric back onto the board, smoothing out any wrinkles or bubbles. Use a small roller to apply even pressure.
Step 4: Securing with Pins (Optional)
Use sequin pins to hold the fabric in place while the adhesive cures. Remove the pins after 24 hours.
5.2. Method 2: Pinning It Down
A quick and effective solution for temporarily securing larger sagging areas.
Step 1: Preparation
Gather sequin pins or similar pins.
Step 2: Pinning the Fabric
Push the pins through the fabric into the foam backing board, starting from the center of the sagging area and working outwards.
Step 3: Arranging Pins
Arrange the pins in a visually pleasing pattern to distribute the fabric evenly.
5.3. Method 3: Clear-Headed Twist Pins (Saggy Stoppers)
A more durable and less invasive option for securing the headliner.
Step 1: Preparation
Purchase clear-headed twist pins from an auto supply store or online.
Step 2: Inserting Pins
Twist the pins through the fabric and into the headliner board, spacing them evenly across the sagging area.
Step 3: Adjusting Pins
Adjust the pins as needed to ensure the fabric is taut and smooth.
5.4. Method 4: Steam Cleaner and Paint Roller Combo
Ideal for larger areas where the adhesive has generally weakened.
Step 1: Steam Cleaning
Use a steam cleaner to gently heat the sagging area, reactivating the old adhesive. Hold the steamer a few inches away from the fabric to avoid damage.
Step 2: Rolling the Fabric
Immediately after steaming, use a paint roller to smooth the fabric back onto the headliner board. Apply even pressure to ensure good contact.
Step 3: Repeat as Needed
Repeat the steaming and rolling process until the fabric is securely reattached.
6. Advanced Techniques for Difficult Areas
Addressing specific challenges requires specialized techniques.
6.1. Working Around Sunroofs and Lights
Carefully detach the fabric around these fixtures, apply adhesive, and reattach, ensuring a smooth finish.
6.2. Handling Creases and Wrinkles
Use the steam cleaner and roller method to gently smooth out creases and wrinkles. For stubborn wrinkles, consider using a heat gun on a low setting, but be cautious to avoid burning the fabric.
7. Preventing Future Sagging: Maintenance Tips
Prevention is always better than cure. Implementing these tips can significantly extend the life of your car’s headliner.
7.1. Park in the Shade
Limit exposure to direct sunlight to prevent the adhesive from breaking down.
7.2. Regular Cleaning
Keep the headliner clean by gently vacuuming or wiping it with a damp microfiber cloth.
7.3. Monitor and Address Leaks
Promptly repair any leaks to prevent moisture damage.
7.4. Avoid Harsh Chemicals
Use only headliner-specific cleaners to avoid damaging the fabric or adhesive.
7.5. Maintain Interior Temperature
Use window shades to regulate the interior temperature, especially during hot weather.
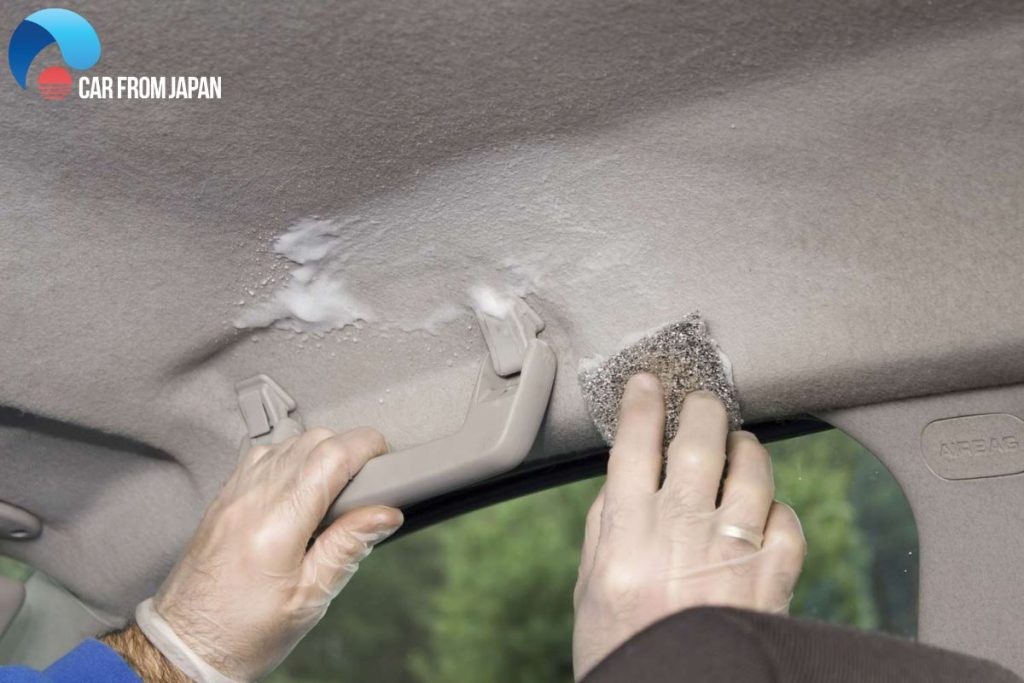 How to fix sagging headliner
8. When to Call a Professional: Recognizing Unfixable Damage
Sometimes, DIY repairs aren’t enough. If the headliner board is severely damaged or the fabric is extensively torn, professional replacement is the best option.
8.1. Signs of Severe Damage
Cracked or warped headliner board. Extensive tears or stains on the fabric. Multiple failed DIY repair attempts.
8.2. Benefits of Professional Replacement
Guaranteed quality and durability. Proper installation to prevent future sagging. Access to specialized tools and materials.
9. Cost Analysis: DIY vs. Professional Repair
Consider the costs associated with both options to make an informed decision.
| Expense | DIY Repair | Professional Repair |
|---|---|---|
| Materials | $20 – $50 | Included in service |
| Tools | $0 – $100 (if needed) | Included in service |
| Labor | Your time | $300 – $1000+ |
| Total Cost | $20 – $150 | $300 – $1000+ |
| Skill Level | Basic to Intermediate | Professional |
| Time Investment | 2-4 hours | 1-2 days (drop-off) |
10. Choosing the Right Products: CARDIAGTECH.NET Recommendations
CARDIAGTECH.NET offers high-quality tools and materials for all your automotive repair needs.
10.1. Headliner Adhesive Sprays
Recommend adhesives with high heat resistance and strong bonding properties.
10.2. Cleaning Solutions
Gentle, pH-balanced cleaners specifically designed for automotive interiors.
10.3. Essential Tools
Steam cleaners, rollers, and pin sets that are durable and effective.
11. Troubleshooting Common Issues
Addressing common problems ensures a smooth repair process.
11.1. Adhesive Not Sticking
Ensure both surfaces are clean and dry. Apply multiple thin coats of adhesive rather than one thick coat.
11.2. Fabric Bubbling
Use a roller to smooth out bubbles immediately after applying adhesive. If bubbles persist, gently prick them with a needle and smooth again.
11.3. Pins Falling Out
Use longer, sturdier pins or consider using adhesive in conjunction with pins for added security.
12. Real-World Examples: Success Stories
Hearing from others who have successfully tackled this repair can be encouraging.
12.1. Case Study 1: Minor Sagging in a Sedan
A car owner successfully used the gluing method to repair a small sagging area around the rearview mirror, saving hundreds of dollars.
12.2. Case Study 2: Extensive Sagging in an SUV
Another owner used clear-headed twist pins to secure a larger sagging area in their SUV, achieving a presentable and functional result.
13. Safety Precautions
Safety should always be a top priority when undertaking any automotive repair.
13.1. Ventilation
Work in a well-ventilated area to avoid inhaling harmful fumes from adhesives and cleaners.
13.2. Protective Gear
Wear safety glasses and gloves to protect your eyes and skin.
13.3. Fire Safety
Keep flammable materials away from heat sources and use caution when working with electrical tools.
14. Legal and Environmental Considerations
Be aware of any regulations regarding the disposal of used adhesives and cleaning products.
14.1. Proper Disposal
Dispose of used adhesives and cleaning products according to local regulations.
14.2. Recycling
Recycle any recyclable materials, such as cardboard and plastic containers.
15. Staying Updated: Latest Trends in Car Interior Repair
Keep abreast of the latest advancements in automotive repair to ensure you’re using the best techniques and products.
15.1. New Materials
Explore new headliner fabrics and adhesives that offer improved durability and performance.
15.2. Innovative Tools
Invest in new tools that can make the repair process easier and more efficient.
16. Resources and Further Reading
Expand your knowledge with these valuable resources.
16.1. Online Forums
Join online forums and communities to share tips and ask questions.
16.2. Repair Manuals
Consult repair manuals for detailed instructions and diagrams.
16.3. Video Tutorials
Watch video tutorials for step-by-step guidance on specific repair techniques.
17. Conclusion: Taking Pride in Your Car’s Interior
Repairing your car’s ceiling felt is a rewarding project that enhances your vehicle’s appearance and value. With the right tools, techniques, and a bit of patience, you can achieve professional-quality results.
Maintaining your car’s headliner not only improves its aesthetic appeal but also contributes to a more comfortable driving experience. Whether you choose to tackle the repair yourself or seek professional assistance, addressing a sagging headliner promptly can prevent further damage and ensure your car’s interior remains in top condition. For all your automotive repair needs, trust CARDIAGTECH.NET to provide the tools and expertise you need to succeed.
18. Actionable Steps: Get Started Today
Ready to tackle your sagging car ceiling felt? Here’s how to get started:
- Assess the Damage: Determine the extent of the sagging and identify the affected areas.
- Gather Your Supplies: Purchase the necessary tools and materials from CARDIAGTECH.NET, ensuring you have everything on hand before you begin.
- Choose Your Method: Select the repair method that best suits the type and severity of the sagging.
- Follow the Steps: Carefully follow the step-by-step instructions outlined in this guide.
- Take Your Time: Rushing the process can lead to mistakes. Take your time and pay attention to detail.
- Enjoy Your Work: Once the repair is complete, take pride in your accomplishment and enjoy the refreshed look of your car’s interior.
With CARDIAGTECH.NET, you have the resources and support you need to successfully repair your car’s ceiling felt and keep your vehicle looking its best. Don’t let a sagging headliner detract from your driving experience—take action today!
Is a sagging headliner making your car look shabby and uncomfortable? CARDIAGTECH.NET offers the tools and expertise you need to fix it yourself. Don’t let this issue get you down; our high-quality products and detailed guides will help you restore your car’s interior quickly and effectively.
19. FAQs: Addressing Your Concerns About Car Ceiling Felt Repair
19.1. How Do You Know if Your Ceiling is Sagging?
Signs of a sagging car ceiling include visible drooping, cracking sounds when the car moves, and tiny blisters or circles forming on the fabric.
19.2. Is It OK to Fix the Headliner Sagging Myself?
Yes, you can fix minor sagging issues yourself with the right tools and materials. Replacement kits are readily available, making DIY repairs accessible.
19.3. Can I Paint a Headliner?
Painting a headliner is not recommended due to the potential for uneven coverage and issues with temperature-related expansion and contraction. It’s better to repair or replace the fabric.
19.4. Does Car Insurance Cover the Cost of Car Headliner Replacement?
Most car insurance policies do not cover interior upholstery, trim, or headliners unless the damage is caused by a covered event like a collision.
19.5. How Long Does It Take for a Headliner to Sag?
The lifespan of a headliner varies depending on factors like climate, usage, and material quality. Sagging can occur within a few years in hot, humid conditions, or last for a decade or more in milder climates.
19.6. Can I Use Regular Glue Instead of Headliner Adhesive?
No, regular glue is not suitable for headliners. Headliner adhesive is specifically designed to withstand high temperatures and provide a strong, flexible bond.
19.7. What is the Best Way to Clean a Car Headliner?
The best way to clean a car headliner is to use a gentle, pH-balanced cleaner and a soft microfiber cloth. Avoid using harsh chemicals or excessive moisture.
19.8. How Can I Prevent My Car Headliner from Sagging in the First Place?
To prevent sagging, park in the shade, regularly clean the headliner, address leaks promptly, and avoid using harsh chemicals.
19.9. Are There Different Types of Headliner Fabric?
Yes, there are various types of headliner fabric, including cloth, suede, and vinyl. Each material has its own advantages and disadvantages in terms of durability, appearance, and cost.
19.10. What Should I Do If My Headliner Board is Damaged?
If your headliner board is damaged, you may need to replace it along with the fabric. Headliner boards can be purchased from auto parts retailers or online.
20. Why Choose CARDIAGTECH.NET for Your Automotive Repair Needs?
At CARDIAGTECH.NET, we understand the challenges you face as an automotive technician. Our mission is to provide you with the highest quality tools and equipment to enhance your efficiency, accuracy, and overall success. Here’s why you should choose us:
- Quality Products: We offer a wide range of top-notch tools and equipment designed to meet the demands of professional automotive repair.
- Expert Support: Our team of experts is always ready to assist you with any questions or concerns, ensuring you get the right tools for the job.
- Competitive Pricing: We strive to offer competitive pricing without compromising on quality, helping you maximize your profitability.
- Innovative Solutions: We stay ahead of the curve with the latest technology and innovative solutions to keep you at the forefront of the industry.
- Customer Satisfaction: Your satisfaction is our priority. We are committed to providing exceptional service and support to ensure you have a positive experience with us.
20.1. Overcome Your Challenges with CARDIAGTECH.NET
We recognize the difficulties you face in your profession:
- Physical Demands: Our ergonomic tools are designed to reduce strain and improve comfort during long hours of work.
- Keeping Up with Technology: We offer training and resources to help you stay current with the latest automotive technologies and repair techniques.
- Time Constraints: Our efficient tools and equipment can help you complete repairs quickly and accurately, saving you valuable time.
- Competition: By using our high-quality tools and equipment, you can enhance the quality and efficiency of your services, giving you a competitive edge.
- Finding the Right Tools: Our comprehensive selection of tools and equipment ensures you can find exactly what you need for any repair job.
Ready to take your automotive repair business to the next level? Contact CARDIAGTECH.NET today to learn more about our products and services. Let us help you enhance your efficiency, accuracy, and profitability.
Contact Information:
- Address: 276 Reock St, City of Orange, NJ 07050, United States
- WhatsApp: +1 (641) 206-8880
- Website: CARDIAGTECH.NET
Don’t wait—reach out to CARDIAGTECH.NET now and discover how we can help you succeed!
Want to maintain your car’s value and appearance? Addressing a sagging headliner is a smart move. Contact CARDIAGTECH.NET today, and let our experts guide you through the best solutions for your vehicle.