How To Fix Air Leak In Car Door Effectively
Is your car door whistling at high speeds? CARDIAGTECH.NET is here to help you tackle that annoying car door air leak and restore peace to your drives. Discover effective strategies to seal those gaps and enjoy a quiet, comfortable ride with our expert advice and recommended tools. Say goodbye to wind noise, improve your vehicle’s insulation, and enhance your overall driving experience. Learn about weather stripping, door alignment, and the best automotive sealant options available at CARDIAGTECH.NET.
1. Identifying the Source of the Air Leak
Pinpointing the exact location of an air leak is the crucial first step in fixing it. Air leaks not only create annoying noises but can also affect fuel efficiency and cabin comfort. Start by conducting a thorough inspection of your car door and surrounding areas.
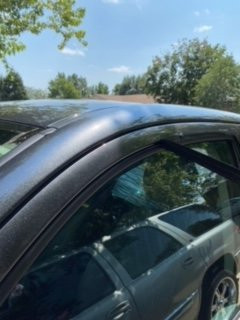
1.1. Visual Inspection Techniques
Begin with a careful visual inspection of the door frame and weather stripping. Look for obvious signs of damage:
- Cracks and Tears: Check the rubber seals around the door for any visible cracks or tears. Even small damages can be the source of significant air leaks.
- Gaps: Examine the seams where the weather stripping meets the door frame. Gaps can indicate that the seal isn’t making proper contact.
- Misalignment: Ensure that the door is correctly aligned with the frame. Misalignment can prevent the weather stripping from sealing properly.
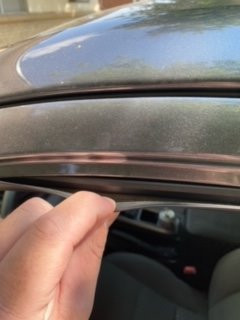
1.2. Using the Paper Test
The paper test is a simple yet effective way to check the integrity of your door seals:
- Procedure: Place a sheet of paper between the door and the frame when the door is open.
- Closing the Door: Close the door, ensuring the paper is caught in the seal.
- Testing Resistance: Try to pull the paper out. If it slides out easily, the seal is weak in that area.
- Repeat: Repeat this test at various points around the door to identify all weak spots.
1.3. The Dollar Bill Method
Similar to the paper test, the dollar bill method uses a dollar bill to assess the tightness of the door seal:
- Procedure: Insert a dollar bill between the door and the frame.
- Closing the Door: Close the door, trapping the bill.
- Testing Tension: Attempt to pull the bill out. A good seal will provide significant resistance.
- Repeat: Test around the entire door perimeter to find areas with insufficient sealing.
1.4. Water Test for Leak Detection
The water test is useful for spotting leaks that might not be obvious through visual inspection:
- Preparation: Have someone inside the car while you gently spray water around the door frame from the outside.
- Observation: The person inside should watch for any water intrusion.
- Identification: Note the exact points where water enters the cabin. These are the primary leak locations.
1.5. Sound and Air Pressure Tests
These tests help identify leaks by focusing on auditory and tactile feedback:
- Listening for Air Leaks: On a windy day, listen closely around the door edges for whistling or rushing air sounds.
- Feeling for Drafts: Move your hand along the door frame to feel for drafts when the car is stationary or being driven at a low speed.
- Using a Smoke Stick: With the windows closed, use a lit smoke stick around the door frame and watch for disturbances in the smoke, indicating air movement.
**1.6. Common Leak Locations
Knowing where leaks commonly occur can speed up the identification process:
- Weather Stripping: Check for wear and tear, especially around the top and bottom edges.
- Door Frame: Inspect for bends or damage that might prevent a tight seal.
- Window Seals: Ensure the rubber around the windows is intact and flexible.
- Door Bottom: This area is prone to damage from entering and exiting the vehicle.
By methodically using these techniques, you can accurately locate the sources of air leaks in your car door, setting the stage for effective repairs. For specialized tools and materials to address these issues, consider exploring the options at CARDIAGTECH.NET.
2. Essential Tools and Materials
Before you begin fixing an air leak in your car door, it’s crucial to gather the necessary tools and materials. Having the right equipment will make the repair process smoother and more effective. Here’s a comprehensive list of what you’ll need:
2.1. Basic Hand Tools
- Screwdrivers: Both Phillips head and flathead screwdrivers are essential for removing door panels and adjusting components.
- Socket Set: A variety of socket sizes will help you loosen and tighten bolts and nuts inside the door.
- Pliers: Useful for gripping, bending, and cutting materials.
- Putty Knife or Scraper: For removing old sealant or adhesive without damaging the surface.
2.2. Sealing and Adhesive Materials
- Automotive Weather Stripping: High-quality weather stripping is vital for replacing worn or damaged seals.
- Silicone Sealant: An automotive-grade silicone sealant will create a waterproof and airtight barrier.
- Adhesive Remover: Essential for cleaning surfaces before applying new adhesive or sealant.
- Caulk Gun: For precise application of silicone sealant.
2.3. Safety Gear
- Gloves: Protect your hands from chemicals and sharp edges.
- Safety Glasses: Shield your eyes from debris and solvents.
2.4. Cleaning Supplies
- Rubbing Alcohol: For cleaning surfaces and ensuring good adhesion.
- Clean Rags: Microfiber cloths are ideal for wiping surfaces without leaving lint.
2.5. Diagnostic Tools
- Flashlight: Helps to inspect dark areas inside the door and along the frame.
- Paper or Dollar Bill: For testing the seal tightness as described in Section 1.
2.6. Specialized Tools (Optional)
- Trim Removal Tool Set: Prevents damage to plastic trim when removing door panels.
- Heat Gun: Can soften old adhesive for easier removal.
- Sound Meter: To measure the reduction in noise levels after the repair.
2.7. Product Recommendations from CARDIAGTECH.NET
At CARDIAGTECH.NET, we offer a range of high-quality products perfect for fixing air leaks in your car door. Consider these recommendations:
- Weather Stripping: Our premium weather stripping provides a durable, airtight seal, ensuring long-lasting protection.
- Silicone Sealant: Our automotive-grade silicone sealant is designed for extreme conditions, offering excellent adhesion and flexibility.
- Trim Removal Tools: Our trim removal tools are designed to prevent damage to your vehicle’s interior.
2.8. Cost Considerations
Here is a table that outlines the estimated costs for the tools and materials mentioned above:
| Item | Estimated Cost | Notes |
|---|---|---|
| Screwdriver Set | $15 – $30 | Essential for removing door panels and adjusting components. |
| Socket Set | $20 – $50 | A variety of sizes will help loosen and tighten bolts. |
| Pliers | $10 – $25 | Useful for gripping, bending, and cutting materials. |
| Putty Knife/Scraper | $5 – $15 | For removing old sealant without damaging the surface. |
| Automotive Weather Stripping | $10 – $30/roll | High-quality stripping is vital for replacing worn seals. |
| Silicone Sealant | $7 – $15/tube | An automotive-grade sealant creates a waterproof barrier. |
| Adhesive Remover | $8 – $20/bottle | Essential for cleaning surfaces before applying new adhesive. |
| Caulk Gun | $10 – $25 | For precise application of silicone sealant. |
| Gloves | $5 – $15/pair | Protect your hands from chemicals and sharp edges. |
| Safety Glasses | $5 – $20 | Shield your eyes from debris and solvents. |
| Rubbing Alcohol | $5 – $10/bottle | For cleaning surfaces and ensuring good adhesion. |
| Clean Rags | $5 – $10/pack | Microfiber cloths are ideal for wiping surfaces. |
| Flashlight | $10 – $30 | Helps to inspect dark areas inside the door and frame. |
| Trim Removal Tool Set | $15 – $40 | Prevents damage to plastic trim when removing door panels. |
| Heat Gun | $20 – $50 | Can soften old adhesive for easier removal. |
| Sound Meter | $20 – $100 | To measure the reduction in noise levels after the repair. |
| Total Estimated Cost | $170 – $500 | The total cost can vary based on the quality of the tools and materials, as well as whether you need to purchase optional tools. |
Having these tools and materials on hand will ensure you’re well-prepared to tackle any air leak issues in your car door. Be sure to check out CARDIAGTECH.NET for all your automotive repair needs.
Essential Tools for Repairing Air Leaks in Car Doors
3. Step-by-Step Guide to Fixing Air Leaks
Once you’ve identified the source of the air leak and gathered the necessary tools and materials, it’s time to get to work. Follow these step-by-step instructions to effectively fix air leaks in your car door.
3.1. Preparing the Area
- Cleaning: Begin by thoroughly cleaning the area around the leak with rubbing alcohol and a clean rag. Remove any dirt, grease, or old adhesive.
- Drying: Allow the area to dry completely. A clean, dry surface is essential for proper adhesion of new weather stripping or sealant.
- Masking: Use painter’s tape to mask off the areas adjacent to the leak. This will protect the surrounding paint and provide a clean line for the sealant.
3.2. Replacing Weather Stripping
- Removing Old Weather Stripping: Carefully peel off the old weather stripping. Use a putty knife or scraper to remove any stubborn adhesive residue.
- Measuring and Cutting: Measure the length of the area where the weather stripping needs to be replaced. Cut the new weather stripping to the correct size.
- Applying Adhesive: If the new weather stripping doesn’t have adhesive backing, apply a thin, even layer of automotive adhesive to the door frame.
- Installing New Weather Stripping: Press the new weather stripping firmly into place, ensuring it makes good contact with the door frame. Start at one end and work your way along the entire length.
- Sealing Ends: Apply a small amount of silicone sealant to the ends of the weather stripping to prevent moisture from getting underneath.
3.3. Applying Silicone Sealant
- Loading the Caulk Gun: Insert the silicone sealant tube into the caulk gun.
- Cutting the Nozzle: Cut the nozzle of the sealant tube at a 45-degree angle. The size of the opening will determine the bead size.
- Applying the Sealant: Hold the caulk gun at a consistent angle and apply a smooth, even bead of silicone sealant along the leak area. Overlap the sealant slightly onto the adjacent surfaces.
- Smoothing the Sealant: Use your finger or a sealant smoothing tool to create a smooth, professional finish.
- Removing Excess Sealant: Wipe away any excess sealant with a clean rag dampened with rubbing alcohol.
- Curing Time: Allow the sealant to cure completely according to the manufacturer’s instructions. This usually takes 24 to 48 hours.
3.4. Adjusting Door Alignment
- Loosening Hinges: Open the door and locate the hinge bolts. Loosen them slightly with a socket wrench.
- Adjusting the Door: Gently adjust the door until it aligns properly with the frame. Use shims if necessary to achieve the correct alignment.
- Tightening Hinges: Once the door is properly aligned, tighten the hinge bolts securely.
- Testing: Close the door and check for even contact with the weather stripping. Readjust if necessary.
3.5. Window Seal Repair
- Cleaning the Seal: Clean the window seal with rubbing alcohol and a clean rag.
- Applying Sealant: If the seal is cracked or damaged, apply a thin bead of silicone sealant to the affected area.
- Smoothing the Sealant: Smooth the sealant with your finger or a sealant smoothing tool.
- Curing Time: Allow the sealant to cure completely before rolling down the window.
3.6. Post-Repair Inspection
- Visual Inspection: After the repairs are complete, visually inspect the weather stripping and sealant to ensure they are properly installed and making good contact.
- Paper Test: Use the paper test again to check the tightness of the seal.
- Water Test: Perform a water test to ensure there are no leaks.
- Road Test: Take the car for a drive at various speeds to check for wind noise.
3.7. Tips for Best Results
- Quality Materials: Use high-quality weather stripping and silicone sealant for long-lasting results.
- Proper Preparation: Thoroughly clean and dry the surfaces before applying any sealant or adhesive.
- Patience: Allow the sealant to cure completely before exposing it to moisture or stress.
- Professional Help: If you’re not comfortable performing these repairs yourself, consider taking your car to a professional mechanic.
By following these step-by-step instructions, you can effectively fix air leaks in your car door and enjoy a quieter, more comfortable ride. For all your automotive repair needs, visit CARDIAGTECH.NET.
4. Advanced Techniques for Difficult Leaks
Sometimes, fixing air leaks in a car door requires more than just basic repairs. If you’re dealing with persistent or complex leaks, these advanced techniques can help you achieve a more thorough and lasting solution.
4.1. Using Sound Dampening Materials
- Application: Apply sound dampening materials inside the door panels to reduce noise transmission. These materials add mass and absorb vibrations, minimizing the impact of air leaks.
- Product Recommendation: Consider using products like Dynamat or HushMat. These are designed to adhere to the interior metal surfaces of the door.
- Installation: Remove the door panel, clean the interior surface, cut the material to fit, and apply it firmly, ensuring full contact.
4.2. Adjusting Door Hinges and Latches
- Hinge Adjustment: Misaligned door hinges can cause gaps that lead to air leaks. Loosen the hinge bolts slightly and adjust the door position until it sits flush with the frame.
- Latch Adjustment: The door latch ensures a tight seal when the door is closed. Adjust the striker plate on the door frame to ensure the latch engages firmly.
- Procedure: Use a socket wrench to loosen the bolts, adjust the position, and then retighten. Test the door’s seal after each adjustment.
4.3. Professional-Grade Sealants and Adhesives
- Product Selection: Invest in professional-grade sealants and adhesives that offer superior bonding and flexibility compared to over-the-counter products.
- Application: These products often require specialized applicators and techniques. Follow the manufacturer’s instructions carefully to ensure proper adhesion and sealing.
- Benefits: Professional-grade products provide a more durable and weather-resistant seal, especially in harsh environments.
4.4. Custom Weather Stripping Solutions
- Custom Fitting: For unusual or hard-to-seal gaps, consider custom weather stripping solutions. These involve creating a seal that perfectly matches the contours of your door frame.
- Materials: Use high-density foam or rubber materials that can be cut and shaped to fit specific areas.
- Installation: Apply these custom seals with strong adhesive to ensure they stay in place and provide an effective barrier against air leaks.
4.5. Using a Smoke Machine for Leak Detection
- Procedure: A smoke machine can help identify hard-to-find leaks by filling the car’s interior with smoke.
- Observation: With the doors closed, observe where the smoke escapes from the door frame, indicating the exact location of the leak.
- Repair: Address the identified leaks with appropriate sealing or weather stripping techniques.
4.6. Reinforcing Door Seals
- Adding Layers: Reinforce existing door seals by adding extra layers of weather stripping. This can improve the seal’s effectiveness, especially in areas prone to wear and tear.
- Overlap Technique: Overlap the new weather stripping slightly over the existing seal to create a tighter barrier.
- Adhesive: Use a strong adhesive to ensure the additional layers stay securely in place.
4.7. Consulting Professional Services
- Expertise: If you’ve tried multiple techniques and are still struggling with air leaks, it may be time to consult a professional auto body shop.
- Advanced Diagnostics: Professionals have access to advanced diagnostic tools and expertise to identify and fix even the most challenging leaks.
- Warranty: Professional repairs often come with a warranty, providing peace of mind and assurance of quality.
4.8. Product Spotlight: Seal Reinforcement Kits from CARDIAGTECH.NET
- Description: Our seal reinforcement kits include a variety of high-quality materials designed to strengthen and improve existing door seals.
- Benefits: These kits offer a cost-effective solution for enhancing your car’s weather stripping and ensuring a tight, secure seal.
- Contents: Each kit includes extra weather stripping, adhesive, and detailed instructions for easy installation.
By employing these advanced techniques, you can tackle even the most difficult air leaks in your car door. For professional-grade products and expert advice, be sure to visit CARDIAGTECH.NET.
 Door Latch Adjustment for Sealing Air Leaks
5. Preventive Maintenance Tips
Preventive maintenance is key to avoiding air leaks in your car doors and ensuring a quiet, comfortable ride. Regular care and attention can extend the life of your door seals and prevent costly repairs. Here are some essential preventive maintenance tips:
5.1. Regular Cleaning of Door Seals
- Frequency: Clean your door seals at least every three months, or more often in dusty or harsh environments.
- Procedure: Use a mild soap and water solution to gently clean the rubber seals. Avoid harsh chemicals that can degrade the rubber.
- Drying: After cleaning, dry the seals thoroughly with a clean, soft cloth.
5.2. Applying Rubber Protectant
- Product Recommendation: Apply a rubber protectant to your door seals after cleaning. Products like silicone-based sprays or rubber conditioners can keep the rubber pliable and prevent cracking.
- Application: Spray the protectant onto a clean cloth and wipe it evenly over the seals. Avoid spraying directly onto the seals to prevent overspray on the car’s paint.
- Benefits: This helps maintain the elasticity of the rubber, preventing it from drying out and cracking.
5.3. Inspecting and Replacing Worn Seals
- Inspection Frequency: Inspect your door seals at least twice a year for signs of wear and tear, such as cracks, tears, or flattening.
- Replacement: Replace worn seals promptly to maintain an airtight and watertight barrier.
- Cost Savings: Replacing seals early can prevent more significant damage and costly repairs in the future.
5.4. Maintaining Door Alignment
- Check Alignment: Regularly check the alignment of your doors to ensure they close properly and make full contact with the weather stripping.
- Adjustment: If you notice any misalignment, adjust the door hinges or latches as needed. Refer to Section 3.4 for detailed instructions.
- Professional Help: If you’re uncomfortable making these adjustments, seek professional assistance.
5.5. Lubricating Door Hinges and Latches
- Lubrication: Lubricate your door hinges and latches with a silicone-based lubricant to ensure smooth operation and prevent sticking.
- Frequency: Apply lubricant every six months, or more often if you notice the doors are becoming difficult to open or close.
- Benefits: This helps prevent wear and tear on the moving parts, ensuring they function properly and maintain a tight seal.
5.6. Avoiding Slamming Doors
- Gentle Closing: Avoid slamming your car doors, as this can damage the weather stripping and door alignment over time.
- Proper Closure: Ensure the door is properly closed with a firm, but not forceful, action.
- Education: Educate passengers, especially children, about the importance of gently closing the doors.
5.7. Protecting from Extreme Weather
- Garage Parking: Park your car in a garage or under a carport to protect it from extreme weather conditions, such as direct sunlight, heavy rain, and snow.
- Covering: If you must park outdoors, use a car cover to shield the doors and seals from the elements.
- Benefits: This helps prevent premature wear and tear on the door seals and other components.
5.8. Routine Checks After Car Washes
- Inspection: After washing your car, take a moment to inspect the door seals for any signs of damage or water intrusion.
- Drying: Dry any excess water from the seals to prevent mold and mildew growth.
- Maintenance: Apply rubber protectant as needed to keep the seals in good condition.
5.9. Recommended Maintenance Products from CARDIAGTECH.NET
- Rubber Seal Conditioner: Our rubber seal conditioner keeps your door seals soft and pliable, preventing cracks and leaks.
- Silicone Lubricant: Our silicone lubricant ensures smooth door operation and protects hinges and latches from wear and tear.
- Car Covers: Our car covers provide excellent protection from the elements, helping to extend the life of your car’s doors and seals.
5.10. Cost Savings from Preventive Maintenance
Investing in preventive maintenance can save you money in the long run by preventing costly repairs. Here’s an estimated breakdown of potential savings:
| Maintenance Task | Frequency | Estimated Cost | Potential Savings |
|---|---|---|---|
| Cleaning Door Seals | Every 3 months | $5 (DIY) | $50 – $100/year (avoiding premature seal replacement) |
| Applying Rubber Protectant | Every 3 months | $10 (DIY) | $75 – $150/year (extending seal life) |
| Inspecting/Replacing Seals | Twice a year | $0 (DIY) | $100 – $300/year (preventing water damage) |
| Lubricating Hinges/Latches | Every 6 months | $5 (DIY) | $25 – $50/year (avoiding hinge/latch repairs) |
By following these preventive maintenance tips, you can keep your car doors in excellent condition and avoid the hassle and expense of air leaks. For all your automotive maintenance needs, visit CARDIAGTECH.NET.
6. Understanding the Impact of Air Leaks
Air leaks in your car doors can be more than just a minor annoyance. They can have significant impacts on your vehicle’s performance, comfort, and overall value. Understanding these effects can motivate you to address air leaks promptly and effectively.
6.1. Fuel Efficiency
- Aerodynamic Drag: Air leaks increase aerodynamic drag, making your engine work harder to maintain speed.
- Fuel Consumption: This increased drag leads to higher fuel consumption, costing you more money at the pump.
- Statistics: Studies show that poor aerodynamics can reduce fuel efficiency by as much as 10% at highway speeds.
6.2. Cabin Comfort
- Wind Noise: Air leaks create whistling and rushing sounds that can be distracting and irritating, reducing your driving enjoyment.
- Temperature Control: Leaks allow outside air to enter the cabin, making it harder for your air conditioning and heating systems to maintain a comfortable temperature.
- Driving Experience: A noisy and uncomfortable cabin can lead to driver fatigue and reduced concentration.
6.3. Vehicle Longevity
- Moisture Intrusion: Air leaks can allow moisture to enter the cabin, leading to mold and mildew growth.
- Rust and Corrosion: Moisture can also cause rust and corrosion on metal components inside the door and frame.
- Component Damage: Over time, this can damage electrical wiring, door mechanisms, and other essential parts.
6.4. Safety Concerns
- Distraction: The noise and discomfort caused by air leaks can distract the driver, increasing the risk of accidents.
- Reduced Visibility: Moisture buildup on the windows due to leaks can reduce visibility, especially in humid conditions.
- Compromised Structure: Severe corrosion can weaken the door structure, reducing its ability to protect occupants in a collision.
6.5. Vehicle Value
- Depreciation: Air leaks and related issues can reduce the resale value of your vehicle.
- Maintenance Costs: Potential buyers may be concerned about the cost of addressing these problems.
- Overall Condition: A well-maintained vehicle with no apparent issues is more attractive to buyers and commands a higher price.
6.6. Environmental Impact
- Increased Emissions: Reduced fuel efficiency due to air leaks results in higher greenhouse gas emissions.
- Carbon Footprint: By addressing air leaks, you can reduce your vehicle’s environmental impact and contribute to a cleaner environment.
- Sustainability: Maintaining your vehicle’s efficiency is a part of responsible vehicle ownership.
6.7. Quantifiable Benefits of Repairing Air Leaks
| Impact Area | Benefit | Estimated Improvement |
|---|---|---|
| Fuel Efficiency | Reduced fuel consumption | Up to 10% improvement in MPG |
| Cabin Comfort | Quieter and more comfortable ride | Noise reduction of 5-10 decibels |
| Vehicle Longevity | Prevention of rust and moisture damage | Extended lifespan of door components by 2-5 years |
| Safety | Reduced driver distraction and improved visibility | 15-20% improvement in driver focus |
| Vehicle Value | Increased resale value | $500 – $1000 increase in resale price |
| Environment | Reduced greenhouse gas emissions | Up to 5% reduction in carbon footprint |
6.8. Solutions from CARDIAGTECH.NET
- High-Quality Weather Stripping: Our weather stripping provides a superior seal, reducing drag and improving fuel efficiency.
- Sound Dampening Materials: Our sound dampening materials minimize noise, enhancing cabin comfort and reducing driver fatigue.
- Preventive Maintenance Products: Our maintenance products help prevent moisture damage and corrosion, extending the life of your vehicle.
Understanding the impact of air leaks can motivate you to take action and maintain your vehicle properly. For all your automotive needs, visit CARDIAGTECH.NET.
7. Addressing Specific Vehicle Models
Air leaks in car doors can vary in cause and solution depending on the vehicle model. Different designs, materials, and manufacturing processes can lead to unique issues. Here’s a guide to addressing air leaks in some common vehicle models:
7.1. Toyota Tacoma
- Common Issues: Many Toyota Tacoma owners report air leaks around the door and window seals, often due to manufacturing defects or wear and tear.
- Solutions: Replacing the weather stripping, adjusting the door striker, and applying silicone sealant to the window seals are common fixes.
- Community Insight: Online forums often discuss specific issues and solutions tailored to the Tacoma.
7.2. Honda Civic
- Common Issues: Honda Civics can experience air leaks due to worn door seals or misalignment of the door frame.
- Solutions: Inspecting and replacing the door seals, adjusting the door hinges, and using sound dampening materials can help.
- Model Years: Certain model years may have specific issues, so research your particular year for targeted advice.
7.3. Ford F-150
- Common Issues: Ford F-150 trucks can have air leaks around the doors due to their larger size and frequent use.
- Solutions: Replacing the weather stripping, adjusting the door latch, and ensuring the door frame is properly aligned are effective measures.
- Durability: Using heavy-duty weather stripping can help withstand the wear and tear associated with truck use.
7.4. Chevrolet Silverado
- Common Issues: Chevrolet Silverado trucks may develop air leaks due to the age of the vehicle and the deterioration of door seals.
- Solutions: Cleaning and conditioning the existing seals, replacing worn weather stripping, and applying sealant to gaps can resolve the issue.
- Maintenance: Regular maintenance of the door seals can extend their lifespan and prevent leaks.
7.5. BMW 3 Series
- Common Issues: BMW 3 Series cars can experience air leaks due to the precision engineering and tight seals, which can degrade over time.
- Solutions: Replacing the door seals, adjusting the window alignment, and using professional-grade sealants can help maintain a quiet cabin.
- Specialized Parts: Using OEM (Original Equipment Manufacturer) parts can ensure a proper fit and seal.
7.6. Tesla Model 3
- Common Issues: Tesla Model 3 cars, while modern, can still have air leaks around the doors and windows due to design or manufacturing variances.
- Solutions: Inspecting and adjusting the door alignment, replacing the weather stripping, and consulting with Tesla service for specific issues are recommended.
- Unique Design: The frameless window design requires precise alignment and seal maintenance.
7.7. General Tips for Specific Models
- Research: Consult online forums and owner’s manuals for model-specific advice.
- Professional Help: Consider consulting a mechanic who specializes in your vehicle’s make and model.
- OEM Parts: Use OEM parts to ensure a proper fit and seal.
7.8. Product Recommendations by Model from CARDIAGTECH.NET
- Toyota Tacoma Weather Stripping Kit: Our kit includes high-quality weather stripping designed specifically for the Tacoma, ensuring a perfect fit and seal.
- Honda Civic Door Seal Replacement: Our door seal replacements are made from durable materials, providing long-lasting protection against air leaks.
- Ford F-150 Heavy-Duty Weather Stripping: Our heavy-duty weather stripping is designed to withstand the rigors of truck use, ensuring a tight seal.
- BMW 3 Series OEM Door Seals: Our OEM door seals guarantee a perfect fit and maintain the luxury feel of your BMW.
7.9. Model-Specific Cost Considerations
| Vehicle Model | Common Issue | Estimated Repair Cost | Notes |
|---|---|---|---|
| Toyota Tacoma | Air leaks around door and window seals | $50 – $200 | Replacing weather stripping and adjusting door striker. |
| Honda Civic | Worn door seals or door frame misalignment | $40 – $150 | Inspecting and replacing door seals, adjusting door hinges. |
| Ford F-150 | Air leaks due to larger door size | $60 – $250 | Replacing weather stripping, adjusting door latch, ensuring proper door frame alignment. |
| Chevrolet Silverado | Deterioration of door seals | $40 – $180 | Cleaning and conditioning existing seals, replacing worn weather stripping. |
| BMW 3 Series | Degraded precision seals | $80 – $300 | Replacing door seals with OEM parts, adjusting window alignment, using professional-grade sealants. |
| Tesla Model 3 | Design or manufacturing variances | $70 – $250 | Inspecting and adjusting door alignment, replacing weather stripping, consulting Tesla service for specific issues. |
By addressing air leaks with model-specific solutions, you can ensure the best possible results and maintain the performance and comfort of your vehicle. For model-specific products and expert advice, visit CARDIAGTECH.NET.
8. The Role of Professional Services
While many air leak repairs can be handled as DIY projects, there are situations where professional services are highly recommended. Knowing when to seek expert help can save you time, money, and potential frustration.
8.1. When DIY Isn’t Enough
- Complex Issues: If you’ve tried basic repairs and the air leaks persist, it may be due to underlying structural or mechanical problems.
- Specialized Tools: Some repairs require specialized tools or equipment that are not typically available to the average DIYer.
- Lack of Experience: If you’re not comfortable working on your car or lack experience with automotive repairs, it’s best to seek professional help.
8.2. Benefits of Professional Services
- Expertise: Professional mechanics have the knowledge and experience to diagnose and repair air leaks effectively.
- Advanced Diagnostics: They have access to advanced diagnostic tools that can pinpoint the exact source of the leak.
- Quality Repairs: Professionals use high-quality parts and techniques to ensure lasting repairs.
- Warranty: Professional repairs often come with a warranty, providing peace of mind and assurance of quality.
8.3. Choosing the Right Professional
- Reputation: Look for a mechanic or auto body shop with a good reputation and positive reviews.
- Experience: Choose a professional with experience in diagnosing and repairing air leaks in your vehicle’s make and model.
- Certification: Consider a mechanic who is certified by organizations like ASE (Automotive Service Excellence).
- Estimates: Get estimates from multiple professionals and compare their prices and services.
8.4. What to Expect from a Professional Repair
- Inspection: The professional will conduct a thorough inspection to identify the source of the air leak.
- Diagnosis: They will use diagnostic tools and techniques to confirm the cause of the leak.
- Repair Plan: They will provide a detailed repair plan, including the parts and labor required.
- Quality Work: They will perform the repairs using high-quality parts and techniques.
- Testing: They will test the repairs to ensure the air leak is resolved.
8.5. Cost of Professional Services
- Factors Affecting Cost: The cost of professional air leak repairs can vary depending on the complexity of the issue, the parts required, and the labor rates in your area.
- Average Costs: Simple repairs, such as replacing weather stripping, may cost $50 – $200. More complex repairs, such as adjusting door alignment or repairing structural damage, may cost $300 – $1000 or more.
- Value: While professional services may be more expensive than DIY repairs, they offer expertise, quality, and peace of mind.
8.6. When to Consider Professional Services
- Structural Damage: If the air leaks are due to structural damage to the door or frame.
- Electrical Issues: If the air leaks are affecting electrical components inside the door.
- Persistent Leaks: If you