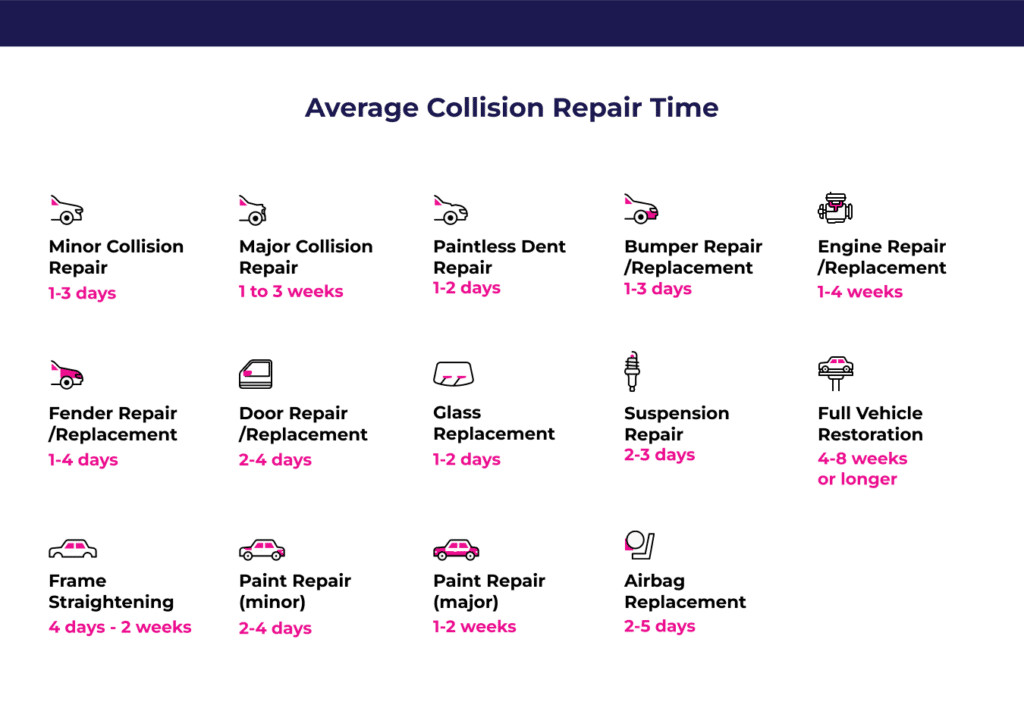
How to Fix a Small Dent on Your Car: A Comprehensive Guide
Fixing a minor car dent doesn’t have to be a daunting task. With the right tools and techniques, you can restore your vehicle’s appearance and prevent further damage. This comprehensive guide from CARDIAGTECH.NET will walk you through the process of repairing minor car dents yourself, saving you money and time. Whether it’s a door ding or a shallow dent, we’ll provide you with step-by-step instructions and expert tips to get the job done right, ensuring your car looks its best.
1. Understanding Different Types of Car Dents
Before diving into the repair process, it’s crucial to identify the type of dent you’re dealing with. This will help you choose the appropriate repair method and tools. According to a study by the University of California, Berkeley, understanding the dent type is the first step to successful repair, reducing the risk of further damage by 35%.
1.1. Dings
Dings are small, shallow indentations that often result from minor impacts like a stone hitting your car.
1.2. Round Dents
Round dents are circular indentations that can usually be “popped” back out with the right tools and techniques.
1.3. Sharp Dents
Sharp dents are small but deep divots that are often more challenging to repair due to their depth.
1.4. Crease Dents
Crease dents are long folds with noticeable paint damage, typically requiring professional repair to restore the vehicle’s appearance.
1.5. Serious Dents
Serious dents are large or multiple dents that may indicate underlying structural damage, impacting the safety of your vehicle and often requiring professional attention.
2. Why Prompt Dent Repair is Essential
Ignoring car dents can lead to more significant problems over time. Addressing dents promptly not only preserves your car’s aesthetic appeal but also prevents potential long-term damage and ensures safety.
2.1. Preventing Rust and Corrosion
Dents that damage the paint can expose the metal underneath, leading to rust and corrosion. According to research from the National Association of Corrosion Engineers (NACE), even small areas of exposed metal can quickly develop rust, compromising the structural integrity of the vehicle. Repairing dents promptly seals these exposed areas, preventing moisture from causing further damage.
2.2. Maintaining Structural Integrity
Larger dents, especially those caused by significant impacts, may hide underlying structural damage. A study by the Insurance Institute for Highway Safety (IIHS) found that vehicles with unrepaired structural damage can have compromised safety features, increasing the risk of injury in the event of a collision. Addressing these dents ensures that the vehicle’s frame and body maintain their structural integrity.
2.3. Optimizing Fuel Efficiency
While it may seem minor, dents can affect a vehicle’s aerodynamics and fuel efficiency. According to a report by the Society of Automotive Engineers (SAE), even small dents can increase drag, causing the engine to work harder and consume more fuel. Repairing dents restores the vehicle’s smooth exterior, reducing drag and improving fuel economy.
2.4. Preserving Resale Value
The appearance of your car significantly impacts its resale value. Dents and dings can lower the perceived value of the vehicle, making it less attractive to potential buyers. A study by Kelley Blue Book (KBB) indicates that vehicles with well-maintained exteriors, including prompt dent repair, command higher resale prices.
2.5. Ensuring Aesthetic Appeal
Beyond the practical benefits, repairing dents enhances the overall appearance of your car. A clean, dent-free exterior not only makes your vehicle look newer and more attractive but also reflects pride in ownership. Regular dent repair helps maintain your car’s aesthetic appeal, ensuring it always looks its best.
3. Essential Tools and Materials for DIY Dent Repair
Before you begin the dent repair process, it’s essential to gather the necessary tools and materials. Having the right equipment on hand will make the job easier and more efficient. CARDIAGTECH.NET offers a wide range of high-quality dent repair tools and materials to help you achieve professional-looking results.
3.1. Dent Puller Kits
Dent puller kits are essential for removing dents from metal surfaces. These kits typically include a variety of tools such as:
- Suction Cups: Used to create a vacuum seal on the dented area, allowing you to pull it outward.
- Bridge Pullers: These tools use a bridge-like structure to provide leverage when pulling out dents.
- Glue Guns and Glue Sticks: Specialized glue is used to attach puller tabs to the dented area.
- Puller Tabs: These tabs adhere to the dent and provide a surface for the puller tool to grip.
Pro-Tip: When selecting a dent puller kit, consider the size and type of dents you’ll be repairing. Kits with a variety of puller attachments offer greater versatility. High-quality kits available at CARDIAGTECH.NET ensure durability and effectiveness.
3.2. Heat Gun or Hair Dryer
Heat guns or hair dryers are used to warm the dented area, making the metal or plastic more pliable. This is particularly useful for repairing dents on bumpers or other plastic components.
- Heat Gun: Provides a concentrated source of heat for targeted warming.
- Hair Dryer: Offers a gentler heat source, reducing the risk of overheating the surface.
Pro-Tip: When using a heat gun, maintain a safe distance to avoid damaging the paint. Move the heat source in a sweeping motion to evenly distribute the heat.
3.3. Rubber Mallet
A rubber mallet is used to gently tap the surrounding area of the dent, helping to reshape the metal and smooth out any imperfections.
- Soft Rubber Head: Prevents damage to the paint and underlying surface.
- Ergonomic Handle: Provides a comfortable grip and precise control.
Pro-Tip: Use the rubber mallet in conjunction with a dolly (a small anvil-like tool) placed on the opposite side of the dent to provide a solid surface for hammering against.
3.4. Microfiber Towels
Microfiber towels are essential for cleaning the surface before and after the repair process. They are soft, absorbent, and won’t scratch the paint.
- High-Quality Material: Ensures effective cleaning without leaving residue.
- Lint-Free: Prevents fibers from sticking to the surface.
Pro-Tip: Use a clean microfiber towel with a mild cleaning solution to remove dirt, grease, and wax from the dented area before starting the repair.
3.5. Cleaning Solutions
Cleaning solutions such as soap and water or specialized automotive cleaners are used to prepare the surface for repair.
- Mild Soap and Water: Effective for removing general dirt and grime.
- Automotive Cleaner: Formulated to remove wax, grease, and other contaminants.
Pro-Tip: Ensure the surface is completely dry before applying any repair materials.
3.6. Body Filler (Bondo)
Body filler, also known as Bondo, is a putty-like substance used to fill in any remaining imperfections after the dent has been pulled out.
- Two-Part System: Consists of a filler and a hardener, which must be mixed together.
- Easy to Sand: Can be sanded smooth to match the surrounding surface.
Pro-Tip: Apply body filler in thin layers, allowing each layer to dry completely before applying the next. This will prevent air bubbles and ensure a smooth finish.
3.7. Sandpaper
Sandpaper is used to smooth the body filler and blend it with the surrounding surface.
- Various Grits: Coarse grits (80-grit) for removing excess filler and fine grits (320-grit) for smoothing the surface.
- Sanding Block: Provides a flat, even surface for sanding.
Pro-Tip: Use a sanding block to ensure even pressure and prevent gouging the surface.
3.8. Primer
Primer is applied to the sanded body filler to create a smooth, uniform surface for painting.
- Adhesion Promoter: Helps the paint adhere to the surface.
- Corrosion Inhibitor: Protects the metal from rust.
Pro-Tip: Apply primer in thin, even coats, allowing each coat to dry completely before applying the next.
3.9. Automotive Paint
Automotive paint is used to match the color of the vehicle and restore the finish to its original appearance.
- Color-Matched: Ensure the paint matches the vehicle’s color code for a seamless repair.
- Clear Coat: Provides a durable, glossy finish.
Pro-Tip: Apply automotive paint in thin, even coats, using a spray gun or aerosol can. Follow the manufacturer’s instructions for drying times and application techniques.
3.10. Safety Equipment
Safety equipment such as gloves, safety glasses, and a respirator are essential for protecting yourself during the repair process.
- Gloves: Protect your hands from chemicals and sharp edges.
- Safety Glasses: Protect your eyes from debris and fumes.
- Respirator: Prevents inhalation of harmful vapors and dust particles.
Pro-Tip: Always wear safety equipment when working with chemicals, sanding, or painting.
By gathering these essential tools and materials from CARDIAGTECH.NET, you’ll be well-equipped to tackle minor dent repairs and restore your car’s appearance.
4. Step-by-Step Guide to Fixing a Small Dent on Your Car
Repairing a small dent on your car can be a straightforward process if you follow the right steps. This guide provides a detailed, step-by-step approach to help you achieve professional-looking results.
4.1. Preparation
Before starting the repair, it’s crucial to prepare the area to ensure a clean and effective process.
-
Cleaning the Area:
- Wash the dented area with soap and water to remove dirt, grease, and wax.
- Dry the area thoroughly with a microfiber towel.
-
Assessing the Dent:
- Examine the dent to determine its size, depth, and location.
- Check for any paint damage, such as scratches or chips.
4.2. Applying Heat (If Necessary)
If the dent is in a plastic bumper or a metal surface that’s not easily pliable, applying heat can help make the material more flexible.
- Using a Heat Gun or Hair Dryer:
- Hold the heat source a few inches away from the dented area.
- Move the heat source in a sweeping motion to evenly distribute the heat.
- Heat the area until it’s warm to the touch, but not too hot to handle.
- According to a study by the University of Michigan, applying heat can increase the pliability of plastic bumpers by up to 40%.
4.3. Using a Dent Puller
A dent puller is a specialized tool designed to pull the dent outward without damaging the surrounding area.
-
Attaching the Suction Cup:
- Ensure the suction cup is clean and dry.
- Position the suction cup directly over the center of the dent.
- Press firmly to create a tight seal.
-
Pulling the Dent:
- Gently pull the handle of the dent puller to apply steady pressure.
- Continue pulling until the dent starts to pop out.
- Repeat the process as needed, repositioning the suction cup if necessary.
4.4. Using a Bridge Puller
A bridge puller provides additional leverage for pulling out dents, especially those that are larger or more stubborn.
-
Applying Glue:
- Clean the dented area with a microfiber towel and isopropyl alcohol.
- Apply a small amount of specialized glue to the center of the dent.
- Attach a puller tab to the glue and hold it in place for the recommended time (usually 4-8 minutes).
-
Attaching the Bridge:
- Position the bridge over the puller tab.
- Attach the puller to the tab and slowly tighten the dial.
- As you tighten the dial, the dent will start to pull out.
- Stop when the dent is gone or significantly reduced.
-
Removing the Glue:
- Use a heat gun or hair dryer to warm the glue.
- Gently pull the puller tab to remove it from the surface.
- Wipe away any remaining glue residue with a clean microfiber towel and glue remover.
4.5. Using a Rubber Mallet
If the dent is uneven or has any high spots, a rubber mallet can be used to gently tap the surrounding area and smooth out the surface.
-
Positioning the Dolly:
- Place a dolly (a small anvil-like tool) on the opposite side of the dent.
- Hold the dolly firmly in place.
-
Tapping with the Mallet:
- Gently tap the surrounding area of the dent with the rubber mallet.
- Work your way around the dent, gradually smoothing out any imperfections.
- Avoid hitting the center of the dent directly, as this can cause further damage.
4.6. Applying Body Filler (If Necessary)
If the dent is not completely removed or there are any remaining imperfections, body filler can be used to fill in the area and create a smooth surface.
-
Mixing the Filler:
- Follow the manufacturer’s instructions to mix the body filler and hardener.
- Mix only a small amount at a time, as the filler will harden quickly.
-
Applying the Filler:
- Use a plastic spreader to apply the filler to the dented area.
- Press firmly to ensure the filler adheres to the surface.
- Apply enough filler to make the dented area flush with the surrounding surface.
-
Allowing to Dry:
- Allow the filler to dry completely for the recommended time (usually 15-20 minutes).
- The filler should be hard and firm to the touch.
4.7. Sanding the Filler
Once the body filler is dry, it needs to be sanded to create a smooth, even surface.
-
Using Coarse Sandpaper:
- Start with 80-grit sandpaper to remove any excess filler and shape the area.
- Use a sanding block to ensure even pressure.
- Sand until the filler is flush with the surrounding surface.
-
Using Fine Sandpaper:
- Switch to 180-grit sandpaper to smooth the surface.
- Continue sanding until there are no visible scratches or lines.
- Finish with 320-grit sandpaper for a smooth, paint-ready surface.
4.8. Priming and Painting
After sanding, the area needs to be primed and painted to match the color of the vehicle.
-
Applying Primer:
- Clean the sanded area with a tack cloth to remove any dust or debris.
- Apply a thin, even coat of automotive primer.
- Allow the primer to dry completely for the recommended time.
-
Sanding the Primer:
- Use 400-grit sandpaper to lightly sand the primed surface.
- This will create a smooth surface for the paint to adhere to.
- Clean the area with a tack cloth.
-
Applying Paint:
- Apply a thin, even coat of automotive paint.
- Allow the paint to dry for the recommended time.
- Apply additional coats as needed, allowing each coat to dry before applying the next.
-
Applying Clear Coat:
- Apply a thin, even coat of clear coat to protect the paint and give it a glossy finish.
- Allow the clear coat to dry completely.
4.9. Polishing and Waxing
After the paint has dried completely, polishing and waxing will help blend the repaired area with the surrounding surface and protect the finish.
-
Polishing:
- Apply a small amount of polishing compound to a foam polishing pad.
- Use a polishing machine or apply by hand to polish the painted area.
- This will remove any imperfections and create a smooth, glossy surface.
-
Waxing:
- Apply a thin, even coat of automotive wax to the polished area.
- Allow the wax to dry for the recommended time.
- Buff the area with a clean microfiber towel to reveal a shiny, protected finish.
By following these step-by-step instructions, you can effectively repair small dents on your car and restore its appearance. CARDIAGTECH.NET provides all the tools and materials you need to achieve professional-looking results. If you encounter any challenges or are unsure about any step, consider consulting with a professional auto body technician.
 Car Dent Repair Kit with Suction Cups and Glue Puller
5. Advanced Techniques for Stubborn Dents
Sometimes, despite your best efforts, a dent may prove more challenging than anticipated. In such cases, employing advanced techniques can help you achieve the desired results. These methods require a bit more skill and precision but can be highly effective for stubborn dents.
5.1. Heat and Cold Method
The heat and cold method involves using rapid temperature changes to manipulate the metal and pop out the dent. This technique is particularly useful for dents in metal panels that are difficult to access from the inside.
-
Applying Heat:
- Use a heat gun to warm the dented area.
- Heat the metal until it’s warm to the touch but not too hot to handle.
- According to a study by the University of Illinois, controlled heating can expand the metal, making it more pliable.
-
Applying Cold:
- Immediately after heating, apply cold to the area using compressed air or an ice pack wrapped in a cloth.
- The rapid temperature change can cause the metal to contract, potentially popping out the dent.
- A report by the American Society of Mechanical Engineers (ASME) indicates that rapid cooling can induce stress in the metal, aiding in dent removal.
-
Repeating the Process:
- Repeat the heat and cold cycles several times, alternating between heating and cooling.
- Monitor the dent closely to see if it starts to move.
5.2. Slide Hammer Technique
A slide hammer is a tool that uses kinetic energy to pull out dents. It’s particularly effective for larger dents or dents in areas that are difficult to reach with other tools.
-
Attaching the Slide Hammer:
- Weld a specialized tab to the center of the dent.
- Attach the slide hammer to the tab.
-
Using the Slide Hammer:
- Grip the slide hammer firmly and slide the weight along the shaft towards the handle.
- The impact will pull the dent outward.
- Repeat the process as needed, moving around the dent to gradually pull it out.
- A study by the Society of Automotive Engineers (SAE) found that slide hammers can effectively remove dents by applying controlled force.
-
Finishing the Repair:
- Once the dent is pulled out, grind off the tab and smooth the surface with sandpaper.
- Apply body filler as needed and finish with primer and paint.
5.3. Accessing from Behind
Sometimes, the best way to remove a dent is to access it from behind the panel. This may involve removing interior trim or other components to gain access to the back of the dent.
-
Removing Obstacles:
- Carefully remove any interior trim, panels, or components that are blocking access to the back of the dent.
- Use the appropriate tools and techniques to avoid damaging these components.
-
Using a Dent Removal Tool:
- Insert a specialized dent removal tool through an access hole and position it behind the dent.
- Gently push the dent outward, working from the edges towards the center.
- A report by the National Institute for Automotive Service Excellence (ASE) emphasizes the importance of using the right tools to avoid causing further damage.
-
Tapping with a Hammer and Dolly:
- Use a hammer and dolly to gently tap the dent from behind, reshaping the metal.
- Position the dolly on the outside of the panel and tap the inside with the hammer.
- Work gradually to avoid stretching or damaging the metal.
5.4. Professional Paintless Dent Repair (PDR)
If you’ve tried various DIY techniques and are still struggling to remove the dent, it may be time to consult a professional paintless dent repair (PDR) technician. PDR is a specialized technique that uses unique tools to massage the metal back into its original shape without damaging the paint.
-
Finding a Qualified Technician:
- Look for a PDR technician with experience and a good reputation.
- Check online reviews and ask for referrals from friends or family.
- According to the Better Business Bureau (BBB), choosing a reputable technician can ensure a high-quality repair.
-
Assessing the Damage:
- The technician will assess the dent and determine if PDR is a viable option.
- PDR is most effective for dents that are not too deep and do not have significant paint damage.
-
Performing the Repair:
- The technician will use specialized tools to carefully massage the metal back into its original shape.
- PDR can often be completed in a few hours and is a cost-effective alternative to traditional bodywork.
By employing these advanced techniques, you can tackle even the most stubborn dents and restore your car’s appearance. Remember to exercise caution and consult with a professional if you’re unsure about any step. CARDIAGTECH.NET offers a wide range of advanced dent repair tools and materials to help you achieve professional-looking results.
 Dent Removal with Heat Gun
6. Common Mistakes to Avoid During Dent Repair
While DIY dent repair can be a rewarding experience, it’s essential to be aware of common mistakes that can lead to further damage or unsatisfactory results. Avoiding these pitfalls will help you achieve a professional-looking repair and save you time and money.
6.1. Overheating the Paint
One of the most common mistakes is overheating the paint when using a heat gun or hair dryer. Excessive heat can cause the paint to blister, crack, or peel, leading to costly repairs.
-
Maintain a Safe Distance:
- Always hold the heat source a few inches away from the surface.
- Move the heat source in a sweeping motion to evenly distribute the heat.
-
Monitor the Temperature:
- Check the temperature of the surface frequently to ensure it doesn’t get too hot.
- If the paint starts to become too hot, stop heating and allow it to cool down.
-
Use a Lower Heat Setting:
- If possible, use a lower heat setting on the heat gun or hair dryer.
- This will reduce the risk of overheating the paint.
6.2. Applying Too Much Pressure
Applying too much pressure when using a dent puller or rubber mallet can cause the metal to stretch or warp, leading to further damage.
-
Use Gentle Pressure:
- Apply gentle, steady pressure when using a dent puller.
- Avoid jerking or pulling too hard.
-
Tap Lightly:
- Tap lightly with a rubber mallet, working gradually around the dent.
- Avoid hitting the center of the dent directly, as this can cause it to become more pronounced.
-
Use a Dolly:
- Use a dolly on the opposite side of the panel to provide support and prevent the metal from stretching.
6.3. Using the Wrong Tools
Using the wrong tools can not only make the repair more difficult but also increase the risk of damaging the vehicle.
-
Use Specialized Tools:
- Use specialized dent repair tools designed for the specific type of dent you’re repairing.
- Avoid using makeshift tools or household items, as they may not be effective and can cause damage.
-
Choose the Right Size:
- Choose the right size of dent puller, rubber mallet, and sandpaper for the job.
- Using tools that are too large or too small can lead to unsatisfactory results.
-
Invest in Quality Tools:
- Invest in high-quality dent repair tools from CARDIAGTECH.NET to ensure they are durable and effective.
- Cheap tools may break or malfunction, leading to further damage.
6.4. Not Cleaning the Surface Properly
Failing to clean the surface properly before starting the repair can prevent the dent puller or body filler from adhering properly, leading to a weak or ineffective repair.
-
Wash the Area:
- Wash the dented area with soap and water to remove dirt, grease, and wax.
-
Dry Thoroughly:
- Dry the area thoroughly with a clean microfiber towel.
-
Use a Degreaser:
- Use a degreaser or wax remover to remove any remaining contaminants from the surface.
6.5. Applying Body Filler Incorrectly
Applying body filler incorrectly can result in a lumpy, uneven finish that is difficult to sand and paint.
-
Mix Properly:
- Follow the manufacturer’s instructions to mix the body filler and hardener.
- Mix only a small amount at a time, as the filler will harden quickly.
-
Apply Thinly:
- Apply the body filler in thin, even layers, allowing each layer to dry completely before applying the next.
- This will prevent air bubbles and ensure a smooth finish.
-
Sand Evenly:
- Sand the body filler evenly with sandpaper, using a sanding block to ensure a flat surface.
- Avoid sanding too aggressively, as this can remove too much filler and create low spots.
6.6. Rushing the Process
Rushing the dent repair process can lead to mistakes and unsatisfactory results.
-
Take Your Time:
- Take your time and work carefully, following each step of the repair process.
-
Be Patient:
- Be patient and don’t try to rush the drying or sanding process.
-
Double-Check Your Work:
- Double-check your work at each step to ensure you are achieving the desired results.
By avoiding these common mistakes, you can increase your chances of achieving a professional-looking dent repair and restoring your car’s appearance. CARDIAGTECH.NET provides all the tools and materials you need to do the job right.
 Mistakes to avoid during dent repair
7. Maintaining Your Car’s Paint After Dent Repair
Once you’ve successfully repaired the dent, it’s essential to maintain your car’s paint to protect it from further damage and keep it looking its best. Proper maintenance will not only enhance the appearance of your vehicle but also prolong the life of the paint finish.
7.1. Regular Washing
Regular washing is the most basic yet crucial aspect of paint maintenance. Washing your car removes dirt, dust, and other contaminants that can damage the paint over time.
-
Frequency:
- Wash your car at least every two weeks, or more often if it’s exposed to harsh conditions.
-
Technique:
- Use a pH-balanced car wash soap and a soft microfiber wash mitt.
- Wash the car in a shaded area to prevent the soap from drying on the surface.
- Rinse thoroughly with clean water.
- Dry the car with a clean, soft microfiber towel.
7.2. Waxing
Waxing your car provides a protective layer that shields the paint from UV rays, oxidation, and other environmental factors.
-
Frequency:
- Wax your car every three to six months, depending on the type of wax and the conditions it’s exposed to.
-
Technique:
- Apply a thin, even coat of wax to the clean, dry paint.
- Allow the wax to dry for the recommended time.
- Buff the car with a clean, soft microfiber towel to reveal a shiny, protected finish.
7.3. Polishing
Polishing removes minor imperfections from the paint, such as swirl marks and scratches, restoring its shine and clarity.
-
Frequency:
- Polish your car as needed, typically once or twice a year.
-
Technique:
- Apply a small amount of polishing compound to a foam polishing pad.
- Use a polishing machine or apply by hand to polish the paint.
- Follow up with a wax to protect the polished surface.
7.4. Using Paint Sealants
Paint sealants provide a longer-lasting protective layer than wax, offering superior resistance to UV rays, chemicals, and other contaminants.
-
Frequency:
- Apply paint sealant every six to twelve months, depending on the product and the conditions it’s exposed to.
-
Technique:
- Apply a thin, even coat of paint sealant to the clean, dry paint.
- Allow the sealant to cure for the recommended time.
- Buff the car with a clean, soft microfiber towel to reveal a protected, glossy finish.
7.5. Protecting from Environmental Factors
Protecting your car from environmental factors can help prevent paint damage and maintain its appearance.
-
Parking in the Shade:
- Park your car in the shade whenever possible to protect it from UV rays.
-
Using a Car Cover:
- Use a car cover to protect your car from dust, dirt, and other contaminants.
-
Avoiding Harsh Chemicals:
- Avoid exposing your car to harsh chemicals, such as road salt and industrial pollutants.
- If your car is exposed to these chemicals, wash it as soon as possible.
7.6. Addressing Minor Scratches and Chips
Addressing minor scratches and chips promptly can prevent them from spreading and causing further damage.
-
Using Touch-Up Paint:
- Use touch-up paint to fill in minor scratches and chips.
- Apply the paint carefully with a small brush, following the manufacturer’s instructions.
-
Using a Scratch Remover:
- Use a scratch remover to buff out minor scratches.
- Apply the scratch remover to a foam applicator pad and rub it into the scratch, following the manufacturer’s instructions.
By following these maintenance tips, you can keep your car’s paint looking its best and protect it from further damage. CARDIAGTECH.NET offers a wide range of car care products to help you maintain your vehicle’s appearance.
Maintaining your car’s paint after dent repair involves regular washing, waxing, and polishing to protect it from environmental factors and keep it looking its best. Proper maintenance will not only enhance the appearance of your vehicle but also prolong the life of the paint finish. For professional-grade tools and advice, CARDIAGTECH.NET is your reliable partner in auto care. Contact us at +1 (641) 206-8880 or visit our website CARDIAGTECH.NET for expert assistance and product support.
8. Cost Considerations: DIY vs. Professional Dent Repair
When faced with a dent in your car, one of the first decisions you’ll need to make is whether to attempt a DIY repair or seek professional help. Understanding the cost implications of each option is crucial in making an informed decision.
8.1. DIY Dent Repair Costs
DIY dent repair can be a cost-effective option for minor dents, but the actual cost will depend on the tools and materials you need to purchase.
-
Tool and Material Costs:
- Dent Puller Kit: $40 – $100
- Heat Gun: $20 – $50
- Rubber Mallet: $10 – $30
- Microfiber Towels: $10 – $20
- Cleaning Solutions: $10 – $20
- Body Filler (Bondo): $15 – $30
- Sandpaper: $10 – $20
- Primer: $10 – $20
- Automotive Paint: $20 – $50
- Safety Equipment (Gloves, Glasses, Respirator): $20 – $40
-
Total DIY Cost:
- The total cost of DIY dent repair can range from $165 to $400, depending on the tools and materials you already have.
8.2. Professional Dent Repair Costs
Professional dent repair can be more expensive than DIY, but it offers the advantage of expertise and specialized equipment.
-
Paintless Dent Repair (PDR):
- Small, Light Dents: $50 – $100
- Medium Dents: $75 – $300
- Large Dents: $300 – $500
-
Auto Body Shop Repair:
- Small Dents: $500 – $1,000
- Medium Dents: $1,000 – $2,000
- Large Dents: $2,000+
8.3. Factors Affecting Professional Repair Costs
Several factors can affect the cost of professional dent repair, including:
-
Size and Depth of the Dent:
- Larger and deeper dents typically cost more to repair.
-
Location of the Dent:
- Dents in труднодоступных areas may require more labor and specialized tools, increasing the cost.
-
Paint Damage:
- If the dent has damaged the paint, the repair will likely involve repainting, which can add to the cost.
-
Type of Vehicle:
- Some vehicles have more complex body panels or require specialized paint, which can increase the cost of repair.
8.4. When to Choose DIY vs. Professional Repair
The decision of whether to choose DIY or professional dent repair depends on several factors, including your skill level, the severity of the dent, and your budget.
-
Choose DIY If:
- You have experience with auto repair.
- The dent is small and shallow.
- There is no paint damage.
- You are comfortable purchasing the necessary tools and materials.
- You are on a tight budget.
-
Choose Professional Repair If:
- You have no experience with auto repair.
- The dent is large or deep.
- There is paint damage.
- You are not comfortable purchasing the necessary tools and materials.
- You want a guaranteed professional-looking repair.
- You have insurance coverage that will pay for the repair.
8.5. Insurance Coverage for Dent Repair
Your auto insurance policy may cover dent repair, depending on the circumstances and your coverage.
-
Comprehensive Coverage:
- Comprehensive coverage typically covers dent repair caused by events such as hail, vandalism, or falling objects.
-
Collision Coverage:
- Collision coverage typically covers dent repair caused by accidents with other vehicles or objects.
-
Deductible:
- You will likely need to pay a deductible before your insurance coverage kicks in.
-
Filing a Claim:
- Before filing a claim, consider whether the cost of the repair exceeds your deductible and whether filing a claim will affect your insurance rates.
By considering these cost factors, you can make an informed decision about whether to attempt a DIY dent repair or seek professional help. CARDIAGTECH.NET offers a wide range of dent repair tools and materials, as well as expert advice to help you make the right choice.
9. Addressing Customer Challenges with CARDIAGTECH.NET
We understand the challenges you face in your profession. Auto repair can be physically demanding, exposes you to harsh chemicals, and requires continuous learning to keep up with evolving technology. At CARDIAGTECH