How To Fix A Leaking Car Radiator: A Comprehensive Guide
How To Fix A Leaking Car Radiator? Your car’s radiator is essential for keeping your engine cool and preventing overheating. At CARDIAGTECH.NET, we understand the importance of a properly functioning cooling system and are here to provide a solution with our range of high-quality tools and equipment. This guide will walk you through diagnosing, repairing, and maintaining your radiator, so let’s solve this together.
1. Understanding the Role of Your Car Radiator
The car radiator is a crucial component of your engine’s cooling system, responsible for dissipating heat and preventing your engine from overheating. Without a functional radiator, the engine would quickly overheat, leading to severe damage and costly repairs.
1.1. What Does a Radiator Do?
The radiator functions by circulating coolant through the engine block, absorbing heat, and then passing it through a series of thin fins where air flows, cooling the coolant before it’s recirculated.
- Coolant Circulation: The radiator facilitates the continuous circulation of coolant, ensuring consistent temperature regulation.
- Heat Dissipation: The design maximizes surface area for efficient heat transfer to the surrounding air.
- Pressure Regulation: Radiators maintain optimal pressure levels to prevent boiling and ensure effective cooling.
1.2. Why Radiator Health is Critical
Maintaining the health of your car radiator is vital for the longevity and performance of your engine. A faulty radiator can lead to:
- Engine Overheating: This can cause cylinder head damage, cracked engine blocks, and piston damage.
- Reduced Engine Efficiency: Overheating reduces combustion efficiency and overall performance.
- Costly Repairs: Neglecting radiator maintenance can lead to extensive and expensive engine repairs.
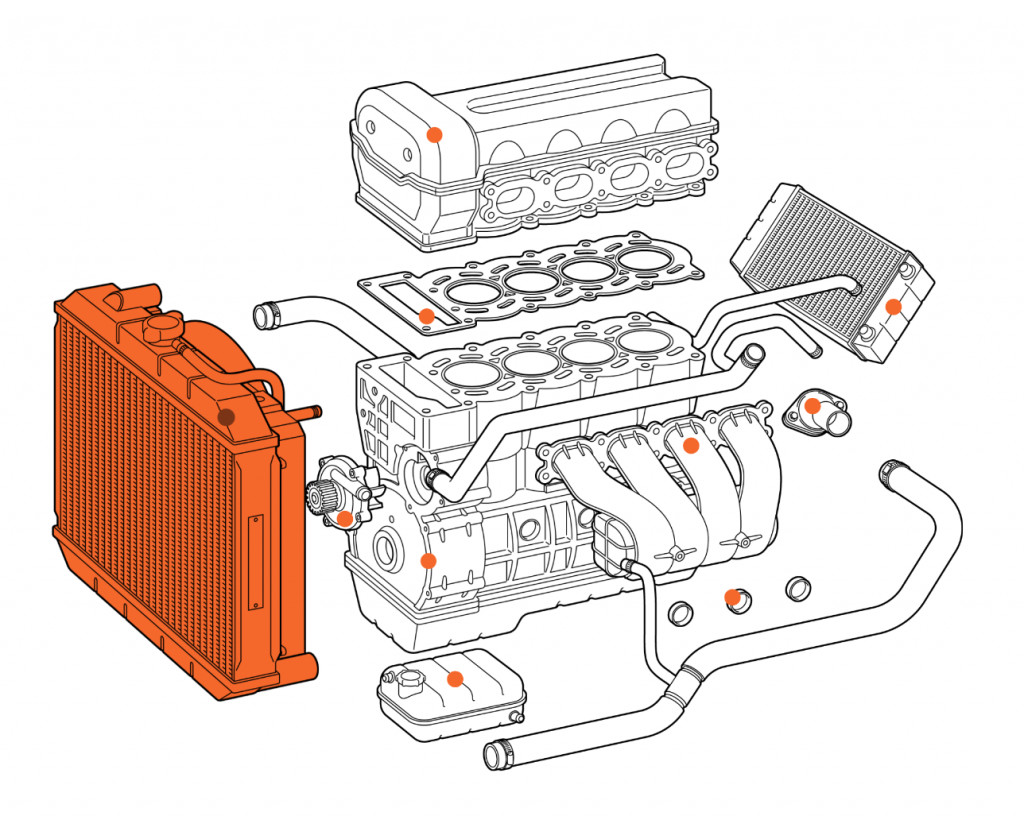
Car radiator highlighted in an exploded diagram of a car engine, illustrating its central role in engine cooling.
2. Identifying the Symptoms of a Leaking Car Radiator
Recognizing the signs of a leaking radiator early can save you from significant engine damage. Here are the key symptoms to watch for:
2.1. Common Leak Indicators
- Visible Coolant Leaks: Puddles of green, orange, or yellow fluid under your car.
- Low Coolant Level: Frequent need to top up the coolant reservoir.
- Engine Overheating: The temperature gauge consistently reads high, especially under load.
- Steam from Under the Hood: Indicates boiling coolant due to loss of pressure.
- Sweet Smell: The distinctive sweet odor of coolant, especially noticeable near the engine.
- Radiator Hissing: A hissing sound when the engine is running, indicating escaping steam or coolant.
- Rust and Corrosion: Visible rust around the radiator, hoses, and connections.
2.2. Advanced Diagnostic Tips
- Pressure Testing: Use a radiator pressure tester to check for leaks by pressurizing the system.
- UV Dye Test: Add UV dye to the coolant and use a UV light to detect even small leaks.
- Visual Inspection: Carefully inspect the radiator core, hoses, and connections for cracks, damage, or corrosion.
- Check Radiator Cap: Ensure the cap is sealing properly to maintain system pressure.
3. Understanding the Causes of Radiator Leaks
Knowing the common causes of radiator leaks can help you prevent them and address them effectively.
3.1. Primary Causes of Leaks
- Corrosion: Over time, coolant can become acidic, corroding the radiator’s metal.
- Physical Damage: Impacts from road debris can cause punctures and cracks.
- Old Age: Radiators degrade over time due to constant temperature and pressure changes.
- Loose Connections: Hoses and clamps can loosen, causing leaks at connection points.
- Faulty Radiator Cap: A malfunctioning cap can’t maintain proper pressure, leading to leaks.
- Electrolysis: Stray electrical currents can cause corrosion within the cooling system.
3.2. Preventing Radiator Damage
- Regular Coolant Flushes: Replace coolant at recommended intervals to prevent corrosion.
- Use Correct Coolant Type: Use the coolant type specified by your vehicle’s manufacturer.
- Inspect Hoses and Clamps: Regularly check for cracks, leaks, and loose connections.
- Protect the Radiator: Install a mesh screen to protect the radiator from road debris.
- Monitor Engine Temperature: Keep an eye on the temperature gauge to catch issues early.
4. Tools and Materials Needed for Radiator Repair
Having the right tools and materials on hand will make your radiator repair process smoother and more efficient. At CARDIAGTECH.NET, we offer a wide range of high-quality tools to help you tackle this task.
4.1. Essential Tools
- Socket Set: For removing and tightening bolts and nuts.
- Screwdrivers: Both flathead and Phillips head for various tasks.
- Pliers: For clamping hoses and manipulating parts.
- Hose Clamp Pliers: Specifically designed for removing and installing hose clamps.
- Radiator Pressure Tester: To detect leaks in the cooling system.
- Drain Pan: To catch coolant when draining the radiator.
- Funnel: For easy coolant filling.
- Safety Glasses: To protect your eyes from splashes.
- Gloves: To protect your hands from chemicals and heat.
- UV Light and Dye Kit (Optional): For detecting small leaks.
- Multimeter: For checking electrical connections and diagnosing electrical issues.
4.2. Necessary Materials
- New Coolant: Use the correct type specified for your vehicle.
- Radiator Stop Leak (Optional): For minor leaks, but use with caution.
- Replacement Hoses: If hoses are cracked or deteriorated.
- New Hose Clamps: To ensure secure connections.
- Radiator Flush: For cleaning the cooling system.
- Distilled Water: For mixing with coolant.
- Shop Towels: For cleaning up spills.
- Sandpaper or Wire Brush: For cleaning corroded surfaces.
- Thread Sealant: For sealing threaded connections.
Purchasing these tools and materials from CARDIAGTECH.NET ensures you are getting high-quality products that will last, making your repair process easier and more reliable.
5. Step-by-Step Guide to Fixing a Leaking Car Radiator
Follow these steps to safely and effectively repair a leaking car radiator. Always prioritize safety and take necessary precautions.
5.1. Safety First
- Let the Engine Cool: Never work on a hot engine. Allow it to cool completely to avoid burns.
- Disconnect the Battery: Disconnect the negative battery terminal to prevent electrical accidents.
- Wear Safety Gear: Always wear safety glasses and gloves.
- Work in a Well-Ventilated Area: Coolant can release harmful fumes.
5.2. Draining the Radiator
- Locate the Drain Valve: This is usually at the bottom corner of the radiator.
- Place a Drain Pan: Position the pan under the drain valve.
- Open the Drain Valve: Use pliers or a screwdriver to open the valve and let the coolant drain completely.
- Remove the Radiator Cap: This helps the coolant drain faster.
5.3. Identifying the Leak Source
- Inspect the Radiator: Look for visible cracks, corrosion, or damage.
- Check Hoses and Connections: Examine the hoses and clamps for leaks or damage.
- Use a Pressure Tester: Attach the tester to the radiator and pressurize the system to identify leaks.
- Consider UV Dye: Add UV dye to the coolant and use a UV light to find small leaks.
5.4. Repairing Minor Leaks
- Radiator Stop Leak: If the leak is small, consider using a radiator stop leak product. Follow the manufacturer’s instructions carefully.
- Clean the Area: Clean the area around the leak with sandpaper or a wire brush to remove corrosion.
- Apply Epoxy: For small cracks, apply a radiator repair epoxy. Let it cure completely before refilling the radiator.
5.5. Replacing Hoses and Clamps
- Remove Old Hoses: Use hose clamp pliers to remove the old clamps and detach the hoses.
- Install New Hoses: Attach the new hoses and secure them with new hose clamps. Ensure the clamps are tightened properly to prevent leaks.
5.6. Replacing the Radiator (If Necessary)
- Disconnect Hoses: Disconnect all hoses and electrical connections from the radiator.
- Remove Mounting Bolts: Remove the bolts holding the radiator in place.
- Lift Out the Old Radiator: Carefully lift the radiator out of the vehicle.
- Install New Radiator: Place the new radiator in position and secure it with the mounting bolts.
- Reconnect Hoses and Electrical Connections: Reattach all hoses and electrical connections.
5.7. Flushing the Cooling System
- Add Radiator Flush: Pour radiator flush into the system.
- Fill with Water: Fill the radiator with water.
- Run the Engine: Run the engine for the time specified on the flush product.
- Drain the System: Allow the engine to cool, then drain the system completely.
- Rinse with Water: Refill and drain the system with clean water until the water runs clear.
5.8. Refilling the Cooling System
- Mix Coolant: Mix coolant with distilled water according to the manufacturer’s instructions (usually a 50/50 mix).
- Fill the Radiator: Slowly fill the radiator with the coolant mixture.
- Bleed the System: Open the bleeder valves (if equipped) to release trapped air.
- Check Coolant Level: After running the engine for a few minutes, check the coolant level and add more if necessary.
5.9. Final Checks
- Inspect for Leaks: Check all connections and hoses for leaks.
- Monitor Temperature: Keep an eye on the temperature gauge while driving to ensure the engine is not overheating.
- Check Coolant Level Regularly: Check the coolant level in the days following the repair to ensure there are no leaks.
 K-Seal being poured to fix a car radiator leak, illustrating a common method for sealing minor leaks.
6. Advanced Troubleshooting for Persistent Leaks
If you’ve followed the steps above and are still experiencing leaks, here are some advanced troubleshooting tips.
6.1. Investigating Unusual Leaks
- Check Water Pump: A leaking water pump can mimic a radiator leak. Inspect the water pump weep hole for signs of leakage.
- Inspect Head Gasket: A blown head gasket can cause coolant loss and overheating. Check for white smoke from the exhaust and coolant in the oil.
- Check Heater Core: A leaking heater core can cause coolant to leak into the passenger compartment. Look for a sweet smell inside the car and dampness on the floor.
- Examine Freeze Plugs: These plugs on the engine block can corrode and leak.
6.2. Using Advanced Diagnostic Tools
- Combustion Leak Tester: Use this tool to check for combustion gases in the coolant, indicating a head gasket leak.
- Block Tester: Similar to a combustion leak tester, this tool uses a special fluid that changes color in the presence of combustion gases.
- Infrared Thermometer: Use this to check for uneven temperature distribution across the radiator, indicating blockage or poor flow.
6.3. Seeking Professional Help
If you’re unable to resolve the issue yourself, it’s best to seek professional help from a qualified mechanic. They have the expertise and tools to diagnose and repair complex cooling system issues.
6.4. The Benefits of Professional Radiator Service
- Expert Diagnosis: Professional mechanics can accurately diagnose the source of the leak.
- Quality Parts: They use high-quality replacement parts that meet or exceed OEM specifications.
- Proper Installation: Professionals ensure that all parts are installed correctly and the system is properly sealed.
- Warranty: Many professional services offer a warranty on their work, providing peace of mind.
7. Maintaining Your Car Radiator for Longevity
Proper maintenance is essential for extending the life of your car radiator and preventing future leaks.
7.1. Regular Maintenance Tips
- Check Coolant Level: Regularly check the coolant level and top it off as needed.
- Inspect Hoses and Clamps: Inspect hoses and clamps for cracks, leaks, and loose connections.
- Flush the Cooling System: Flush the cooling system every 2 to 3 years, or as recommended by your vehicle’s manufacturer.
- Use the Correct Coolant: Always use the coolant type specified for your vehicle.
- Inspect Radiator Cap: Ensure the radiator cap is sealing properly and replace it if necessary.
- Monitor Engine Temperature: Keep an eye on the temperature gauge and address any overheating issues promptly.
- Clean the Radiator Fins: Periodically clean the radiator fins to remove dirt and debris that can impede airflow.
7.2. Products to Enhance Radiator Life
- Coolant Additives: Use coolant additives to prevent corrosion and scale buildup.
- Hose Protectors: Install hose protectors to prevent damage from abrasion and heat.
- Radiator Guards: Install a radiator guard to protect the radiator from road debris.
8. Understanding Coolant Types and Their Importance
Choosing the right coolant is crucial for maintaining the health of your radiator and cooling system.
8.1. Types of Coolant
- Green Coolant (IAT – Inorganic Additive Technology): Traditional coolant used in older vehicles.
- Orange Coolant (OAT – Organic Acid Technology): Long-life coolant used in many modern vehicles.
- Yellow Coolant (HOAT – Hybrid Organic Acid Technology): Hybrid coolant that combines OAT and IAT for extended life.
- Blue Coolant (POAT – Phosphate Organic Acid Technology): Used in some Asian vehicles.
8.2. Why Coolant Type Matters
Using the wrong coolant can lead to corrosion, reduced cooling efficiency, and damage to cooling system components. Always consult your vehicle’s owner’s manual to determine the correct coolant type.
8.3. Mixing Coolant Types
Never mix different types of coolant, as this can cause chemical reactions that lead to corrosion and sludge buildup. If you need to switch coolant types, flush the cooling system thoroughly before refilling with the new coolant.
9. Cost Analysis: DIY vs. Professional Repair
Deciding whether to repair your car radiator yourself or hire a professional depends on your skills, tools, and the complexity of the repair.
9.1. DIY Repair Costs
- Tools: $50 – $200 (if you need to purchase tools)
- Materials: $30 – $100 (coolant, hoses, clamps, stop leak)
- Time: Several hours
9.2. Professional Repair Costs
- Diagnosis: $50 – $150
- Radiator Replacement: $300 – $800 (including parts and labor)
- Hose Replacement: $100 – $300
9.3. Factors to Consider
- Your Skill Level: Are you comfortable working on your car’s cooling system?
- Tool Availability: Do you have the necessary tools?
- Time Commitment: Do you have the time to complete the repair?
- Complexity of Repair: Is the leak minor, or does the radiator need to be replaced?
9.4. When to Choose DIY
- Minor Leaks: If the leak is small and easily accessible.
- Hose Replacement: If you need to replace a hose or clamp.
- You Enjoy Working on Cars: If you find satisfaction in DIY auto repairs.
9.5. When to Choose Professional Repair
- Major Leaks: If the radiator is severely damaged or needs to be replaced.
- Complex Issues: If you suspect a head gasket leak or other internal engine problem.
- Lack of Time or Tools: If you don’t have the time or tools to complete the repair.
- Peace of Mind: If you want the assurance of a professional repair with a warranty.
10. Innovative Solutions and Products at CARDIAGTECH.NET
At CARDIAGTECH.NET, we offer a range of innovative tools and products to help you diagnose, repair, and maintain your car radiator.
10.1. Featured Products
- Radiator Pressure Testers: High-quality pressure testers for accurate leak detection.
- Hose Clamp Pliers: Ergonomic pliers for easy hose clamp removal and installation.
- UV Leak Detection Kits: Complete kits for finding even the smallest coolant leaks.
- Coolant Flush Machines: Efficient machines for thorough cooling system flushing.
- Digital Multimeters: Versatile multimeters for diagnosing electrical issues in the cooling system.
- Radiator Repair Kits: Comprehensive kits with epoxy, sandpaper, and cleaning supplies for minor repairs.
- Engine Scanners: Advanced engine scanners to diagnose the root causes of leaks and engine issues.
10.2. Benefits of Choosing CARDIAGTECH.NET
- High-Quality Products: We offer only the highest quality tools and materials.
- Competitive Prices: Our products are priced competitively to provide the best value.
- Expert Support: Our knowledgeable staff can provide expert advice and support.
- Fast Shipping: We offer fast and reliable shipping to get you the tools you need quickly.
- Customer Satisfaction: We are committed to customer satisfaction and stand behind our products.
- Wide Selection: We offer a wide selection of tools and equipment for all your automotive needs.
- Innovative Solutions: We stay up-to-date with the latest automotive technology and offer innovative solutions to help you diagnose and repair your vehicle.
11. Environmental Considerations for Coolant Disposal
Proper coolant disposal is essential for protecting the environment and preventing contamination.
11.1. Environmental Impact of Coolant
Coolant contains ethylene glycol, which is toxic to humans and animals. Improper disposal can contaminate soil and water sources.
11.2. Safe Disposal Practices
- Collect Used Coolant: Drain used coolant into a sealed container.
- Recycle Coolant: Take the used coolant to a recycling center or auto parts store that accepts used coolant.
- Do Not Pour Down Drains: Never pour coolant down drains or into the environment.
- Label Containers: Clearly label containers of used coolant to prevent accidental misuse.
- Check Local Regulations: Follow local regulations for coolant disposal.
11.3. Alternative Coolants
Consider using propylene glycol-based coolant, which is less toxic than ethylene glycol-based coolant.
12. Common Mistakes to Avoid During Radiator Repair
Avoiding these common mistakes can save you time, money, and frustration during radiator repair.
12.1. Mistakes to Watch Out For
- Not Letting the Engine Cool: Working on a hot engine can cause burns.
- Using the Wrong Coolant: Using the wrong coolant can damage the cooling system.
- Not Flushing the System: Not flushing the system can leave contaminants that cause corrosion.
- Over-Tightening Clamps: Over-tightening clamps can damage hoses.
- Not Bleeding the System: Not bleeding the system can cause air pockets that lead to overheating.
- Using Stop Leak as a Permanent Solution: Stop leak is only a temporary fix and should not be used as a permanent solution.
- Neglecting Safety: Not wearing safety glasses and gloves can lead to injury.
12.2. Tips for Avoiding Mistakes
- Read the Instructions: Carefully read the instructions for all products and tools.
- Follow the Steps: Follow the repair steps carefully and in the correct order.
- Take Your Time: Don’t rush the repair process.
- Ask for Help: If you’re unsure about something, ask for help from a qualified mechanic.
- Double-Check Your Work: Before starting the engine, double-check all connections and components.
13. Frequently Asked Questions (FAQ) About Car Radiator Leaks
Here are some frequently asked questions about car radiator leaks and their solutions.
13.1. Common Questions
- How often should I flush my car radiator?
- Every 2 to 3 years, or as recommended by your vehicle’s manufacturer.
- Can I drive with a leaking radiator?
- It’s not recommended, as it can lead to overheating and engine damage.
- Is it safe to use radiator stop leak?
- It can be a temporary fix for small leaks, but use it with caution.
- What type of coolant should I use?
- Use the coolant type specified by your vehicle’s manufacturer.
- How do I know if my radiator cap is bad?
- If you notice coolant leaks around the cap or the engine is overheating, the cap may be bad.
- Can a leaking radiator cause other problems?
- Yes, it can lead to engine overheating, reduced efficiency, and costly repairs.
- How much does it cost to replace a car radiator?
- $300 – $800, including parts and labor.
- What are the signs of a blown head gasket?
- White smoke from the exhaust, coolant in the oil, and engine overheating.
- How can I protect my radiator from damage?
- Install a radiator guard and regularly inspect hoses and connections.
- Where can I find high-quality radiator repair tools?
- At CARDIAGTECH.NET, we offer a wide range of high-quality tools for radiator repair.
14. The Future of Radiator Technology and Maintenance
As automotive technology advances, so does radiator technology. Here’s a glimpse into the future of radiator maintenance and design.
14.1. Emerging Trends
- Electric Vehicle Cooling Systems: EVs require advanced cooling systems for batteries and electric motors.
- Smart Radiators: Radiators with sensors that monitor coolant levels, temperature, and pressure.
- Advanced Materials: Use of lightweight and corrosion-resistant materials like aluminum alloys and polymers.
- Improved Coolant Formulations: Development of coolants with extended life and enhanced cooling properties.
- Predictive Maintenance: Use of data analytics to predict radiator failures and schedule maintenance proactively.
14.2. The Role of CARDIAGTECH.NET
At CARDIAGTECH.NET, we are committed to staying at the forefront of automotive technology and providing our customers with the latest tools and solutions for radiator maintenance and repair. We continually update our product offerings to meet the evolving needs of the automotive industry.
15. Final Thoughts: Taking Control of Your Car’s Cooling System
Maintaining your car’s cooling system is essential for the longevity and performance of your vehicle. By understanding the function of the radiator, recognizing the symptoms of a leak, and following the steps outlined in this guide, you can take control of your car’s cooling system and prevent costly repairs.
Remember, at CARDIAGTECH.NET, we are here to support you with high-quality tools, expert advice, and innovative solutions. Whether you’re a professional mechanic or a DIY enthusiast, we have everything you need to keep your car running smoothly.
Is your car radiator giving you trouble? Don’t wait until it’s too late. Contact CARDIAGTECH.NET today for expert advice and the best tools to fix your leaking car radiator. Call us at +1 (641) 206-8880 or visit our website at CARDIAGTECH.NET. Our address is 276 Reock St, City of Orange, NJ 07050, United States. We’re here to help you keep your engine cool and your car running its best.