How To Fix A Hole In My Car Seat Like A Pro
Fixing a hole in your car seat can restore comfort and value. CARDIAGTECH.NET offers expert solutions for auto upholstery repair. Learn easy steps to repair and revitalize your car’s interior, and discover essential tips for restoring your vehicle’s value with our proven repair strategies and high-quality auto repair tools.
1. Understanding Car Seat Damage and Repair Options
Car seats endure daily wear and tear, making them susceptible to holes. Addressing these damages promptly not only enhances the aesthetic appeal of your vehicle but also protects the underlying material from further degradation. Knowing the type of damage and repair options available is the first step in restoring your car’s interior.
1.1. Types of Car Seat Damage
Identifying the kind of damage is critical in choosing the right repair strategy. Common types include:
- Small Tears: Often caused by sharp objects or minor abrasions.
- Holes: Usually the result of more significant punctures or prolonged wear.
- Burns: Typically from cigarettes or other heat sources.
- Seam Splits: Occur along the stitched areas due to stress or aging.
- Fading and Discoloration: Result from sun exposure and general wear.
1.2. Assessing the Damage
Before starting any repair, assess the extent of the damage. Consider these factors:
- Size of the Hole: Smaller holes are easier to fix and may require simple patching.
- Material Type: Leather, vinyl, and fabric each require different repair techniques and materials.
- Location of the Damage: Damage on a seam or edge may need professional attention.
- Overall Condition of the Seat: Heavily worn seats might benefit from complete reupholstering.
1.3. DIY vs. Professional Repair
Deciding whether to repair the car seat yourself or seek professional help depends on several factors:
- DIY Repair:
- Pros: Cost-effective, convenient, and allows you to learn new skills.
- Cons: May not achieve professional-quality results, requires time and patience, and could potentially worsen the damage if not done correctly.
- Professional Repair:
- Pros: Guarantees high-quality results, saves time and effort, and ensures the repair is done correctly.
- Cons: More expensive and requires scheduling an appointment.
For minor damage, DIY repair kits from CARDIAGTECH.NET can be a great option. For extensive damage, consulting a professional might be more appropriate.
2. Essential Tools and Materials for Car Seat Repair
Having the right tools and materials is essential for a successful car seat repair. High-quality products from CARDIAGTECH.NET can ensure durability and a professional finish.
2.1. Basic Repair Kit Components
A comprehensive repair kit typically includes:
- Cleaning Solution: To prepare the area by removing dirt and grease.
- Leather or Vinyl Repair Compound: To fill the hole or tear.
- Backing Material: To provide support behind the damaged area.
- Adhesive: To secure the backing material.
- Coloring Agent: To match the original seat color.
- Applicators: Spatulas, sponges, and brushes for applying the repair compound and coloring agent.
- Sandpaper: For smoothing the repaired area.
- Protective Finish: To seal and protect the repaired area.
2.2. Specialized Tools
Depending on the type of repair, you might need additional tools:
- Heat Gun: For curing repair compounds quickly.
- Sewing Kit: For repairing seam splits.
- Leather Needles and Thread: For leather repairs.
- Scissors or Utility Knife: For trimming materials.
- Tweezers: For precise application of backing material.
- Airbrush: For applying color evenly over larger areas.
2.3. Material-Specific Supplies
Different materials require specific repair products:
- Leather: Leather repair kits, leather glue, leather filler, and leather dyes.
- Vinyl: Vinyl repair kits, vinyl adhesive, and vinyl colorants.
- Fabric: Fabric patches, fabric glue, and upholstery thread.
2.4. Where to Buy Quality Supplies
CARDIAGTECH.NET offers a wide range of high-quality car seat repair supplies. Sourcing materials from a reputable supplier ensures you get products that are effective and long-lasting.
3. Step-by-Step Guide to Repairing a Hole in a Car Seat
Follow these steps to effectively repair a hole in your car seat using tools and materials from CARDIAGTECH.NET.
3.1. Preparing the Area
- Clean the Damaged Area:
- Use a vacuum cleaner to remove loose debris.
- Apply a specialized cleaning solution from CARDIAGTECH.NET to remove dirt, grease, and oils.
- Wipe the area with a clean, damp cloth and let it dry completely.
- Trim Loose Fibers:
- Use scissors or a utility knife to carefully trim any loose fibers or frayed edges around the hole.
- Ensure the edges are clean and even for a smooth repair.
- Sand Rough Edges:
- Use fine-grit sandpaper to lightly smooth any rough edges around the hole.
- This will help the repair compound adhere better and create a seamless finish.
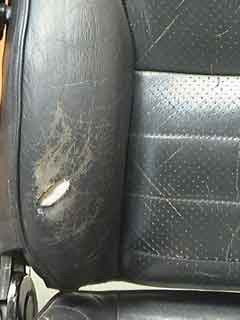
3.2. Applying a Backing Patch
Applying a leather repair sub-patch
- Cut the Backing Material:
- Cut a piece of backing material slightly larger than the hole.
- Ensure it extends about 1 cm beyond the edges of the hole on all sides.
- Insert the Backing Material:
- Use tweezers to carefully insert the backing material under the edges of the hole.
- Ensure the backing material lies flat and covers the entire hole with an extra 1 cm overlap.
- Secure the Backing Material:
- Apply leather or vinyl adhesive to the underside of the edges around the hole.
- Press the edges onto the backing material and hold in place until the adhesive sets.
- Let it dry completely according to the adhesive instructions.
3.3. Filling the Hole
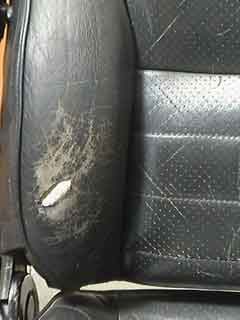 Filling a hole with heavy filler
- Apply the Repair Compound:
- Use a spatula to apply a thin layer of leather or vinyl repair compound over the backing patch.
- Ensure the layer is thin and covers the entire patch.
- Dry Each Layer:
- Allow the first layer to dry for about 20-30 minutes. Use a heat gun to speed up the drying process if needed.
- Apply additional thin layers, allowing each to dry completely before applying the next.
- Build Up the Filler:
- Continue applying thin layers until the filler is level with the surface of the car seat.
- Typically, 5-6 thin layers are needed to achieve the desired level.
- Smooth the Surface:
- Use the edge of the spatula to smooth the surface of each layer before it dries.
- This helps to remove excess filler and create a smooth, even surface.
3.4. Coloring and Finishing
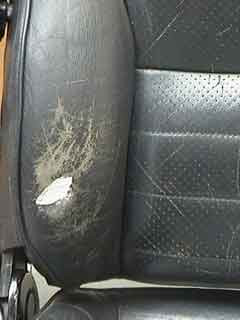 Applying an initial coat of colorant
- Apply the Coloring Agent:
- Match the coloring agent to the original color of the car seat using a color matching kit from CARDIAGTECH.NET.
- Apply a small amount of colorant to a sponge and rub it into the repaired area.
- Ensure the colorant penetrates the creases and valleys of the material for a better finish.
- Spray Additional Coats:
- Use an airbrush to spray thin coats of colorant over the repaired area.
- Allow each coat to dry before applying the next.
- Apply 10-15 thin coats to achieve the best results and blend the repair seamlessly.
- Apply Protective Finish:
- Once the colorant is dry, apply a protective finish to seal the color and protect the repair.
- Use the spray gun to apply 4-5 thin coats of the finish, allowing each coat to dry before applying the next.
- Allow to Cure:
- Let the repaired area cure for 24 hours before using the car seat.
- This ensures the filler, colorant, and finish have cured sufficiently.
4. Advanced Repair Techniques for Different Materials
Different materials like leather, vinyl, and fabric require specific techniques for effective repair.
4.1. Leather Car Seat Repair
Leather requires specialized products and techniques to maintain its natural look and feel.
- Cleaning: Use leather-specific cleaners to avoid damage.
- Filling: Use leather fillers that remain flexible.
- Coloring: Apply leather dyes for a seamless match.
- Conditioning: Condition the leather after repair to maintain its suppleness.
4.2. Vinyl Car Seat Repair
Vinyl is more resistant to damage but requires specific adhesives and colorants.
- Cleaning: Use vinyl cleaners that won’t dry out the material.
- Filling: Apply vinyl repair compounds designed for flexibility.
- Coloring: Use vinyl colorants that bond well with the surface.
- Texturing: Use a graining pad to match the original texture of the vinyl.
4.3. Fabric Car Seat Repair
Fabric repairs often involve patching and sewing techniques.
- Patching: Use fabric patches that match the color and texture of the original material.
- Sewing: Sew the patch securely in place using upholstery thread.
- Adhesive: Apply fabric glue for extra reinforcement.
- Steaming: Steam the repaired area to blend the patch with the surrounding fabric.
5. Preventing Future Damage to Your Car Seats
Preventing future damage is as important as repairing existing problems.
5.1. Protective Measures
- Seat Covers: Use seat covers to protect against wear and tear.
- Regular Cleaning: Clean your car seats regularly to remove dirt and grime.
- Conditioning: Condition leather seats to prevent drying and cracking.
- Sun Protection: Use sunshades to protect against UV damage.
5.2. Tips for Maintaining Car Seat Quality
- Avoid Sharp Objects: Be careful with sharp objects that can cause tears.
- Promptly Clean Spills: Clean spills immediately to prevent staining.
- Park in the Shade: Park in the shade to reduce sun exposure.
- Regular Inspections: Inspect your car seats regularly for signs of wear and tear.
5.3. Products to Prolong Car Seat Life
CARDIAGTECH.NET offers a range of products designed to prolong the life of your car seats:
- Leather Conditioners: To keep leather supple and prevent cracking.
- Vinyl Protectants: To protect against UV damage and fading.
- Fabric Guards: To repel stains and spills.
- Cleaning Kits: To maintain the cleanliness of your car seats.
6. Cost Analysis: DIY vs. Professional Repair Services
Understanding the costs associated with DIY and professional repair services can help you make an informed decision.
6.1. DIY Repair Costs
DIY repairs can be cost-effective, but expenses can add up. Consider the following:
- Repair Kits: $20 – $100 (depending on the type of material and complexity).
- Specialized Tools: $10 – $50 (if additional tools are needed).
- Material-Specific Supplies: $15 – $40 (for leather, vinyl, or fabric).
Total DIY Repair Costs: $45 – $190
6.2. Professional Repair Service Costs
Professional repairs offer convenience and quality but come at a higher price. Typical costs include:
- Small Tears and Holes: $50 – $150
- Medium Tears and Holes: $150 – $300
- Large Tears and Holes: $300 – $500
- Full Seat Reupholstering: $500 – $1500
6.3. Factors Affecting Repair Costs
Several factors influence the overall cost of car seat repair:
- Extent of the Damage: Larger and more complex repairs cost more.
- Type of Material: Leather repairs are generally more expensive than vinyl or fabric.
- Labor Costs: Professional labor rates vary by location and expertise.
- Additional Services: Extra services like color matching or conditioning can increase costs.
6.4. Making the Right Choice
Consider your budget, skill level, and the extent of the damage when choosing between DIY and professional repair services. DIY is suitable for minor damage, while professional services are better for extensive repairs or high-end vehicles.
7. Common Mistakes to Avoid During Car Seat Repair
Avoiding common mistakes ensures a successful and long-lasting repair.
7.1. Improper Cleaning
- Mistake: Using harsh chemicals that damage the material.
- Solution: Use gentle, material-specific cleaners recommended by CARDIAGTECH.NET.
7.2. Inadequate Preparation
- Mistake: Skipping the sanding or trimming steps.
- Solution: Properly prepare the area by sanding rough edges and trimming loose fibers.
7.3. Over-Application of Filler
- Mistake: Applying too much filler at once.
- Solution: Apply thin layers and allow each to dry completely.
7.4. Incorrect Color Matching
- Mistake: Using a colorant that doesn’t match the original seat color.
- Solution: Use a color matching kit from CARDIAGTECH.NET to ensure a seamless blend.
7.5. Rushing the Drying Process
- Mistake: Not allowing enough time for the repair compound and colorant to dry.
- Solution: Allow sufficient drying time for each layer and use a heat gun to speed up the process.
7.6. Neglecting Protective Finish
- Mistake: Skipping the application of a protective finish.
- Solution: Apply a protective finish to seal the color and protect the repair from future damage.
8. Maximizing the Lifespan of Your Car Seat Repair
Taking proactive steps can significantly extend the life of your car seat repair.
8.1. Regular Maintenance Tips
- Consistent Cleaning: Clean your car seats regularly with material-specific cleaners to remove dirt, dust, and spills.
- Conditioning Leather Seats: Apply leather conditioner every 3-6 months to keep the leather soft and prevent cracking.
- Protecting from Sun Exposure: Use sunshades when parking to minimize UV damage.
- Using Seat Covers: Invest in quality seat covers to protect against daily wear and tear.
8.2. Best Practices for Everyday Use
- Avoid Sharp Objects: Be mindful of sharp objects that can puncture or tear the car seats.
- Prompt Spill Cleanup: Clean spills immediately to prevent stains from setting in.
- Gentle Seating: Avoid excessive pressure or harsh movements on the seats.
- Proper Entry and Exit: Use care when entering and exiting the vehicle to prevent excessive wear on seat edges.
8.3. High-Quality Products for Longevity
- Leather Conditioners: Maintain the suppleness and prevent cracking.
- Vinyl Protectants: Shield against UV damage and fading.
- Fabric Guards: Repel stains and spills, keeping the seats clean.
- Cleaning Kits: Comprehensive kits for regular maintenance.
9. Eco-Friendly Car Seat Repair Options
Choosing eco-friendly repair options minimizes environmental impact.
9.1. Sustainable Materials
- Recycled Fabrics: Use recycled fabric patches for repairs.
- Eco-Friendly Adhesives: Choose water-based or solvent-free adhesives.
- Natural Cleaners: Opt for natural cleaning solutions that are biodegradable.
9.2. Reducing Waste
- Repair Over Replacement: Repairing your car seats instead of replacing them reduces waste.
- Minimal Packaging: Look for products with minimal and recyclable packaging.
- DIY Solutions: DIY repairs often use fewer materials than professional services.
9.3. Environmentally Responsible Products
- Biodegradable Cleaners: Use cleaners that break down naturally and don’t harm the environment.
- Low-VOC Colorants: Select colorants with low volatile organic compounds to reduce air pollution.
- Sustainable Leather: Choose leather from tanneries with responsible environmental practices.
10. Enhancing Car Value Through Seat Repair
Repairing your car seats can significantly enhance its resale value and overall appeal.
10.1. Aesthetic Appeal
- First Impressions: Well-maintained car seats create a positive first impression for potential buyers.
- Interior Condition: Clean and repaired seats indicate that the car has been well cared for.
- Overall Value: Enhancing the aesthetic appeal can increase the perceived value of the vehicle.
10.2. Resale Value
- Increased Market Price: Cars with well-maintained interiors command higher resale prices.
- Faster Sale: Vehicles in good condition sell more quickly.
- Negotiating Power: Clean, repaired seats give you more negotiating power during the sale.
10.3. Long-Term Benefits
- Prevent Further Damage: Repairing damage early prevents it from worsening, saving money in the long run.
- Maintain Comfort: Comfortable seats make driving more enjoyable.
- Pride of Ownership: A well-maintained interior enhances your pride in owning the vehicle.
11. The Future of Car Seat Repair Technology
Innovative technologies are transforming car seat repair, offering more efficient and effective solutions.
11.1. Advancements in Materials
- Self-Healing Polymers: New materials that can automatically repair minor damages.
- Durable Fabrics: Fabrics designed to resist tears, stains, and fading.
- Advanced Adhesives: Stronger and more flexible adhesives for better repairs.
11.2. Automation and Robotics
- Automated Repair Systems: Robotic systems that can perform precise repairs on car seats.
- 3D Printing: Using 3D printing to create custom patches and components for repairs.
- AI-Powered Diagnostics: AI systems that can assess damage and recommend the best repair solutions.
11.3. Enhanced DIY Tools
- User-Friendly Kits: More comprehensive and easier-to-use DIY repair kits.
- Digital Color Matching: Apps that use your smartphone to match colors accurately.
- Improved Applicators: Precision applicators for better control and smoother finishes.
12. Why Choose CARDIAGTECH.NET for Your Car Seat Repair Needs
CARDIAGTECH.NET offers unparalleled expertise and high-quality products for all your car seat repair needs.
12.1. Extensive Product Range
- Comprehensive Kits: Kits for leather, vinyl, and fabric repairs.
- Specialized Tools: A wide range of tools for every type of repair.
- Material-Specific Supplies: Cleaners, adhesives, colorants, and protectants for all materials.
12.2. Expert Guidance and Support
- Detailed Tutorials: Step-by-step guides and videos to help you through the repair process.
- Expert Advice: Access to professional advice and support.
- Customer Service: Dedicated customer service team to answer your questions and provide assistance.
12.3. Quality and Reliability
- High-Quality Products: Only the best materials and tools are offered.
- Proven Results: Products that deliver reliable and long-lasting repairs.
- Customer Satisfaction: A commitment to ensuring customer satisfaction with every purchase.
13. Real-Life Success Stories: Car Seat Repair Transformations
Witnessing real-life car seat repair transformations can inspire and reassure you about the potential outcomes.
13.1. Case Study 1: Restoring a Vintage Leather Seat
- Challenge: Restoring a severely cracked and faded leather seat in a vintage car.
- Solution: Using a leather repair kit from CARDIAGTECH.NET, the seat was cleaned, filled, colored, and conditioned.
- Result: The seat was restored to its original glory, enhancing the car’s overall value and aesthetic appeal.
13.2. Case Study 2: Repairing a Torn Vinyl Seat
- Challenge: Repairing a large tear in a vinyl seat caused by a sharp object.
- Solution: A vinyl repair kit from CARDIAGTECH.NET was used to patch the tear, match the color, and restore the texture.
- Result: The tear was seamlessly repaired, and the seat looked as good as new.
13.3. Case Study 3: Reviving a Stained Fabric Seat
- Challenge: Removing stubborn stains and repairing a small tear in a fabric seat.
- Solution: A fabric cleaning kit and a fabric patch from CARDIAGTECH.NET were used to clean the stains and repair the tear.
- Result: The stains were removed, the tear was repaired, and the seat looked fresh and clean.
14. Legal and Ethical Considerations in Car Seat Repair
Understanding the legal and ethical aspects ensures responsible repair practices.
14.1. Safety Standards
- Compliance: Ensure that all repairs comply with safety standards.
- Professional Advice: Consult with a professional if you are unsure about safety requirements.
- Reliable Products: Use products from CARDIAGTECH.NET that meet safety standards.
14.2. Disclosure Requirements
- Transparency: Disclose any significant repairs to potential buyers when selling the vehicle.
- Honesty: Be honest about the extent of the repairs and the materials used.
- Documentation: Keep records of all repairs and maintenance performed.
14.3. Environmental Responsibility
- Eco-Friendly Practices: Use eco-friendly materials and disposal methods.
- Waste Reduction: Minimize waste by repairing instead of replacing.
- Responsible Sourcing: Choose products from companies with responsible environmental practices.
15. Expert Tips for Achieving Professional-Quality Results
Follow these expert tips to achieve professional-quality car seat repairs.
15.1. Precision and Patience
- Take Your Time: Don’t rush the repair process; allow ample time for each step.
- Attention to Detail: Pay close attention to detail to ensure a seamless finish.
- Practice Makes Perfect: Practice on a small, inconspicuous area before tackling the main repair.
15.2. Using the Right Tools
- High-Quality Tools: Invest in high-quality tools from CARDIAGTECH.NET.
- Proper Maintenance: Keep your tools clean and well-maintained.
- Specialized Tools: Use specialized tools for specific tasks.
15.3. Mastering Color Matching
- Color Matching Kits: Use color matching kits from CARDIAGTECH.NET for accurate results.
- Test First: Test the color on a small area before applying it to the entire repair.
- Multiple Coats: Apply multiple thin coats for a seamless blend.
16. Car Seat Repair as a Profitable DIY Project
Turning car seat repair into a profitable DIY project can be both rewarding and lucrative.
16.1. Identifying Market Opportunities
- Local Demand: Assess the demand for car seat repair services in your area.
- Niche Markets: Focus on niche markets like vintage cars or high-end vehicles.
- Online Platforms: Use online platforms to advertise your services.
16.2. Setting Up Your DIY Repair Business
- Essential Tools and Supplies: Invest in high-quality tools and supplies from CARDIAGTECH.NET.
- Workspace Setup: Create a dedicated workspace for repairs.
- Business Plan: Develop a business plan outlining your services, pricing, and marketing strategies.
16.3. Marketing Your Services
- Online Advertising: Use online advertising to reach potential customers.
- Social Media: Promote your services on social media platforms.
- Word of Mouth: Encourage satisfied customers to spread the word.
17. Future Trends in Car Seat Materials and Design
Staying informed about future trends ensures you are prepared for upcoming changes.
17.1. Sustainable Materials
- Eco-Friendly Fabrics: Increased use of sustainable and recycled fabrics.
- Biodegradable Components: Development of biodegradable components for car seats.
- Reduced Carbon Footprint: Efforts to reduce the carbon footprint of car seat production.
17.2. Smart Seating Technology
- Integrated Sensors: Car seats with integrated sensors for monitoring driver health and comfort.
- Adaptive Seating: Seating systems that automatically adjust to the driver’s body.
- Heated and Cooled Seats: More advanced heating and cooling technologies.
17.3. Enhanced Durability and Comfort
- Scratch-Resistant Materials: Development of scratch-resistant materials for car seats.
- Improved Ergonomics: Car seats designed for better ergonomic support.
- Advanced Cushioning: Use of advanced cushioning materials for increased comfort.
18. Resources and Learning Opportunities for Car Seat Repair
Continuous learning and access to resources can enhance your skills and knowledge.
18.1. Online Courses and Tutorials
- CARDIAGTECH.NET Tutorials: Access to detailed tutorials and guides on the CARDIAGTECH.NET website.
- Online Learning Platforms: Enroll in online courses on platforms like Udemy and Coursera.
- YouTube Channels: Subscribe to YouTube channels dedicated to car seat repair.
18.2. Professional Workshops and Seminars
- Industry Events: Attend industry events and workshops to learn from experts.
- Training Programs: Participate in training programs offered by automotive organizations.
- Local Seminars: Attend local seminars and workshops on car seat repair.
18.3. Books and Publications
- Repair Manuals: Consult repair manuals for detailed instructions and diagrams.
- Trade Magazines: Read trade magazines for industry news and trends.
- Online Forums: Participate in online forums to ask questions and share knowledge.
19. Building a Community Around Car Seat Repair
Engaging with a community of car seat repair enthusiasts can provide support and inspiration.
19.1. Online Forums and Groups
- Automotive Forums: Join automotive forums to discuss car seat repair techniques.
- Social Media Groups: Participate in social media groups dedicated to car seat repair.
- Specialized Forums: Join specialized forums focused on specific types of car seat repair.
19.2. Local Meetups and Clubs
- Car Clubs: Join local car clubs and attend meetups.
- DIY Workshops: Organize or participate in DIY car seat repair workshops.
- Community Events: Attend community events focused on automotive repair.
19.3. Sharing Your Expertise
- Write Articles: Share your knowledge by writing articles on car seat repair.
- Create Tutorials: Create tutorials and videos to help others learn.
- Offer Advice: Offer advice and support to other members of the community.
20. Ensuring Safety and Comfort on Every Ride
Ultimately, car seat repair is about ensuring safety and comfort for you and your passengers.
20.1. Regular Inspections
- Check for Damage: Regularly inspect your car seats for signs of wear and tear.
- Address Issues Promptly: Address any issues promptly to prevent them from worsening.
- Professional Inspections: Consider professional inspections for thorough assessments.
20.2. Maintaining Proper Support
- Ergonomic Design: Ensure your car seats provide proper ergonomic support.
- Adjustments: Make necessary adjustments to ensure a comfortable driving experience.
- Support Accessories: Use support accessories like cushions and lumbar supports.
20.3. Prioritizing Safety
- Compliance with Standards: Ensure all repairs comply with safety standards.
- Reliable Repairs: Use reliable products and techniques for all repairs.
- Professional Assistance: Seek professional assistance when needed to ensure safety.
Ready to fix that hole in your car seat? CARDIAGTECH.NET offers the tools, materials, and expertise you need to restore your vehicle’s interior to its former glory. Don’t let damaged seats detract from your driving experience. Contact us today at +1 (641) 206-8880 or visit our website CARDIAGTECH.NET to explore our range of car seat repair solutions. Located at 276 Reock St, City of Orange, NJ 07050, United States, we’re here to help you achieve professional-quality results and enhance your car’s value.
FAQ: How to Fix a Hole in My Car Seat
Q1: What are the first steps in fixing a hole in my car seat?
Begin by cleaning the area, trimming loose fibers, and assessing the damage to determine the best repair method.
Q2: What materials do I need to repair a hole in a leather car seat?
You’ll need a leather repair kit, leather glue, leather filler, leather dyes, and applicators. CARDIAGTECH.NET offers comprehensive kits for this purpose.
Q3: How do I apply a backing patch to support the repair?
Cut a piece of backing material larger than the hole, insert it under the edges, and secure it with adhesive. Ensure it lies flat and covers the entire hole.
Q4: What is the best way to fill the hole in my car seat?
Apply the repair compound in thin layers, allowing each to dry before applying the next. Smooth the surface of each layer to remove excess filler.
Q5: How do I match the color of the repair to the original seat color?
Use a color matching kit from CARDIAGTECH.NET to ensure a seamless blend. Test the color on a small area before applying it to the entire repair.
Q6: Can I use a heat gun to speed up the drying process?
Yes, a heat gun can speed up the drying process. Use it carefully and follow the manufacturer’s instructions to avoid damaging the material.
Q7: What is the purpose of applying a protective finish after the repair?
A protective finish seals the color and protects the repair from future damage. It helps to prolong the life of the repair and maintain the appearance of the car seat.
Q8: How can I prevent future damage to my car seats?
Use seat covers, clean your car seats regularly, condition leather seats, and protect against UV damage with sunshades.
Q9: Is it better to DIY or seek professional help for car seat repair?
DIY is suitable for minor damage, while professional services are better for extensive repairs or high-end vehicles.
Q10: Where can I buy quality car seat repair supplies?
CARDIAGTECH.NET offers a wide range of high-quality car seat repair supplies. Visit our website or contact us at +1 (641) 206-8880 for more information.