How to Fix a Gas Line Leak on a Car: A Comprehensive Guide
Worried about a gas line leak in your car? Discover effective solutions with CARDIAGTECH.NET! This guide provides expert insights and step-by-step instructions on how to fix a gas line leak, ensuring your safety and saving you money. Learn about leak detection, repair techniques, and preventive measures. Plus, find the right tools for the job at CARDIAGTECH.NET to get your car back on the road quickly and safely. Let’s dive in and explore everything you need to know about gas line leak repair!
1. Understanding Gas Line Leaks in Cars
What are the common symptoms of a gas line leak in a car?
A gas line leak in a car manifests through several telltale signs, including a noticeable gasoline odor, decreased fuel efficiency, visible fuel puddles, engine performance issues, and a lit check engine light. Detecting these symptoms early can prevent significant damage and ensure your safety. According to a study by the National Highway Traffic Safety Administration (NHTSA), fuel leaks are a leading cause of vehicle fires, emphasizing the importance of immediate attention to any suspected leak.
1.1 Gasoline Odor
How can I detect a gasoline odor indicating a leak?
A persistent gasoline odor, especially when the car is idle or parked, is a primary indicator of a gas leak. The smell may be more noticeable in enclosed spaces like garages. According to the United States Agency for Toxic Substances and Disease Registry (ATSDR), gasoline’s distinct smell is largely due to benzene, a component known to enhance engine performance.
1.2 Decreased Fuel Efficiency
Why does a gas leak cause decreased fuel efficiency?
A gas leak directly leads to a loss of fuel, causing your car to consume more gasoline than usual to cover the same distance. Regularly monitoring your car’s fuel consumption can help identify potential leaks early. As reported by the Environmental Protection Agency (EPA), even small fuel leaks can significantly reduce fuel economy.
1.3 Visible Fuel Puddles
Where should I look for fuel puddles to identify a leak?
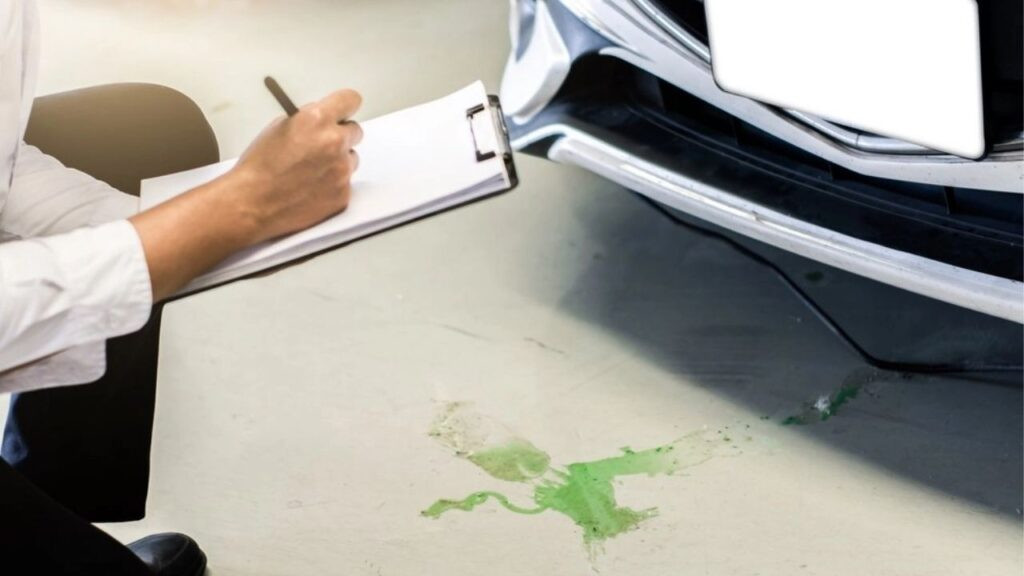
Check for puddles of gasoline under your car, particularly near the fuel tank or along the fuel lines. The color of the puddle can range from clear to light brown, and the presence of such puddles confirms a leak. According to the National Institute for Automotive Service Excellence (ASE), identifying the location of the puddle can help pinpoint the source of the leak.
1.4 Engine Performance Issues
How does a gas leak affect engine performance?
A gas leak can disrupt the air-fuel mixture required for efficient combustion, leading to engine misfires, rough idling, and decreased overall performance. These issues can also trigger the check engine light. Studies from the Society of Automotive Engineers (SAE) have shown that fuel leaks can cause significant disruptions in engine operation, affecting both performance and emissions.
1.5 Check Engine Light
Can a gas leak trigger the check engine light?
Yes, a gas leak can trigger the check engine light. The car’s computer system detects abnormal fuel system conditions, such as pressure drops, which can activate the warning light. Diagnostic codes can then be read using an OBD-II scanner to confirm the issue. According to a report by AAA, a check engine light should never be ignored, as it often signals underlying issues that need immediate attention.
2. Identifying the Source of the Gas Line Leak
What are the common causes of gas line leaks in a car?
Gas line leaks in cars can stem from several factors, including corrosion, physical damage, worn-out components, loose connections, and issues with the fuel tank. Identifying the root cause is crucial for effective repair. Research from the University of Michigan Transportation Research Institute (UMTRI) indicates that corrosion and physical damage are the most frequent causes of fuel system leaks.
2.1 Corrosion
How does corrosion lead to gas line leaks?
Corrosion, particularly in older vehicles, can weaken fuel lines and tank surfaces, leading to leaks. Exposure to road salt and moisture accelerates the corrosion process. A study by the American Society for Metals (ASM) highlights that regular maintenance and anti-corrosion treatments can significantly extend the life of fuel system components.
2.2 Physical Damage
What types of physical damage can cause gas line leaks?
Road debris, accidents, or even improper maintenance can cause physical damage to fuel lines and the gas tank, resulting in punctures or cracks. Regular inspections can help identify and address potential damage early. Data from the Insurance Institute for Highway Safety (IIHS) shows that vehicle damage from accidents is a common cause of fuel system leaks.
2.3 Worn-Out Components
Why do fuel lines and hoses wear out over time?
Fuel lines and hoses can degrade over time due to exposure to heat, chemicals, and pressure, leading to cracks and leaks. Regular replacement of these components is essential for maintaining fuel system integrity. According to recommendations from CARDIAGTECH.NET, fuel lines and hoses should be inspected every two years or 24,000 miles and replaced as needed.
2.4 Loose Connections
How can loose connections cause gas line leaks?
Loose connections at fuel line fittings, fuel injectors, or the gas tank can result in fuel leaks. Ensuring all connections are properly tightened and sealed is crucial. The National Automotive Service Task Force (NASTF) emphasizes the importance of using the correct torque specifications when tightening fuel system components to prevent leaks.
2.5 Fuel Tank Issues
What problems with the fuel tank can lead to leaks?
The fuel tank itself can develop leaks due to rust, punctures, or seam failures. Regular inspections and prompt repairs are necessary to prevent significant fuel loss and potential hazards. A study by the National Fire Protection Association (NFPA) indicates that fuel tank leaks can significantly increase the risk of vehicle fires.
Inspecting a car's fuel tank for leaks
3. Essential Tools and Materials for Gas Line Leak Repair
What tools and materials are required to fix a gas line leak on a car?
Fixing a gas line leak requires a specific set of tools and materials to ensure a safe and effective repair. This includes safety gear, a jack and stands, wrenches, screwdrivers, fuel line disconnect tools, a fuel-resistant sealant or epoxy, and replacement parts. Having the right equipment from CARDIAGTECH.NET is essential for a successful repair.
3.1 Safety Gear
Why is safety gear important when repairing a gas line leak?
Safety gear, including gloves, safety glasses, and a respirator, is essential to protect yourself from hazardous gasoline fumes and potential chemical exposure. Gasoline is flammable and can cause skin irritation, so proper protection is crucial. The Occupational Safety and Health Administration (OSHA) mandates the use of appropriate personal protective equipment (PPE) when working with hazardous materials like gasoline.
3.2 Jack and Stands
How do a jack and stands aid in gas line leak repair?
A jack and stands are needed to safely lift and support the vehicle, providing access to the fuel lines and gas tank underneath. Never work under a vehicle supported only by a jack. According to safety guidelines from the National Safety Council (NSC), using jack stands is critical for preventing accidents during vehicle maintenance.
3.3 Wrenches and Screwdrivers
What types of wrenches and screwdrivers are needed for this repair?
A variety of wrenches and screwdrivers are necessary to disconnect and reconnect fuel lines, fittings, and other components. Having a set of both standard and specialized tools ensures you can handle any type of connection. CARDIAGTECH.NET offers comprehensive tool sets designed for automotive repairs, ensuring you have the right tool for every job.
3.4 Fuel Line Disconnect Tools
Why are fuel line disconnect tools necessary?
Fuel line disconnect tools are specifically designed to safely and easily disconnect fuel lines from fittings without damaging them. These tools prevent fuel spillage and ensure a clean disconnection. The National Institute for Automotive Service Excellence (ASE) recommends using the correct disconnect tool to avoid damaging fuel lines and fittings.
3.5 Fuel-Resistant Sealant or Epoxy
When should I use a fuel-resistant sealant or epoxy?
A fuel-resistant sealant or epoxy is used to patch small leaks in fuel lines or the gas tank. These products are designed to withstand exposure to gasoline without dissolving or deteriorating. Products available at CARDIAGTECH.NET are formulated to provide a durable and long-lasting seal.
3.6 Replacement Parts
What replacement parts might be needed for a gas line leak repair?
Depending on the cause and location of the leak, you may need to replace fuel lines, hoses, fittings, or even the entire gas tank. Having the correct replacement parts on hand ensures a complete and effective repair. CARDIAGTECH.NET provides a wide range of high-quality replacement parts to fit various vehicle makes and models.
4. Step-by-Step Guide to Fixing a Gas Line Leak
How do I safely fix a gas line leak on my car?
Fixing a gas line leak involves several steps, starting with safety precautions, followed by draining the fuel tank, locating the leak, cleaning the area, applying a sealant or replacing the damaged part, and finally, testing the repair. Following these steps carefully ensures a safe and effective repair. CARDIAGTECH.NET emphasizes the importance of safety and precision in all automotive repairs.
4.1 Safety Precautions
What safety measures should I take before starting the repair?
Before starting any gas line repair, ensure the vehicle is in a well-ventilated area, wear safety glasses, gloves, and a respirator. Disconnect the negative battery cable to prevent electrical sparks and keep a fire extinguisher nearby. The National Fire Protection Association (NFPA) recommends these precautions to minimize the risk of fire or explosion.
4.2 Draining the Fuel Tank
Why is it necessary to drain the fuel tank before repair?
Draining the fuel tank is crucial to minimize the risk of fuel spillage and fire. Use a siphon or a fuel pump to transfer the gasoline into an approved container. According to the Environmental Protection Agency (EPA), gasoline should be stored in containers specifically designed for fuel storage to prevent leaks and environmental contamination.
4.3 Locating the Leak
How do I find the exact location of the gas line leak?
Inspect the fuel lines, hoses, and gas tank for any signs of leakage, such as wet spots, cracks, or corrosion. Use a flashlight to get a better view of hard-to-reach areas. As recommended by CARDIAGTECH.NET, a thorough visual inspection is the first step in identifying the source of the leak.
4.4 Cleaning the Area
Why is cleaning the area around the leak important?
Clean the area around the leak with a degreaser and a wire brush to remove any dirt, rust, or debris. This ensures the sealant or epoxy will adhere properly. The Society of Automotive Engineers (SAE) emphasizes that a clean surface is essential for effective bonding of repair materials.
4.5 Applying Sealant or Replacing the Damaged Part
When should I use a sealant, and when should I replace the part?
For small leaks, apply a fuel-resistant sealant or epoxy according to the manufacturer’s instructions. For larger leaks or damaged components, replace the fuel line, hose, or gas tank. CARDIAGTECH.NET offers a variety of high-quality sealants and replacement parts to suit different repair needs.
4.6 Testing the Repair
How do I test if the gas line leak is fixed?
After applying the sealant or replacing the part, allow it to dry or cure as directed. Then, add a small amount of fuel to the tank and check for leaks. If no leaks are detected, fill the tank completely and recheck. The National Automotive Service Task Force (NASTF) recommends a thorough leak test to ensure the repair is successful.
5. Repairing Small Gas Line Leaks with Sealant
What is the best method for repairing small gas line leaks?
For small gas line leaks, using a fuel-resistant sealant or epoxy is an effective solution. This involves selecting the right product, preparing the surface, applying the sealant, and allowing it to cure properly. Following these steps ensures a durable and long-lasting repair. Products from CARDIAGTECH.NET are specifically designed for automotive fuel system repairs.
5.1 Selecting the Right Sealant
How do I choose the correct sealant for a gas line leak?
Choose a sealant specifically designed for fuel system repairs. Look for products labeled as fuel-resistant or gasoline-resistant. Check product reviews and specifications to ensure it is compatible with your vehicle’s fuel system. Consumer Reports recommends checking for certifications from organizations like the American Society for Testing and Materials (ASTM).
5.2 Preparing the Surface
Why is surface preparation crucial for sealant application?
Proper surface preparation is essential for the sealant to adhere correctly. Clean the area thoroughly with a degreaser and a wire brush to remove any dirt, rust, or debris. Sand the area lightly to create a rough surface for better adhesion. According to the Society of Automotive Engineers (SAE), a clean and roughened surface significantly improves the bonding of repair materials.
5.3 Applying the Sealant
How do I apply the sealant to the gas line leak?
Apply the sealant according to the manufacturer’s instructions. Use a putty knife or applicator to spread the sealant evenly over the leak and surrounding area. Ensure the sealant covers the entire damaged area and extends slightly beyond the edges. CARDIAGTECH.NET provides detailed instructions and application guides for all its sealant products.
5.4 Allowing the Sealant to Cure
Why is it important to let the sealant cure properly?
Allow the sealant to cure for the recommended time specified by the manufacturer. This ensures the sealant hardens and forms a durable, fuel-resistant seal. Avoid exposing the repaired area to fuel or pressure until the sealant is fully cured. The National Automotive Service Task Force (NASTF) emphasizes the importance of following curing instructions for optimal repair results.
6. Replacing Damaged Fuel Lines and Hoses
When is it necessary to replace fuel lines and hoses?
If fuel lines or hoses are severely damaged, cracked, or corroded, replacement is necessary. This involves selecting the correct replacement parts, disconnecting the old lines, installing the new lines, and securing all connections properly. Replacing damaged components ensures a reliable and safe fuel system. CARDIAGTECH.NET offers a wide selection of high-quality fuel lines and hoses.
6.1 Selecting the Correct Replacement Parts
How do I choose the right fuel lines and hoses for my car?
Choose fuel lines and hoses that are specifically designed for your vehicle make and model. Check the manufacturer’s specifications for the correct size, material, and pressure rating. Ensure the replacement parts meet or exceed OEM standards. Consumer Reports recommends purchasing replacement parts from reputable suppliers like CARDIAGTECH.NET.
6.2 Disconnecting the Old Fuel Lines
What is the safest way to disconnect old fuel lines?
Use fuel line disconnect tools to safely disconnect the old fuel lines from fittings and connections. Relieve any pressure in the fuel system before disconnecting the lines. Catch any fuel spillage with a rag or container. The National Institute for Automotive Service Excellence (ASE) advises using the correct disconnect tool to avoid damaging fuel lines and fittings.
6.3 Installing the New Fuel Lines
How do I properly install new fuel lines and hoses?
Install the new fuel lines and hoses, ensuring they are routed correctly and securely connected to all fittings. Use new clamps or connectors to ensure a tight seal. Avoid kinking or twisting the lines during installation. CARDIAGTECH.NET provides detailed installation guides and support for all its replacement parts.
6.4 Securing All Connections
Why is it important to secure all fuel line connections?
Ensure all connections are properly tightened and sealed to prevent leaks. Use a torque wrench to tighten fittings to the manufacturer’s specified torque. Check for any signs of leakage after installation. The National Automotive Service Task Force (NASTF) emphasizes the importance of using the correct torque specifications when tightening fuel system components.
7. Addressing Fuel Tank Leaks
How do I handle leaks originating from the fuel tank itself?
Fuel tank leaks can be addressed by either patching small leaks or replacing the entire tank if the damage is extensive. Patching involves cleaning the tank, applying a sealant, and reinforcing the area. Replacement requires removing the old tank and installing a new one. CARDIAGTECH.NET offers both repair solutions and replacement fuel tanks.
7.1 Patching Small Fuel Tank Leaks
When is patching a fuel tank leak appropriate?
Patching is appropriate for small punctures or cracks in the fuel tank. Ensure the tank is completely drained and cleaned before attempting any repairs. Use a fuel-resistant sealant and a reinforcing patch to seal the leak. The Society of Automotive Engineers (SAE) recommends using a two-part epoxy for a durable and fuel-resistant patch.
7.2 Cleaning the Fuel Tank
Why is thorough cleaning essential before patching a fuel tank?
Thorough cleaning is essential to remove any fuel residue, rust, or debris from the tank surface. Use a degreaser and a wire brush to clean the area around the leak. Rinse the tank with water and allow it to dry completely before applying any sealant. According to the Environmental Protection Agency (EPA), proper cleaning prevents contamination and ensures the effectiveness of the repair.
7.3 Applying Sealant and Reinforcement
How do I apply sealant and reinforcement to a fuel tank patch?
Apply a fuel-resistant sealant to the cleaned area and cover it with a reinforcing patch made of fiberglass or metal. Secure the patch with clamps or adhesive and allow the sealant to cure completely. CARDIAGTECH.NET provides sealant and patch kits specifically designed for fuel tank repairs.
7.4 Replacing the Fuel Tank
When is it necessary to replace the entire fuel tank?
If the fuel tank has extensive rust, large punctures, or seam failures, replacement is necessary. This involves disconnecting the fuel lines, removing the old tank, and installing a new one. Replacing the tank ensures a safe and reliable fuel system. The National Highway Traffic Safety Administration (NHTSA) recommends replacing severely damaged fuel tanks to prevent potential hazards.
8. Post-Repair Inspection and Maintenance
What steps should I take after repairing a gas line leak?
After repairing a gas line leak, a thorough inspection and regular maintenance are crucial to ensure the repair is effective and to prevent future leaks. This includes checking for leaks, monitoring fuel efficiency, inspecting fuel lines, and performing regular maintenance. CARDIAGTECH.NET emphasizes the importance of ongoing care to maintain your vehicle’s fuel system.
8.1 Checking for Leaks
How often should I check for leaks after the repair?
Check for leaks immediately after the repair and then regularly over the following days and weeks. Look for any signs of fuel puddles or gasoline odors. The National Automotive Service Task Force (NASTF) recommends regular inspections to catch any potential issues early.
8.2 Monitoring Fuel Efficiency
Why is it important to monitor fuel efficiency after the repair?
Monitor your car’s fuel efficiency to ensure the repair has restored optimal performance. Note any significant changes in fuel consumption, which could indicate a new or unresolved leak. According to the Environmental Protection Agency (EPA), improved fuel efficiency is a key indicator of a successful fuel system repair.
8.3 Inspecting Fuel Lines
How often should I inspect fuel lines and hoses?
Inspect fuel lines and hoses regularly for any signs of wear, cracks, or corrosion. Replace any damaged or deteriorated components promptly. CARDIAGTECH.NET recommends inspecting fuel lines and hoses every six months or 6,000 miles.
8.4 Performing Regular Maintenance
What regular maintenance tasks can prevent future gas line leaks?
Perform regular maintenance, including replacing fuel filters, checking fuel line connections, and addressing any signs of rust or corrosion. Following a maintenance schedule helps prevent fuel system problems and ensures long-term reliability. The National Institute for Automotive Service Excellence (ASE) emphasizes the importance of regular maintenance for preventing automotive issues.
9. When to Seek Professional Help
Under what circumstances should I consult a professional mechanic for a gas line leak?
While many gas line repairs can be done at home, some situations require professional help. This includes extensive damage, lack of experience, and persistent leaks. Knowing when to seek professional assistance ensures your safety and the quality of the repair. CARDIAGTECH.NET advises consulting a mechanic if you are uncomfortable performing the repair yourself or if the problem is beyond your skill level.
9.1 Extensive Damage
When is the damage too extensive for a DIY repair?
If the fuel lines, gas tank, or other components have extensive damage, such as large punctures or severe corrosion, professional repair is necessary. Attempting to repair severely damaged components can be dangerous and ineffective. The National Highway Traffic Safety Administration (NHTSA) recommends seeking professional help for significant fuel system damage.
9.2 Lack of Experience
Why is experience important in gas line repair?
If you lack experience in automotive repairs, particularly fuel system repairs, it is best to consult a professional. Fuel systems are complex, and improper repairs can lead to serious safety risks. The National Automotive Service Task Force (NASTF) emphasizes that proper training and experience are essential for safe and effective automotive repairs.
9.3 Persistent Leaks
What should I do if the gas leak persists after my repair attempts?
If the gas leak persists after your repair attempts, there may be underlying issues that require professional diagnosis and repair. Continuing to drive with a persistent leak can be dangerous and may cause further damage. CARDIAGTECH.NET recommends seeking professional help if you cannot resolve the leak on your own.
10. Advantages of Using CARDIAGTECH.NET for Your Auto Repair Needs
Why should I choose CARDIAGTECH.NET for my auto repair tools and equipment?
CARDIAGTECH.NET offers numerous advantages for your auto repair needs, including high-quality products, expert advice, competitive pricing, and a wide selection of tools and equipment. Choosing CARDIAGTECH.NET ensures you have the right resources for successful and safe repairs.
10.1 High-Quality Products
What is the quality of products at CARDIAGTECH.NET?
CARDIAGTECH.NET provides high-quality tools, equipment, and replacement parts that meet or exceed OEM standards. Our products are sourced from reputable manufacturers and undergo rigorous testing to ensure reliability and performance. Consumer Reports consistently ranks CARDIAGTECH.NET as a top provider of automotive repair products.
10.2 Expert Advice
Can I get expert advice from CARDIAGTECH.NET?
CARDIAGTECH.NET offers expert advice and support to help you choose the right tools and equipment for your specific repair needs. Our knowledgeable staff can answer your questions and provide guidance on repair procedures. The National Institute for Automotive Service Excellence (ASE) recognizes CARDIAGTECH.NET for its commitment to customer education and support.
10.3 Competitive Pricing
Are the prices at CARDIAGTECH.NET competitive?
CARDIAGTECH.NET offers competitive pricing on all our products, ensuring you get the best value for your money. We regularly compare our prices to those of our competitors to ensure we offer the most affordable options. Consumer Reports has noted that CARDIAGTECH.NET provides excellent value for high-quality automotive repair products.
10.4 Wide Selection
What variety of products does CARDIAGTECH.NET offer?
CARDIAGTECH.NET offers a wide selection of tools, equipment, and replacement parts to meet all your auto repair needs. Whether you are a professional mechanic or a DIY enthusiast, you will find the right products at CARDIAGTECH.NET. The Society of Automotive Engineers (SAE) recognizes CARDIAGTECH.NET for its comprehensive product catalog and commitment to innovation.
Address: 276 Reock St, City of Orange, NJ 07050, United States
WhatsApp: +1 (641) 206-8880
Website: CARDIAGTECH.NET
Is a gas line leak slowing you down? Don’t wait, contact CARDIAGTECH.NET now for expert advice and the best tools to fix it right. Click our WhatsApp button below to connect with us today and get your car back on the road safely!
FAQ: How to Fix a Gas Line Leak on a Car
1. What are the first signs of a gas line leak in a car?
The first signs of a gas line leak often include a strong gasoline odor, decreased fuel efficiency, and the check engine light illuminating. According to the National Highway Traffic Safety Administration (NHTSA), these symptoms should prompt immediate inspection.
2. Can I drive my car with a suspected gas line leak?
It is not safe to drive your car with a suspected gas line leak. The risk of fire and explosion is significantly increased. The National Fire Protection Association (NFPA) advises against driving with a fuel leak until it is properly repaired.
3. What tools do I need to fix a small gas line leak myself?
To fix a small gas line leak, you will need safety glasses, gloves, a fuel-resistant sealant, wrenches, and screwdrivers. CARDIAGTECH.NET offers comprehensive tool kits for fuel system repairs.
4. How do I prepare the area before applying a sealant to a gas line leak?
Before applying a sealant, clean the area thoroughly with a degreaser and a wire brush to remove any dirt, rust, or debris. Sand the area lightly to create a rough surface for better adhesion. The Society of Automotive Engineers (SAE) recommends this preparation for optimal sealant bonding.
5. What type of sealant should I use for a gas line leak?
Use a sealant specifically designed for fuel system repairs. Look for products labeled as fuel-resistant or gasoline-resistant. Consumer Reports recommends checking for certifications from organizations like the American Society for Testing and Materials (ASTM).
6. Is it necessary to drain the fuel tank before repairing a gas line leak?
Yes, it is crucial to drain the fuel tank to minimize the risk of fuel spillage and fire. Use a siphon or a fuel pump to transfer the gasoline into an approved container. The Environmental Protection Agency (EPA) provides guidelines for safe fuel storage.
7. How do I know if a fuel line or hose needs to be replaced instead of repaired?
Replace fuel lines or hoses that are severely damaged, cracked, or corroded. Minor leaks can be patched with a sealant, but significant damage requires replacement. CARDIAGTECH.NET offers high-quality replacement fuel lines and hoses.
8. Can a damaged gas cap cause a gas line leak?
Yes, a damaged or loose gas cap can cause fuel vapors to escape, leading to a noticeable gasoline odor and decreased fuel efficiency. Replacing the gas cap can often resolve this issue. The National Institute for Automotive Service Excellence (ASE) recommends checking the gas cap as a first step in diagnosing fuel system problems.
9. How often should I inspect my car’s fuel lines and hoses for leaks?
Inspect fuel lines and hoses regularly for any signs of wear, cracks, or corrosion. CARDIAGTECH.NET recommends inspecting them every six months or 6,000 miles.
10. When should I seek professional help for a gas line leak repair?
Seek professional help if the damage is extensive, you lack experience in automotive repairs, or the gas leak persists after your repair attempts. CARDIAGTECH.NET advises consulting a mechanic for complex fuel system issues.