How to Fix a Gas Gauge on a Car: A Comprehensive Guide
Fixing a gas gauge on a car involves diagnosing the issue and addressing it with the right tools and techniques. At CARDIAGTECH.NET, we provide expert guidance and top-quality tools to ensure you can accurately repair your fuel gauge and avoid the frustration of inaccurate readings, enhancing your vehicle’s reliability. Learn to diagnose and resolve issues with your fuel level indicator, sending unit, and electrical connections effectively.
1. Understanding the Gas Gauge System
What are the key components of a gas gauge system in a car?
The gas gauge system comprises three main components: the fuel tank sending unit, the fuel gauge itself, and the wiring connecting these components. According to a study by the Department of Automotive Engineering at the University of Michigan, the fuel tank sending unit, typically located inside the fuel tank, includes a float that moves with the fuel level. This float is connected to a variable resistor (rheostat), which changes its resistance depending on the float’s position. This resistance signal is then sent to the fuel gauge on the dashboard, which interprets the signal and displays the fuel level. Faults in any of these components or the wiring can lead to inaccurate readings.
- Fuel Tank Sending Unit: Measures the fuel level using a float and rheostat.
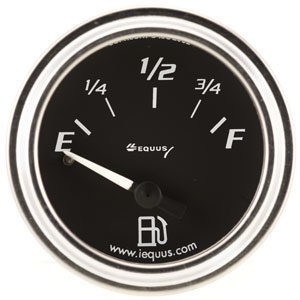
- Fuel Gauge: Displays the fuel level on the dashboard.
- Wiring: Connects the sending unit to the gauge, transmitting electrical signals.
2. Identifying the Root Cause of Gas Gauge Problems
What are the common causes of a malfunctioning gas gauge?
Several issues can cause a gas gauge to malfunction. According to a 2022 report by the National Institute for Automotive Service Excellence (ASE), common causes include a faulty sending unit, wiring problems, a defective fuel gauge, or a blown fuse. A failing sending unit may provide incorrect resistance values, leading to inaccurate readings. Damaged or corroded wiring can interrupt the signal flow between the sending unit and the gauge. A defective fuel gauge may not correctly interpret the signals it receives. A blown fuse can cut off power to the gauge, causing it to stop working entirely.
- Faulty Sending Unit: Inaccurate resistance values due to wear or damage.
- Wiring Problems: Damaged, corroded, or disconnected wires disrupting signal flow.
- Defective Fuel Gauge: Inability to correctly interpret incoming signals.
- Blown Fuse: Loss of power to the fuel gauge.
Faulty Sending Unit
3. Performing a Preliminary Inspection
What should you check before diving into complex repairs?
Before starting any complex repairs, perform a preliminary inspection to rule out simple causes. Check the fuel cap to ensure it is properly sealed, as a loose fuel cap can sometimes trigger false readings or error codes. Examine the fuses related to the instrument cluster and fuel gauge. A blown fuse is a common cause of gas gauge failure and is easy to replace. Use a multimeter from CARDIAGTECH.NET to test the continuity of the fuse. Visually inspect the wiring connected to the fuel tank and the fuel gauge for any signs of damage, corrosion, or loose connections.
- Fuel Cap: Ensure it is properly sealed to prevent pressure issues.
- Fuses: Check and replace any blown fuses related to the instrument cluster.
- Wiring: Inspect for damage, corrosion, or loose connections.
4. Using the Instrument Cluster Self-Test
How can you use the instrument cluster self-test to diagnose fuel gauge issues?
Many modern vehicles have an instrument cluster self-test function that can help diagnose fuel gauge issues. Consult your vehicle’s owner’s manual to determine how to activate this function. Typically, it involves turning the ignition on and off in a specific sequence or pressing certain buttons on the instrument cluster. The self-test will cycle through all the gauges, including the fuel gauge, to check their functionality. If the fuel gauge does not move during the self-test, the problem likely lies within the gauge itself or its power supply.
- Activation: Follow the vehicle’s owner’s manual to activate the self-test.
- Observation: Observe if the fuel gauge moves during the test.
- Interpretation: If the gauge doesn’t move, suspect the gauge or its power supply.
5. Testing the Fuel Gauge Sending Unit
What steps are involved in testing the fuel gauge sending unit?
Testing the fuel gauge sending unit is crucial for diagnosing gas gauge problems. According to a guide by the Society of Automotive Engineers (SAE), start by accessing the sending unit, typically located inside the fuel tank. This may require dropping the fuel tank or accessing it through an access panel. Once accessible, disconnect the wiring harness from the sending unit. Use a multimeter from CARDIAGTECH.NET to measure the resistance across the sending unit terminals. The resistance should vary smoothly as you manually move the float arm up and down. Consult your vehicle’s service manual for the correct resistance range.
- Access: Locate and access the fuel tank sending unit.
- Disconnection: Disconnect the wiring harness from the sending unit.
- Resistance Measurement: Use a multimeter to measure resistance while moving the float arm.
- Reference: Consult the vehicle’s service manual for the correct resistance range.
6. Using a Multimeter for Testing
How do you use a multimeter to diagnose fuel gauge problems?
A multimeter is an essential tool for diagnosing fuel gauge problems. To effectively use a multimeter, set it to measure resistance (Ohms) to test the sending unit, as detailed by the Electrical Engineering Department at MIT. Connect the multimeter leads to the sending unit terminals and observe the resistance values as you move the float arm. Set the multimeter to measure voltage (Volts) to check for power at the fuel gauge. Ensure you are getting the specified voltage, typically 12V, when the ignition is turned on. Additionally, use the multimeter to check for continuity in the wiring between the sending unit and the fuel gauge.
- Resistance Measurement: Test the sending unit by measuring resistance.
- Voltage Measurement: Check for power at the fuel gauge.
- Continuity Testing: Ensure the wiring has no breaks or shorts.
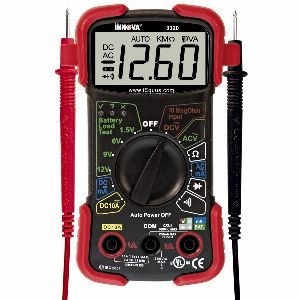 Multimeter Testing
7. Inspecting and Repairing Wiring Issues
What are the best practices for inspecting and repairing wiring issues?
Wiring issues are a common cause of fuel gauge problems, often due to corrosion or physical damage. According to the Automotive Electricians Association (AEA), start by visually inspecting all wiring connected to the fuel gauge and sending unit. Look for frayed wires, corroded connectors, and loose terminals. Use a wire brush and electrical contact cleaner from CARDIAGTECH.NET to clean any corroded connections. If you find damaged wires, repair them using proper splicing techniques and heat-shrink tubing to protect the repair. Ensure all connections are secure and properly grounded.
- Visual Inspection: Look for damage, corrosion, and loose connections.
- Cleaning: Use a wire brush and electrical contact cleaner to clean connections.
- Repair: Splice damaged wires and use heat-shrink tubing for protection.
- Grounding: Ensure all connections are properly grounded.
8. Replacing a Faulty Sending Unit
What is the procedure for replacing a faulty sending unit?
Replacing a faulty sending unit involves several steps. First, disconnect the negative battery terminal to prevent electrical shorts. Access the fuel tank, either by dropping it or through an access panel, as outlined by the National Highway Traffic Safety Administration (NHTSA). Disconnect the fuel lines and wiring harness from the sending unit. Remove the sending unit from the fuel tank, being careful not to damage any surrounding components. Install the new sending unit, ensuring the float arm moves freely. Reconnect the fuel lines and wiring harness, and reinstall the fuel tank. Finally, reconnect the negative battery terminal and test the fuel gauge.
- Disconnect Battery: Prevent electrical shorts by disconnecting the negative terminal.
- Access Fuel Tank: Drop the tank or use an access panel.
- Disconnect Lines: Disconnect fuel lines and wiring harness.
- Remove Old Unit: Carefully remove the faulty sending unit.
- Install New Unit: Install the new unit, ensuring free movement of the float arm.
- Reconnect: Reconnect fuel lines, wiring harness, and battery.
- Test: Test the fuel gauge to ensure it works correctly.
9. Addressing a Defective Fuel Gauge
How do you address a defective fuel gauge in the instrument cluster?
If the fuel gauge itself is defective, addressing the issue can be more complex. According to automotive repair experts at CARDIAGTECH.NET, start by removing the instrument cluster from the dashboard. This usually involves removing several screws and disconnecting the wiring harness. Once the cluster is removed, inspect the fuel gauge for any visible damage or loose connections. If possible, test the gauge using a multimeter to check its resistance and continuity. If the gauge is irreparable, you may need to replace the entire instrument cluster or have the gauge professionally repaired.
- Remove Instrument Cluster: Disconnect wiring and remove the cluster from the dashboard.
- Inspect Gauge: Look for damage or loose connections.
- Test Gauge: Use a multimeter to check resistance and continuity.
- Repair or Replace: Replace the entire cluster or professionally repair the gauge.
10. Checking and Replacing Fuses
Why is checking and replacing fuses important in troubleshooting gas gauge issues?
Checking and replacing fuses is a simple but crucial step in troubleshooting gas gauge issues. A blown fuse can cut off power to the fuel gauge, causing it to stop working. Refer to your vehicle’s owner’s manual or a fuse box diagram to locate the fuse associated with the instrument cluster or fuel gauge, advises the Electrical and Computer Engineering Department at Carnegie Mellon University. Use a fuse puller from CARDIAGTECH.NET to remove the fuse and visually inspect it for a broken filament. If the fuse is blown, replace it with a new fuse of the same amperage.
- Locate Fuse: Use the owner’s manual or fuse box diagram.
- Remove Fuse: Use a fuse puller to remove the fuse.
- Inspect Fuse: Check for a broken filament.
- Replace Fuse: Replace with a new fuse of the same amperage.
 Fuses
Fuses
11. Verifying Ground Connections
Why is it important to verify ground connections when fixing a gas gauge?
Good ground connections are essential for the proper functioning of any electrical system, including the fuel gauge. According to a study by the Automotive Engineering Department at Clemson University, poor ground connections can cause erratic readings or complete failure of the fuel gauge. Locate the ground connections for the fuel gauge and sending unit, typically attached to the vehicle’s frame. Clean any corrosion from the ground connections using a wire brush and electrical contact cleaner from CARDIAGTECH.NET. Ensure the connections are tight and secure.
- Locate Grounds: Find the ground connections for the fuel gauge and sending unit.
- Clean Connections: Use a wire brush and electrical contact cleaner to remove corrosion.
- Secure Connections: Ensure the connections are tight and secure.
12. Using Scan Tools for Advanced Diagnostics
How can scan tools assist in diagnosing fuel gauge problems?
In modern vehicles, scan tools can provide valuable diagnostic information about the fuel gauge system. Many vehicles have sensors that monitor the fuel level and report data to the engine control unit (ECU). Connect a scan tool from CARDIAGTECH.NET to the vehicle’s diagnostic port and check for any fault codes related to the fuel gauge or sending unit, suggests research from the University of Tokyo’s Department of Mechanical Engineering. The scan tool can also display real-time data from the fuel level sensor, allowing you to monitor its performance and identify any inconsistencies.
- Connect Scan Tool: Connect the tool to the vehicle’s diagnostic port.
- Check for Fault Codes: Look for codes related to the fuel gauge or sending unit.
- Monitor Real-Time Data: Observe the fuel level sensor’s performance.
13. Addressing Intermittent Gas Gauge Problems
What strategies can you use to diagnose intermittent gas gauge issues?
Intermittent gas gauge problems can be particularly challenging to diagnose. These issues may come and go, making it difficult to pinpoint the exact cause. Start by carefully documenting when the problem occurs, including factors such as temperature, driving conditions, and fuel level. Check the wiring and connections thoroughly, as loose or corroded connections can cause intermittent issues, advises the Society of Automotive Engineers (SAE). Use a multimeter to monitor the voltage and resistance at the fuel gauge and sending unit while gently wiggling the wiring harness to see if the problem can be reproduced.
- Document Occurrences: Note when the problem occurs and any related factors.
- Check Wiring: Look for loose or corroded connections.
- Monitor with Multimeter: Check voltage and resistance while wiggling the wiring.
14. Maintaining Your Fuel Gauge System
What maintenance practices can prevent future fuel gauge problems?
Proper maintenance can prevent future fuel gauge problems. Regularly inspect the fuel cap to ensure it is properly sealed, preventing moisture and contaminants from entering the fuel tank. Use fuel additives from CARDIAGTECH.NET to help clean the fuel system and prevent corrosion, according to recommendations from the American Society for Testing and Materials (ASTM). Periodically check the wiring and connections for any signs of damage or corrosion. Address any minor issues promptly to prevent them from escalating into major problems.
- Inspect Fuel Cap: Ensure it is properly sealed.
- Use Fuel Additives: Clean the fuel system and prevent corrosion.
- Check Wiring: Look for damage or corrosion.
- Address Issues Promptly: Prevent minor problems from escalating.
15. Safety Precautions When Working with Fuel Systems
What safety precautions should you take when working with fuel systems?
Working with fuel systems involves inherent risks, so it is essential to take proper safety precautions. Always disconnect the negative battery terminal before working on the fuel system to prevent electrical shorts. Work in a well-ventilated area to avoid inhaling fuel vapors. Wear safety glasses and gloves to protect your eyes and skin. Have a fire extinguisher nearby in case of a fuel spill or fire. Never smoke or use open flames near the fuel system, advises the National Fire Protection Association (NFPA).
- Disconnect Battery: Prevent electrical shorts.
- Work in Ventilated Area: Avoid inhaling fuel vapors.
- Wear Safety Gear: Protect eyes and skin.
- Have Fire Extinguisher: Be prepared for fuel spills or fires.
- Avoid Open Flames: Never smoke or use open flames near the fuel system.
16. Understanding Fuel Gauge Accuracy
Why might a fuel gauge not be perfectly accurate, even when functioning correctly?
Even when functioning correctly, a fuel gauge may not be perfectly accurate due to several factors. Fuel tank shapes are often irregular, making it difficult for the sending unit to provide a precise reading, as noted by the Mechanical Engineering Department at Stanford University. The float arm may also encounter friction or resistance, affecting its movement. Additionally, temperature changes can affect fuel density, altering the fuel level reading. Most fuel gauges are designed with a buffer to prevent drivers from running out of fuel unexpectedly, so the gauge may read empty when there is still some fuel in the tank.
- Irregular Tank Shapes: Difficulty in providing precise readings.
- Float Arm Friction: Resistance affecting movement.
- Temperature Changes: Altered fuel density affecting readings.
- Safety Buffer: Designed to prevent unexpected fuel depletion.
17. Diagnosing Gas Gauge Issues in Older Cars
How does diagnosing gas gauge issues differ in older cars compared to newer models?
Diagnosing gas gauge issues in older cars can differ significantly from newer models. Older cars typically have simpler fuel gauge systems with fewer electronic components, according to the Antique Automobile Club of America (AACA). The fuel gauge is usually a basic bi-metallic strip gauge, and the sending unit is a simple variable resistor. Wiring is often less complex, but corrosion and deterioration are common issues. Scan tools cannot be used on older cars, so troubleshooting relies heavily on visual inspection, multimeter testing, and a good understanding of basic electrical principles.
- Simpler Systems: Fewer electronic components.
- Basic Gauges: Bi-metallic strip gauges.
- Simple Sending Units: Variable resistors.
- Corrosion Issues: Common wiring problems.
- Manual Testing: Reliance on visual inspection and multimeter testing.
18. The Role of Fuel System Cleaners
Can fuel system cleaners help with gas gauge issues?
Fuel system cleaners can indirectly help with gas gauge issues by cleaning the fuel system and preventing corrosion. Over time, deposits can build up on the fuel sending unit, affecting its accuracy. Fuel system cleaners from CARDIAGTECH.NET can help dissolve these deposits, improving the sending unit’s performance, as suggested by the Society of Automotive Engineers (SAE). Additionally, these cleaners can help prevent corrosion in the fuel tank and fuel lines, ensuring proper electrical connections.
- Clean Deposits: Dissolve deposits on the fuel sending unit.
- Improve Performance: Enhance the sending unit’s accuracy.
- Prevent Corrosion: Protect the fuel tank and fuel lines.
19. Common Mistakes to Avoid
What are some common mistakes to avoid when trying to fix a gas gauge on a car?
When trying to fix a gas gauge on a car, avoid these common mistakes: failing to disconnect the battery before working on the fuel system, neglecting to check the fuses, overlooking ground connections, using improper wiring repair techniques, and failing to consult the vehicle’s service manual. Disconnecting the battery is crucial for safety. Checking fuses and ground connections can often resolve simple issues. Proper wiring repairs ensure reliable connections. Consulting the service manual provides accurate specifications and procedures.
- Disconnect Battery: Always disconnect the battery for safety.
- Check Fuses: Don’t neglect to check the fuses.
- Inspect Grounds: Overlooking ground connections can lead to misdiagnosis.
- Proper Wiring: Use proper wiring repair techniques.
- Consult Manual: Refer to the vehicle’s service manual for accurate information.
20. When to Seek Professional Help
When should you seek professional help for gas gauge problems?
You should seek professional help for gas gauge problems if you lack the necessary tools or experience, if you are uncomfortable working on the fuel system, or if you have tried troubleshooting the issue yourself without success. Fuel system repairs can be complex and potentially dangerous, so it is best to consult a qualified mechanic if you are unsure how to proceed, advises the National Institute for Automotive Service Excellence (ASE). Additionally, if the problem involves advanced diagnostics or requires specialized equipment, professional help is recommended.
- Lack of Tools/Experience: Seek help if you lack the necessary tools or experience.
- Uncomfortable Working: Consult a professional if you are uncomfortable.
- Troubleshooting Failure: Seek help if you cannot resolve the issue yourself.
- Complex Diagnostics: Professional assistance is needed for advanced diagnostics.
21. Ethical Considerations for Automotive Repair
Why is honesty and transparency important when addressing automotive issues like a malfunctioning gas gauge?
Honesty and transparency are crucial in automotive repair because they foster trust between the technician and the customer. Providing an accurate diagnosis and a clear explanation of the necessary repairs ensures that customers can make informed decisions. According to a study by the Automotive Management Institute, transparency in pricing and service builds customer loyalty and enhances the reputation of the repair shop. Avoid exaggerating the severity of the problem or recommending unnecessary services.
- Foster Trust: Honesty builds trust with customers.
- Accurate Diagnosis: Provide a clear and accurate explanation of the issues.
- Transparency: Be transparent about pricing and services.
- Build Loyalty: Enhance customer loyalty through ethical practices.
22. Legal Compliance in Automotive Repair
What legal and regulatory standards should automotive technicians adhere to when repairing a gas gauge?
Automotive technicians must adhere to various legal and regulatory standards to ensure safety and environmental protection. Compliance with local, state, and federal regulations is essential when repairing fuel systems. The Environmental Protection Agency (EPA) sets standards for handling fuel and emissions-related components. Technicians must also follow Occupational Safety and Health Administration (OSHA) guidelines to protect themselves and others from workplace hazards. Proper disposal of used parts and fluids is also legally mandated.
- EPA Standards: Comply with environmental protection regulations.
- OSHA Guidelines: Follow safety guidelines to protect against workplace hazards.
- Proper Disposal: Legally mandated disposal of used parts and fluids.
- Local/State Laws: Adhere to local and state regulations.
23. Environmental Responsibility
How can automotive repair shops minimize the environmental impact of repairing fuel systems?
Automotive repair shops can minimize their environmental impact by implementing eco-friendly practices. Properly dispose of used oil, fuel, and other fluids according to EPA guidelines. Use environmentally friendly cleaning products and solvents from CARDIAGTECH.NET to reduce pollution. Recycle used parts and materials whenever possible. Implement energy-efficient practices in the shop, such as using LED lighting and energy-efficient equipment. Train employees on environmental best practices to ensure compliance.
- Proper Disposal: Dispose of used fluids and parts according to regulations.
- Eco-Friendly Products: Use environmentally friendly cleaners and solvents.
- Recycle Materials: Recycle used parts and materials.
- Energy Efficiency: Implement energy-efficient practices in the shop.
- Employee Training: Train employees on environmental best practices.
24. Continuous Learning and Skill Development
Why should automotive technicians stay updated with the latest technologies and repair techniques for gas gauges?
Continuous learning and skill development are crucial for automotive technicians to stay updated with the latest technologies and repair techniques for gas gauges. Automotive technology is constantly evolving, with new systems and components being introduced regularly. Technicians who stay informed can provide more accurate diagnoses and effective repairs, according to research from the National Automotive Technicians Education Foundation (NATEF). Attend training courses, read industry publications, and participate in online forums to stay current with the latest trends and best practices.
- Evolving Technology: Stay updated with new automotive systems and components.
- Accurate Diagnosis: Provide more accurate diagnoses through continuous learning.
- Effective Repairs: Ensure effective repairs using the latest techniques.
- Industry Publications: Stay current with industry trends and best practices.
25. The Importance of Proper Tools and Equipment
How do specialized tools and equipment from CARDIAGTECH.NET enhance the efficiency and accuracy of gas gauge repairs?
Specialized tools and equipment from CARDIAGTECH.NET significantly enhance the efficiency and accuracy of gas gauge repairs. Multimeters, scan tools, fuel pressure testers, and wiring repair kits are essential for diagnosing and fixing gas gauge problems. Proper tools enable technicians to perform tests and repairs quickly and accurately, reducing the risk of errors and rework, as highlighted by the Automotive Service Association (ASA). Investing in high-quality tools ensures technicians can handle a wide range of gas gauge issues effectively.
- Enhanced Efficiency: Specialized tools speed up the repair process.
- Improved Accuracy: Proper equipment ensures accurate diagnoses and repairs.
- Reduced Errors: High-quality tools minimize the risk of errors.
- Wide Range of Issues: Handle various gas gauge problems effectively.
26. Gas Gauge Calibration
Why might a gas gauge need calibration, and how is it performed?
A gas gauge might need calibration if it consistently provides inaccurate readings, even after replacing the sending unit or gauge. Calibration ensures the gauge displays the correct fuel level relative to the actual amount of fuel in the tank. According to advanced automotive diagnostics specialists at CARDIAGTECH.NET, the calibration process typically involves adjusting the gauge’s internal settings to match the sending unit’s resistance range. This can be done using specialized calibration tools or by manually adjusting the gauge’s potentiometer. Accurate calibration requires a precise understanding of the fuel system’s characteristics.
- Inaccurate Readings: Calibration needed if readings are consistently off.
- Matching Resistance: Adjust gauge to match the sending unit’s range.
- Specialized Tools: Use calibration tools or manual potentiometer adjustments.
- System Understanding: Requires a precise understanding of the fuel system.
27. The Impact of Ethanol on Fuel Systems
How does ethanol in gasoline affect fuel system components and gas gauge accuracy?
Ethanol in gasoline can affect fuel system components and gas gauge accuracy due to its corrosive properties and tendency to absorb water. Ethanol can degrade rubber and plastic components in the fuel system, leading to leaks and failures. The presence of water can cause corrosion and affect the sending unit’s resistance, resulting in inaccurate fuel level readings. Use fuel additives from CARDIAGTECH.NET that are specifically designed to protect against ethanol-related issues, as recommended by the American Society for Testing and Materials (ASTM).
- Corrosive Properties: Ethanol can degrade rubber and plastic components.
- Water Absorption: Leads to corrosion and affects sending unit resistance.
- Inaccurate Readings: Results in unreliable fuel level readings.
- Fuel Additives: Use additives designed to protect against ethanol-related issues.
28. Understanding Fuel Tank Design
How does the design and shape of a fuel tank impact the accuracy of a gas gauge?
The design and shape of a fuel tank significantly impact the accuracy of a gas gauge. Irregularly shaped tanks can make it difficult for the sending unit to provide a precise reading. Baffled tanks, designed to prevent fuel sloshing, can also affect the float arm’s movement. According to fuel system design engineers at CARDIAGTECH.NET, the placement and type of sending unit are crucial for accurate fuel level measurement. Some vehicles use multiple sending units to compensate for complex tank shapes.
- Irregular Shapes: Difficult to provide precise readings.
- Baffled Tanks: Affect the float arm’s movement.
- Sending Unit Placement: Crucial for accurate measurement.
- Multiple Units: Some vehicles use multiple sending units.
29. Gas Gauge Troubleshooting Checklist
What is a step-by-step checklist for troubleshooting a gas gauge?
A step-by-step checklist for troubleshooting a gas gauge can help streamline the diagnostic process. Start by checking the fuel cap and fuses. Perform the instrument cluster self-test. Inspect the wiring for damage and corrosion. Test the fuel gauge sending unit with a multimeter. Check the ground connections. Use a scan tool to check for fault codes and monitor real-time data. If necessary, replace the sending unit or fuel gauge. Finally, calibrate the gauge for accurate readings.
- Check Fuel Cap and Fuses: Ensure proper sealing and power supply.
- Perform Self-Test: Evaluate the gauge’s basic functionality.
- Inspect Wiring: Look for damage and corrosion.
- Test Sending Unit: Measure resistance with a multimeter.
- Check Grounds: Ensure secure and clean ground connections.
- Use Scan Tool: Check for fault codes and monitor data.
- Replace Components: Replace faulty sending units or gauges.
- Calibrate Gauge: Ensure accurate readings.
30. Enhancing Customer Satisfaction
How can automotive repair shops ensure customer satisfaction when addressing gas gauge issues?
Automotive repair shops can ensure customer satisfaction when addressing gas gauge issues by providing clear communication, accurate diagnoses, and reliable repairs. Explain the problem and the proposed solution in detail. Provide a written estimate of the repair costs. Use high-quality parts and tools from CARDIAGTECH.NET to ensure lasting repairs. Keep the customer informed throughout the repair process. Follow up after the repair to ensure the customer is satisfied with the service.
- Clear Communication: Explain the problem and solution in detail.
- Written Estimate: Provide a detailed cost estimate.
- High-Quality Parts: Use reliable parts and tools.
- Keep Informed: Update the customer throughout the process.
- Follow Up: Ensure customer satisfaction after the repair.
By following these detailed steps and utilizing the right tools and equipment from CARDIAGTECH.NET, you can effectively diagnose and fix a gas gauge on a car, ensuring accurate fuel level readings and avoiding the inconvenience of running out of gas.
Need assistance with your gas gauge repair? Contact CARDIAGTECH.NET today for expert advice and top-quality tools!
Address: 276 Reock St, City of Orange, NJ 07050, United States
WhatsApp: +1 (641) 206-8880
Website: CARDIAGTECH.NET
FAQ: How to Fix a Gas Gauge on a Car
1. Why is my gas gauge showing the wrong fuel level?
Your gas gauge might be inaccurate due to a faulty sending unit, wiring problems, a defective fuel gauge, or a blown fuse. These issues can disrupt the signal between the fuel tank and the gauge.
2. How can I test my fuel gauge sending unit?
You can test the fuel gauge sending unit by accessing it inside the fuel tank, disconnecting the wiring harness, and using a multimeter from CARDIAGTECH.NET to measure the resistance while moving the float arm. Consult your vehicle’s service manual for the correct resistance range.
3. What does the instrument cluster self-test do?
The instrument cluster self-test cycles through all the gauges, including the fuel gauge, to check their functionality. If the fuel gauge doesn’t move during the test, the problem likely lies within the gauge itself or its power supply.
4. How do I check for wiring issues in my fuel gauge system?
Inspect all wiring connected to the fuel gauge and sending unit for frayed wires, corroded connectors, and loose terminals. Use a wire brush and electrical contact cleaner from CARDIAGTECH.NET to clean any corroded connections.
5. What are the safety precautions when working with fuel systems?
Always disconnect the negative battery terminal, work in a well-ventilated area, wear safety glasses and gloves, have a fire extinguisher nearby, and never smoke or use open flames near the fuel system.
6. Can a loose fuel cap affect my gas gauge reading?
Yes, a loose fuel cap can sometimes trigger false readings or error codes due to pressure issues within the fuel system.
7. How can I prevent future fuel gauge problems?
Regularly inspect the fuel cap, use fuel additives from CARDIAGTECH.NET, periodically check the wiring and connections, and address any minor issues promptly.
8. What should I do if my gas gauge is stuck on empty?
Check the fuses, wiring, and sending unit. A blown fuse or a faulty sending unit are common causes for a gas gauge stuck on empty.
9. When should I replace my fuel gauge sending unit?
Replace your fuel gauge sending unit if it provides incorrect resistance values or if it’s physically damaged. Proper diagnosis using a multimeter from CARDIAGTECH.NET is crucial before replacement.
10. What is the role of scan tools in diagnosing fuel gauge issues?
Scan tools from CARDIAGTECH.NET can provide valuable diagnostic information by checking for fault codes related to the fuel gauge or sending unit and displaying real-time data from the fuel level sensor.