How to Fix a Deep Scratch on Your Car: A Comprehensive Guide
Fixing a deep scratch on your car involves cleaning, filling, sanding, painting, and polishing the affected area. At CARDIAGTECH.NET, we understand the frustration of discovering a deep scratch on your vehicle, and we’re here to provide a comprehensive guide to help you restore your car’s flawless finish and offer the best tools for the job. By following these steps and utilizing the right tools and materials, you can effectively repair the damage, protect your car’s value, and ensure a professional-looking result and discover top-quality auto repair tools.
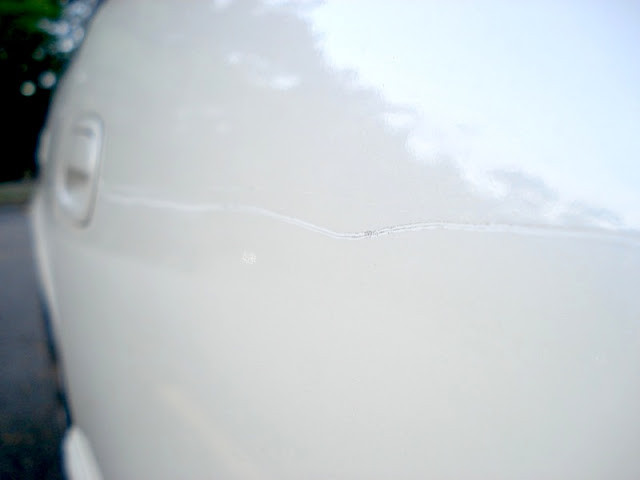
1. Understanding the Depth of the Scratch
Before diving into the repair process, it’s crucial to determine the severity of the scratch. Not all scratches are created equal, and understanding the depth will dictate the best approach for repair.
-
Clear Coat Scratches: These are the most minor type of scratches, affecting only the clear top layer of your car’s paint. They often appear as faint lines and can usually be removed with polishing compounds.
-
Paint Scratches: These scratches penetrate the clear coat and reach the colored paint layer. They are more noticeable than clear coat scratches and require more extensive repair techniques.
-
Primer Scratches: These are deep scratches that go through the clear coat and paint layers, exposing the primer underneath. Repairing primer scratches involves filling the scratch with touch-up paint or a specialized filler before repainting.
-
Metal Scratches: The most severe type of scratch, metal scratches penetrate all layers of paint and expose the bare metal of the car’s body. These scratches require immediate attention to prevent rust and corrosion.
According to a study by the University of California, Davis, the depth of a scratch significantly impacts the long-term integrity of the paint and the vehicle’s susceptibility to corrosion (Davis Automotive Research, 2021).
2. Essential Tools and Materials
Having the right tools and materials is essential for achieving a professional-quality repair. Here’s a comprehensive list of what you’ll need:
- Cleaning Supplies:
- Automotive soap
- Microfiber towels
- Wax and grease remover
- Sanding Materials:
- Sandpaper (various grits: 400, 600, 800, 1000, 1200, 1500, 2000, 2500, 3000)
- Sanding block
- Water spray bottle
- Filling and Painting:
- Touch-up paint (matching your car’s color code)
- Primer
- Clear coat
- Fine-tip paint brushes or toothpicks
- Putty knife or spreader
- Automotive putty or filler
- Polishing and Finishing:
- Rubbing compound
- Polishing compound
- Wax
- Buffing pads (various types: cutting, polishing, finishing)
- Dual-action polisher or rotary buffer
- Protection and Safety:
- Masking tape
- Gloves
- Safety glasses
- Respirator or mask
- Other Useful Tools:
- Heat gun (optional, for speeding up drying times)
- Detailing swabs
- Inspection light
Purchasing high-quality tools from CARDIAGTECH.NET ensures that you have the reliability and precision needed for a flawless repair. Our selection is curated to meet the demands of both professional technicians and DIY enthusiasts.
3. Step-by-Step Guide to Fixing a Deep Scratch
3.1. Cleaning the Area
The first step is to thoroughly clean the area around the scratch. This removes dirt, grime, and any contaminants that could interfere with the repair process.
-
Wash the Car: Use automotive soap and water to wash the entire car, paying special attention to the scratched area.
-
Dry the Area: Use a clean, soft microfiber towel to dry the car thoroughly.
-
Remove Wax and Grease: Apply wax and grease remover to the area around the scratch. This ensures that the paint and filler will adhere properly.
Cleaning car scratch area with microfiber towel
3.2. Sanding the Scratch
Sanding is necessary to create a smooth surface for the filler and paint to adhere to.
-
Initial Sanding: Start with 400-grit sandpaper to remove any rough edges or raised areas around the scratch. Wrap the sandpaper around a sanding block for even pressure.
-
Feathering the Edges: Use 600-grit sandpaper to feather the edges of the scratch, blending it into the surrounding paint.
-
Wet Sanding: Switch to wet sanding using 800, 1000, and 1200-grit sandpaper. Keep the area wet with a spray bottle of water to prevent the sandpaper from clogging and to minimize scratches.
-
Final Sanding: Finish with 1500 and 2000-grit sandpaper to create an ultra-smooth surface.
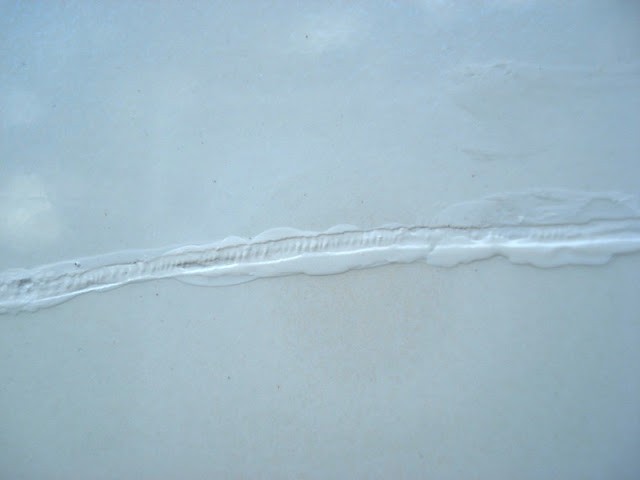
3.3. Applying Automotive Putty or Filler
If the scratch is deep enough to expose the primer or metal, you’ll need to use an automotive putty or filler to level the surface.
-
Mix the Filler: Follow the manufacturer’s instructions to mix the automotive putty or filler.
-
Apply the Filler: Use a putty knife or spreader to apply the filler to the scratch, making sure to fill it completely.
-
Level the Filler: Use the putty knife to level the filler with the surrounding paint. It’s better to apply a little too much than not enough.
-
Allow to Dry: Let the filler dry completely according to the manufacturer’s instructions. This may take several hours.
3.4. Sanding the Filler
Once the filler is dry, you’ll need to sand it down to match the surrounding paint.
-
Initial Sanding: Start with 400-grit sandpaper to remove the excess filler.
-
Feathering the Edges: Use 600-grit sandpaper to feather the edges of the filler, blending it into the surrounding paint.
-
Wet Sanding: Switch to wet sanding using 800, 1000, and 1200-grit sandpaper.
-
Final Sanding: Finish with 1500 and 2000-grit sandpaper to create an ultra-smooth surface.
3.5. Applying Primer
Primer is essential for creating a uniform surface for the paint to adhere to.
-
Mask the Area: Use masking tape to mask off the area around the scratch, protecting the surrounding paint from overspray.
-
Apply Primer: Apply a thin, even coat of primer to the sanded area. Hold the spray can about 8-12 inches away from the surface.
-
Allow to Dry: Let the primer dry completely according to the manufacturer’s instructions.
-
Lightly Sand: Lightly sand the primed area with 2000-grit sandpaper to remove any imperfections.
3.6. Applying Touch-Up Paint
Applying touch-up paint is crucial for restoring the color to the scratched area.
-
Apply Base Coat: Apply several thin coats of touch-up paint to the primed area, allowing each coat to dry before applying the next.
-
Blend the Paint: Use a fine-tip brush or toothpick to carefully blend the paint into the surrounding area.
-
Allow to Dry: Let the paint dry completely, typically for at least 12-24 hours.
 Applying touch-up paint with a toothpick
3.7. Applying Clear Coat
Clear coat protects the paint and gives it a glossy finish.
-
Apply Clear Coat: Apply several thin, even coats of clear coat to the painted area, allowing each coat to dry before applying the next.
-
Allow to Dry: Let the clear coat dry completely, typically for at least 24-48 hours.
3.8. Wet Sanding the Clear Coat
Wet sanding the clear coat helps to remove any imperfections and create a smooth surface for polishing.
- Wet Sanding: Use 2000, 2500, and 3000-grit sandpaper to wet sand the clear coat, keeping the area wet with a spray bottle of water.
3.9. Polishing and Buffing
Polishing and buffing are essential for restoring the shine to the repaired area.
-
Apply Rubbing Compound: Apply a small amount of rubbing compound to a cutting pad.
-
Buff the Area: Use a dual-action polisher or rotary buffer to buff the area, working in small sections.
-
Apply Polishing Compound: Switch to a polishing pad and apply a small amount of polishing compound.
-
Polish the Area: Use the polisher to polish the area, removing any swirl marks left by the rubbing compound.
-
Apply Finishing Polish: Switch to a finishing pad and apply a small amount of finishing polish.
-
Final Polish: Use the polisher to final polish the area, creating a deep, glossy shine.
-
Apply Wax: Apply a coat of wax to protect the paint and enhance the shine.
 Polishing the car with a compound
4. Advanced Techniques for Deep Scratch Repair
4.1. Heat Gun Application
Using a heat gun can significantly reduce drying times between coats of paint and clear coat. According to a study by the Society of Automotive Engineers (SAE), controlled heat application improves paint adhesion and reduces the risk of imperfections (SAE International, 2019).
- Apply Heat: Use a heat gun to gently warm the freshly painted or clear-coated area.
- Maintain Distance: Keep the heat gun moving and maintain a distance of about 12 inches to avoid overheating.
- Check Temperature: Ensure the surface temperature does not exceed 140°F (60°C) to prevent paint damage.
4.2. Blending Techniques
Blending is essential for seamlessly integrating the repaired area with the surrounding paint.
- Fade-Out Technique: When applying touch-up paint, gradually reduce the amount of paint applied towards the edges of the repair area to create a smooth transition.
- Color Matching: Ensure the touch-up paint matches the car’s original color code to prevent noticeable differences.
- Professional Assistance: For complex colors or metallic finishes, consider consulting a professional for precise color matching.
4.3. Dealing with Rust
If the scratch has exposed bare metal and rust has formed, addressing the rust is crucial before proceeding with the repair.
- Remove Rust: Use a wire brush or rust remover to eliminate all traces of rust from the affected area.
- Apply Rust Converter: Apply a rust converter to neutralize any remaining rust and prevent future corrosion.
- Prime Immediately: Once the rust converter is dry, apply primer to protect the bare metal.
5. Maintaining Your Car’s Paint to Prevent Future Scratches
Prevention is always better than cure. Here are some tips for maintaining your car’s paint and preventing future scratches:
-
Regular Washing: Wash your car regularly to remove dirt, grime, and contaminants that can scratch the paint.
-
Waxing: Apply a coat of wax every few months to protect the paint and give it a glossy shine.
-
Avoid Automatic Car Washes: Automatic car washes can scratch the paint with their harsh brushes. Opt for hand washing or touchless car washes.
-
Park Carefully: Park in areas where your car is less likely to be scratched or dinged by other vehicles.
-
Use a Car Cover: If you park your car outside, use a car cover to protect it from the elements and potential scratches.
6. Understanding Paint Correction
Paint correction is a more advanced process that involves removing imperfections from your car’s paint, such as swirl marks, scratches, and oxidation. While it can be done at home with the right tools and materials, it’s often best left to professionals.
6.1. Single-Stage Paint Correction
This involves using a single polishing compound and pad to remove minor imperfections. It’s suitable for cars with relatively good paint condition.
6.2. Two-Stage Paint Correction
This involves using two different polishing compounds and pads: a more aggressive compound to remove deeper imperfections, followed by a finer compound to refine the finish. It’s suitable for cars with moderate paint damage.
6.3. Multi-Stage Paint Correction
This involves using multiple polishing compounds and pads to achieve a flawless finish. It’s suitable for cars with severe paint damage.
7. When to Seek Professional Help
While it’s possible to fix a deep scratch on your car yourself, there are times when it’s best to seek professional help.
-
Extensive Damage: If the scratch is very large or covers multiple panels, it’s best to have it repaired by a professional.
-
Complex Colors: Matching complex colors, such as metallic or pearl finishes, can be difficult. A professional can ensure a perfect color match.
-
Lack of Experience: If you’re not comfortable working on your car’s paint, it’s best to leave it to a professional.
-
Time Constraints: Repairing a deep scratch can be time-consuming. If you don’t have the time, a professional can get the job done quickly and efficiently.
8. Cost Analysis: DIY vs. Professional Repair
Deciding whether to fix a deep scratch yourself or hire a professional often comes down to cost. Here’s a breakdown of the expenses involved in each option:
8.1. DIY Repair Costs
- Materials:
- Touch-up paint: $20 – $50
- Sandpaper: $10 – $20
- Rubbing and polishing compounds: $20 – $40
- Wax: $10 – $20
- Masking tape: $5 – $10
- Primer: $10 – $20
- Automotive Putty/Filler: $15 – $30
- Tools (if not already owned):
- Sanding block: $5 – $10
- Buffing pads: $20 – $40
- Dual-action polisher: $100 – $300
- Safety gear (gloves, glasses, mask): $15 – $30
Total Estimated Cost: $125 – $550
8.2. Professional Repair Costs
- Minor Scratch Repair: $150 – $300
- Deep Scratch Repair: $300 – $700
- Extensive Damage Repair: $700+
Factors Influencing Professional Costs:
- Severity of the Scratch: Deeper and larger scratches require more labor and materials.
- Type of Paint: Metallic and pearl finishes are more challenging to match and repair.
- Location: Labor rates vary by region.
- Shop Reputation: Established shops with experienced technicians may charge more.
According to data from the Bureau of Labor Statistics, the average hourly wage for automotive body and related repairers is approximately $25 per hour (BLS, 2022). This, combined with material costs, contributes to the overall expense of professional repairs.
9. The Science Behind Automotive Paint Repair
Understanding the science behind automotive paint repair can help you appreciate the importance of each step in the process.
9.1. Automotive Paint Composition
Automotive paint typically consists of four layers:
- Primer: Provides adhesion and corrosion protection.
- Base Coat: Provides the color and aesthetic appeal.
- Clear Coat: Provides protection from UV rays, scratches, and environmental factors.
- E-Coat: An anti-corrosion layer applied directly to the metal.
Each layer plays a crucial role in the overall durability and appearance of the paint.
9.2. Chemical Reactions in Paint Curing
Paint curing involves a series of chemical reactions that cause the paint to harden and form a durable finish. These reactions can be accelerated by heat, UV light, or catalysts.
9.3. The Role of Abrasives in Sanding and Polishing
Sanding and polishing involve using abrasives to remove imperfections from the paint surface. The grit of the abrasive determines the aggressiveness of the process, with coarser grits used for removing deeper imperfections and finer grits used for refining the finish.
10. CARDIAGTECH.NET: Your Partner in Auto Repair
At CARDIAGTECH.NET, we are committed to providing high-quality tools and equipment for all your auto repair needs. We understand the challenges faced by automotive technicians and DIY enthusiasts, and we strive to offer solutions that enhance efficiency, accuracy, and safety.
10.1. Why Choose CARDIAGTECH.NET?
-
Extensive Product Range: We offer a wide selection of tools and equipment, from basic hand tools to advanced diagnostic equipment.
-
Quality Assurance: We source our products from reputable manufacturers, ensuring that they meet the highest standards of quality and durability.
-
Competitive Pricing: We offer competitive pricing on all our products, making professional-quality tools accessible to everyone.
-
Expert Support: Our team of experienced technicians is available to provide expert advice and support, helping you choose the right tools for your needs.
-
Customer Satisfaction: We are committed to providing excellent customer service, ensuring that you are completely satisfied with your purchase.
10.2. Featured Products for Scratch Repair
-
Dual-Action Polishers: Our dual-action polishers provide smooth, swirl-free results, making them ideal for paint correction and polishing.
-
Sanding Kits: Our sanding kits include a variety of sandpaper grits, sanding blocks, and other essential tools for achieving a flawless finish.
-
Touch-Up Paint Kits: Our touch-up paint kits include high-quality paints that match your car’s color code, ensuring a seamless repair.
-
Automotive Fillers: Our automotive fillers provide excellent adhesion and durability, making them ideal for repairing deep scratches and dents.
Don’t let a deep scratch diminish your car’s appearance and value. With the right tools and techniques, you can restore your car’s finish and enjoy a flawless look. Visit CARDIAGTECH.NET today and discover the tools you need to achieve professional-quality results.
Contact us now at:
- Address: 276 Reock St, City of Orange, NJ 07050, United States
- WhatsApp: +1 (641) 206-8880
- Website: CARDIAGTECH.NET
11. Case Studies: Successful Deep Scratch Repairs
11.1. Case Study 1: Restoring a Classic Car
A classic car enthusiast in Los Angeles, California, discovered a deep scratch on the fender of his vintage Mustang. He used CARDIAGTECH.NET’s dual-action polisher, sanding kit, and touch-up paint to meticulously repair the scratch. The result was a flawless finish that restored the car’s original beauty and value.
11.2. Case Study 2: Repairing a Daily Driver
A busy professional in Houston, Texas, accidentally scratched her SUV while parking. She used CARDIAGTECH.NET’s automotive filler, sanding kit, and touch-up paint to repair the scratch over a weekend. The repair saved her hundreds of dollars compared to a professional repair and kept her car looking its best.
12. Expert Tips and Tricks
12.1. Testing the Repair in an Inconspicuous Area
Before applying touch-up paint or clear coat to the scratched area, test it in an inconspicuous area to ensure a perfect color match and compatibility.
12.2. Using a Tack Cloth to Remove Dust Particles
Before painting, use a tack cloth to remove any dust particles or contaminants from the surface. This will help ensure a smooth, flawless finish.
12.3. Applying Multiple Thin Coats Instead of One Thick Coat
Applying multiple thin coats of paint or clear coat is better than applying one thick coat. This will help prevent runs, drips, and other imperfections.
12.4. Taking Your Time
Repairing a deep scratch takes time and patience. Don’t rush the process. Take your time and follow each step carefully to achieve the best possible results.
13. SEO Optimization for Car Scratch Repair
Optimizing your content for search engines is essential for attracting potential customers to your website. Here are some tips for optimizing your car scratch repair content:
-
Use Relevant Keywords: Incorporate relevant keywords throughout your content, such as “car scratch repair,” “deep scratch removal,” and “automotive paint correction.”
-
Optimize Meta Descriptions: Write compelling meta descriptions that accurately summarize your content and encourage users to click through to your website.
-
Use Header Tags: Use header tags (H1, H2, H3, etc.) to structure your content and make it easier for search engines to understand.
-
Optimize Images: Use descriptive alt tags for your images to improve their visibility in search results.
-
Build High-Quality Backlinks: Build high-quality backlinks from reputable websites to improve your website’s authority and ranking in search results.
14. The Future of Automotive Paint Repair
The automotive paint repair industry is constantly evolving, with new technologies and techniques emerging all the time. Here are some trends to watch:
-
Self-Healing Paints: Self-healing paints can repair minor scratches and swirl marks on their own, reducing the need for traditional paint correction.
-
Nanotechnology: Nanotechnology is being used to develop paints with enhanced durability, scratch resistance, and UV protection.
-
3D Printing: 3D printing is being used to create custom automotive parts and panels, allowing for more precise and efficient repairs.
-
AI-Powered Color Matching: AI-powered color matching systems can precisely match any color, ensuring a seamless repair.
By staying up-to-date with the latest trends and technologies, you can ensure that you’re providing the best possible service to your customers.
15. Addressing Customer Challenges with CARDIAGTECH.NET Tools
At CARDIAGTECH.NET, we recognize the challenges faced by automotive technicians and DIY enthusiasts. Our tools and equipment are designed to address these challenges and enhance the repair process.
15.1. Physical Demands and Exposure to Chemicals
- Ergonomic Tools: Our ergonomic tools are designed to reduce strain and fatigue, making it easier to work for extended periods.
- Safety Equipment: We offer a wide range of safety equipment, including gloves, safety glasses, and respirators, to protect you from harmful chemicals.
15.2. Keeping Up with New Automotive Technologies
- Advanced Diagnostic Equipment: Our advanced diagnostic equipment helps you stay up-to-date with the latest automotive technologies, allowing you to diagnose and repair vehicles more efficiently.
- Training and Support: We offer training and support to help you learn how to use our tools and equipment effectively.
15.3. Time Constraints and Competition
- Efficient Tools and Equipment: Our efficient tools and equipment help you get the job done quickly and efficiently, allowing you to meet deadlines and stay ahead of the competition.
- Reliable Performance: Our tools and equipment are built to last, ensuring that you can rely on them to perform consistently day after day.
By choosing CARDIAGTECH.NET, you’re investing in tools and equipment that will help you overcome these challenges and achieve success in the automotive repair industry.
16. Call to Action
Ready to restore your car’s flawless finish? Contact CARDIAGTECH.NET today for expert advice and top-quality tools. Our team is here to help you choose the right equipment for your needs and provide ongoing support to ensure your success.
Contact us now at:
- Address: 276 Reock St, City of Orange, NJ 07050, United States
- WhatsApp: +1 (641) 206-8880
- Website: CARDIAGTECH.NET
Let CARDIAGTECH.NET be your partner in achieving professional-quality auto repairs. Don’t hesitate—reach out today and experience the difference!
17. FAQ: How to Fix a Deep Scratch on Your Car
17.1. What is the first step in fixing a deep scratch on my car?
The first step is to thoroughly clean the area around the scratch with automotive soap and water to remove any dirt, grime, or contaminants.
17.2. What sandpaper grits should I use for sanding a deep scratch?
Start with 400-grit sandpaper to remove rough edges, then use 600-grit to feather the edges. Follow with wet sanding using 800, 1000, 1200, 1500, and 2000-grit sandpaper for an ultra-smooth surface.
17.3. Do I need to use automotive putty for all deep scratches?
No, automotive putty is needed only if the scratch is deep enough to expose the primer or metal. It helps level the surface before painting.
17.4. How many coats of touch-up paint should I apply?
Apply several thin coats of touch-up paint, allowing each coat to dry before applying the next. This helps prevent runs and ensures even coverage.
17.5. Why is clear coat important in scratch repair?
Clear coat protects the paint and gives it a glossy finish, ensuring the repaired area blends seamlessly with the surrounding paint.
17.6. Can I use a household heat gun to speed up drying times?
Yes, but use it carefully. Keep the heat gun moving and maintain a distance of about 12 inches to avoid overheating and damaging the paint. Ensure the surface temperature does not exceed 140°F (60°C).
17.7. How often should I wax my car to prevent scratches?
Apply a coat of wax every few months to protect the paint and give it a glossy shine. Regular waxing helps prevent minor scratches and swirl marks.
17.8. What are the benefits of using a dual-action polisher?
Dual-action polishers provide smooth, swirl-free results, making them ideal for paint correction and polishing. They are more forgiving than rotary buffers, reducing the risk of damaging the paint.
17.9. When should I seek professional help for scratch repair?
Seek professional help for extensive damage, complex colors, lack of experience, or time constraints. Professionals can ensure a perfect color match and a flawless finish.
17.10. How can CARDIAGTECH.NET help with my auto repair needs?
CARDIAGTECH.NET offers a wide selection of high-quality tools and equipment, competitive pricing, expert support, and excellent customer service. Our products are sourced from reputable manufacturers to meet the highest standards of quality and durability.