**How Do You Fix Ripped Leather Car Seats: A Comprehensive Guide**
Is your car’s ripped leather seat making your ride less enjoyable? How Do You Fix Ripped Leather Car Seats? You can fix ripped leather car seats by cleaning the area, applying a leather binder, using a grain match pad, and then applying colorant. CARDIAGTECH.NET provides all the tools and products you need to restore your leather car seats to their former glory. This guide will show you a complete method with all the instructions for repairing ripped leather.
1. What Causes Leather Car Seats to Rip?
What causes leather car seats to rip? Leather car seats rip due to a combination of factors, including wear and tear, exposure to sunlight and temperature changes, lack of maintenance, and accidental damage. Understanding these causes helps in preventing future damage.
- Wear and Tear:
- Friction: Repeatedly sliding in and out of the seat causes friction, which can weaken the leather over time.
- Flexing: The constant flexing of the leather as you sit and move can lead to cracks and tears.
- Environmental Factors:
- Sunlight: UV rays from the sun can dry out and fade the leather, making it more prone to cracking.
- Temperature Changes: Extreme temperature fluctuations can cause the leather to expand and contract, leading to stress and eventual tears.
- Lack of Maintenance:
- Neglecting Cleaning: Dirt, oils, and grime can accumulate on the leather, causing it to deteriorate.
- Lack of Conditioning: Without regular conditioning, the leather can dry out and lose its elasticity.
- Accidental Damage:
- Sharp Objects: Keys, pens, or other sharp objects can puncture or scratch the leather.
- Spills: Certain liquids can stain or damage the leather if not cleaned promptly.
2. What Tools and Materials Are Needed to Fix Ripped Leather Car Seats?
What tools and materials are needed to fix ripped leather car seats? To fix ripped leather car seats, you’ll need a leather repair kit, leather cleaner, sandpaper, a colorant kit, and some basic tools. Having the right tools ensures a professional-looking repair.
| Tool/Material | Description |
|---|---|
| Leather Repair Kit | Includes leather filler, adhesive, backing fabric, and a palette knife. |
| Leather Cleaner | Used to remove dirt, oils, and grime from the leather surface. |
| Sandpaper | Fine-grit sandpaper (320-400 grit) for smoothing out rough edges and imperfections. |
| Colorant Kit | Includes leather dye or colorant to match the original color of the car seat. |
| Leather Conditioner | Applied after the repair to moisturize and protect the leather. |
| Cutting Tools | A sharp scalpel or scissors for trimming loose fibers and edges. |
| Application Tools | Sponges, brushes, or an airbrush for applying cleaner, colorant, and conditioner. |
| Protective Gear | Gloves to protect your hands and a mask to avoid inhaling fumes. |
| Sub-Patch | Provides a strong backing for the repair. Cut it to size, ensuring it completely covers the repair with an additional 1cm of material surrounding the hole |
| Leather Glue | Use a small amount of leather glue onto the spatula supplied and feed this underneath the edges of the hole to coat the underside of the leather surrounding it, taking care not to move the canvas patch |
| Heavy Filler | Use the end of the palette knife and place a thin layer into the hole over the backing patch. Make sure all the layer is very thin, just covering the sub-patch and allow 20 minutes to dry |
| Alcohol cleaner | Wipe down the leather with the alcohol cleaner, this will remove any dirt or dust from the area before moving on to the next step. |
| Leather Prep & abrasive pad | Gently rub the surface of the leather to remove any grease and oils that have accumulated. This step will also remove any loose fibers and remove the manufactured finish |
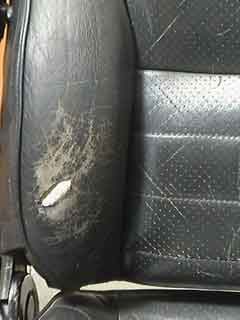
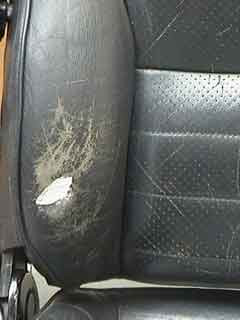
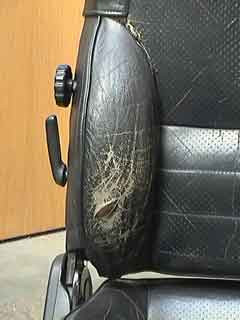
3. How to Prepare the Leather Car Seat for Repair?
How to prepare the leather car seat for repair? Preparing the leather car seat involves cleaning, removing loose fibers, and prepping the surface. This ensures the repair materials adhere properly.
- Clean the Area:
- Use a leather cleaner to thoroughly clean the area around the rip.
- Remove any dirt, oils, or grime that may interfere with the repair.
- Remove Loose Fibers:
- Use a scalpel or scissors to carefully trim any loose fibers or frayed edges around the rip.
- This will create a clean surface for the repair.
- Sand the Edges:
- Gently sand the edges of the rip with fine-grit sandpaper.
- This helps to smooth out any rough spots and create a seamless transition between the repair and the existing leather.
- Wipe with Alcohol Cleaner:
- After prepping, wipe the leather down with the alcohol cleaner.
- This will remove any dirt or dust from the area before moving on to the next step.
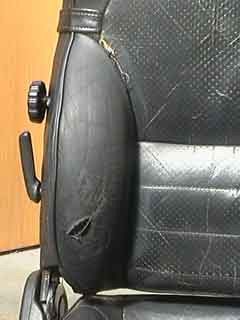
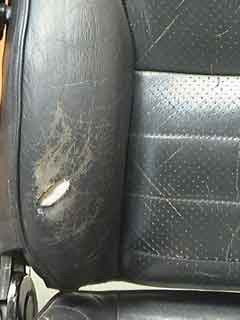
Preparing the leather car seat by cleaning and prepping
4. Step-by-Step Guide: How to Fix Ripped Leather Car Seats
How to fix ripped leather car seats using a step-by-step guide? Fixing ripped leather car seats involves applying a backing patch, filling the rip, sanding, and applying colorant. Each step is crucial for a durable and seamless repair.
- Apply a Backing Patch:
- Cut a piece of backing fabric slightly larger than the rip.
- Use tweezers to insert one side of the patch underneath the leather so that the 1cm excess is completely under the leather.
- Apply pressure to hold this in place and gently feed the patch under the remaining edges of the hole.
- When done the patch should lie flat under the repair, and the 1cm surrounding material we left should be underneath the leather on all sides.
- This provides a strong foundation for the filler.
- Apply Leather Glue:
- Put a small amount of Leather Glue onto the spatula supplied and feed this underneath the edges of the hole to coat the underside of the leather surrounding it, taking care not to move the canvas patch.
- When all edges have been glued, apply pressure to bond the leather to the patch and allow to dry.
- Fill the Rip:
- Using a palette knife, apply a thin layer of leather filler over the backing patch.
- Allow each layer to dry for about 20 minutes before applying the next. Use a hairdryer to speed up the process.
- Apply at least 5-6 thin layers to build up the filler until the filler level is built up to just below the top of the hole.
- Sand the Filled Area:
- Once the filler is completely dry, gently sand the area with fine-grit sandpaper.
- Smooth out any imperfections and blend the filler with the surrounding leather.
- Wipe the area clean with a damp cloth to remove any sanding dust.
- Apply Colorant:
- Match the colorant to the original color of the leather car seat.
- Apply the colorant in thin, even coats using a sponge, brush, or airbrush.
- Allow each coat to dry completely before applying the next.
- Apply an initial coat of colorant using one of the sponges supplied in the kit and apply a small amount of colorant to it, then rub this into the area of the repair thoroughly.
- This allows the colourant to penetrate into the creases of the leather and valleys of the grain, giving a better overall finish.
- Apply Finish:
- Using an airbrush spray as many thin coats of colour over the leather car seat to thoroughly blend in the repair.
- For the best result, ensure that each coat is very thin and is given sufficient time to cure before applying the next.
- Condition the Leather:
- Apply a leather conditioner to the repaired area.
- This will moisturize the leather, restore its elasticity, and protect it from future damage.
 Applying a backing patch for leather repair
5. How to Choose the Right Leather Repair Kit?
How to choose the right leather repair kit for your car seats? When choosing a leather repair kit, consider the type of damage, the color of your leather, and the quality of the materials included. A suitable kit ensures a lasting repair.
- Type of Damage:
- Small Rips and Tears: A basic kit with leather filler and colorant may suffice.
- Large Rips and Holes: Look for a kit with backing fabric and heavy-duty filler.
- Color Matching:
- Custom Color Matching: Some kits offer custom color matching services to ensure a perfect blend.
- Color Selection: Choose a kit with a wide range of color options to find the closest match.
- Quality of Materials:
- Filler Quality: Opt for a kit with high-quality leather filler that is flexible and durable.
- Colorant Quality: Ensure the colorant is fade-resistant and provides a long-lasting finish.
- Kit Contents:
- Comprehensive Kits: These include all the necessary tools and materials for a complete repair.
- Specialty Kits: Some kits are designed for specific types of leather or damage.
6. What Are Common Mistakes to Avoid When Fixing Leather Car Seats?
What are common mistakes to avoid when fixing leather car seats? Common mistakes include using too much filler, not allowing enough drying time, and improper color matching. Avoiding these mistakes ensures a professional-looking repair.
- Using Too Much Filler:
- Thin Layers: Apply the filler in thin, even layers to prevent cracking and shrinking.
- Avoid Overfilling: Do not overfill the rip, as this can create an uneven surface.
- Insufficient Drying Time:
- Allow Proper Drying: Allow each layer of filler and colorant to dry completely before proceeding to the next step.
- Use a Hair Dryer: Speed up the drying process with a hair dryer on a low setting.
- Improper Color Matching:
- Test the Color: Test the colorant on an inconspicuous area before applying it to the entire repair.
- Adjust as Needed: Adjust the color as needed to achieve a perfect match.
- Skipping Preparation:
- Thorough Cleaning: Always clean and prepare the leather surface before starting the repair.
- Remove Loose Fibers: Trim any loose fibers or frayed edges for a smooth finish.
 Filling the hole with leather filler in thin layers
7. How to Maintain Leather Car Seats to Prevent Rips?
How to maintain leather car seats to prevent rips? Regular cleaning, conditioning, and protecting your leather car seats can prevent rips and extend their lifespan. Consistent maintenance keeps your seats looking new.
- Regular Cleaning:
- Gentle Cleaner: Use a pH-balanced leather cleaner to remove dirt and grime.
- Soft Cloth: Wipe the seats with a soft, damp cloth to avoid scratching the leather.
- Conditioning:
- Leather Conditioner: Apply a leather conditioner every 1-3 months to keep the leather moisturized.
- Proper Application: Follow the manufacturer’s instructions for applying the conditioner.
- Protection from Sunlight:
- Park in the Shade: Park your car in the shade or use a sunshade to protect the seats from UV rays.
- Window Tinting: Consider window tinting to reduce the amount of sunlight entering the car.
- Avoid Sharp Objects:
- Be Careful: Be mindful of sharp objects that could puncture or scratch the leather.
- Empty Pockets: Remove keys, pens, and other sharp items from your pockets before sitting down.
- Promptly Clean Spills:
- Act Quickly: Clean up spills immediately to prevent staining and damage.
- Blot, Don’t Rub: Blot the spill with a clean cloth instead of rubbing, which can spread the stain.
8. Can You Use Household Products to Fix Leather Car Seats?
Can you use household products to fix leather car seats instead of professional kits? It’s generally not recommended to use household products, as they can cause further damage. Professional kits are specifically designed for leather repair.
- Leather Cleaners:
- pH-Balanced: Household cleaners may contain harsh chemicals that can damage the leather.
- Specialized Cleaners: Use a pH-balanced leather cleaner to avoid drying out or discoloring the leather.
- Conditioners:
- Avoid Oils: Household oils or lotions can leave a greasy residue and attract dirt.
- Leather Conditioners: Use a dedicated leather conditioner to moisturize and protect the leather.
- Fillers:
- Not Recommended: Household fillers are not flexible enough and can crack over time.
- Leather Fillers: Use a leather filler specifically designed for repairing leather surfaces.
- Colorants:
- Color Matching: Household dyes or paints are unlikely to match the original color of the leather.
- Leather Colorants: Use a leather colorant designed for automotive leather for best results.
9. How Long Does It Take to Fix Ripped Leather Car Seats?
How long does it take to fix ripped leather car seats? The time it takes to fix ripped leather car seats depends on the size and severity of the damage. A small rip might take a few hours, while a large tear could take a full day.
- Small Rips and Tears:
- Preparation: 30 minutes
- Repair: 1-2 hours
- Total Time: 1.5-2.5 hours
- Medium Rips:
- Preparation: 45 minutes
- Repair: 2-3 hours
- Total Time: 2.75-3.75 hours
- Large Rips and Holes:
- Preparation: 1 hour
- Repair: 4-6 hours
- Total Time: 5-7 hours
 Adding more layers of filler to the leather seat
10. Is It Worth Fixing Ripped Leather Car Seats or Should You Replace Them?
Is it worth fixing ripped leather car seats, or should you replace them? Fixing ripped leather car seats is often more cost-effective than replacing them, especially for minor damage. However, extensive damage may warrant replacement.
- Cost:
- Repair Cost: A leather repair kit typically costs between $30 and $100.
- Replacement Cost: Replacing leather car seats can cost several hundred to several thousand dollars, depending on the make and model of the car.
- Severity of Damage:
- Minor Damage: Small rips, tears, and scratches can be easily repaired with a repair kit.
- Extensive Damage: Large holes, significant wear, and multiple damage points may be better addressed with replacement.
- DIY vs. Professional Repair:
- DIY Repair: If you’re comfortable with DIY projects, repairing the seats yourself can save money.
- Professional Repair: For more complex repairs or if you want a guaranteed result, consider hiring a professional.
- Vehicle Value:
- High-Value Vehicle: Maintaining the original leather seats can preserve the value of a high-end vehicle.
- Lower-Value Vehicle: Repairing the seats may be a more economical option for older or less valuable cars.
11. How to Find a Professional Leather Repair Service?
How to find a professional leather repair service for your car seats? Finding a professional leather repair service involves checking online reviews, asking for recommendations, and verifying their expertise. A reputable service ensures a high-quality repair.
- Online Reviews:
- Check Reviews: Look for online reviews on sites like Google, Yelp, and Better Business Bureau.
- Read Testimonials: Read testimonials to get an idea of the quality of their work and customer service.
- Recommendations:
- Ask Friends: Ask friends, family, or colleagues for recommendations.
- Local Mechanics: Local mechanics or car dealerships may be able to recommend a reputable leather repair service.
- Verify Expertise:
- Experience: Choose a service with years of experience in leather repair.
- Certifications: Check if they have any certifications or affiliations with professional organizations.
- Ask for Estimates:
- Compare Quotes: Get estimates from multiple services to compare prices and services offered.
- Detailed Estimate: Ensure the estimate includes a breakdown of costs for materials and labor.
- Check Portfolio:
- Before and After Photos: Ask to see before and after photos of their previous work.
- Quality of Work: Assess the quality of their repairs and attention to detail.
12. What Types of Leather Are Used in Car Seats?
What types of leather are commonly used in car seats? Common types of leather used in car seats include full-grain, top-grain, and bonded leather. Each type offers different levels of quality, durability, and cost.
- Full-Grain Leather:
- Highest Quality: Full-grain leather is the highest quality leather, made from the entire hide.
- Durability: It is very durable and develops a patina over time.
- Cost: It is the most expensive type of leather.
- Top-Grain Leather:
- Quality: Top-grain leather is made from the top layer of the hide, but it is sanded and finished to remove imperfections.
- Durability: It is less durable than full-grain leather but still offers good quality.
- Cost: It is more affordable than full-grain leather.
- Bonded Leather:
- Lowest Quality: Bonded leather is made from leftover scraps of leather that are bonded together.
- Durability: It is the least durable type of leather and prone to cracking and peeling.
- Cost: It is the most affordable type of leather.
- Faux Leather (Leatherette):
- Synthetic Material: Faux leather is a synthetic material that mimics the look and feel of real leather.
- Durability: It is durable and easy to clean.
- Cost: It is more affordable than real leather.
13. How to Protect Repaired Leather Car Seats?
How to protect repaired leather car seats after fixing them? Protecting repaired leather car seats involves regular conditioning, using seat covers, and avoiding harsh chemicals. These measures ensure the repair lasts longer.
- Regular Conditioning:
- Maintain Moisture: Apply a leather conditioner every 1-3 months to keep the leather moisturized and prevent cracking.
- Quality Conditioner: Use a high-quality leather conditioner recommended for automotive leather.
- Use Seat Covers:
- Protect from Wear: Use seat covers to protect the leather from daily wear and tear, spills, and sunlight.
- Choose the Right Covers: Choose seat covers made from breathable materials to prevent moisture buildup.
- Avoid Harsh Chemicals:
- Gentle Cleaners: Use gentle, pH-balanced leather cleaners to avoid damaging the leather.
- Avoid Solvents: Avoid using harsh chemicals, solvents, or abrasive cleaners.
- Park in the Shade:
- Protect from UV Rays: Park your car in the shade or use a sunshade to protect the seats from UV rays, which can cause fading and cracking.
- Regular Cleaning:
- Remove Dirt: Regularly clean the seats to remove dirt, oils, and grime that can accumulate and damage the leather.
 Applying the final layer of filler
14. Can Climate Affect Leather Car Seats?
Can climate affect leather car seats, leading to rips and damage? Yes, climate significantly affects leather car seats. Extreme temperatures, humidity, and sunlight can all contribute to the deterioration of leather.
- Hot Climates:
- Drying and Cracking: High temperatures can dry out the leather, causing it to crack and fade.
- UV Damage: Intense sunlight can damage the leather, leading to discoloration and weakening.
- Cold Climates:
- Stiffness and Cracking: Cold temperatures can make the leather stiff and brittle, increasing the risk of cracking.
- Moisture Damage: In snowy or wet conditions, moisture can seep into the leather and cause damage.
- Humid Climates:
- Mold and Mildew: High humidity can promote the growth of mold and mildew on the leather.
- Stickiness: Leather can become sticky and uncomfortable in humid conditions.
- Dry Climates:
- Dehydration: Dry air can dehydrate the leather, leading to cracking and splitting.
- Increased Wear: Lack of moisture can make the leather more susceptible to wear and tear.
- Temperature Fluctuations:
- Expansion and Contraction: Frequent temperature changes can cause the leather to expand and contract, leading to stress and eventual damage.
15. How to Handle Different Types of Rips in Leather Car Seats?
How to handle different types of rips in leather car seats? Different types of rips, such as small tears, large tears, and punctures, require different repair techniques. Understanding the type of damage is essential for effective repair.
- Small Tears:
- Cleaning: Clean the area around the tear with a leather cleaner.
- Adhesive: Apply leather adhesive to the edges of the tear and press them together.
- Filler: Use a small amount of leather filler to smooth out the surface.
- Colorant: Apply colorant to match the original color of the leather.
- Large Tears:
- Backing Patch: Apply a backing patch underneath the tear for support.
- Leather Glue: Glue the edges of the tear to the backing patch.
- Filler: Fill the tear with multiple thin layers of leather filler.
- Sanding: Sand the filled area smooth.
- Colorant: Apply colorant to blend the repair with the surrounding leather.
- Punctures:
- Cleaning: Clean the area around the puncture.
- Backing Patch: Insert a small backing patch into the puncture.
- Filler: Fill the puncture with leather filler.
- Sanding: Sand the filled area smooth.
- Colorant: Apply colorant to match the original color of the leather.
- Scratches:
- Cleaning: Clean the scratched area.
- Conditioner: Apply leather conditioner to hydrate the leather.
- Scratch Repair Kit: Use a scratch repair kit to fill in the scratches.
- Colorant: Apply colorant to blend the repair with the surrounding leather.
16. Are There Eco-Friendly Leather Repair Options?
Are there eco-friendly leather repair options available? Yes, several eco-friendly leather repair options are available, including water-based products and natural leather conditioners. These options reduce environmental impact.
- Water-Based Products:
- Low VOC: Look for water-based leather cleaners, conditioners, and colorants with low volatile organic compounds (VOCs).
- Biodegradable: Choose products that are biodegradable and environmentally friendly.
- Natural Leather Conditioners:
- Natural Oils: Opt for leather conditioners made with natural oils such as beeswax, lanolin, or coconut oil.
- Avoid Harmful Chemicals: Avoid conditioners that contain harsh chemicals, synthetic fragrances, or petroleum-based ingredients.
- Recycled Materials:
- Recycled Leather: Consider using recycled leather or leather scraps for backing patches and filler materials.
- Sustainable Practices: Support companies that use sustainable manufacturing practices and eco-friendly packaging.
- DIY Solutions:
- Homemade Cleaners: Make your own leather cleaner using mild soap and water.
- Natural Conditioners: Use natural oils like olive oil or almond oil as a leather conditioner.
- Professional Services:
- Eco-Friendly Services: Look for professional leather repair services that use eco-friendly products and practices.
- Green Initiatives: Support businesses that have green initiatives and prioritize environmental sustainability.
17. How Does the Color of Your Car Seat Affect the Repair Process?
How does the color of your car seat affect the repair process? The color of your car seat significantly affects the repair process, as you need to match the colorant precisely to achieve a seamless repair. Darker colors are generally easier to match than lighter ones.
- Color Matching:
- Importance of Matching: Accurate color matching is crucial for a seamless repair.
- Custom Color Matching: Some leather repair kits offer custom color matching services to ensure a perfect blend.
- Color Charts: Use color charts or swatches to find the closest match to your car seat’s color.
- Dark Colors:
- Easier to Match: Dark colors like black, dark brown, and dark gray are generally easier to match.
- Less Noticeable Imperfections: Minor imperfections in the color match are less noticeable with darker colors.
- Light Colors:
- Difficult to Match: Light colors like beige, tan, and light gray are more challenging to match.
- Highly Visible Imperfections: Any imperfections in the color match are highly visible with lighter colors.
- Two-Tone Seats:
- Multiple Colors: For two-tone seats, you’ll need to match multiple colors and blend them seamlessly.
- Professional Help: Consider seeking professional help for complex color matching on two-tone seats.
- Fading and Discoloration:
- Address Fading: If the leather has faded or discolored over time, you may need to address the fading before applying the colorant.
- Uniform Color: Apply a base coat of colorant to create a uniform color before applying the final coat.
18. What Are the Best Brands for Leather Repair Kits?
What are the best brands for leather repair kits that you can buy? Several reputable brands offer high-quality leather repair kits. Researching and choosing a well-regarded brand ensures you get reliable products.
- Furniture Clinic:
- High-Quality Products: Furniture Clinic is known for its high-quality leather repair products and comprehensive kits.
- Wide Range of Products: They offer a wide range of products for various types of leather damage.
- Leather Magic:
- Professional-Grade Kits: Leather Magic offers professional-grade leather repair kits that are popular among auto detailers and repair shops.
- Color Matching Services: They provide color matching services to ensure a perfect blend.
- Coconix:
- Easy-to-Use Kits: Coconix offers easy-to-use leather repair kits that are suitable for beginners.
- Versatile Products: Their products are versatile and can be used on various types of leather.
- FORTIVO:
- Affordable Options: FORTIVO provides affordable leather repair kits that offer good value for money.
- DIY Friendly: Their kits are designed for DIY enthusiasts and come with detailed instructions.
- 3M:
- Trusted Brand: 3M is a trusted brand in the automotive industry and offers a range of leather repair products.
- Durable Repairs: Their products are known for their durability and long-lasting repairs.
- Gliptone:
- Specialized Products: Gliptone specializes in leather care and repair products for automotive applications.
- Restoration Kits: They offer restoration kits for restoring old and damaged leather interiors.
For all your leather car seat repair needs, visit CARDIAGTECH.NET at 276 Reock St, City of Orange, NJ 07050, United States, or contact us via WhatsApp at +1 (641) 206-8880.
Adding more layers of filler to the leather seat
19. How to Improve the Longevity of Your Car Seat Repair
How to improve the longevity of your car seat repair after fixing the damage? To improve the longevity of your car seat repair, protect it from wear and tear, maintain the leather, and address any minor issues promptly.
- Protect from Wear and Tear:
- Seat Covers: Use seat covers to shield the repaired area from daily wear and tear, spills, and sharp objects.
- Careful Use: Avoid sliding in and out of the seat, which can cause friction and wear down the repair.
- Maintain the Leather:
- Regular Cleaning: Clean the leather regularly with a pH-balanced leather cleaner to remove dirt and grime.
- Conditioning: Apply a leather conditioner every 1-3 months to keep the leather moisturized and prevent cracking.
- Address Minor Issues Promptly:
- Inspect Regularly: Regularly inspect the repaired area for any signs of wear or damage.
- Touch-Ups: Address any minor issues, such as small scratches or fading, with touch-up colorant or repair kits.
- Avoid Extreme Temperatures:
- Park in the Shade: Park your car in the shade or use a sunshade to protect the seats from extreme temperatures and UV rays.
- Climate Control: Use climate control to maintain a consistent temperature inside the car.
- Professional Maintenance:
- Routine Check-Ups: Schedule routine maintenance with a professional leather repair service to address any potential issues.
- Expert Advice: Seek expert advice on the best practices for maintaining your repaired leather car seats.
20. Is Leather Car Seat Repair a DIY Task, or Should You Call a Professional?
Is leather car seat repair best as a DIY task, or should you call a professional for fixing it? Whether leather car seat repair is a DIY task or requires a professional depends on your skills, the complexity of the damage, and your desired outcome.
- DIY Repair:
- Simple Repairs: DIY repair is suitable for small rips, tears, scratches, and minor damage.
- Cost-Effective: DIY repair can save money compared to hiring a professional.
- Tools and Kits: DIY repair requires purchasing leather repair kits and tools.
- Time and Effort: DIY repair requires time, patience, and attention to detail.
- Professional Repair:
- Complex Repairs: Professional repair is recommended for large tears, extensive damage, and complex repairs.
- Expertise and Experience: Professionals have the expertise and experience to achieve a high-quality repair.
- Specialized Tools: Professionals have access to specialized tools and equipment.
- Guaranteed Results: Professional repair services often offer guarantees on their work.
- Higher Cost: Professional repair services come at a higher cost.
For professional assistance and high-quality tools, contact CARDIAGTECH.NET at 276 Reock St, City of Orange, NJ 07050, United States, or via WhatsApp at +1 (641) 206-8880.
Don’t let ripped leather car seats ruin your driving experience. With the right tools and techniques from CARDIAGTECH.NET, you can restore your car seats to their original condition. Contact us today to learn more and get started!
 Before and after the leather repair
Ready to restore your car seats? Contact CARDIAGTECH.NET today for expert advice and the best leather repair tools. Our team is ready to assist you with any questions and help you find the perfect solution for your needs. Reach out via WhatsApp at +1 (641) 206-8880 or visit our website CARDIAGTECH.NET!
FAQ: How to Fix Ripped Leather Car Seats
-
What causes leather car seats to rip?
Leather car seats rip due to wear and tear, sunlight exposure, temperature changes, lack of maintenance, and accidental damage. -
What tools do I need to fix ripped leather car seats?
You’ll need a leather repair kit, leather cleaner, sandpaper, a colorant kit, and basic tools like a scalpel and palette knife. -
How do I prepare the leather car seat for repair?
Clean the area, remove loose fibers, and gently sand the edges of the rip to create a smooth surface. -
Can I use household products to fix leather car seats?
It’s not recommended, as household products can cause further damage. Use professional leather repair products. -
How long does it take to fix ripped leather car seats?
It depends on the size and severity of the damage, ranging from a few hours for small rips to a full day for large tears. -
Is it cheaper to fix or replace ripped leather car seats?
Fixing is often more cost-effective for minor damage, while replacement may be better for extensive damage. -
How can I maintain leather car seats to prevent rips?
Regularly clean and condition the leather, protect it from sunlight, and avoid sharp objects. -
How does climate affect leather car seats?
Extreme temperatures, humidity, and sunlight can all contribute to the deterioration of leather car seats. -
What should I look for in a leather repair kit?
Consider the type of damage, color matching options, and the quality of materials included in the kit. -
Can I hire a professional to fix my leather car seats?
Yes, you can find professional leather repair services by checking online reviews, asking for recommendations, and verifying their expertise.