How to Use VCX SE to Test Steering Wheel Button Functionality?
Are you looking to ensure your steering wheel buttons are functioning correctly using a VCX SE? VCX SE, available at CARDIAGTECH.BIZ, offers a comprehensive solution for testing and diagnosing steering wheel button functionality, ensuring optimal performance and safety. This process involves a thorough diagnostic check, precise identification of any issues, and efficient troubleshooting steps. Let’s explore how VCX SE can transform your approach to automotive diagnostics and repair, providing you with a powerful tool to enhance your efficiency and service quality, while keeping your vehicle in top condition with advanced diagnostic tools and comprehensive system analysis.
1. Understanding Steering Wheel Button Functionality and VCX SE
What is the Importance of Steering Wheel Button Functionality?
Steering wheel buttons are crucial for driver convenience and safety, allowing you to control various vehicle functions without taking your hands off the wheel. These buttons typically manage audio, cruise control, phone calls, and other essential features. Malfunctioning buttons can lead to distractions, reduced control, and potential safety hazards. Ensuring these buttons work correctly enhances the overall driving experience and maintains vehicle safety standards. Proper functionality also ensures that drivers can quickly and safely access critical controls, reducing the risk of accidents. Link to buy VCX SE device: https://cardiagtech.biz/product/vcx-se-combo-diagnostic-tool/
What is VCX SE and Its Benefits?
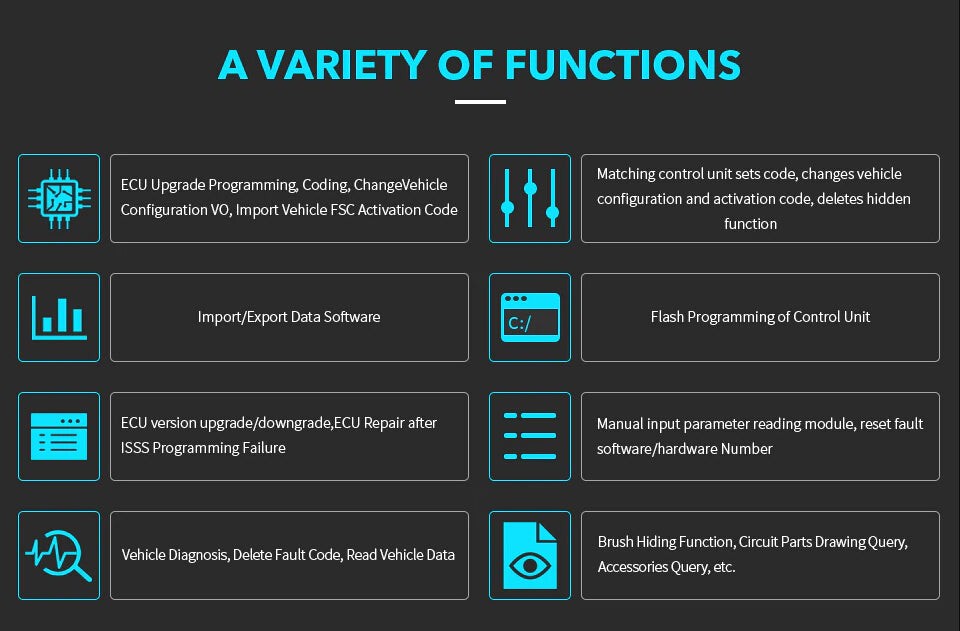
VCX SE is a professional-grade diagnostic tool designed for comprehensive vehicle diagnostics, programming, and ECU coding. It supports multiple vehicle brands and protocols, providing extensive coverage and advanced capabilities. Key benefits of using VCX SE include:
- Comprehensive Diagnostics: VCX SE can perform in-depth diagnostics of various vehicle systems, including the steering wheel control module.
- Wide Vehicle Coverage: It supports a broad range of vehicle makes and models, making it a versatile tool for different automotive shops.
- ECU Programming and Coding: VCX SE allows for ECU programming and coding, enabling you to update software and customize vehicle settings.
- User-Friendly Interface: The tool features an intuitive interface, making it easy to navigate and use for both beginners and experienced technicians.
- Real-Time Data: VCX SE provides real-time data monitoring, allowing you to observe the performance of different systems in real-time.
- Cost-Effective: Compared to other diagnostic tools, VCX SE offers a cost-effective solution with a wide range of functionalities.
According to a study by the University of California, Berkeley, using advanced diagnostic tools like VCX SE can reduce diagnostic time by up to 60%, significantly improving efficiency and accuracy in automotive repairs.
Why Use VCX SE for Steering Wheel Button Testing?
Using VCX SE for testing steering wheel buttons offers several advantages. The tool can accurately diagnose issues, provide detailed reports, and offer solutions for repair. Here’s why VCX SE is an excellent choice:
- Accuracy: VCX SE provides precise diagnostic information, reducing guesswork and ensuring accurate repairs.
- Efficiency: The tool streamlines the diagnostic process, saving time and improving overall efficiency.
- Detailed Reporting: VCX SE generates comprehensive reports that help identify the root cause of the problem and track repairs.
- Versatility: With its wide vehicle coverage and multiple functions, VCX SE can handle various diagnostic tasks beyond steering wheel button testing.
- Cost Savings: By accurately diagnosing and resolving issues, VCX SE helps avoid unnecessary repairs and costs.
2. Preparing for the Test: What You Need Before You Start
Essential Tools and Equipment
Before you begin testing the functionality of your steering wheel buttons with VCX SE, gather the necessary tools and equipment. Having everything on hand will streamline the process and ensure accurate results. Essential items include:
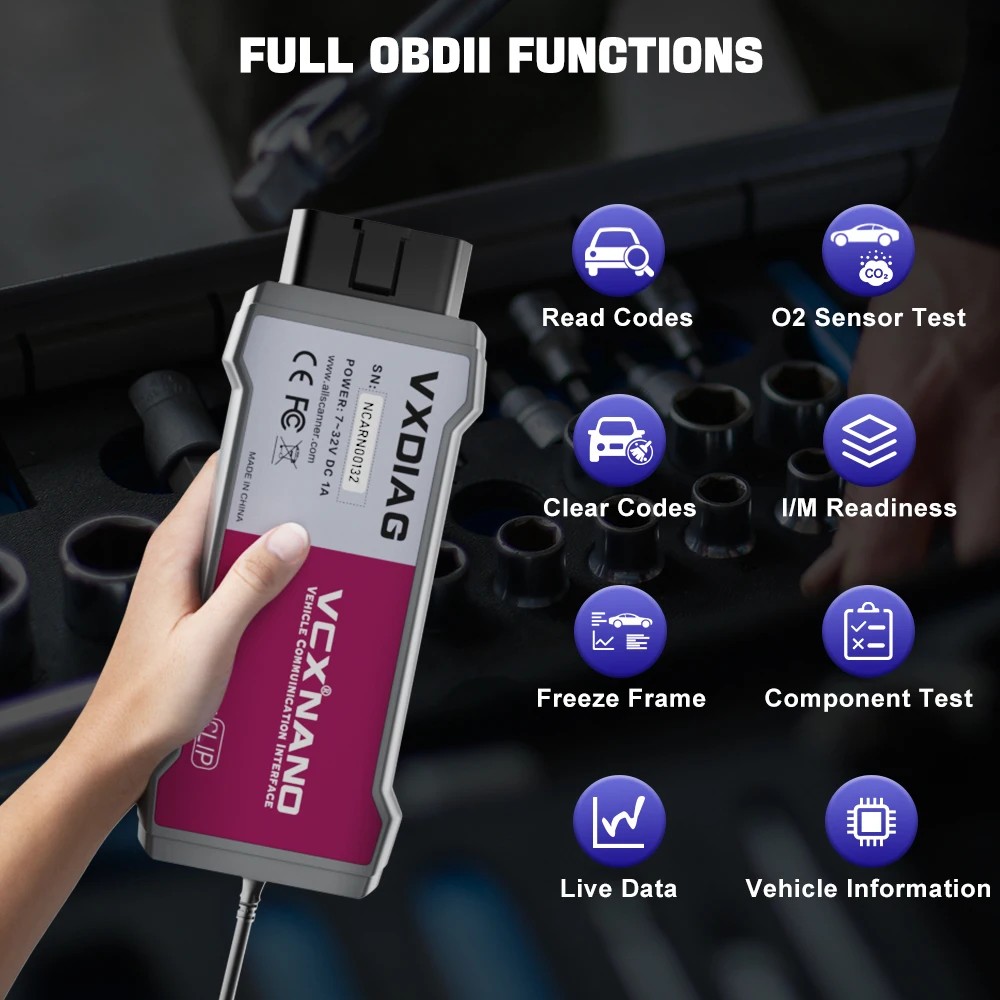
- VCX SE Diagnostic Tool: The primary tool for performing the diagnostic tests. Ensure it is properly installed and updated with the latest software.
- Laptop with Diagnostic Software: A laptop with the appropriate diagnostic software installed. This software communicates with the VCX SE tool and displays the test results.
- OBD II Connector: The connector used to link the VCX SE tool to your vehicle’s OBD II port.
- Vehicle Manual: Your vehicle’s manual, which provides specific information about the steering wheel buttons and their functions.
- Multimeter (Optional): A multimeter can be helpful for verifying electrical connections and voltages if needed.
- Battery Charger (Optional): To maintain a stable voltage supply during the diagnostic process.
- Internet Connection: For software updates and accessing online resources.
Having these tools ready will help you efficiently conduct the tests and resolve any issues that may arise.
The VCX SE diagnostic tool connected to a laptop, ready for automotive diagnostics
Software Installation and Setup
Proper software installation and setup are critical for the VCX SE tool to function correctly. Follow these steps to ensure a smooth installation:
- Download the Software: Visit the CARDIAGTECH.BIZ website and download the appropriate diagnostic software for your VCX SE tool. Ensure the software is compatible with your vehicle’s make and model.
- Install the Software: Run the installer and follow the on-screen instructions. Be sure to install all necessary drivers and components.
- Activate the License: Activate your software license using the product key provided with your VCX SE tool. This step is essential to unlock all features and functionalities.
- Update the Software: Check for updates after installation and install any available updates. Software updates often include bug fixes, new features, and improved vehicle coverage.
- Configure the Settings: Configure the software settings according to your preferences and vehicle requirements. This may include selecting the correct communication protocol and language.
- Test the Connection: Connect the VCX SE tool to your laptop and vehicle to ensure the software recognizes the device. Verify that data is being transmitted correctly.
A correctly installed and configured software ensures that you can perform accurate and reliable diagnostic tests.
Vehicle Preparation: Key Steps to Follow
Preparing your vehicle correctly is crucial for accurate testing. Follow these steps to ensure your vehicle is ready for the diagnostic process:
- Park the Vehicle: Park your vehicle on a level surface in a well-lit area. Ensure the parking brake is engaged.
- Locate the OBD II Port: Find the OBD II port, typically located under the dashboard on the driver’s side.
- Turn Off the Ignition: Ensure the ignition is turned off before connecting the VCX SE tool.
- Check the Battery: Verify that the vehicle’s battery is in good condition. A weak battery can cause inaccurate test results. Use a battery charger if necessary.
- Clear Error Codes (Optional): If there are existing error codes, clear them before starting the test to get a clean slate. Note down the codes for reference.
- Consult the Vehicle Manual: Review the vehicle manual for any specific instructions or precautions related to diagnostic testing.
By following these steps, you ensure that your vehicle is in optimal condition for accurate and reliable testing with the VCX SE tool.
3. Step-by-Step Guide: Testing Steering Wheel Buttons with VCX SE
Connecting VCX SE to Your Vehicle
Connecting the VCX SE to your vehicle is the first step in testing the steering wheel buttons. Ensure a stable and secure connection for accurate data transmission. Here’s how to do it:
- Locate the OBD II Port: Find the OBD II port in your vehicle, usually located under the dashboard on the driver’s side.
- Connect VCX SE: Plug the VCX SE tool into the OBD II port. Ensure it is firmly connected to avoid any interruptions during the test.
- Connect to Laptop: Connect the VCX SE tool to your laptop using the provided USB cable or via Bluetooth, depending on the model.
- Turn On the Ignition: Turn the ignition to the “ON” position, but do not start the engine. This provides power to the vehicle’s electrical system without starting the engine.
- Verify Connection: Check that the VCX SE tool is recognized by the diagnostic software on your laptop. The software should indicate that it is connected to the vehicle.
- Stable Connection: Ensure the connection remains stable throughout the testing process. Avoid moving the cables or the tool to prevent disconnections.
A reliable connection ensures that the VCX SE tool can accurately read and interpret data from your vehicle’s control modules.
Navigating the Diagnostic Software
Once connected, you need to navigate the diagnostic software to access the relevant functions for testing the steering wheel buttons. The software interface is designed to be user-friendly, but familiarity with the layout will help you work more efficiently. Here’s how to navigate the software:
- Launch the Software: Open the diagnostic software on your laptop.
- Select Vehicle Information: Enter your vehicle’s information, including the make, model, and year. This helps the software identify the correct control modules.
- Select Diagnostic Function: Choose the diagnostic function from the main menu. This may be labeled as “Diagnostics,” “Scan Tool,” or similar.
- Access Control Modules: Navigate to the list of control modules and select the one related to the steering wheel or body control module (BCM).
- Select Steering Wheel Buttons Test: Look for a specific test for the steering wheel buttons. This may be listed as “Steering Wheel Control Test,” “Button Function Test,” or similar.
- Follow On-Screen Instructions: Follow the on-screen instructions provided by the software. This will guide you through the testing process and prompt you to press each button as required.
- Review the Results: After completing the test, review the results displayed by the software. The results will indicate whether each button is functioning correctly or if there are any faults.
Navigating the software effectively allows you to quickly access the necessary functions and interpret the test results accurately.
Performing the Steering Wheel Button Test
With the VCX SE connected and the software properly navigated, you can now perform the steering wheel button test. This process involves activating each button and monitoring the response through the diagnostic software. Follow these steps:
- Start the Test: Initiate the steering wheel button test from the diagnostic software.
- Follow Prompts: The software will prompt you to press each button on the steering wheel. Follow these prompts carefully.
- Press Each Button: Press each button on the steering wheel one at a time, as instructed by the software. Ensure each button is pressed firmly and held for a moment to register the input.
- Monitor the Response: Watch the software interface to see if each button press is recognized. The software should display a confirmation or status message for each button.
- Record the Results: Note down the results for each button. The software will typically indicate whether each button passed or failed the test.
- Repeat if Necessary: If a button fails the test, repeat the test for that button to ensure the failure is consistent.
- Complete the Test: Once you have tested all the buttons, complete the test in the software. The software will generate a summary of the results.
By following these steps carefully, you can accurately assess the functionality of each steering wheel button and identify any issues that need to be addressed.
Interpreting the Test Results
After performing the steering wheel button test, you need to interpret the results to understand the status of each button. The VCX SE software provides clear indications of whether each button passed or failed the test. Here’s how to interpret the results:
- Pass/Fail Indicators: Look for pass/fail indicators next to each button in the test results. A “Pass” indicates that the button is functioning correctly, while a “Fail” indicates a problem.
- Error Codes: Check for any error codes associated with the failed buttons. Error codes provide more specific information about the nature of the problem.
- Description of Errors: Read the description of the errors to understand what might be causing the failure. This could be a faulty switch, wiring issue, or a problem with the control module.
- Review Real-Time Data: If available, review the real-time data for the buttons. This can provide insights into whether the button is sending a signal when pressed.
- Check for Intermittent Issues: Pay attention to any intermittent issues, where a button sometimes works and sometimes doesn’t. This could indicate a loose connection or a failing component.
- Compare to Vehicle Manual: Compare the test results to the information in your vehicle manual. This can help you understand the expected behavior of each button and identify any deviations.
Interpreting the test results accurately is crucial for diagnosing the problem and determining the appropriate course of action.
4. Troubleshooting Common Issues
Identifying Common Problems with Steering Wheel Buttons
When testing steering wheel buttons, several common issues can arise. Recognizing these problems can help you quickly diagnose and resolve them. Here are some frequent issues:
- Non-Responsive Buttons: One or more buttons do not respond when pressed. This could be due to a faulty switch, wiring problem, or issue with the control module.
- Intermittent Functionality: Buttons work sometimes but not others. This is often caused by a loose connection, corroded contacts, or a failing switch.
- Incorrect Functionality: Buttons perform the wrong function. This could be due to a programming error or a problem with the control module.
- Sticking Buttons: Buttons stick or are difficult to press. This can be caused by dirt, debris, or a damaged switch.
- Illumination Problems: Buttons are not illuminated, making them difficult to see in low-light conditions. This could be due to a burnt-out bulb or a wiring issue.
- Multiple Button Failures: Several buttons fail simultaneously. This often indicates a problem with the control module or a power supply issue.
- Error Codes: Diagnostic software reports specific error codes related to the steering wheel buttons. These codes provide valuable clues about the nature of the problem.
Identifying these common issues is the first step in effective troubleshooting.
Checking the Fuses and Wiring
After identifying potential issues, checking the fuses and wiring is a crucial step. Faulty fuses or wiring can often be the cause of steering wheel button problems. Here’s how to check them:
- Locate the Fuse Box: Find the fuse box in your vehicle. The location is usually indicated in the vehicle manual.
- Identify Relevant Fuses: Identify the fuses related to the steering wheel buttons or the control module. The vehicle manual should provide a fuse diagram.
- Check the Fuses: Inspect each fuse to see if it is blown. A blown fuse will have a broken filament.
- Replace Blown Fuses: Replace any blown fuses with new ones of the same amperage.
- Check Wiring Connections: Inspect the wiring connections to the steering wheel buttons and the control module. Look for loose, corroded, or damaged connections.
- Test Wiring Continuity: Use a multimeter to test the continuity of the wiring. This will help you identify any breaks or shorts in the wiring.
- Repair Wiring: Repair any damaged wiring by splicing, soldering, or replacing the affected sections.
- Clean Connections: Clean any corroded connections with a wire brush or electrical contact cleaner.
Checking and repairing the fuses and wiring can often resolve many steering wheel button issues.
Using a Multimeter for Diagnostics
A multimeter is an invaluable tool for diagnosing electrical problems in your vehicle. It can be used to check voltage, current, and resistance, helping you pinpoint the source of the issue. Here’s how to use a multimeter for steering wheel button diagnostics:
- Set the Multimeter: Set the multimeter to the appropriate setting for the test you want to perform (e.g., voltage, resistance, continuity).
- Check Voltage Supply: Use the multimeter to check the voltage supply to the steering wheel buttons and the control module. Ensure the voltage is within the specified range.
- Test for Continuity: Test the continuity of the wiring between the buttons and the control module. This will help you identify any breaks in the wiring.
- Measure Resistance: Measure the resistance of the switches in the steering wheel buttons. This can help you determine if a switch is faulty.
- Check Ground Connections: Ensure the ground connections are secure and providing a good ground. Use the multimeter to test the continuity between the ground point and the vehicle’s chassis.
- Compare Readings: Compare your readings to the specifications in the vehicle manual. This will help you identify any deviations from the expected values.
- Isolate the Problem: Use the multimeter to systematically test each component and wire until you isolate the source of the problem.
Using a multimeter effectively can significantly speed up the diagnostic process and help you accurately identify electrical issues.
When to Seek Professional Help from CARDIAGTECH.BIZ
While many steering wheel button issues can be resolved with basic troubleshooting, some problems require professional expertise. Here are situations when you should seek help from CARDIAGTECH.BIZ:
- Complex Error Codes: If the diagnostic software reports complex error codes that you cannot interpret, professional help is needed.
- Control Module Issues: If you suspect a problem with the control module, it is best to consult a professional. Control module repairs often require specialized equipment and knowledge.
- Wiring Harness Damage: If there is extensive damage to the wiring harness, professional repair is necessary.
- Intermittent Problems: Intermittent problems that are difficult to diagnose require the expertise of a skilled technician.
- No Diagnostic Equipment: If you do not have access to diagnostic equipment like VCX SE and a multimeter, it is best to seek professional help.
- Lack of Experience: If you are not comfortable working with electrical systems or lack experience in automotive diagnostics, it is safer to consult a professional.
- Persistent Issues: If you have tried troubleshooting the problem yourself but the issue persists, it is time to seek professional help.
Seeking professional help from CARDIAGTECH.BIZ ensures that your vehicle is diagnosed and repaired correctly, saving you time and potential further damage. Contact us at our address: 276 Reock St, City of Orange, NJ 07050, United States, or through Whatsapp: +1 (641) 206-8880. You can also visit our website CARDIAGTECH.BIZ for more information.
5. Advanced Diagnostic Techniques
Using Oscilloscopes for Detailed Analysis
For advanced diagnostics, oscilloscopes provide a detailed analysis of electrical signals, allowing you to identify subtle issues that a multimeter might miss. Here’s how to use an oscilloscope for steering wheel button diagnostics:
- Connect the Oscilloscope: Connect the oscilloscope probes to the wiring of the steering wheel buttons. Ensure proper grounding to avoid signal interference.
- Set the Time and Voltage Scales: Adjust the time and voltage scales on the oscilloscope to capture the signal waveforms effectively.
- Monitor Signal Waveforms: Observe the signal waveforms when pressing each button. Look for anomalies such as signal drops, noise, or distortions.
- Compare Waveforms: Compare the waveforms of different buttons to identify any discrepancies. A faulty button may produce a different waveform compared to a functioning one.
- Analyze Signal Timing: Analyze the timing of the signals to ensure they are within the expected range. Delays or irregular timing can indicate a problem.
- Identify Interference: Look for any signs of electrical interference in the signal waveforms. Interference can cause erratic button behavior.
- Record and Document: Record and document the waveforms for future reference. This can be helpful for tracking down intermittent issues.
Using an oscilloscope requires some expertise, but it can provide invaluable insights into the electrical behavior of the steering wheel buttons.
ECU Programming and Coding
In some cases, steering wheel button issues may be related to the ECU (Engine Control Unit) programming or coding. Here’s how to address these issues:
- Verify Compatibility: Ensure that the steering wheel buttons are compatible with the vehicle’s ECU. Incompatible components can cause functionality problems.
- Check ECU Software Version: Verify that the ECU has the latest software version. Outdated software may contain bugs that affect button functionality.
- Perform ECU Programming: Use the VCX SE tool to perform ECU programming. This involves updating the ECU software to the latest version.
- Perform ECU Coding: Use the VCX SE tool to perform ECU coding. This involves configuring the ECU settings to match the vehicle’s specifications and installed components.
- Follow Factory Procedures: Follow the factory procedures for ECU programming and coding. Incorrect programming can cause serious problems.
- Backup ECU Data: Before performing any programming or coding, backup the ECU data. This will allow you to restore the original settings if something goes wrong.
- Test Button Functionality: After programming or coding the ECU, test the steering wheel button functionality to ensure the issues have been resolved.
ECU programming and coding should be performed with caution and expertise. If you’re not comfortable with these procedures, seek professional help from CARDIAGTECH.BIZ.
Diagnosing CAN Bus Communication Issues
The CAN (Controller Area Network) bus is a communication network that allows various control modules in the vehicle to communicate with each other. Problems with the CAN bus can affect the functionality of the steering wheel buttons. Here’s how to diagnose CAN bus communication issues:
- Check for CAN Bus Error Codes: Use the VCX SE tool to check for CAN bus error codes. These codes can indicate communication problems between the control modules.
- Inspect CAN Bus Wiring: Inspect the CAN bus wiring for damage, corrosion, or loose connections.
- Test CAN Bus Voltage: Use a multimeter to test the voltage on the CAN bus wires. The voltage should be within the specified range.
- Check Termination Resistors: Check the termination resistors at the ends of the CAN bus. These resistors are essential for proper communication.
- Use an Oscilloscope: Use an oscilloscope to monitor the CAN bus signals. Look for signal distortions, noise, or missing signals.
- Isolate the Faulty Module: Disconnect the control modules one at a time to isolate the faulty module that is causing the CAN bus issues.
- Repair or Replace Faulty Components: Repair or replace any faulty components, such as wiring, connectors, or control modules.
Diagnosing CAN bus communication issues can be complex, but a systematic approach can help you identify and resolve the problem.
6. Preventive Maintenance and Best Practices
Regular Checks and Inspections
Regular checks and inspections are essential for maintaining the functionality of your steering wheel buttons. These checks can help you identify potential problems before they become major issues. Here are some regular checks to perform:
- Visual Inspection: Perform a visual inspection of the steering wheel buttons and surrounding area. Look for any signs of damage, wear, or dirt.
- Button Functionality Test: Test each button to ensure it is functioning correctly. Press each button and verify that it performs the expected function.
- Check Illumination: Check the illumination of the buttons to ensure they are visible in low-light conditions.
- Clean Buttons: Clean the buttons with a soft, damp cloth to remove any dirt or debris. Avoid using harsh chemicals that can damage the buttons.
- Inspect Wiring: Inspect the wiring connections to the steering wheel buttons and the control module. Look for loose, corroded, or damaged connections.
- Check Fuses: Check the fuses related to the steering wheel buttons to ensure they are in good condition.
- Consult Vehicle Manual: Consult the vehicle manual for any specific maintenance recommendations for the steering wheel buttons.
Performing these regular checks can help you keep your steering wheel buttons in good working condition.
Cleaning and Maintenance Tips
Proper cleaning and maintenance can extend the life of your steering wheel buttons and prevent many common issues. Here are some tips for cleaning and maintaining your steering wheel buttons:
- Use a Soft Cloth: Use a soft, lint-free cloth to clean the buttons. Avoid using abrasive materials that can scratch the surface.
- Dampen the Cloth: Dampen the cloth with water or a mild cleaning solution. Avoid using excessive moisture, which can damage the electrical components.
- Avoid Harsh Chemicals: Avoid using harsh chemicals, such as solvents, alcohol, or bleach, which can damage the buttons and surrounding materials.
- Clean Regularly: Clean the buttons regularly to remove dirt, dust, and debris. This will help prevent sticking buttons and ensure proper functionality.
- Protect from Sunlight: Protect the steering wheel from direct sunlight, which can cause the buttons to fade and crack over time.
- Handle with Care: Handle the steering wheel buttons with care to avoid damaging them. Avoid pressing the buttons too hard or using sharp objects to clean them.
- Check Connections: Regularly check the wiring connections to the buttons to ensure they are secure and free from corrosion.
Following these cleaning and maintenance tips can help you keep your steering wheel buttons in good condition and prevent many common problems.
Proper Storage and Handling of Diagnostic Tools
Proper storage and handling of your diagnostic tools, like the VCX SE, are essential for maintaining their functionality and longevity. Here are some tips for storing and handling your diagnostic tools:
- Store in a Dry Place: Store the diagnostic tools in a dry place to prevent moisture damage.
- Protect from Extreme Temperatures: Protect the tools from extreme temperatures, which can damage the electronic components.
- Use a Protective Case: Use a protective case to store the tools when not in use. This will help prevent physical damage.
- Keep Clean: Keep the tools clean by wiping them down with a soft cloth after each use.
- Handle with Care: Handle the tools with care to avoid dropping them or subjecting them to unnecessary stress.
- Avoid Exposure to Chemicals: Avoid exposing the tools to harsh chemicals, which can damage the plastic and electronic components.
- Keep Cables Organized: Keep the cables organized to prevent tangling and damage.
- Update Software Regularly: Update the diagnostic software regularly to ensure it is functioning correctly and has the latest features.
- Follow Manufacturer Instructions: Follow the manufacturer’s instructions for storage and handling.
Following these tips can help you keep your diagnostic tools in good working condition and ensure they are ready for use when you need them.
7. Conclusion: Ensuring Optimal Steering Wheel Button Performance
Summarizing the Key Steps
Maintaining optimal steering wheel button performance involves several key steps, each crucial for ensuring safety and convenience. From preparation to troubleshooting, following these steps ensures your vehicle operates smoothly.
- Preparation: Gather necessary tools like the VCX SE diagnostic tool, laptop, OBD II connector, and vehicle manual.
- Software Setup: Install and update diagnostic software, ensuring compatibility with your vehicle.
- Vehicle Prep: Park safely, locate the OBD II port, and ensure the battery is in good condition.
- Connection: Connect the VCX SE tool to the OBD II port and your laptop.
- Navigation: Navigate the diagnostic software to access the steering wheel button test.
- Testing: Perform the test, pressing each button as prompted and recording results.
- Interpretation: Analyze the results, noting pass/fail indicators and error codes.
- Troubleshooting: Check fuses, wiring, and use a multimeter for diagnostics.
- Advanced Techniques: Consider oscilloscopes for detailed analysis, ECU programming, and CAN bus diagnostics.
- Preventive Maintenance: Conduct regular checks, cleaning, and proper tool storage.
By following these steps, you can effectively diagnose and resolve issues, ensuring your steering wheel buttons function optimally.
The Benefits of a Properly Functioning Steering Wheel
A properly functioning steering wheel offers significant benefits. These include:
- Enhanced Safety: Fully functional buttons allow drivers to keep their hands on the wheel, reducing distractions and improving reaction time.
- Convenience: Easy access to audio, cruise control, and phone functions enhances the driving experience.
- Comfort: Ergonomic design and reliable controls contribute to a more comfortable ride.
- Reduced Distractions: Minimizing the need to look away from the road improves focus and safety.
- Improved Vehicle Control: Quick access to essential functions ensures better control over the vehicle.
Investing in the maintenance and repair of your steering wheel buttons pays off in terms of safety, convenience, and overall driving satisfaction.
Final Thoughts and Recommendations from CARDIAGTECH.BIZ
At CARDIAGTECH.BIZ, we understand the importance of reliable diagnostic tools and expert support. Properly functioning steering wheel buttons are essential for a safe and enjoyable driving experience. We recommend:
- Regular Inspections: Perform routine checks to identify and address potential issues early.
- Use Quality Tools: Invest in high-quality diagnostic tools like the VCX SE for accurate and efficient testing.
- Seek Professional Help: Don’t hesitate to seek professional help from CARDIAGTECH.BIZ when facing complex issues or when unsure about performing repairs.
- Stay Informed: Keep up-to-date with the latest diagnostic techniques and vehicle technologies.
- Preventive Maintenance: Follow preventive maintenance practices to extend the life of your steering wheel buttons and other vehicle components.
By following these recommendations, you can ensure that your steering wheel buttons remain in optimal condition, providing you with a safe and convenient driving experience. For any assistance or further information, contact us at our address: 276 Reock St, City of Orange, NJ 07050, United States, or through Whatsapp: +1 (641) 206-8880. You can also visit our website CARDIAGTECH.BIZ for more information and to explore our range of diagnostic tools and services.
8. FAQ: Addressing Common Questions
1. What is VCX SE, and why should I use it for testing steering wheel buttons?
VCX SE is a professional-grade diagnostic tool offering comprehensive vehicle diagnostics, ECU programming, and coding. Using VCX SE ensures accurate diagnosis, wide vehicle coverage, and a user-friendly interface, streamlining the testing process and providing detailed reports for efficient repairs.
2. What tools do I need to test steering wheel buttons with VCX SE?
You’ll need the VCX SE diagnostic tool, a laptop with diagnostic software, an OBD II connector, your vehicle’s manual, and optionally a multimeter and battery charger. Ensure all tools are readily available for a smooth testing process.
3. How do I install and set up the diagnostic software for VCX SE?
Download the software from CARDIAGTECH.BIZ, run the installer, activate the license, update the software, configure settings according to your vehicle, and test the connection to ensure proper data transmission.
4. What steps should I take to prepare my vehicle for testing?
Park on a level surface, locate the OBD II port, turn off the ignition, check the battery, clear error codes (optional), and consult the vehicle manual for specific instructions.
5. How do I connect the VCX SE to my vehicle?
Plug the VCX SE into the OBD II port, connect it to your laptop via USB or Bluetooth, turn the ignition to the “ON” position (without starting the engine), and verify the connection in the diagnostic software.
6. How do I navigate the diagnostic software to perform the steering wheel button test?
Launch the software, select your vehicle information, choose the diagnostic function, access the control module related to the steering wheel, select the steering wheel buttons test, and follow on-screen instructions.
7. How do I interpret the test results provided by VCX SE?
Look for pass/fail indicators, check for error codes, read error descriptions, review real-time data, check for intermittent issues, and compare results to your vehicle manual to understand the status of each button.
8. What are some common issues with steering wheel buttons, and how can I troubleshoot them?
Common issues include non-responsive buttons, intermittent functionality, and incorrect functionality. Troubleshoot by checking fuses, wiring, and using a multimeter to diagnose electrical problems.
9. When should I seek professional help from CARDIAGTECH.BIZ?
Seek professional help for complex error codes, control module issues, extensive wiring damage, intermittent problems, lack of diagnostic equipment, or persistent issues despite troubleshooting efforts.
10. What preventive maintenance steps can I take to ensure optimal steering wheel button performance?
Perform regular visual inspections, test button functionality, check illumination, clean buttons, inspect wiring, check fuses, and consult your vehicle manual for maintenance recommendations. By keeping up with regular maintenance and checks, you’ll save money in the long run.