How To Fix Car Paint Ruined By Bird Poop
Bird poop can damage your car’s paint, but don’t worry CARDIAGTECH.NET is here to help. Learn effective methods to repair the damage and protect your car’s finish with our professional advice and tools. Discover how to remove bird dropping stains, etching repair, and automotive paint correction using our expert solutions.
1. Understanding Bird Poop Damage on Car Paint
Bird droppings pose a significant threat to your car’s paint. Understanding the chemical composition of bird poop and its effects on automotive finishes is essential for effective prevention and repair. The longer bird poop sits on your car, the more damage it can cause, leading to costly repairs.
1.1. The Chemical Composition of Bird Poop
Bird poop contains uric acid, which is highly corrosive. This acid, combined with seeds, grit, and other undigested materials, creates a potent mixture that can quickly damage car paint.
- Uric Acid: The primary corrosive agent.
- Seeds and Grit: These act as abrasives, scratching the paint surface.
- Digested Materials: Enzymes and bacteria that further break down the paint.
1.2. How Bird Poop Damages Car Paint
When bird poop lands on your car, the uric acid starts to etch into the clear coat. The sun’s heat accelerates this process, causing the paint to soften and expand. As the poop dries, it contracts, creating stress on the paint. This leads to etching, staining, and even cracking.
The damage can be categorized into two main types:
- Type I – Topical Stain Etching: Shallow damage that affects the surface of the clear coat.
- Type II – Fractured/Wrinkled Etching: Deeper damage that penetrates through the clear coat, causing fractures and wrinkles.
1.3. Factors That Increase the Risk of Damage
Several factors can increase the risk and severity of bird poop damage:
- Sunlight: Direct sunlight intensifies the etching process.
- Temperature: High temperatures accelerate the chemical reactions.
- Type of Paint: Some paints are more susceptible to damage than others.
- Duration: The longer the poop remains on the car, the worse the damage.
1.4. Statistics on Car Paint Damage from Bird Poop
Studies have shown that bird droppings are a leading cause of paint damage. According to a survey by the Environmental Protection Agency, approximately 85% of car owners have experienced damage from bird poop. The cost of repairing this damage can range from $100 to $500 or more, depending on the severity and the type of repair needed.
1.5. Preventive Measures to Protect Your Car’s Paint
Prevention is the best strategy to protect your car’s paint from bird poop. Here are some proactive steps:
- Park in Covered Areas: Garages, carports, and covered parking structures provide protection.
- Use a Car Cover: A car cover shields your vehicle from direct contact with bird droppings.
- Apply a Protective Coating: Wax, sealant, or ceramic coating add a layer of protection.
- Regular Washing: Washing your car regularly removes bird poop and other contaminants.
- Immediate Removal: Remove bird poop as soon as possible to minimize damage.
By understanding the chemical composition of bird poop, the damage it causes, and the factors that increase the risk, you can take effective preventive measures to protect your car’s paint. Regular maintenance and prompt action are key to preserving your vehicle’s appearance and value.
2. Identifying the Type of Bird Poop Etching
Identifying the type of bird poop etching is the first step in determining the appropriate repair method. There are two primary types of etching: Topical Stain Etching (Type I) and Fractured/Wrinkled Etching (Type II). Each requires a different approach to repair.
2.1. Type I: Topical Stain Etching
Topical Stain Etchings are shallow and affect only the surface of the clear coat. These are generally easier to remove and often require simple polishing techniques.
- Appearance: Usually appears as a dull or discolored spot on the paint.
- Depth: Shallow, affecting only the top layer of the clear coat.
- Repair Method: Can be removed with polishing compounds and light buffing.
2.1.1. How to Identify Type I Etching
To identify Type I etching, look for the following characteristics:
- Surface Inspection: Examine the affected area under good lighting.
- Touch Test: Gently run your fingernail over the spot. If it feels smooth and the discoloration is only on the surface, it is likely Type I etching.
- Visual Clues: Look for a slight dullness or stain that doesn’t appear to penetrate deeply into the paint.
2.2. Type II: Fractured/Wrinkled Etching
Fractured/Wrinkled Etchings are more severe and penetrate deeper into the clear coat. These are harder to repair and may require professional attention.
- Appearance: The paint appears cracked, wrinkled, or fractured.
- Depth: Deep, affecting multiple layers of the clear coat.
- Repair Method: Often requires wet sanding, compounding, and polishing.
2.2.1. How to Identify Type II Etching
To identify Type II etching, look for the following characteristics:
- Surface Inspection: Examine the affected area closely.
- Touch Test: Gently run your fingernail over the spot. If you feel ridges, cracks, or wrinkles, it is likely Type II etching.
- Visual Clues: Look for visible fractures, wrinkles, or a network of fine lines in the paint.
2.3. Tools for Identifying Etching Types
Using the right tools can help you accurately identify the type of etching:
- Magnifying Glass: A magnifying glass allows you to see the surface details more clearly.
- Bright Light Source: A strong light source helps reveal subtle imperfections and variations in the paint.
- Paint Depth Gauge: This tool measures the thickness of the clear coat, helping you determine the depth of the etching.
2.4. Comparison Table of Etching Types
| Feature | Type I: Topical Stain Etching | Type II: Fractured/Wrinkled Etching |
|---|---|---|
| Appearance | Dull or discolored spot | Cracked, wrinkled, or fractured |
| Depth | Shallow, surface layer | Deep, multiple layers |
| Touch Test | Smooth | Ridges, cracks, or wrinkles |
| Repair Method | Polishing compounds and light buffing | Wet sanding, compounding, and polishing |
2.5. Why Accurate Identification Matters
Accurate identification is crucial because using the wrong repair method can worsen the damage. For example, attempting to aggressively polish Type II etching without proper wet sanding can remove too much clear coat and expose the base coat.
By carefully examining the affected area and using the right tools, you can accurately identify the type of bird poop etching and choose the appropriate repair method. This will help you restore your car’s paint to its original condition and prevent further damage.
3. Essential Tools and Materials for Repair
Having the right tools and materials is essential for effectively repairing car paint damaged by bird poop. Using high-quality products ensures a professional finish and protects your car’s paint in the long run.
3.1. Cleaning Supplies
Before starting any repair work, thoroughly cleaning the affected area is crucial.
- Car Wash Soap: Use a pH-balanced car wash soap to remove dirt and debris.
- Microfiber Towels: Soft microfiber towels prevent scratching during cleaning.
- Detailing Brushes: Small brushes help clean hard-to-reach areas.
- Clay Bar: A clay bar removes embedded contaminants from the paint surface.
3.2. Polishing Compounds
Polishing compounds are essential for removing surface imperfections and restoring the paint’s shine.
- Compound: A more abrasive compound for removing deeper scratches and etching.
- Polish: A finer polish for refining the finish and enhancing gloss.
- Swirl Remover: Specifically designed to eliminate swirl marks and holograms.
3.3. Buffing Pads
The choice of buffing pad depends on the type of repair needed.
- Cutting Pads: Used with compounds to remove heavier imperfections.
- Polishing Pads: Used with polishes to refine the finish.
- Finishing Pads: Used with swirl removers to create a high-gloss shine.
3.4. Polishing Machines
A polishing machine can significantly speed up the repair process and provide better results than hand polishing.
- Dual-Action Polisher: Safe and easy to use, ideal for beginners.
- Rotary Polisher: More powerful but requires skill and experience.
3.5. Protective Coatings
Applying a protective coating after polishing helps protect the paint from future damage.
- Wax: Provides a temporary layer of protection and enhances shine.
- Sealant: Offers longer-lasting protection than wax.
- Ceramic Coating: Provides the most durable and long-lasting protection.
3.6. Safety Gear
Protecting yourself during the repair process is essential.
- Gloves: Protect your hands from chemicals and abrasives.
- Eye Protection: Safety glasses or goggles prevent debris from entering your eyes.
- Mask: A dust mask protects you from inhaling polishing dust.
3.7. Additional Tools
- Spray Bottle: For applying water or detailing solutions.
- Masking Tape: To protect adjacent areas from being polished.
- Inspection Light: A bright light to reveal imperfections in the paint.
- Paint Depth Gauge: To measure the thickness of the clear coat.
3.8. Recommended Brands and Products
- Cleaning: Meguiar’s, Chemical Guys, Adam’s Polishes
- Polishing Compounds: Menzerna, Rupes, Sonax
- Buffing Pads: Lake Country, Buff and Shine, Griot’s Garage
- Protective Coatings: CarPro, Gtechniq, Optimum Polymer Technologies
3.9. Cost Breakdown
| Item | Estimated Cost |
|---|---|
| Car Wash Soap | $10 – $20 |
| Microfiber Towels | $15 – $30 |
| Clay Bar | $10 – $25 |
| Compound | $20 – $40 |
| Polish | $20 – $40 |
| Swirl Remover | $20 – $40 |
| Buffing Pads | $30 – $60 |
| Dual-Action Polisher | $100 – $300 |
| Wax/Sealant | $20 – $50 |
| Ceramic Coating | $50 – $200 |
| Safety Gear | $20 – $40 |
| Additional Tools | $30 – $50 |
Having these essential tools and materials on hand will enable you to effectively repair car paint damaged by bird poop and maintain your vehicle’s appearance. Remember to always follow the manufacturer’s instructions when using any product.
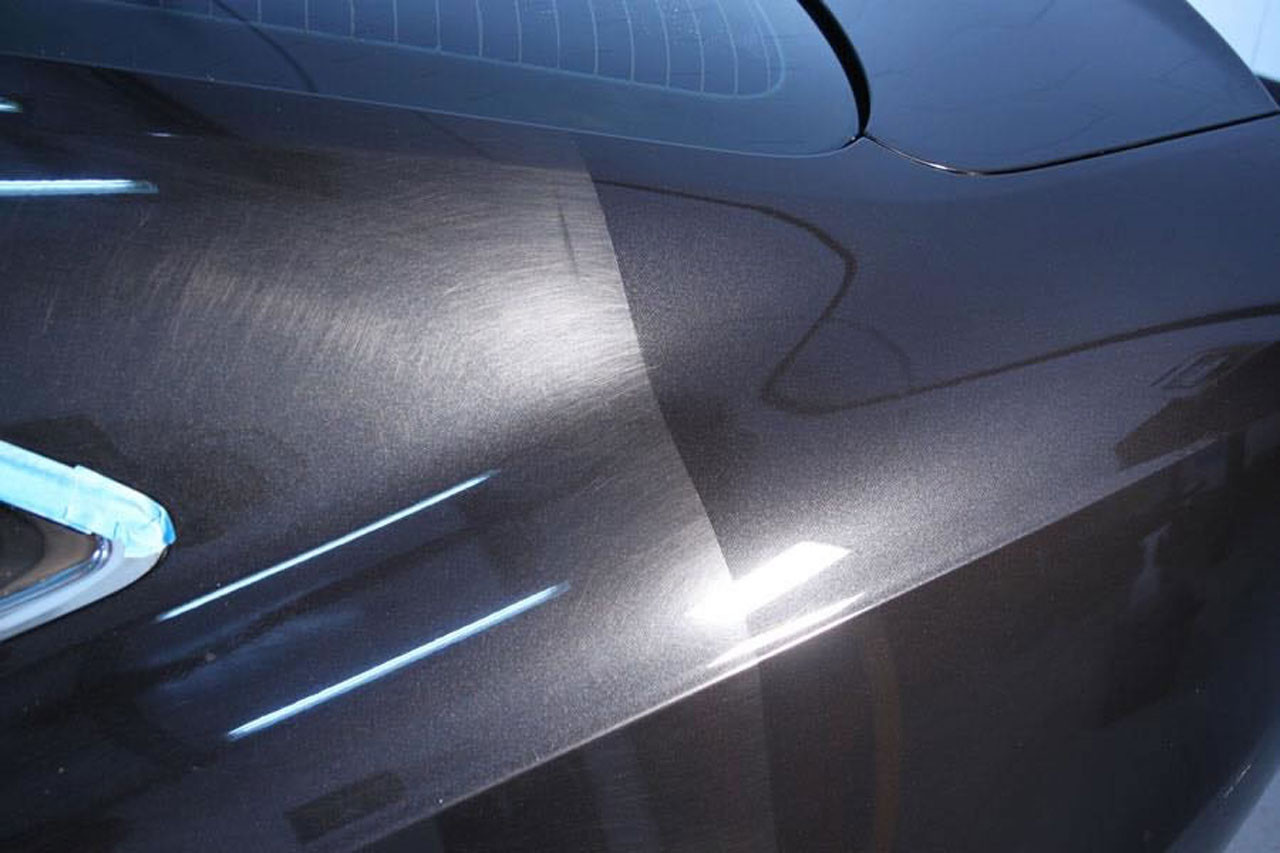
4. Step-by-Step Guide to Removing Type I Etching
Removing Type I Topical Stain Etching involves a straightforward process of cleaning, polishing, and protecting the paint. This type of etching is shallow and can often be corrected with minimal effort using the right tools and techniques.
4.1. Preparation
Before you begin, gather all the necessary supplies and prepare the work area.
- Wash the Car: Thoroughly wash the car with pH-balanced car wash soap to remove dirt and debris.
- Dry the Car: Use soft microfiber towels to dry the car completely.
- Clay Bar Treatment: Use a clay bar to remove any embedded contaminants from the paint surface.
- Masking: Apply masking tape to protect adjacent areas, such as trim and lights.
4.2. Polishing
Polishing is the key step in removing Type I etching.
- Apply Compound: Apply a small amount of polishing compound to a polishing pad.
- Polishing Machine: Use a dual-action polisher to work the compound into the paint. Apply moderate pressure and move the polisher in overlapping motions.
- Technique: Work in small sections (approximately 2×2 feet) at a time.
- Inspection: After compounding, wipe the area clean with a microfiber towel and inspect the results.
4.3. Refining the Finish
After compounding, refine the finish with a polish to remove any remaining imperfections and enhance the gloss.
- Apply Polish: Apply a small amount of polish to a polishing pad.
- Polishing Machine: Use the dual-action polisher to work the polish into the paint. Use lighter pressure and move the polisher in overlapping motions.
- Technique: Work in the same small sections as before.
- Inspection: Wipe the area clean with a microfiber towel and inspect the results.
4.4. Swirl Mark Removal (If Necessary)
If you notice any swirl marks or holograms, use a swirl remover.
- Apply Swirl Remover: Apply a small amount of swirl remover to a finishing pad.
- Polishing Machine: Use the dual-action polisher to work the swirl remover into the paint. Use very light pressure and move the polisher in overlapping motions.
- Technique: Work in the same small sections as before.
- Inspection: Wipe the area clean with a microfiber towel and inspect the results.
4.5. Protection
After polishing, protect the paint with a wax, sealant, or ceramic coating.
- Apply Protective Coating: Apply a thin, even layer of wax, sealant, or ceramic coating to the polished area.
- Cure Time: Allow the coating to cure according to the manufacturer’s instructions.
- Buffing: Buff the area with a clean microfiber towel to remove any excess coating and reveal a high-gloss shine.
4.6. Step-by-Step Table
| Step | Action | Tools/Materials | Technique |
|---|---|---|---|
| 1 | Wash the Car | Car wash soap, microfiber towels | Wash and dry thoroughly |
| 2 | Clay Bar Treatment | Clay bar, lubricant | Remove embedded contaminants |
| 3 | Apply Compound | Polishing compound, polishing pad | Small amount, moderate pressure |
| 4 | Polish with Compound | Dual-action polisher | Overlapping motions, 2×2 ft sections |
| 5 | Apply Polish | Polish, polishing pad | Small amount, lighter pressure |
| 6 | Polish with Polish | Dual-action polisher | Overlapping motions, 2×2 ft sections |
| 7 | Apply Swirl Remover (If Needed) | Swirl remover, finishing pad | Small amount, very light pressure |
| 8 | Polish with Swirl Remover | Dual-action polisher | Overlapping motions, 2×2 ft sections |
| 9 | Apply Protective Coating | Wax, sealant, or ceramic coating | Thin, even layer |
| 10 | Cure and Buff | Microfiber towel | Follow manufacturer’s instructions, buff to shine |
4.7. Tips for Success
- Work in a Shaded Area: Avoid direct sunlight to prevent the compound and polish from drying too quickly.
- Use Clean Pads: Always use clean buffing pads to avoid reintroducing contaminants to the paint.
- Inspect Regularly: Regularly inspect your work to ensure you are removing the etching effectively.
- Take Your Time: Rushing the process can lead to mistakes and damage to the paint.
By following these steps and using the right tools and materials, you can successfully remove Type I Topical Stain Etching and restore your car’s paint to its original condition.
5. Advanced Techniques for Type II Etching Repair
Repairing Type II Fractured/Wrinkled Etching requires more advanced techniques due to the deeper damage to the clear coat. This process involves wet sanding, compounding, polishing, and protecting the paint.
5.1. Assessment
Before starting, assess the extent of the damage.
- Inspect the Etching: Examine the affected area under good lighting to determine the depth and severity of the etching.
- Paint Depth Gauge: Use a paint depth gauge to measure the thickness of the clear coat. This will help you determine how much material can be safely removed.
5.2. Wet Sanding
Wet sanding is used to level the damaged area and remove the fractured or wrinkled paint.
- Prepare the Area: Clean the area thoroughly and mask off the surrounding paint.
- Soak Sandpaper: Soak a piece of high-grit sandpaper (e.g., 3000 grit) in water for several minutes.
- Sanding Block: Wrap the sandpaper around a sanding block for even pressure.
- Wet Sanding: Gently sand the affected area in a back-and-forth motion, keeping the surface wet.
- Inspection: Regularly check your progress and monitor the paint thickness to avoid removing too much clear coat.
5.3. Compounding
After wet sanding, use a compound to remove the sanding marks and level the surface.
- Apply Compound: Apply a small amount of polishing compound to a cutting pad.
- Polishing Machine: Use a dual-action or rotary polisher to work the compound into the paint.
- Technique: Apply moderate pressure and move the polisher in overlapping motions. Work in small sections (approximately 2×2 feet) at a time.
- Inspection: Wipe the area clean with a microfiber towel and inspect the results.
5.4. Polishing
After compounding, refine the finish with a polish to remove any remaining imperfections and enhance the gloss.
- Apply Polish: Apply a small amount of polish to a polishing pad.
- Polishing Machine: Use the dual-action or rotary polisher to work the polish into the paint. Use lighter pressure and move the polisher in overlapping motions.
- Technique: Work in the same small sections as before.
- Inspection: Wipe the area clean with a microfiber towel and inspect the results.
5.5. Swirl Mark Removal (If Necessary)
If you notice any swirl marks or holograms, use a swirl remover.
- Apply Swirl Remover: Apply a small amount of swirl remover to a finishing pad.
- Polishing Machine: Use the dual-action or rotary polisher to work the swirl remover into the paint. Use very light pressure and move the polisher in overlapping motions.
- Technique: Work in the same small sections as before.
- Inspection: Wipe the area clean with a microfiber towel and inspect the results.
5.6. Protection
After polishing, protect the paint with a wax, sealant, or ceramic coating.
- Apply Protective Coating: Apply a thin, even layer of wax, sealant, or ceramic coating to the polished area.
- Cure Time: Allow the coating to cure according to the manufacturer’s instructions.
- Buffing: Buff the area with a clean microfiber towel to remove any excess coating and reveal a high-gloss shine.
5.7. Step-by-Step Table
| Step | Action | Tools/Materials | Technique |
|---|---|---|---|
| 1 | Assess the Damage | Inspection light, paint depth gauge | Determine depth and severity |
| 2 | Prepare the Area | Car wash soap, masking tape | Clean and mask off surrounding paint |
| 3 | Wet Sanding | 3000 grit sandpaper, sanding block, water | Gently sand, keep surface wet |
| 4 | Apply Compound | Polishing compound, cutting pad | Small amount, moderate pressure |
| 5 | Polish with Compound | Dual-action or rotary polisher | Overlapping motions, 2×2 ft sections |
| 6 | Apply Polish | Polish, polishing pad | Small amount, lighter pressure |
| 7 | Polish with Polish | Dual-action or rotary polisher | Overlapping motions, 2×2 ft sections |
| 8 | Apply Swirl Remover (If Needed) | Swirl remover, finishing pad | Small amount, very light pressure |
| 9 | Polish with Swirl Remover | Dual-action or rotary polisher | Overlapping motions, 2×2 ft sections |
| 10 | Apply Protective Coating | Wax, sealant, or ceramic coating | Thin, even layer |
| 11 | Cure and Buff | Microfiber towel | Follow manufacturer’s instructions, buff to shine |
5.8. Precautions
- Monitor Paint Thickness: Regularly check the paint thickness to avoid removing too much clear coat.
- Use Proper Sanding Technique: Use a sanding block and keep the surface wet to ensure even sanding.
- Start with High Grit: Start with a high-grit sandpaper and gradually move to lower grits if necessary.
- Work in a Clean Environment: Ensure the work area is clean to prevent reintroducing contaminants to the paint.
5.9. When to Seek Professional Help
If the damage is severe or you are not comfortable performing these advanced techniques, it is best to seek professional help. Professional detailers have the experience and equipment to safely and effectively repair Type II etching.
By following these steps and taking the necessary precautions, you can successfully repair Type II Fractured/Wrinkled Etching and restore your car’s paint to its original condition.
6. Protecting Your Car Paint After Repair
After successfully repairing the damage caused by bird poop, it is essential to protect your car’s paint to prevent future damage. Applying protective coatings and maintaining regular cleaning habits will keep your car looking its best.
6.1. Protective Coating Options
There are several protective coating options available, each with its own advantages and disadvantages.
- Wax: Provides a temporary layer of protection, enhances shine, and is easy to apply.
- Sealant: Offers longer-lasting protection than wax, provides good UV protection, and is relatively easy to apply.
- Ceramic Coating: Provides the most durable and long-lasting protection, offers excellent resistance to scratches, chemicals, and UV rays, but requires professional application.
6.2. Wax Application
Wax provides a temporary layer of protection and enhances the shine of your car’s paint.
- Clean the Car: Wash and dry the car thoroughly.
- Apply Wax: Apply a thin, even layer of wax to the paint using a foam applicator pad.
- Cure Time: Allow the wax to cure according to the manufacturer’s instructions (usually 10-20 minutes).
- Buffing: Buff the area with a clean microfiber towel to remove any excess wax and reveal a high-gloss shine.
- Frequency: Reapply wax every 1-3 months for optimal protection.
6.3. Sealant Application
Sealants offer longer-lasting protection than wax and provide good UV protection.
- Clean the Car: Wash and dry the car thoroughly.
- Apply Sealant: Apply a thin, even layer of sealant to the paint using a foam applicator pad.
- Cure Time: Allow the sealant to cure according to the manufacturer’s instructions (usually 20-30 minutes).
- Buffing: Buff the area with a clean microfiber towel to remove any excess sealant and reveal a high-gloss shine.
- Frequency: Reapply sealant every 4-6 months for optimal protection.
6.4. Ceramic Coating Application
Ceramic coatings provide the most durable and long-lasting protection for your car’s paint.
- Preparation: Thoroughly clean and decontaminate the paint.
- Apply Coating: Apply the ceramic coating to the applicator pad.
- Application Technique: Apply the coating to a small area using the recommended application technique.
- Leveling: Level the coating after the prescribed amount of time.
- Curing: Allow the coating to cure according to the manufacturer’s instructions.
- Inspection: Inspect the finish and repeat the process until all panels are coated.
- Professional Application: Ceramic coatings require professional application.
6.5. Regular Cleaning and Maintenance
Regular cleaning and maintenance are essential for preserving the appearance and protection of your car’s paint.
- Wash Regularly: Wash your car at least every two weeks to remove dirt, grime, and contaminants.
- Use pH-Balanced Soap: Use a pH-balanced car wash soap to avoid damaging the protective coating.
- Dry with Microfiber Towels: Use soft microfiber towels to dry the car and prevent scratching.
- Remove Bird Poop Promptly: Remove bird poop as soon as possible to prevent etching and staining.
6.6. Additional Tips for Protecting Your Car’s Paint
- Park in Covered Areas: Park in garages, carports, or covered parking structures whenever possible.
- Use a Car Cover: Use a car cover when parking outdoors for extended periods.
- Avoid Harsh Chemicals: Avoid using harsh chemicals or abrasive cleaners on your car’s paint.
- Inspect Regularly: Regularly inspect your car’s paint for any signs of damage and address them promptly.
6.7. Protection Step-by-Step Table
| Step | Action | Tools/Materials | Technique | Frequency |
|---|---|---|---|---|
| 1 | Wash the Car | Car wash soap, microfiber towels | Wash and dry thoroughly | Every 2 weeks |
| 2 | Apply Wax | Wax, foam applicator pad, microfiber towel | Apply thin, even layer, cure, buff | Every 1-3 months |
| 3 | Apply Sealant | Sealant, foam applicator pad, microfiber towel | Apply thin, even layer, cure, buff | Every 4-6 months |
| 4 | Apply Ceramic Coating | Ceramic coating, applicator pad | Professional application recommended | Every 2-5 years |
| 5 | Remove Bird Poop Promptly | Car wash soap, microfiber towels | Gently wash the affected area | As soon as possible |
By following these steps and implementing a regular maintenance routine, you can effectively protect your car’s paint after repair and keep it looking its best for years to come.
7. The Science Behind Car Paint Protection
Understanding the science behind car paint protection can help you make informed decisions about the best products and techniques to use. Car paint consists of several layers, each serving a specific purpose. Protecting these layers is essential for maintaining your car’s appearance and value.
7.1. Layers of Car Paint
Car paint typically consists of four layers:
- Primer: The base layer that adheres to the metal and provides a smooth surface for the subsequent layers.
- Base Coat: The colored layer that gives the car its distinctive appearance.
- Clear Coat: A transparent layer that protects the base coat from UV rays, scratches, and environmental damage.
- Protective Coating (Optional): A layer of wax, sealant, or ceramic coating that provides additional protection.
7.2. How Protective Coatings Work
Protective coatings work by creating a barrier between the car paint and the environment. Each type of coating offers different levels of protection.
- Wax: Forms a thin, sacrificial layer that protects the clear coat from water, dirt, and UV rays. It enhances shine but is easily removed by washing and environmental factors.
- Sealant: Creates a synthetic layer that bonds to the clear coat, providing longer-lasting protection than wax. It offers good UV protection and resistance to chemicals.
- Ceramic Coating: Forms a hard, durable layer that bonds to the clear coat, providing the most durable protection against scratches, chemicals, and UV rays. It also creates a hydrophobic surface that repels water and dirt.
7.3. UV Protection
UV rays can cause the paint to fade and oxidize over time. Protective coatings with UV inhibitors help block these harmful rays and prevent damage.
- Wax: Offers minimal UV protection.
- Sealant: Offers good UV protection.
- Ceramic Coating: Offers excellent UV protection.
7.4. Hydrophobic Properties
Hydrophobic coatings repel water, causing it to bead up and roll off the surface. This helps prevent water spots and makes it easier to clean the car.
- Wax: Offers some hydrophobic properties.
- Sealant: Offers good hydrophobic properties.
- Ceramic Coating: Offers excellent hydrophobic properties.
7.5. Chemical Resistance
Protective coatings can also resist chemicals, such as acid rain, bird poop, and tree sap, which can damage the paint.
- Wax: Offers minimal chemical resistance.
- Sealant: Offers good chemical resistance.
- Ceramic Coating: Offers excellent chemical resistance.
7.6. The Role of pH-Balanced Cleaners
Using pH-balanced cleaners is essential for maintaining the integrity of the protective coating. Harsh chemicals can strip away the coating and damage the paint.
- pH-Balanced Car Wash Soap: Helps remove dirt and grime without damaging the protective coating.
- Avoid Abrasive Cleaners: Avoid using abrasive cleaners or scouring pads, which can scratch the paint.
7.7. Scientific Studies on Paint Protection
Studies have shown that protective coatings can significantly reduce paint damage from environmental factors. For example, a study by the American Society for Testing and Materials (ASTM) found that ceramic coatings can reduce paint oxidation by up to 80%.
7.8. Protection Factor Table
| Feature | Wax | Sealant | Ceramic Coating |
|---|---|---|---|
| UV Protection | Minimal | Good | Excellent |
| Hydrophobic Properties | Some | Good | Excellent |
| Chemical Resistance | Minimal | Good | Excellent |
| Durability | Low | Medium | High |
| Ease of Application | High | Medium | Low |
7.9. Choosing the Right Protection
Choosing the right protective coating depends on your budget, lifestyle, and desired level of protection. If you want the best possible protection and are willing to invest in professional application, ceramic coating is the best choice. If you prefer a more affordable option that you can apply yourself, sealant is a good choice.
Understanding the science behind car paint protection can help you make informed decisions and take the necessary steps to keep your car looking its best.
8. DIY vs. Professional Car Paint Repair
When faced with car paint damage from bird poop, you might wonder whether to tackle the repair yourself (DIY) or hire a professional. Both options have their pros and cons, depending on the severity of the damage, your skill level, and your budget.
8.1. DIY Repair
DIY repair involves fixing the damage yourself using readily available tools and materials.
Pros:
- Cost-Effective: DIY repair is generally cheaper than hiring a professional.
- Convenience: You can repair the damage at your own pace and on your own schedule.
- Learning Experience: DIY repair can be a valuable learning experience.
Cons:
- Time-Consuming: DIY repair can take a significant amount of time, especially if you are not experienced.
- Risk of Further Damage: If not done correctly, DIY repair can worsen the damage.
- Quality Concerns: The quality of the repair may not be as high as a professional repair.
8.2. Professional Repair
Professional repair involves hiring a qualified detailer or body shop to fix the damage.
Pros:
- High-Quality Repair: Professionals have the experience, skills, and equipment to perform high-quality repairs.
- Time-Saving: Professionals can complete the repair much faster than you could do it yourself.
- Reduced Risk of Damage: Professionals know how to repair the damage without causing further harm to the paint.
Cons:
- Costly: Professional repair can be expensive, especially for severe damage.
- Scheduling: You may need to schedule an appointment and wait for the repair to be completed.
8.3. Factors to Consider
Several factors can help you decide whether to DIY or hire a professional:
- Severity of Damage: Minor damage, such as Type I etching, can often be repaired DIY. Severe damage, such as Type II etching, may require professional attention.
- Skill Level: If you are comfortable using polishing machines and wet sanding, you may be able to handle the repair yourself. If not, it is best to hire a professional.
- Budget: If you are on a tight budget, DIY repair may be the better option. If you are willing to invest in a high-quality repair, professional repair is the way to go.
- Time Availability: If you have plenty of time and enjoy working on cars, DIY repair may be a good choice. If you are short on time, professional repair is the better option.
8.4. Cost Comparison Table
| Item | DIY Cost | Professional Cost |
|---|---|---|
| Cleaning Supplies | $30 – $50 | Included |
| Polishing Compounds | $40 – $80 | Included |
| Buffing Pads | $30 – $60 | Included |
| Polishing Machine (Rental) | $20 – $40/day | Included |
| Protective Coating | $20 – $50 | Included |
| Labor | $0 | $50 – $100/hour |
| Total Cost | $140 – $280 | $200 – $1000+ |
8.5. DIY Repair Checklist
If you decide to tackle the repair yourself, make sure you have the following:
- Essential tools and materials
- A clear understanding of the repair process
- A safe and well-lit work area
- Patience and attention to detail
8.6. Finding a Reputable Professional
If you decide to hire a professional, do your research and choose a reputable detailer or body shop. Look for the following:
- Positive reviews and testimonials
- Experience with car paint repair
- Proper certifications and licenses
- A clear and detailed estimate
8.7. Scenarios
| Scenario | Recommended Approach |
|---|---|
| Minor Type I etching | DIY |
| Severe Type II etching | Professional |
| Limited budget | DIY |
| Time constraints | Professional |
| Lack of experience | Professional |
| Desire for high-quality repair | Professional |
Choosing between DIY and professional car paint repair depends on your individual circumstances. Carefully consider the factors listed above and make the decision that is best for you.
9. Common Mistakes to Avoid When Repairing Car Paint
Repairing car paint, especially