How To Fix A Strut On A Car: Expert Guide
How To Fix A Strut On A Car involves more than just replacing a worn part; it’s about restoring your vehicle’s handling, safety, and overall driving experience. At CARDIAGTECH.NET, we provide the tools and expertise needed to tackle this essential repair, ensuring optimal performance. Replacing struts enhances vehicle safety, improves handling, and extends tire life, making it a worthwhile investment. Explore strut replacement, suspension repair, and automotive maintenance for a smoother, safer ride.
1. Understanding the Importance of Struts
Struts are a critical part of your vehicle’s suspension system. They provide structural support and damping to control spring and suspension movement. Over time, struts wear out, which can lead to reduced handling, increased stopping distance, and uneven tire wear. Recognizing the signs of worn struts is the first step in ensuring your vehicle remains safe and performs optimally.
1.1. What Are Struts and How Do They Work?
Struts are a key component of a vehicle’s suspension system, combining the functions of a shock absorber and a suspension support. Unlike shock absorbers, which primarily dampen the spring’s oscillations, struts also provide structural support to the vehicle’s suspension, influencing wheel alignment and handling.
- Functionality: Struts control the amount of bounce, roll, and sway in a vehicle, providing a smoother and more stable ride.
- Components: A strut assembly typically includes the strut itself (which houses the shock absorber), a coil spring, a strut mount, and other related hardware. The strut mount connects the strut assembly to the vehicle’s frame.
- Impact on Vehicle Performance: When struts are in good condition, they help maintain consistent tire contact with the road, improving braking performance and handling.
1.2. Identifying Signs of Worn Struts
Recognizing the symptoms of worn struts is crucial for maintaining vehicle safety and performance. Here are some common indicators:
- Bouncing Ride: One of the most noticeable signs of worn struts is excessive bouncing after hitting a bump. If your car continues to bounce several times, it indicates that the struts are no longer effectively damping the spring’s motion.
- Increased Stopping Distance: Worn struts can significantly increase your stopping distance. The vehicle’s weight may shift excessively during braking, reducing the tires’ grip on the road.
- Uneven Tire Wear: Struts that are not performing correctly can cause uneven tire wear. Look for cupping or scalloping patterns on your tires, which indicate that the tires are bouncing instead of maintaining consistent contact with the road.
- Leaking Fluid: Inspect the struts for signs of leaking hydraulic fluid. A wet or oily strut body indicates that the seal has failed, and the strut is losing its damping capability.
- Nose Diving During Braking: If your vehicle’s front end dips excessively when you brake, it could be a sign of worn struts. This “nose diving” effect reduces braking efficiency and can be dangerous.
- Difficulty Steering: Worn struts can affect steering responsiveness, making it harder to control the vehicle, especially during turns or sudden maneuvers.
- Unusual Noises: Clunking or knocking sounds, especially when driving over bumps, can indicate that the strut assembly is loose or damaged.
1.3. The Importance of Timely Strut Replacement
Replacing worn struts in a timely manner is essential for several reasons:
- Safety: Worn struts compromise vehicle stability and control, increasing the risk of accidents. Replacing them restores handling and reduces stopping distances.
- Ride Comfort: New struts provide a smoother, more comfortable ride by effectively absorbing road imperfections.
- Tire Life: Replacing struts can prevent uneven tire wear, extending the lifespan of your tires and saving you money in the long run.
- Suspension Component Protection: Worn struts can cause excessive stress on other suspension components, such as ball joints and control arm bushings. Replacing them helps protect these components from premature wear.
- Fuel Efficiency: By maintaining proper wheel alignment and reducing rolling resistance, new struts can contribute to improved fuel efficiency.
1.4. Understanding Different Types of Struts
Struts come in various designs, each suited for specific vehicle types and driving conditions. Understanding the different types can help you choose the best option for your needs.
- Conventional Struts: These are the most common type, found in many passenger cars. They provide basic damping and support.
- Gas-Charged Struts: These struts use pressurized gas to enhance damping performance, reducing body roll and improving handling.
- Electronic Struts: Found in high-end vehicles, electronic struts use sensors and electronic controls to adjust damping characteristics in real-time, providing optimal ride and handling.
- Coilover Struts: These struts combine the strut and coil spring into a single unit, allowing for adjustable ride height and damping. They are often used in performance and racing applications.
- Air Struts: Typically found in luxury cars and SUVs, air struts use air springs instead of coil springs, providing a smooth and adjustable ride.
Understanding the different types of struts and their functions can help you make an informed decision when it’s time for a replacement. At CARDIAGTECH.NET, our experts can guide you in selecting the best struts for your vehicle, ensuring optimal performance and safety.
Alt: A complete strut assembly shows a combination of coil spring, strut, and mount which are essential for vehicle suspension support.
2. Essential Tools and Materials
Before you begin, gather all the necessary tools and materials to ensure a smooth and efficient strut replacement. Having the right equipment not only makes the job easier but also ensures your safety and the quality of the repair. At CARDIAGTECH.NET, we offer a wide range of high-quality tools designed for automotive repairs, including strut replacements.
2.1. List of Required Tools
- Socket Set: A comprehensive socket set with various sizes is essential for removing and installing strut components. Look for a set that includes both metric and standard sizes.
- Wrench Set: Wrenches are needed for tightening bolts and nuts. A combination wrench set with open-end and box-end wrenches is ideal.
- Torque Wrench: A torque wrench is crucial for tightening fasteners to the manufacturer’s specified torque. This ensures proper installation and prevents damage to components.
- Strut Spring Compressor: This tool is used to safely compress the coil spring when disassembling the strut assembly. It is essential for safety and should be used with caution.
- Jack and Jack Stands: A hydraulic jack and jack stands are necessary for lifting and supporting the vehicle. Ensure the jack stands are sturdy and rated for the vehicle’s weight.
- Wheel Chocks: Wheel chocks are used to prevent the vehicle from rolling while it is lifted. Place them behind the rear wheels for added safety.
- Penetrating Oil: Penetrating oil helps loosen rusted or corroded bolts and nuts, making them easier to remove.
- Hammer: A hammer can be used to gently tap components loose or to seat them properly.
- Pry Bar: A pry bar is useful for separating components that are stuck together.
- Allen Wrench Set: Some strut assemblies use Allen bolts, so an Allen wrench set is necessary.
- Screwdrivers: Both flathead and Phillips screwdrivers may be needed for various tasks.
- Safety Glasses: Safety glasses protect your eyes from debris and fluids.
- Gloves: Gloves protect your hands from dirt, grease, and sharp edges.
- Work Light: A work light provides adequate illumination for working under the vehicle.
2.2. Necessary Materials and Replacement Parts
- New Strut Assemblies: Purchase complete strut assemblies that include the strut, coil spring, and strut mount. This simplifies the replacement process and ensures all components are in good condition.
- New Strut Mounts: If you are not using complete strut assemblies, consider replacing the strut mounts. These can wear out over time and cause noise and vibration.
- New Coil Springs: Inspect the coil springs for signs of damage or wear. If they are cracked or weakened, replace them.
- New Hardware: Use new nuts, bolts, and washers to ensure a secure and reliable installation.
- Brake Cleaner: Brake cleaner can be used to clean components and remove grease and dirt.
- Anti-Seize Compound: Apply anti-seize compound to bolts and nuts to prevent corrosion and make them easier to remove in the future.
- Shop Rags: Shop rags are useful for wiping up spills and cleaning components.
2.3. Where to Purchase Quality Tools and Parts
Purchasing high-quality tools and parts is essential for a successful strut replacement. Here are some recommended sources:
- CARDIAGTECH.NET: We offer a wide range of automotive tools and parts, including strut assemblies, spring compressors, and socket sets. Our products are designed for durability and performance, ensuring you have the right equipment for the job. Visit our website or contact us at +1 (641) 206-8880 for expert advice and assistance.
- Auto Parts Stores: Local auto parts stores such as NAPA, AutoZone, and Advance Auto Parts carry a variety of tools and parts. They often have knowledgeable staff who can help you find the right products for your vehicle.
- Online Retailers: Online retailers like Amazon and eBay offer a wide selection of tools and parts at competitive prices. Be sure to read reviews and check the seller’s reputation before making a purchase.
- Specialty Tool Suppliers: Specialty tool suppliers such as Snap-on and Mac Tools offer high-end tools designed for professional mechanics. These tools are known for their quality and durability.
2.4. Safety Gear: Protecting Yourself During the Process
Safety should always be a top priority when working on your vehicle. Here are some essential safety gear items:
- Safety Glasses: Wear safety glasses to protect your eyes from flying debris and fluids.
- Gloves: Wear gloves to protect your hands from dirt, grease, and sharp edges.
- Steel-Toed Boots: Wear steel-toed boots to protect your feet from dropped tools and heavy components.
- Hearing Protection: Wear earplugs or earmuffs to protect your hearing from loud noises.
- Respirator: If you are working with chemicals or in a dusty environment, wear a respirator to protect your lungs.
Having the right tools, materials, and safety gear is crucial for a successful and safe strut replacement. At CARDIAGTECH.NET, we are committed to providing you with the highest quality products and resources to help you get the job done right.
Alt: An array of essential tools for strut replacement including wrenches, sockets, a strut spring compressor, and safety glasses.
3. Step-by-Step Guide to Replacing Struts
Replacing struts can seem like a daunting task, but with the right tools and a detailed guide, it can be a manageable DIY project. This step-by-step guide provides clear instructions and safety tips to help you replace your struts efficiently and safely. At CARDIAGTECH.NET, we emphasize the importance of following each step carefully to ensure the job is done correctly.
3.1. Preparing the Vehicle for Strut Replacement
- Gather Your Tools and Materials: Ensure you have all the necessary tools, replacement struts, and hardware. Refer to Section 2 for a detailed list.
- Park on a Level Surface: Park the vehicle on a level surface and engage the parking brake.
- Loosen the Lug Nuts: Use a lug wrench to loosen the lug nuts on the wheel of the strut you will be replacing. Do not remove them completely at this stage.
- Chock the Rear Wheels: Place wheel chocks behind the rear wheels to prevent the vehicle from rolling.
- Lift the Vehicle: Use a hydraulic jack to lift the vehicle. Place the jack under the vehicle’s frame near the wheel you are working on. Consult your vehicle’s manual for the correct jacking points.
- Secure with Jack Stands: Once the vehicle is lifted to the desired height, place jack stands under the frame near the jacking point. Ensure the jack stands are securely positioned and rated for the vehicle’s weight.
- Lower the Vehicle onto Jack Stands: Slowly lower the vehicle onto the jack stands. Make sure the vehicle is stable before proceeding.
- Remove the Wheel: Finish removing the lug nuts and take off the wheel.
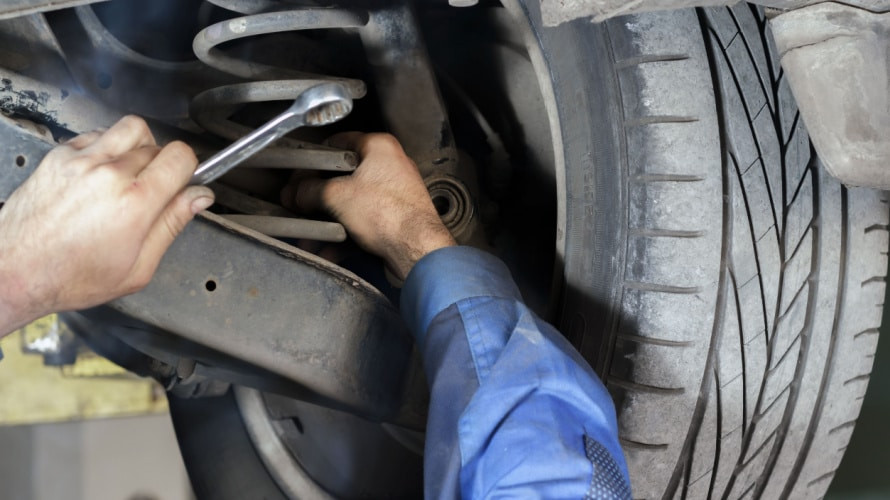
3.2. Removing the Old Strut Assembly
- Disconnect ABS and Brake Lines: If your vehicle has ABS and brake lines attached to the strut, carefully disconnect them. Use a wrench to loosen any retaining bolts or clips. Be careful not to damage the lines.
- Remove the Brake Caliper: Remove the brake caliper and rotor if necessary. Support the caliper with a bungee cord or wire to prevent strain on the brake line.
- Loosen Strut Mounting Bolts: Locate the bolts that attach the strut to the steering knuckle. Spray them with penetrating oil and let it sit for a few minutes. Use a wrench and socket to loosen the bolts.
- Support the Steering Knuckle: Use a jack stand or support to hold the steering knuckle in place once the strut is removed. This prevents the axle from over-extending and damaging other components.
- Remove the Strut Mounting Bolts: Completely remove the strut mounting bolts. You may need to use a hammer to gently tap the strut loose from the steering knuckle.
- Access the Upper Strut Mount: Open the hood and locate the upper strut mount. Remove any covers or components that are in the way.
- Loosen the Upper Strut Mount Nuts: Use a socket to loosen the nuts holding the upper strut mount to the vehicle’s frame. Do not remove them completely at this stage.
- Support the Strut Assembly: Have a helper support the strut assembly from below while you remove the last nut on the upper strut mount.
- Remove the Strut Assembly: Carefully remove the last nut and lower the strut assembly out of the vehicle.
3.3. Preparing the New Strut Assembly
- Inspect the New Strut Assembly: Check the new strut assembly for any signs of damage. Ensure all components are included and in good condition.
- Compare with the Old Strut Assembly: Compare the new strut assembly with the old one to ensure they are the same size and configuration.
- Transfer Any Necessary Components: If necessary, transfer any components from the old strut assembly to the new one. This may include ABS sensors, brake line brackets, or other hardware.
3.4. Installing the New Strut Assembly
- Position the New Strut Assembly: Carefully position the new strut assembly into the vehicle. Align the upper strut mount with the mounting holes in the vehicle’s frame.
- Install the Upper Strut Mount Nuts: Install the nuts on the upper strut mount and tighten them to the manufacturer’s specified torque.
- Align the Strut with the Steering Knuckle: Align the strut with the steering knuckle and insert the mounting bolts.
- Tighten the Strut Mounting Bolts: Tighten the strut mounting bolts to the manufacturer’s specified torque.
- Reattach ABS and Brake Lines: Reattach any ABS and brake lines that were disconnected. Ensure they are securely fastened and properly routed.
- Reinstall the Brake Caliper and Rotor: Reinstall the brake caliper and rotor if they were removed.
- Reinstall the Wheel: Mount the wheel back onto the hub and tighten the lug nuts by hand.
- Lower the Vehicle: Use the hydraulic jack to lift the vehicle slightly. Remove the jack stands and lower the vehicle to the ground.
- Torque the Lug Nuts: Use a torque wrench to tighten the lug nuts to the manufacturer’s specified torque.
3.5. Final Checks and Adjustments
- Check All Connections: Double-check all connections to ensure they are secure and properly tightened.
- Test the Brakes: Pump the brake pedal several times to ensure the brakes are functioning properly.
- Test Drive the Vehicle: Take the vehicle for a test drive to check for any unusual noises or handling issues.
- Get a Wheel Alignment: After replacing the struts, it is essential to get a wheel alignment to ensure proper handling and tire wear.
3.6. Tips for a Smooth Replacement Process
- Read the Vehicle’s Service Manual: Consult your vehicle’s service manual for specific instructions and torque specifications.
- Use Penetrating Oil: Apply penetrating oil to any rusted or corroded bolts and nuts to make them easier to remove.
- Take Your Time: Do not rush the process. Take your time and follow each step carefully.
- Ask for Help: If you are unsure about any step, ask a friend or professional mechanic for assistance.
By following these steps and tips, you can successfully replace your struts and restore your vehicle’s handling and safety. At CARDIAGTECH.NET, we are here to support you with high-quality tools and expert advice.
Alt: Replacing a strut assembly involves carefully positioning the new strut and tightening the mounting bolts for vehicle stability.
4. Safety Precautions
Replacing struts involves working with heavy components and potentially dangerous tools. Following safety precautions is crucial to prevent injuries and ensure a successful repair. At CARDIAGTECH.NET, we prioritize safety and recommend that all DIY mechanics take the necessary steps to protect themselves and their vehicles.
4.1. Importance of Using a Spring Compressor Safely
A spring compressor is used to compress the coil spring when disassembling a strut assembly. Improper use of a spring compressor can lead to serious injury or death. Here are some important safety precautions:
- Read the Instructions: Always read and follow the manufacturer’s instructions for the spring compressor.
- Inspect the Compressor: Inspect the spring compressor for any signs of damage or wear before each use. Do not use a damaged compressor.
- Use the Correct Size Compressor: Use a spring compressor that is designed for the size and type of coil spring you are working with.
- Position the Compressor Correctly: Position the spring compressor so that it is securely attached to the coil spring. Ensure the compressor jaws are properly seated and will not slip off.
- Compress the Spring Gradually: Compress the spring gradually, alternating between the compressor jaws to maintain even pressure.
- Keep a Safe Distance: Keep a safe distance from the spring compressor while compressing the spring. If the spring were to slip or break, it could cause serious injury.
- Wear Safety Glasses: Always wear safety glasses to protect your eyes from flying debris.
- Do Not Over-Compress: Do not over-compress the spring. Only compress it enough to remove the strut mount.
4.2. Proper Use of Jack Stands
Jack stands are used to support the vehicle while you are working underneath it. Improper use of jack stands can cause the vehicle to fall, resulting in serious injury or death. Here are some important safety precautions:
- Use on a Level Surface: Always use jack stands on a level, solid surface.
- Use the Correct Rating: Use jack stands that are rated for the weight of your vehicle. Consult your vehicle’s manual for the correct weight rating.
- Position Correctly: Position the jack stands under the vehicle’s frame near the jacking points. Consult your vehicle’s manual for the correct placement.
- Ensure Secure Placement: Make sure the jack stands are securely positioned and will not slip or tip over.
- Lower the Vehicle Slowly: Slowly lower the vehicle onto the jack stands.
- Check Stability: Before working under the vehicle, check to make sure it is stable and will not move.
- Never Work Under a Vehicle Supported Only by a Jack: Always use jack stands to support the vehicle. Never rely solely on a jack.
4.3. Handling Hazardous Materials
Replacing struts may involve handling hazardous materials such as brake cleaner, penetrating oil, and used oil. Here are some important safety precautions:
- Read the Labels: Always read and follow the manufacturer’s instructions and safety precautions on the product labels.
- Wear Gloves: Wear gloves to protect your hands from chemicals and contaminants.
- Wear Safety Glasses: Wear safety glasses to protect your eyes from splashes and fumes.
- Work in a Well-Ventilated Area: Work in a well-ventilated area to avoid inhaling harmful fumes.
- Dispose of Properly: Dispose of used oil and other hazardous materials properly. Consult your local regulations for proper disposal methods.
- Avoid Contact with Skin and Eyes: Avoid contact with skin and eyes. If contact occurs, rinse immediately with plenty of water and seek medical attention.
- Store Safely: Store hazardous materials in a safe place, away from children and pets.
4.4. General Safety Tips for Automotive Work
- Disconnect the Battery: Disconnect the negative battery cable before starting any work on the vehicle. This will prevent electrical shocks and accidental starting of the engine.
- Wear Appropriate Clothing: Wear appropriate clothing, including closed-toe shoes and snug-fitting clothes. Avoid wearing loose clothing or jewelry that could get caught in moving parts.
- Use Proper Lighting: Use proper lighting to ensure you can see what you are doing.
- Keep Your Work Area Clean: Keep your work area clean and organized to prevent accidents.
- Take Breaks: Take breaks to avoid fatigue.
- Know Your Limits: Know your limits and do not attempt repairs that are beyond your skill level.
By following these safety precautions, you can minimize the risk of injury and ensure a safe and successful strut replacement. At CARDIAGTECH.NET, we are committed to providing you with the resources and information you need to stay safe while working on your vehicle.
Alt: Safe strut replacement ensures wearing safety glasses and using a spring compressor correctly to prevent potential injuries.
5. Troubleshooting Common Issues
Even with careful preparation and execution, you may encounter issues during a strut replacement. Troubleshooting these common problems can help you complete the job successfully. At CARDIAGTECH.NET, we provide expert advice and solutions to help you overcome these challenges.
5.1. Stripped Bolts and Nuts
Stripped bolts and nuts can be a frustrating problem during any automotive repair. Here are some tips for dealing with them:
- Use Penetrating Oil: Apply penetrating oil to the stripped bolt or nut and let it sit for a few minutes. This can help loosen any corrosion and make it easier to remove.
- Use a Socket Extractor: A socket extractor is a specialized tool designed to grip stripped bolts and nuts. Place the extractor over the bolt or nut and use a wrench to turn it.
- Use a Hammer and Chisel: If the bolt or nut is severely stripped, you may need to use a hammer and chisel to loosen it. Place the chisel on the edge of the bolt or nut and tap it with the hammer to try to turn it.
- Use a Bolt Extractor Kit: A bolt extractor kit includes a variety of tools for removing stripped bolts and nuts. Follow the instructions in the kit for the best results.
- Heat the Bolt or Nut: Applying heat to the bolt or nut can help loosen it. Use a propane torch to heat the bolt or nut for a few seconds, then try to remove it. Be careful not to overheat the surrounding components.
- Drill Out the Bolt or Nut: As a last resort, you may need to drill out the bolt or nut. Use a drill bit that is slightly smaller than the diameter of the bolt or nut. Drill through the center of the bolt or nut, then use a screw extractor to remove the remaining piece.
5.2. Stuck Strut Assemblies
Sometimes, the strut assembly may be difficult to remove due to corrosion or rust. Here are some tips for freeing a stuck strut assembly:
- Apply Penetrating Oil: Apply penetrating oil to the strut mounting bolts and the upper strut mount nuts. Let it sit for a few minutes to allow the oil to penetrate.
- Use a Hammer: Use a hammer to gently tap the strut assembly. Be careful not to damage the strut or surrounding components.
- Use a Pry Bar: Use a pry bar to gently pry the strut assembly loose from the steering knuckle. Be careful not to damage the steering knuckle or other components.
- Rotate the Strut: Try rotating the strut assembly back and forth to break it free from the steering knuckle.
- Heat the Steering Knuckle: Applying heat to the steering knuckle can help loosen the strut assembly. Use a propane torch to heat the steering knuckle for a few seconds, then try to remove the strut assembly.
5.3. Coil Spring Compression Issues
Compressing the coil spring can be a challenging and potentially dangerous task. Here are some tips for dealing with coil spring compression issues:
- Use the Correct Spring Compressor: Use a spring compressor that is designed for the size and type of coil spring you are working with.
- Position the Compressor Correctly: Position the spring compressor so that it is securely attached to the coil spring. Ensure the compressor jaws are properly seated and will not slip off.
- Compress the Spring Gradually: Compress the spring gradually, alternating between the compressor jaws to maintain even pressure.
- Inspect the Spring Compressor: Inspect the spring compressor for any signs of damage or wear before each use. Do not use a damaged compressor.
- Wear Safety Glasses: Always wear safety glasses to protect your eyes from flying debris.
- Do Not Over-Compress: Do not over-compress the spring. Only compress it enough to remove the strut mount.
5.4. Difficulty Aligning the New Strut
Aligning the new strut with the steering knuckle can sometimes be difficult. Here are some tips for aligning the new strut:
- Use a Pry Bar: Use a pry bar to gently align the strut with the steering knuckle.
- Use a Jack: Use a jack to slightly raise or lower the steering knuckle to align it with the strut.
- Loosen the Suspension Components: Loosen the suspension components, such as the ball joint or control arm, to allow more movement and make it easier to align the strut.
- Use a Helper: Ask a helper to assist you in aligning the strut with the steering knuckle.
5.5. Noisy Suspension After Replacement
If you notice unusual noises after replacing the struts, here are some possible causes and solutions:
- Loose Bolts or Nuts: Check all bolts and nuts to ensure they are properly tightened.
- Worn Strut Mounts: Replace the strut mounts if they are worn or damaged.
- Incorrect Installation: Double-check the installation to ensure all components are installed correctly.
- Damaged Components: Inspect the surrounding suspension components for any signs of damage.
- Wheel Alignment: Get a wheel alignment to ensure the suspension is properly aligned.
By troubleshooting these common issues, you can successfully complete your strut replacement and ensure your vehicle is safe and performing optimally. At CARDIAGTECH.NET, we are committed to providing you with the resources and support you need to overcome any challenges you may encounter.
Alt: Troubleshooting a strut replacement involves checking for stripped bolts, stuck assemblies, and alignment issues for safe installation.
6. Maintenance Tips to Extend Strut Life
Proper maintenance can significantly extend the lifespan of your struts and keep your vehicle running smoothly. At CARDIAGTECH.NET, we believe in proactive maintenance to prevent costly repairs and ensure optimal performance.
6.1. Regular Inspections
Regularly inspecting your struts can help you identify potential problems early on. Here are some things to look for:
- Check for Leaks: Inspect the struts for signs of leaking hydraulic fluid. A wet or oily strut body indicates that the seal has failed.
- Look for Damage: Check the struts for any signs of physical damage, such as dents or cracks.
- Inspect the Strut Mounts: Check the strut mounts for signs of wear or damage. Look for cracks, tears, or excessive movement.
- Bounce Test: Perform a bounce test by pushing down on each corner of the vehicle and releasing it. The vehicle should rebound once and then settle. If it continues to bounce, the struts may be worn.
- Listen for Noises: Listen for any unusual noises, such as clunking or knocking sounds, when driving over bumps.
6.2. Proper Driving Habits
Your driving habits can significantly impact the lifespan of your struts. Here are some tips for driving in a way that minimizes wear and tear on your struts:
- Avoid Potholes and Bumps: Drive around potholes and bumps whenever possible. Hitting these obstacles can cause significant stress on your struts.
- Slow Down on Rough Roads: Slow down when driving on rough roads or gravel. This will reduce the amount of impact on your struts.
- Avoid Overloading the Vehicle: Avoid overloading the vehicle with excessive weight. Overloading can put extra stress on the struts and cause them to wear out more quickly.
- Drive Smoothly: Avoid sudden acceleration, braking, and turning. Smooth driving can help reduce stress on the struts and other suspension components.
6.3. Keeping Suspension Components Clean
Keeping your suspension components clean can help prevent corrosion and extend their lifespan. Here are some tips for cleaning your suspension components:
- Wash the Undercarriage: Regularly wash the undercarriage of your vehicle to remove dirt, salt, and other contaminants.
- Use a Pressure Washer: Use a pressure washer to clean hard-to-reach areas.
- Apply a Protective Coating: Apply a protective coating to the suspension components to prevent corrosion.
6.4. Maintaining Correct Tire Pressure
Maintaining the correct tire pressure is important for both safety and strut life. Here are some tips for maintaining proper tire pressure:
- Check Tire Pressure Regularly: Check your tire pressure at least once a month.
- Use a Tire Pressure Gauge: Use a tire pressure gauge to check the pressure.
- Inflate to the Recommended Pressure: Inflate your tires to the recommended pressure, which is listed on the tire placard or in your vehicle’s manual.
- Adjust for Temperature: Adjust your tire pressure for temperature changes. Tire pressure decreases in cold weather and increases in hot weather.
6.5. Regular Wheel Alignments
Regular wheel alignments are essential for maintaining proper handling and tire wear. They also help extend the life of your struts. Here are some tips for wheel alignments:
- Get a Wheel Alignment After Strut Replacement: Always get a wheel alignment after replacing your struts.
- Get a Wheel Alignment Regularly: Get a wheel alignment at least once a year, or more often if you notice any handling issues or uneven tire wear.
- Check for Suspension Damage: Have your suspension components inspected for damage before getting a wheel alignment.
By following these maintenance tips, you can extend the lifespan of your struts and keep your vehicle running smoothly. At CARDIAGTECH.NET, we are committed to providing you with the products and information you need to maintain your vehicle properly.
Alt: Extending strut life involves washing the undercarriage to prevent corrosion, maintaining correct tire pressure, and getting regular wheel alignments.
7. Cost Analysis: DIY vs. Professional Repair
Replacing struts involves a significant investment, whether you choose to do it yourself or hire a professional. Understanding the costs associated with each option can help you make an informed decision. At CARDIAGTECH.NET, we provide you with the resources and tools to make DIY repairs more affordable and efficient.
7.1. Cost of DIY Strut Replacement
The cost of a DIY strut replacement includes the cost of the replacement struts, tools, and materials. Here is a breakdown of the typical costs:
- Replacement Struts: The cost of replacement struts can range from $100 to $500 per strut, depending on the make and model of your vehicle and the quality of the struts.
- Tools: If you do not already have the necessary tools, you may need to purchase them. A basic set of tools, including a socket set, wrench set, torque wrench, and spring compressor, can cost between $100 and $500. At CARDIAGTECH.NET, we offer a wide range of high-quality tools at competitive prices.
- Materials: You will also need to purchase materials such as penetrating oil, brake cleaner, anti-seize compound, and new hardware. These materials typically cost between $20 and $50.
- Wheel Alignment: After replacing the struts, you will need to get a wheel alignment. A wheel alignment typically costs between $50 and $150.
Total Cost of DIY Strut Replacement: The total cost of a DIY strut replacement can range from $270 to $1150, depending on the cost of the struts, tools, and materials.
Here’s a sample cost table:
| Item | Estimated Cost (USD) |
|---|---|
| Replacement Struts (Pair) | $200 – $1000 |
| Tools (if needed) | $100 – $500 |
| Materials | $20 – $50 |
| Wheel Alignment | $50 – $150 |
| Total | $370 – $1700 |
7.2. Cost of Professional Strut Replacement
The cost of a professional strut replacement includes the cost of the replacement struts, labor, and shop fees. Here is a breakdown of the typical costs:
- Replacement Struts: The cost of replacement struts is typically the same as for a DIY replacement, ranging from $100 to $500 per strut.
- Labor: Labor costs can range from $100 to $300 per strut, depending on the shop’s hourly rate and the complexity of the job.
- Shop Fees: Shop fees can include costs such as disposal fees, parts markup, and administrative fees. These fees can add an additional $50 to $200 to the total cost.
- Wheel Alignment: As with a DIY replacement, you will need to get a wheel alignment after replacing the struts.
Total Cost of Professional Strut Replacement: The total cost of a professional strut replacement can range from $350 to $1200 per strut, or $700 to $2400 for a pair, depending on the cost of the struts, labor, and shop fees.
Here’s a sample cost table:
| Item | Estimated Cost (USD) |
|---|---|
| Replacement Struts (Pair) | $200 – $1000 |
| Labor (Pair) | $200 – $600 |
| Shop Fees | $50 – $200 |
| Wheel Alignment | $50 – $150 |
| Total | $500 – $1950 |
7.3. Factors to Consider When Choosing Between DIY and Professional Repair
When deciding whether to DIY or hire a professional for your strut replacement, consider the following factors:
- Skill Level: Do you have the necessary skills and experience to safely and effectively replace the struts?
- Time: Do you have the time to complete the repair? A DIY strut replacement can take several hours.
- Tools: Do you have the