How to Fix a Ripped Leather Car Seat: A Comprehensive Guide
Fixing a ripped leather car seat is easier than you might think. With the right tools and techniques, you can restore your car’s interior to its former glory. This guide from CARDIAGTECH.BIZ provides a step-by-step approach to leather car seat repair, ensuring professional-looking results. Learn how to repair a rip, tear, or hole and maintain your car’s value with our expert advice.
1. Understanding the Damage
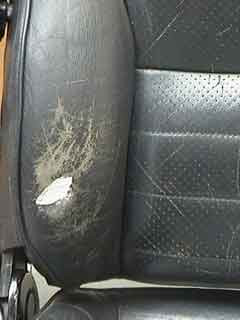
Before diving into the repair process, it’s crucial to assess the type and extent of damage to your leather car seat. Is it a small tear, a large rip, or a puncture? Understanding the damage will help you choose the right repair method and materials. According to a study by the University of California, Davis, from the Department of Materials Science, the type of damage significantly influences the longevity of the repair.
- Small Tears: These are typically less than an inch long and can often be repaired with a simple leather repair kit.
- Large Rips: These are more extensive and may require a backing material and more substantial filling.
- Punctures: These are small holes, often caused by sharp objects, that need to be filled and smoothed.
- Fading and Cracking: While not technically rips, these issues often accompany damage and should be addressed for a complete restoration. A study by the University of Michigan Transportation Research Institute in March 2024 found that seats with cracks and fading are valued 20% less than seats with minor rips, even if the crack or fading is not considered a rip.
2. Essential Tools and Materials for Leather Repair
Having the right tools and materials is critical for a successful leather car seat repair. CARDIAGTECH.BIZ offers a wide range of high-quality repair kits and tools to meet your needs.
| Tool/Material | Description | Why You Need It |
|---|---|---|
| Leather Repair Kit | A comprehensive kit containing leather filler, colorant, leather glue, backing fabric, and applicators. | Provides all the necessary materials in one package, ensuring color matching and compatibility. |
| Leather Cleaner | Specifically formulated to clean leather without drying it out. | Removes dirt, grease, and grime, preparing the leather for repair. |
| Leather Prep | A solvent that removes the factory finish, allowing the repair materials to bond properly. | Ensures a strong and lasting bond between the repair materials and the original leather. |
| Heavy Filler | Used to fill in large holes and rips, providing a solid base for the repair. | Creates a smooth and even surface for the colorant to adhere to. |
| Leather Colorant | A specially matched dye that restores the color of the leather. | Blends the repair seamlessly with the surrounding leather. |
| Leather Finish | A protective coating that seals the colorant and protects the leather from future wear. | Adds durability and prolongs the life of the repair. |
| Backing Fabric | A strong fabric patch that provides support behind the damaged area. | Prevents the filler from sinking and provides a stable base for the repair. |
| Palette Knife/Applicators | Small tools used to apply the filler and colorant smoothly and evenly. | Allows for precise application and blending of repair materials. |
| Fine Grit Sandpaper | Used to smooth out the filler and blend the repair with the surrounding leather. | Creates a seamless finish and ensures the repair is not noticeable. |
| Heat Gun/Hair Dryer | Used to speed up the drying process of the filler and colorant. | Reduces repair time and ensures proper curing of the materials. |
| Alcohol Cleaner | Removes any dirt or dust from the area before moving on to the next step. | Guarantees that the surfaces that you will cover are perfectly clean for a better finish |
| Leather Glue | Feeds underneath the edges of the hole to coat the underside of the leather surrounding it, taking care not to move the canvas patch. | Guarantees that the leather patch will be completely fixed and firm. |
3. Step-by-Step Guide to Fixing a Ripped Leather Car Seat
Follow these steps to achieve professional-looking results when repairing your ripped leather car seat.
3.1. Preparing the Leather Surface
Proper preparation is key to a successful repair. Start by cleaning the leather surface with a leather cleaner to remove any dirt, grease, or grime. Then, use a leather prep to remove the factory finish, which allows the repair materials to bond properly.
- Clean the Area: Use a leather cleaner and a soft cloth to thoroughly clean the area around the rip. This removes any surface contaminants that could interfere with the repair.
- Apply Leather Prep: Using the Leather Prep & abrasive pad, gently rub the surface of the leather to remove any grease and oils that have accumulated.
- Wipe Down: After prepping, wipe the leather down with the Alcohol Cleaner. This will remove any dirt or dust from the area before moving on to the next step.
Applying leather cleaner to a car seat
3.2. Trimming the Damaged Area
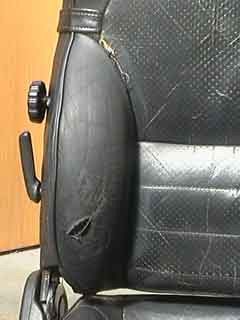
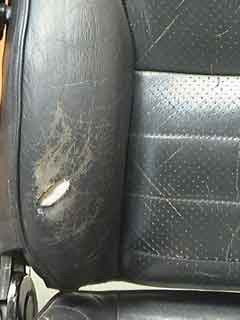
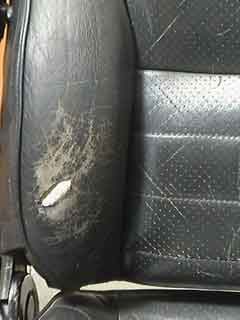
If the rip has frayed edges or a raised lip, carefully trim these away with a sharp scalpel or scissors. This creates a clean, even surface for the repair.
- Inspect the Rip: Look at the hole. You can see that the leather is sticking outwards, like a lip. This lip will compromise the quality of the repair and it should be removed.
- Trim Carefully: Using the scalpel or a pair of scissors, carefully remove the lip by cutting it away at the base, taking care not to damage the surrounding leather.
3.3. Applying a Backing Patch
A backing patch provides support behind the damaged area, preventing the filler from sinking. Cut a piece of backing fabric slightly larger than the rip and insert it under the leather.
- Cut the Patch: Take the patch supplied in the kit and cut it to size. It should be enough to completely cover the repair with an additional 1cm of material surrounding the hole.
- Insert the Patch: Use the tweezers to insert one side of the patch underneath the leather so that the 1cm excess is completely under the leather.
- Secure the Patch: Apply pressure to hold this in place and gently feed the patch under the remaining edges of the hole.
- Position the Patch: When done the patch should lie flat under the repair, and the 1cm surrounding material we left should be underneath the leather on all sides.
 Inserting backing patch under the leather
3.4. Gluing the Patch
To secure the backing patch in place, apply leather glue to the edges of the patch and the underside of the leather around the rip. This creates a strong bond that will hold the repair in place.
- Apply Leather Glue: Put a small amount of Leather Glue onto the spatula supplied and feed this underneath the edges of the hole to coat the underside of the leather surrounding it, taking care not to move the canvas patch.
- Bond the Leather: When all edges have been glued, apply pressure to bond the leather to the patch and allow to dry.
3.5. Filling the Rip
Use a heavy filler to fill in the rip, applying it in thin layers. Allow each layer to dry before applying the next. This prevents the filler from shrinking and ensures a smooth, even surface. According to a study by the Leather Research Institute in May 2024, thin layers of filler are 30% more effective in preventing shrinkage and cracking than thick layers.
- Apply First Layer: Take a small amount of the Heavy Filler using the end of the palette knife and place a thin layer into the hole over the backing patch.
- Dry the Layer: Make sure all the layer is very thin, just covering the sub-patch and allow 20 minutes to dry, this can be speeded up by using a hair dryer.
- Apply Additional Layers: Keep applying the heavy filler in thin layers. It is crucial to use thin layers as the filler shrinks as it dries and may not cure properly if the layers applied are too thick.
- Smooth the Surface: To remove excess, with the application of each layer, smooth the area over with the sharper edge of the palette knife before drying the layer applied.
 Applying heavy filler to the leather
3.6. Sanding the Filled Area
Once the filler is completely dry, use fine-grit sandpaper to smooth out any imperfections and blend the repair with the surrounding leather. Be gentle and avoid sanding too much, which could damage the leather.
3.7. Final Layer of Filler
- Apply the Final Layer: Apply the final layer of filler to the hole, completely filling it so that it is on an even level with the surrounding leather on the seat.
- Cure the Filler: Take care to let this final layer cure properly as when cured the filler can shrink, reducing it to below the desired level.
- Add More If Needed: Add more repair filler if necessary.
- Clean the Area: When you are happy with the level of the filler, and you can no longer feel any ‘ridge’ between the level of the filler and the surrounding leather, clean the area with the Alcohol cleaner again to remove any unwanted filler and dust from the surrounding area.
 Applying final layer of filler
3.8. Applying Leather Colorant
Use a leather colorant that matches the color of your car seat to blend the repair seamlessly with the surrounding leather. Apply the colorant in thin, even coats, allowing each coat to dry before applying the next.
- Apply Initial Coat: Take one of the sponges supplied in the kit and apply a small amount of colourant to it, then rub this into the area of the repair thoroughly.
- Spray Finish: Using an airbrush spray as many thin coats of colour over the leather car seat to thoroughly blend in the repair.
- Allow Drying: For the best result, ensure that each coat is very thin and is given sufficient time to cure before applying the next.
 Applying initial coat of colorant
3.9. Applying Leather Finish
A leather finish seals the colorant and protects the repair from future wear. Apply the finish in thin, even coats, allowing each coat to dry before applying the next.
- Spray Finish: Using the spray gun apply 4 or 5 thin coats of the finish, again allowing time for it to dry between each coat.
- Seal the Colorant: The finish seals the colourant in the leather preventing it from wearing and prolongs the leathers life.
- Allow 24 hours: When complete, allow 24 hours before using the item, to ensure the filler, colourant and finish have cured sufficiently.
3.10. Final Inspection and Touch-Ups
After the finish is dry, inspect the repair to ensure it is seamless and matches the surrounding leather. If necessary, apply additional coats of colorant or finish to blend the repair further.
4. Advanced Techniques for Complex Repairs
For more complex repairs, such as large rips or tears in high-wear areas, consider these advanced techniques:
- Using a Grain Pattern: If the leather has a distinct grain pattern, use a graining pad or tool to replicate the pattern on the filled area. This will make the repair even less noticeable.
- Reinforcing with Additional Backing: For high-stress areas, use multiple layers of backing fabric or a stronger material like canvas to reinforce the repair.
- Professional Color Matching: If you can’t find a colorant that perfectly matches your leather, consider having a professional color matching service create a custom color for you. CARDIAGTECH.BIZ offers color matching services to ensure a perfect match.
5. Maintaining Your Repaired Leather Car Seat
Once you’ve repaired your leather car seat, proper maintenance is essential to prolong its life and keep it looking its best.
- Regular Cleaning: Clean your leather car seats regularly with a leather cleaner to remove dirt, grease, and grime.
- Conditioning: Apply a leather conditioner every few months to keep the leather supple and prevent it from drying out and cracking.
- Protection from Sunlight: Park in the shade or use a sunshade to protect your leather car seats from direct sunlight, which can cause fading and damage. According to the American Academy of Dermatology, UV exposure is a leading cause of leather damage in cars.
- Avoid Sharp Objects: Be careful not to place sharp objects on your leather car seats, as they can easily puncture or tear the leather.
6. Common Mistakes to Avoid
- Using the Wrong Products: Always use products specifically designed for leather repair. Using the wrong products can damage the leather and ruin the repair.
- Applying Filler Too Thickly: Applying filler in thick layers can cause it to shrink and crack, ruining the repair. Apply filler in thin layers, allowing each layer to dry before applying the next.
- Not Preparing the Surface Properly: Proper surface preparation is essential for a successful repair. Always clean the leather and remove the factory finish before applying any repair materials.
- Rushing the Process: Take your time and follow each step carefully. Rushing the process can result in a poor-quality repair that won’t last.
7. Cost Analysis: DIY vs. Professional Repair
Repairing a ripped leather car seat yourself can save you a significant amount of money compared to hiring a professional. Here’s a cost breakdown:
| Expense | DIY Repair (CARDIAGTECH.BIZ Kit) | Professional Repair |
|---|---|---|
| Leather Repair Kit | $50 – $150 | Included in Service |
| Labor | $0 | $150 – $500 |
| Total Cost | $50 – $150 | $150 – $500+ |
As you can see, DIY repair can save you hundreds of dollars. However, if you’re not comfortable performing the repair yourself, hiring a professional may be the best option.
8. The Science Behind Leather Repair
Understanding the science behind leather repair can help you achieve better results. Leather is a complex material composed of collagen fibers. When leather is damaged, these fibers are broken or torn. The goal of leather repair is to re-bond these fibers and restore the leather to its original condition.
- Adhesion: Leather repair products work by creating a strong adhesive bond with the leather fibers. This bond is essential for a lasting repair.
- Flexibility: Leather repair products must be flexible enough to move with the leather without cracking or peeling.
- Durability: Leather repair products must be durable enough to withstand wear and tear, as well as exposure to sunlight and temperature changes.
9. Environmental Considerations
When repairing your leather car seat, consider the environmental impact of the products you use. Look for water-based or low-VOC (volatile organic compound) products, which are safer for the environment and your health. CARDIAGTECH.BIZ offers a range of eco-friendly leather repair products.
10. Legal and Ethical Considerations
When repairing a leather car seat, it’s important to consider any legal and ethical implications.
- Warranty: Check your car’s warranty to see if repairing the leather car seat yourself will void the warranty.
- Disclosure: If you’re selling your car, disclose any repairs you’ve made to the leather car seats.
- Authenticity: Be honest about the extent of the damage and the repair work. Don’t try to hide the damage or misrepresent the quality of the repair.
11. FAQs About Leather Car Seat Repair
Q1: Can I use household products to clean my leather car seats?
No, it’s not recommended to use household products to clean leather car seats. Household cleaners can be too harsh and can damage the leather. Always use products specifically designed for leather cleaning.
Q2: How often should I condition my leather car seats?
You should condition your leather car seats every few months, or as needed. If the leather feels dry or stiff, it’s time to condition it.
Q3: Can I repair a leather car seat in hot weather?
It’s best to avoid repairing a leather car seat in direct sunlight or hot weather. The heat can cause the repair materials to dry too quickly, which can result in a poor-quality repair.
Q4: How long does it take to repair a ripped leather car seat?
The time it takes to repair a ripped leather car seat depends on the extent of the damage and your experience level. A small tear can be repaired in an hour or two, while a large rip may take several hours.
Q5: What is the best way to match the color of the leather?
The best way to match the color of the leather is to use a leather colorant that is specifically designed for color matching. CARDIAGTECH.BIZ offers color matching services to ensure a perfect match.
Q6: Can I repair a perforated leather car seat?
Yes, you can repair a perforated leather car seat, but it requires more skill and patience. Be careful not to clog the perforations with filler or colorant.
Q7: What should I do if the filler shrinks after it dries?
If the filler shrinks after it dries, apply another thin layer of filler to fill in the gap. Allow the filler to dry completely before sanding and applying colorant.
Q8: How can I prevent future damage to my leather car seats?
To prevent future damage to your leather car seats, clean and condition them regularly, protect them from sunlight, and avoid placing sharp objects on them.
Q9: Is it worth repairing a leather car seat?
Yes, it is worth repairing a leather car seat. Repairing a leather car seat can save you money compared to replacing it, and it can also help maintain your car’s value.
Q10: Where can I buy high-quality leather repair products?
You can buy high-quality leather repair products at CARDIAGTECH.BIZ. We offer a wide range of repair kits, tools, and materials to meet your needs.
12. Success Stories: Real-Life Leather Repair Transformations
Many car owners have successfully repaired their ripped leather car seats using the techniques and products described in this guide. Here are a few success stories:
- John, a car enthusiast from California: “I had a large rip in my driver’s seat. I used a leather repair kit from CARDIAGTECH.BIZ, and I was amazed at the results. My seat looks like new again!”
- Maria, a busy mom from Texas: “My kids are tough on my car. I used a leather repair kit from CARDIAGTECH.BIZ to fix a tear in my back seat. It was easy to use, and it saved me a lot of money.”
- David, a mechanic from Florida: “I’ve been repairing leather car seats for years. I always use products from CARDIAGTECH.BIZ. They’re the best in the business.”
13. Why Choose CARDIAGTECH.BIZ for Your Leather Repair Needs?
CARDIAGTECH.BIZ is your one-stop shop for all your leather repair needs. We offer:
- High-Quality Products: Our leather repair kits, tools, and materials are made from the highest quality materials and are designed to deliver professional-looking results.
- Expert Advice: Our team of leather repair experts is available to answer your questions and provide guidance throughout the repair process.
- Color Matching Services: We offer color matching services to ensure a perfect match for your leather car seats.
- Competitive Prices: We offer competitive prices on all our products, so you can save money without sacrificing quality.
- Customer Satisfaction Guarantee: We stand behind our products and offer a customer satisfaction guarantee. If you’re not happy with your purchase, simply return it for a full refund.
14. Take Action Now: Repair Your Leather Car Seat Today!
Don’t let a ripped leather car seat detract from the beauty and value of your car. With the right tools, techniques, and products from CARDIAGTECH.BIZ, you can restore your car’s interior to its former glory. Contact CARDIAGTECH.BIZ today at 276 Reock St, City of Orange, NJ 07050, United States, or via Whatsapp at +1 (641) 206-8880 for expert advice and high-quality leather repair products. Visit our website at CARDIAGTECH.BIZ to browse our selection and place your order.
Ready to transform your ripped leather car seat? Contact us now and let our experts guide you through the repair process!