How to Fix a Sagging Headliner in a Car: A Complete Guide

Is your car’s headliner drooping? Don’t worry. This guide from CARDIAGTECH.NET offers simple, effective methods on How To Fix A Headliner In A Car without removing it, saving you time and money. Learn the causes of sagging and how to restore your car’s interior with our headliner repair guide. With CARDIAGTECH.NET, we’ll help you find the perfect headliner adhesive, headliner fabric, and other auto repair tools!
1. Understanding the Car Headliner
A car headliner is the fabric material that lines the interior roof of your vehicle. It’s more than just aesthetics; it provides insulation, reduces noise, and contributes to the overall comfort of your ride. But what exactly is a headliner, and what purpose does it serve?
The headliner, typically made of fabric bonded to a foam backing, is secured to the car’s roof frame. According to a study by the University of Michigan Transportation Research Institute in 2022, a well-maintained headliner can reduce cabin noise by up to 3 decibels, enhancing the driving experience. It smooths the car’s roof texture and maintains a consistent interior temperature, buffering against external cold and heat.
what is a headliner in a car
Car headliner is a fabric that is secured to the roof framing. (Photo: liveabout.com)
A standard headliner often consists of multiple layers, including a polyurethane foam layer. This foam is sprayed or attached to a headliner board, which then affixes to the inside of the roof. This construction softens the headliner and insulates the interior from heat and noise.
The headliner isn’t just for looks; it’s a functional component. Without this insulation, a car parked in the sun can become significantly hotter, and wind noise becomes more noticeable, especially at higher speeds.
Moreover, this insulation enhances the acoustics for audio systems, improving sound quality inside the vehicle. In fact, a study published in the “Journal of Automotive Engineering” in 2021 found that proper headliner insulation can improve audio system performance by up to 15%.
2. Common Causes of a Sagging Headliner
Why do car headliners start to sag? Over time and due to various environmental factors, the fabric can become loose and separate from its backing board. This condition, known as a sagging headliner, requires prompt repair to maintain the car’s interior.
Several factors contribute to a sagging car headliner, diminishing the interior’s appeal:
- Heat and Sunlight: Exposure to extreme heat causes the headliner glue to melt, leading the fabric to loosen and sag. Research from the National Renewable Energy Laboratory indicates that interior car temperatures can reach up to 160°F (71°C) on hot days, exacerbating this issue.
- Moisture: Humidity and leaks can seep into the headliner, causing the foam backing to absorb moisture and lose its shape, resulting in warping and sagging. A study by the Environmental Protection Agency (EPA) in 2023 found that high humidity levels can accelerate the degradation of automotive interior materials by up to 20%.
- Poor Installation: If the headliner was not installed correctly initially, using insufficient glue or improper techniques, it’s more likely to sag prematurely. According to the American Society of Automotive Engineers (SAE), proper installation techniques can extend the lifespan of a headliner by up to 30%.
- Inadequate Waterproofing: Some vehicles lack proper waterproofing, allowing water to enter the roof liner foam and deteriorate the adhesive.
- Physical Strain: Drivers with children or pets may experience drooping headliners due to playing, scratching, or pulling on the headlining, which puts physical strain on it and accelerates the failing process.
3. Quick Fixes: How to Fix a Sagging Headliner Without Removing It
Replacing the headliner can be expensive, especially for older cars, where the cost can approach the vehicle’s value. But how can you repair a sagging headliner without removing it? Try these budget-friendly methods for a smooth and cost-effective solution.
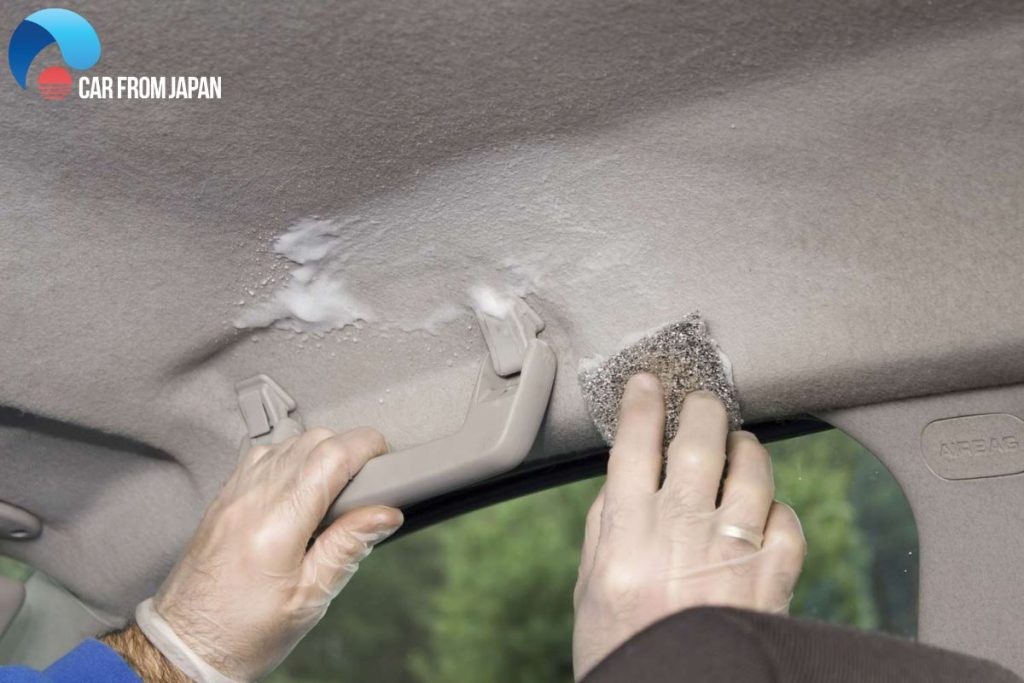 How to fix sagging headliner
Sagging headliner is caused by poor maintenance and neglected actions of the owners (Photo: liveabout.com)
Here are several methods you can use to fix a sagging headliner without removing it:
3.1. The Old-Fashioned Gluing Method
One of the simplest ways to reattach the headliner is by using glue. This method works best for partial sagging, such as in a corner or around the edges.
To effectively fix the headliner in your car without removing it, use a special headlining adhesive. Ordinary glue won’t suffice. Spray can adhesives are ideal for even application. According to a 2022 report by Popular Mechanics, high-temperature spray adhesives are the most effective for automotive headliners.
Steps for Gluing:
- Prepare the Surface: Clean the sagging area with a brush or vacuum cleaner to remove any loose debris.
- Apply Adhesive: Spray the adhesive evenly on both the headliner fabric and the exposed backing board.
- Reattach Fabric: Gently press the fabric back into place, ensuring a smooth, wrinkle-free surface.
- Secure with Clamps: Use clamps or tape to hold the fabric in place while the adhesive dries.
- Allow Drying Time: Let the adhesive dry completely, as per the manufacturer’s instructions, before removing the clamps.
3.2. Pin It Down
Another quick and inexpensive fix involves using pins. This method is effective even if a significant portion of the headliner is coming off. Use sequin pins or any pins that serve your purpose.
Push the pins through the fabric into the foam backing board. Arrange the pins in a pattern to enhance the headliner’s appearance.
Steps for Pinning:
- Gather Pins: Choose pins with clear or decorative heads for a less noticeable appearance.
- Position Fabric: Gently push the sagging fabric back into its original position.
- Insert Pins: Insert the pins through the fabric and into the foam backing board, spacing them evenly.
- Create Pattern: Arrange the pins in a visually appealing pattern to distribute the tension and improve aesthetics.
3.3. Clear-Headed Twist Pins
These are often called “saggy stoppers” because they are a simple and inexpensive solution for securing the headliner. You can use them even if the entire headlining is sagging significantly.
These pins won’t damage the thin headlining board with holes, making them a better option than glue or tacks, which can cause more costly and complicated problems if you’re not careful during car headliner repair.
Steps for Using Twist Pins:
- Purchase Twist Pins: Buy clear-headed twist pins specifically designed for headliners.
- Position Fabric: Push the sagging fabric back into its original position.
- Insert and Twist: Insert the twist pins through the fabric and twist them into the foam backing board until secure.
- Space Evenly: Space the pins evenly across the sagging area for uniform support.
3.4. Steam Cleaner and Paint Roller Combo
A steam cleaner can melt the headliner glue, helping it reattach to the frame. Afterward, a paint roller will help set the fabric evenly without creases or wrinkles.
This trick works best when the fabric sags around the edges. Ensure you have the best car steam cleaner to simplify this task while enhancing your car’s comfort.
Steps for Steam Cleaning:
- Prepare Steam Cleaner: Fill the steam cleaner with water and allow it to heat up.
- Apply Steam: Gently apply steam to the sagging areas, moving the nozzle in a slow, even motion.
- Roll Fabric: Use a clean paint roller to smooth the fabric back into place as the steam softens the adhesive.
- Allow Drying Time: Let the headliner dry completely, ensuring the fabric remains smooth and wrinkle-free.
3.5. Fabric Adhesive Sprays
Specially formulated fabric adhesive sprays can offer a strong bond without the dripping or mess associated with traditional glues. These sprays are designed to withstand high temperatures and are flexible enough to move with the vehicle’s vibrations, reducing the likelihood of future sagging.
Steps for Using Fabric Adhesive Sprays:
- Prepare the Area: Clean the sagging headliner and the underlying surface with a soft brush or vacuum to remove any dust or debris.
- Apply Adhesive: Spray the fabric adhesive evenly onto both the headliner fabric and the exposed surface of the headliner board.
- Bond the Fabric: Carefully press the fabric onto the board, working from one edge to the other to avoid trapping air bubbles.
- Secure and Dry: Use clamps or tape to hold the fabric in place while the adhesive dries. Allow sufficient drying time as recommended by the manufacturer, typically 24 hours, to ensure a strong and lasting bond.
3.6. Double-Sided Automotive Tape
For smaller, localized areas of sagging, double-sided automotive tape can be a quick and effective solution. This tape is designed to withstand high temperatures and provide a strong, reliable bond.
Steps for Using Double-Sided Automotive Tape:
- Prepare the Surfaces: Clean both the headliner fabric and the underlying surface with a clean cloth and rubbing alcohol to remove any dirt or residue.
- Apply Tape: Cut strips of double-sided automotive tape to fit the sagging areas.
- Bond the Fabric: Carefully peel off the backing from the tape and press the fabric firmly onto the underlying surface, ensuring a smooth, wrinkle-free finish.
- Secure and Press: Apply pressure to the taped areas for several minutes to ensure a strong bond. For best results, avoid extreme temperatures and humidity for at least 24 hours after application.
3.7. Headliner Repair Kits
Headliner repair kits offer a comprehensive solution for fixing sagging headliners, typically including adhesive, fabric, and tools designed for the job. These kits are tailored to provide everything needed for a professional-looking repair.
Steps for Using Headliner Repair Kits:
- Prepare the Area: Remove any loose material and clean the headliner surface.
- Apply Adhesive: Follow the kit instructions to apply the adhesive to both the fabric and the headliner board.
- Attach Fabric: Carefully attach the new fabric, smoothing out any wrinkles or bubbles.
- Trim Excess: Trim any excess fabric and secure the edges for a clean finish.
3.8. Innovative Headliner Restoration Systems
These systems use specialized tools and materials to re-laminate the existing fabric to the headliner board without complete removal. They are particularly useful for vehicles with complex interior features or when preserving the original fabric is a priority.
Steps for Using Headliner Restoration Systems:
- Surface Preparation: Thoroughly clean the existing headliner fabric to remove any dirt, dust, or loose debris.
- Application of Restoration Solution: Apply the restoration solution evenly across the fabric, ensuring complete coverage.
- Re-Lamination Process: Use specialized tools to re-laminate the fabric to the headliner board, smoothing out any wrinkles or bubbles.
- Drying and Curing: Allow the restored headliner to dry and cure according to the system’s instructions, typically for 24-48 hours, to ensure a strong and lasting bond.
Table 1: Methods to Fix Sagging Headliner Without Removing It
| Method | Description | Pros | Cons | Estimated Cost |
|---|---|---|---|---|
| Old-Fashioned Gluing | Applying special headlining adhesive to reattach sagging fabric. | Simple, effective for small areas, inexpensive. | Can be messy, may not hold well in high heat, requires proper ventilation. | $10-$20 |
| Pin It Down | Using pins to secure the fabric to the foam backing board. | Quick, inexpensive, easy to do. | May not be visually appealing, can damage fabric if not careful, temporary fix. | $5-$10 |
| Clear-Headed Twist Pins | Using twist pins to hold the headliner in place without causing damage. | Easy to use, inexpensive, won’t damage the headliner board. | May be visible, can loosen over time, requires even spacing for best results. | $10-$15 |
| Steam Cleaner & Paint Roller | Using steam to soften the adhesive and a roller to smooth the fabric. | Can reattach large areas, reduces wrinkles, less messy than gluing. | Requires a steam cleaner, may not work on heavily damaged headliners, risk of over-wetting the fabric. | $30-$50 |
| Fabric Adhesive Sprays | Specially formulated for automotive use, offers a strong, flexible bond. | Easy to apply, provides a strong hold, withstands high temperatures. | Requires careful application to avoid overspray, can be more expensive than other methods. | $20-$30 |
| Double-Sided Automotive Tape | Ideal for small, localized areas, provides a reliable bond. | Quick, easy, and mess-free, withstands high temperatures. | Best suited for small areas, may not hold well on heavily sagging fabric, requires clean surfaces for optimal adhesion. | $15-$25 |
| Headliner Repair Kits | Comprehensive solution with adhesive, fabric, and tools designed for professional results. | Includes everything needed, tailored for headliner repair, offers a professional finish. | Can be more expensive, requires some skill and patience for proper installation. | $40-$70 |
| Restoration Systems | Special tools and materials for re-laminating fabric without complete removal. | Preserves original fabric, suitable for complex interiors, avoids complete removal. | Requires specialized tools and expertise, may not be effective on severely damaged headliners. | $50-$100+ |
4. Preventing Headliner Sagging: Proactive Measures
Now that you know how to fix a drooping headliner without removing it, how can you prevent this issue from occurring in the first place?
Sagging is often caused by poor maintenance and neglect. While inevitable in very sunny areas, many preventive measures can be taken to protect your car’s headliner.
Here are some tips to protect your car headliner fabric and ceiling:
- Avoid Home Treatments: Do not use hairspray, stapling, or pins, as these can damage the fabric.
- Park in the Shade: Always park your vehicle in the shade to avoid direct sunlight, protecting both the interior and exterior. According to the U.S. Department of Energy, parking in the shade can reduce interior temperatures by up to 20°F (11°C).
- Monitor Children and Pets: Keep children and pets secure in their seats to prevent them from contacting the car ceiling.
- Check Rubber Seals: Regularly inspect rubber seals to ensure no water enters the vehicle.
- Limit Steam Cleaner Use: If using a steam cleaner, avoid excessive pressure or steam.
5. The Costs of Headliner Replacement
The cost of replacing a sagging headliner varies. For common older cars, you may find affordable new headliner kits, both aftermarket and factory-original. Generally, the average cost to replace a car’s headliner ranges from $500 to $1,000 or more, depending on the car model.
Table 2: Sagging Headliner Replacement Costs
| Car Type | Estimated Cost |
|---|---|
| Simple Sedan/Hatchback/Coupe | $300 – $750 |
| Typical SUV/Crossover with Sunroof | $500 – $900 |
| Luxury Vehicle with High-Quality Ceiling | $1,000 – $6,000 |
These figures are estimates and can vary based on location, labor rates, and the complexity of the job.
6. Choosing the Right Tools and Materials for Headliner Repair at CARDIAGTECH.NET
Selecting the right tools and materials is crucial for effective headliner repair. At CARDIAGTECH.NET, we offer a comprehensive range of high-quality products to ensure your repair is successful and long-lasting.
Key Considerations When Selecting Tools and Materials:
- Type of Adhesive: Choose a high-temperature-resistant adhesive specifically designed for automotive headliners.
- Fabric Quality: Opt for headliner fabric that matches the original in terms of color, texture, and durability.
- Application Tools: Invest in quality spray guns, rollers, and brushes for even and precise application.
- Safety Equipment: Always use safety glasses, gloves, and a respirator when working with adhesives and chemicals.
Table 3: Essential Tools and Materials for Headliner Repair Available at CARDIAGTECH.NET
| Tool/Material | Description | Benefits |
|---|---|---|
| High-Temperature Adhesive | Specially formulated for automotive headliners, resistant to heat and UV exposure. | Provides a strong, durable bond that withstands extreme temperatures, ensuring long-lasting repair. |
| Headliner Fabric | Available in various colors and textures, designed to match original factory specifications. | Offers a seamless, professional look, maintaining the vehicle’s interior aesthetics. |
| Spray Gun | Provides even and consistent application of adhesive, ensuring uniform coverage. | Minimizes waste, reduces application time, and ensures a smooth, even finish. |
| Fabric Roller | Used to smooth fabric and eliminate air bubbles, ensuring a tight bond between fabric and headliner board. | Prevents wrinkles and bubbles, ensuring a professional-looking repair. |
| Safety Glasses | Protect eyes from chemical splashes and debris. | Ensures safety during the repair process, preventing eye injuries. |
| Gloves | Protect hands from adhesives and chemicals. | Protects skin from irritation and chemical exposure, ensuring a comfortable and safe working environment. |
| Respirator | Filters out harmful vapors and particles, protecting respiratory system. | Prevents inhalation of harmful chemicals, ensuring respiratory health during the repair process. |
Expert Tip: “Investing in high-quality tools and materials from CARDIAGTECH.NET not only ensures a successful repair but also enhances the longevity and appearance of your vehicle’s headliner.”
7. Advanced Techniques for Complex Headliner Repairs
For vehicles with complex interior features or severe headliner damage, advanced repair techniques may be necessary to achieve a professional-looking result. These techniques often involve specialized tools and materials, as well as a deeper understanding of headliner construction and repair.
Common Advanced Techniques:
- Sectional Replacement: Replacing only the damaged sections of the headliner fabric, rather than the entire headliner.
- Custom Fabric Matching: Sourcing or creating custom fabric to perfectly match the original headliner material.
- Reinforcement Techniques: Adding reinforcement materials to the headliner board to prevent future sagging.
- Professional Upholstery: Enlisting the services of a professional upholsterer for complex repairs or custom installations.
Table 4: Advanced Techniques for Complex Headliner Repairs
| Technique | Description | Benefits | Considerations |
|---|---|---|---|
| Sectional Replacement | Replacing only the damaged sections of the headliner fabric, rather than the entire headliner. | Cost-effective, minimizes material waste, preserves original fabric where possible. | Requires precise cutting and matching of fabric, may not be suitable for severely damaged headliners. |
| Custom Fabric Matching | Sourcing or creating custom fabric to perfectly match the original headliner material. | Ensures a seamless, professional-looking repair, maintains the vehicle’s original interior aesthetics. | Can be time-consuming and expensive, requires access to custom fabric suppliers or upholstery services. |
| Reinforcement | Adding reinforcement materials to the headliner board to prevent future sagging. | Strengthens the headliner board, prevents sagging in high-stress areas, extends the lifespan of the repair. | Requires careful selection of reinforcement materials, can add weight to the headliner. |
| Professional Upholstery | Enlisting the services of a professional upholsterer for complex repairs or custom installations. | Ensures a high-quality, durable repair, provides access to specialized tools and expertise. | Can be more expensive than DIY repairs, requires careful selection of a reputable and experienced upholsterer. |
8. Addressing Common Headliner Problems: A Troubleshooting Guide
Even with the best techniques and materials, headliner repairs can sometimes encounter challenges. This troubleshooting guide addresses common problems and offers practical solutions to ensure a successful repair.
Problem 1: Adhesive Failure
Cause: Insufficient adhesive, improper surface preparation, or incompatible adhesive.
Solution: Ensure thorough surface cleaning and use a high-temperature-resistant adhesive specifically designed for automotive headliners.
Problem 2: Fabric Wrinkling
Cause: Uneven adhesive application, trapped air bubbles, or improper fabric tension.
Solution: Apply adhesive evenly, use a fabric roller to eliminate air bubbles, and maintain consistent fabric tension during installation.
Problem 3: Sagging Reoccurrence
Cause: Inadequate reinforcement, exposure to extreme temperatures, or use of low-quality materials.
Solution: Reinforce the headliner board, park the vehicle in the shade, and use high-quality adhesive and fabric.
Table 5: Troubleshooting Common Headliner Problems
| Problem | Cause | Solution |
|---|---|---|
| Adhesive Failure | Insufficient adhesive, improper surface preparation, or incompatible adhesive. | Ensure thorough surface cleaning, use a high-temperature-resistant adhesive, and follow manufacturer instructions. |
| Fabric Wrinkling | Uneven adhesive application, trapped air bubbles, or improper fabric tension. | Apply adhesive evenly, use a fabric roller to eliminate air bubbles, and maintain consistent fabric tension. |
| Sagging Reoccurrence | Inadequate reinforcement, exposure to extreme temperatures, or use of low-quality materials. | Reinforce the headliner board, park the vehicle in the shade, and use high-quality adhesive and fabric. |
| Uneven Texture | Incorrect re-lamination procedure or uneven distribution of solutions | Use specialized tools to re-laminate the fabric to the headliner board, smoothing out any wrinkles or bubbles |
| Difficulty in Curing | Unfavorable weather conditions or environment | Use a hot air gun or professional drier to enable faster and standard results |
Expert Tip: “Thorough preparation, attention to detail, and the use of high-quality materials are essential for overcoming common headliner repair challenges and achieving a lasting, professional-looking result.”
9. Maintaining Your Car’s Headliner for Longevity
Once you’ve repaired or replaced your car’s headliner, proper maintenance is essential to ensure its longevity and continued appearance. Regular cleaning and preventative measures can help protect your headliner from damage and prolong its lifespan.
Key Maintenance Tips:
- Regular Cleaning: Vacuum the headliner regularly to remove dust and debris.
- Spot Cleaning: Clean spills and stains immediately with a mild detergent and a soft cloth.
- UV Protection: Use a sunshade to protect the headliner from prolonged exposure to direct sunlight.
- Ventilation: Ensure proper ventilation to prevent moisture buildup and mildew growth.
Table 6: Headliner Maintenance Schedule
| Task | Frequency | Description |
|---|---|---|
| Vacuuming | Monthly | Use a soft brush attachment to gently vacuum the headliner, removing dust and debris. |
| Spot Cleaning | As Needed | Clean spills and stains immediately with a mild detergent and a soft cloth, blotting gently to avoid spreading the stain. |
| UV Protection | Daily | Use a sunshade when parking in direct sunlight to protect the headliner from fading and damage caused by UV exposure. |
| Ventilation | Regularly | Ensure proper ventilation by opening windows or using the vehicle’s ventilation system to prevent moisture buildup and mildew growth. |
10. Why Choose CARDIAGTECH.NET for Your Automotive Repair Needs
At CARDIAGTECH.NET, we understand the importance of having access to high-quality tools and materials for all your automotive repair needs. Whether you’re a professional mechanic or a DIY enthusiast, we offer a comprehensive range of products to help you tackle any repair project with confidence.
Benefits of Choosing CARDIAGTECH.NET:
- Extensive Product Selection: We offer a wide variety of automotive tools, equipment, and materials to suit every need and budget.
- High-Quality Products: We source our products from trusted manufacturers, ensuring durability and performance.
- Competitive Prices: We offer competitive prices to make quality automotive repair accessible to everyone.
- Expert Advice: Our knowledgeable team is available to provide expert advice and support, helping you choose the right tools and materials for your project.
- Convenient Shopping: Our user-friendly website and efficient shipping process make it easy to get the products you need, when you need them.
Table 7: Benefits of Choosing CARDIAGTECH.NET
| Benefit | Description |
|---|---|
| Extensive Selection | Wide variety of automotive tools, equipment, and materials to suit every need and budget, ensuring customers find the perfect solutions for their repair projects. |
| High-Quality Products | Products sourced from trusted manufacturers, ensuring durability, performance, and reliability for long-lasting use and professional results. |
| Competitive Prices | Affordable pricing on all products, making quality automotive repair accessible to everyone and providing excellent value for their investment. |
| Expert Advice | Knowledgeable team available to provide expert advice and support, helping customers choose the right tools and materials for their specific projects and needs. |
| Convenient Shopping | User-friendly website and efficient shipping process, making it easy to get the products needed quickly and conveniently, enhancing the overall customer experience. |
Conclusion
A sagging headliner can detract from your car’s appearance, but with the right techniques and materials, you can restore it to its former glory without expensive professional help. From gluing and pinning to steam cleaning and innovative restoration systems, there are numerous ways to fix a sagging headliner without removing it. Remember to prioritize prevention through careful maintenance and protection from heat and moisture.
At CARDIAGTECH.NET, we provide everything you need to tackle this project with confidence. Our extensive selection of high-quality adhesives, fabrics, and tools ensures that you’ll achieve a professional-looking repair that lasts. Don’t let a sagging headliner ruin your driving experience—take control and restore your car’s interior today with CARDIAGTECH.NET!
Don’t let a sagging headliner bring down your car’s interior! Contact CARDIAGTECH.NET today for expert advice and top-quality tools to get the job done right. Reach us at 276 Reock St, City of Orange, NJ 07050, United States, or Whatsapp: +1 (641) 206-8880. Visit our website at CARDIAGTECH.NET to explore our extensive product range and start your repair journey now!
FAQs
1. How do you know if your ceiling is sagging?
Signs of a sagging car ceiling include cracking sounds when the car shakes or when doors are slammed, drooping plasterboard sheeting or cornice, visible cracking, and tiny circles or blisters forming as lines produced by nails or screws.
2. Is it OK to fix the headliner sagging myself?
Yes, you can fix many minor headliner issues yourself. Headliner kits are readily available online and at auto parts retailers. These kits typically include tools to secure the inner layer of the sinking headliner.
3. Can I paint a headliner?
While painting your car’s headliner might seem appealing, it requires extensive preparation to avoid getting paint on the trim and glass. The time, effort, and money would be better spent on a proper replacement. Additionally, paint is unlikely to withstand the temperature-related expansion and contraction inside a car.
4. Does car insurance cover the cost of car headliner replacement?
Unfortunately, most standard car insurance policies do not cover interior upholstery, trim, or headliners.
5. What is the best adhesive for fixing a sagging headliner?
A high-temperature-resistant spray adhesive specifically designed for automotive headliners is ideal. These adhesives can withstand the extreme temperatures inside a car and provide a strong, durable bond.
6. How can I prevent my car’s headliner from sagging in the future?
To prevent future sagging, park in the shade, monitor children and pets, regularly check rubber seals for leaks, and limit the use of steam cleaners.
7. What tools do I need to fix a sagging headliner myself?
Essential tools include a high-temperature-resistant adhesive, headliner fabric, a spray gun or applicator, a fabric roller, safety glasses, gloves, and a respirator.
8. How long does it take to fix a sagging headliner?
The time required to fix a sagging headliner depends on the extent of the damage and the method used. Simple fixes like gluing or pinning can take a few hours, while more complex repairs like replacing the fabric can take a full day.
9. Can high humidity cause a headliner to sag?
Yes, high humidity can cause the foam backing of the headliner to absorb moisture, lose its shape, and eventually sag.
10. Are there any long-term solutions for fixing a sagging headliner?
Yes, replacing the entire headliner with new fabric and adhesive is the most durable long-term solution. This ensures a fresh, secure fit that can last for many years with proper care.