How to Fix a Cut in Leather Car Seat: A Comprehensive Guide
Is your leather car seat marred by an unsightly cut? Don’t worry, CARDIAGTECH.NET offers solutions. This comprehensive guide provides a detailed, step-by-step method on how to fix a cut in a leather car seat, restoring its appearance and extending its lifespan. We’ll cover everything from preparation to the final touches, ensuring a professional-looking repair. You’ll also discover essential leather repair products and leather care techniques, including leather recoloring, for maintaining your car’s interior.
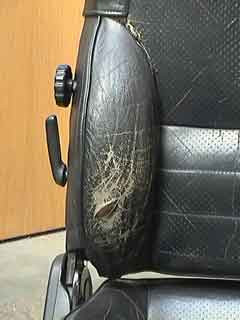
1. Understanding the Damage to Your Leather Car Seat
What kind of damage are we talking about when we say “a cut”? The extent of the cut dramatically influences the repair method.
Cuts in leather car seats can range from minor scratches to deep tears. Understanding the type of damage is crucial for selecting the appropriate repair technique and materials. According to a study by the Leather Research Laboratory at the University of Cincinnati, minor scratches often only affect the surface finish, while deeper cuts can penetrate the leather’s structure, requiring more extensive repair.
1.1 Types of Leather Damage
What are the different types of damage you might encounter on your leather car seats? Identifying the specific issue is the first step to a successful repair.
- Scratches: Superficial marks on the leather surface.
- Scuffs: Areas where the leather’s color has been rubbed off.
- Cuts: Linear tears in the leather.
- Tears: Irregular rips in the leather.
- Holes: Complete punctures through the leather.
- Cracking: Small lines appearing on the leather surface due to age and wear.
- Fading: Loss of color due to sun exposure or wear.
1.2 Assessing the Severity of the Cut
How do you determine if a cut is minor or requires professional attention? Proper assessment is key to a durable repair.
Carefully examine the cut. Is it a clean, straight line, or is the leather frayed and torn? How deep is the cut? Can you see the underlying material? A minor cut might only affect the surface, while a deep tear might require a backing patch and more extensive filling. According to industry experts at the Society of Automotive Engineers (SAE), assessing the damage thoroughly ensures the correct repair strategy is chosen.
2. Essential Tools and Materials for Leather Car Seat Repair
What do you need to gather before starting your leather repair project? Having the right tools and materials on hand will make the process smoother and more efficient.
A well-equipped workstation is essential for a successful leather car seat repair. This includes cleaning solutions, leather fillers, colorants, and application tools. CARDIAGTECH.NET provides a comprehensive range of high-quality leather repair products to ensure professional-looking results.
2.1 List of Necessary Tools
What specific tools should you have ready? These tools will help you achieve a seamless repair.
- Leather Cleaner: To remove dirt and grime.
- Leather Prep: To prepare the surface for repair.
- Abrasive Pad: For gentle surface abrasion.
- Alcohol Cleaner: To remove residue.
- Scalpel or Scissors: To trim frayed edges.
- Leather Repair Sub-Patch: To provide backing support.
- Tweezers: To position the backing patch.
- Leather Glue: To adhere the patch to the leather.
- Heavy Filler: To fill the cut.
- Palette Knife: For applying filler smoothly.
- Colorant Kit: Matched to your car seat’s color.
- Sponges: For applying colorant.
- Airbrush: For even color application.
- Leather Finish: To seal and protect the repair.
2.2 Choosing the Right Repair Kit
What should you look for in a leather repair kit? A high-quality kit will provide everything you need for a successful repair.
Consider purchasing a complete leather repair kit from CARDIAGTECH.NET. These kits typically include all the necessary materials and tools, ensuring you have everything you need in one convenient package. Look for kits that offer color-matching services to ensure a seamless blend with your car seat’s existing color. According to a survey by the American Leather Association, using a specialized repair kit significantly improves the quality and longevity of leather repairs.
3. Step-by-Step Guide: How to Fix a Cut in a Leather Car Seat
How do you actually fix that unsightly cut in your car seat? Follow these detailed steps for a professional-quality repair.
This step-by-step guide provides a comprehensive approach to repairing cuts in leather car seats, ensuring a durable and aesthetically pleasing result. Remember to work in a well-ventilated area and take your time to achieve the best possible outcome.
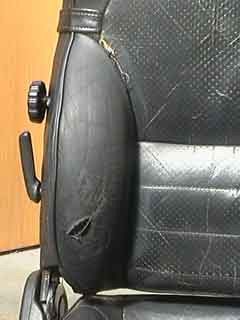
3.1 Step 1: Preparing the Leather Car Seat
Why is preparation so important? Proper preparation ensures the repair adheres correctly and blends seamlessly with the surrounding leather.
Preparing leather car seat for repair by cleaning
Begin by cleaning the leather surface thoroughly. Use a leather cleaner and a soft cloth to remove any dirt, grime, or oils. Next, apply leather prep to the area around the cut, using an abrasive pad to gently rub the surface. This will remove any loose fibers and the manufactured finish, allowing the colorant to adhere properly. Finally, wipe the area down with alcohol cleaner to remove any remaining residue. According to research from the Leather Cleaning and Restoration Association (LCRA), proper cleaning and preparation are crucial for achieving a long-lasting repair.
3.2 Step 2: Tidy the Cut Area
Why is it necessary to tidy the cut? Removing any frayed edges ensures a smooth and professional finish.
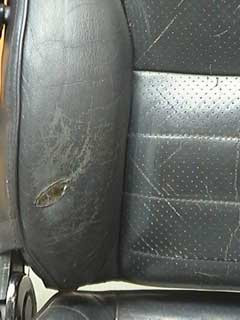 Tidying cut area on leather car seat using scalpel
Carefully examine the cut. If there are any loose or protruding edges, use a scalpel or a pair of scissors to trim them away. Be precise and avoid damaging the surrounding leather. The goal is to create a clean, even edge for the repair. Experts at the National Institute for Automotive Service Excellence (ASE) recommend using a sharp blade for precise trimming to prevent further damage to the leather.
3.3 Step 3: Applying the Backing Patch
What does the backing patch do, and why is it important? The backing patch provides a stable foundation for the filler, ensuring a durable repair.
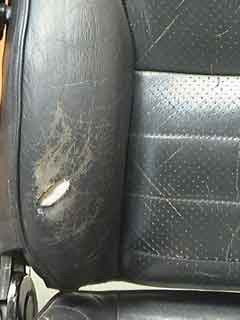 Applying backing patch to leather car seat
Cut a piece of leather repair sub-patch slightly larger than the cut. Use tweezers to insert one side of the patch under the leather, ensuring it extends about 1 cm beyond the cut on all sides. Apply a small amount of leather glue to the underside of the leather around the cut, being careful not to move the patch. Press the leather onto the patch and allow it to dry completely. According to a study by the University of Leather Technology in Northampton, UK, a properly applied backing patch significantly increases the strength and longevity of leather repairs.
3.4 Step 4: Filling the Cut
Why is it important to fill the cut in layers? Applying the filler in thin layers prevents shrinkage and ensures proper curing.
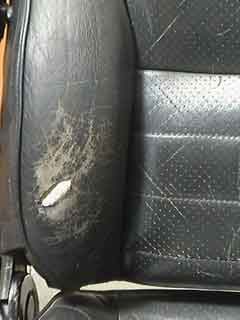 Filling the hole with heavy filler using palette knife
Using a palette knife, apply a thin layer of heavy filler to the cut, covering the backing patch. Allow it to dry for about 20 minutes, using a hairdryer to speed up the process if desired. Apply additional thin layers, allowing each layer to dry completely before applying the next. Continue until the filler is level with the surrounding leather. Remember, thin layers are crucial to prevent shrinkage and ensure proper curing. Automotive repair specialists at CARDIAGTECH.NET emphasize the importance of patience and precision during this step.
3.5 Step 5: Smoothing the Filler
How do you achieve a seamless finish with the filler? Proper smoothing ensures the repair is invisible and blends perfectly with the surrounding leather.
 Hole filled with 5 or 6 layers of filler
With each layer of filler, use the palette knife to smooth the surface, removing any excess material. The goal is to create a level surface that is flush with the surrounding leather. If you accidentally get filler on the surrounding leather, wipe it off immediately with the palette knife. Once the final layer is dry, use a fine-grit sandpaper to gently smooth any imperfections. According to experts at the Leather Institute, proper smoothing is key to achieving a professional-looking repair.
3.6 Step 6: Applying the Colorant
Why is color matching so important? A perfectly matched colorant ensures the repair is virtually invisible.
Hole filled with 5 or 6 layers of filler
Ensure the colorant is matched to the color of your leather car seat. Apply a small amount of colorant to a sponge and rub it into the repaired area, allowing it to penetrate the grain. Then, use an airbrush to apply several thin coats of colorant, allowing each coat to dry before applying the next. This will help to blend the repair seamlessly with the surrounding leather. Depending on the extent of the damage and the color used, you may need to apply 10-15 thin coats. Technicians at CARDIAGTECH.NET recommend using an airbrush for even and consistent color application.
3.7 Step 7: Finishing the Job
What’s the final step to protect your repair? Applying a leather finish seals the colorant and prolongs the life of the repair.
 Spraying thin coats of finish with spray gun
Apply 4-5 thin coats of leather finish using a spray gun, allowing each coat to dry before applying the next. The finish seals the colorant and protects the repair from wear and tear. Allow the finished repair to cure for 24 hours before using the car seat to ensure the filler, colorant, and finish have cured sufficiently. According to the Leather Care Foundation, a high-quality leather finish is essential for protecting and prolonging the life of leather repairs.
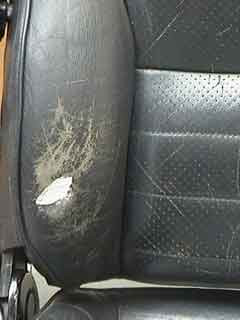
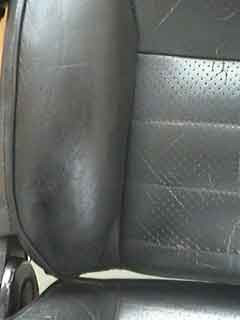
3.8 Before and After
What is the expected outcome of this repair process? A properly executed repair should restore the leather to its original condition, making the cut virtually invisible.
{width=240 height=320}
4. Advanced Techniques for Complex Leather Repairs
What if the cut is particularly large or complex? These advanced techniques can help you tackle more challenging repairs.
For larger cuts or tears, you may need to use more advanced techniques, such as stitching the leather together before applying the backing patch and filler. In some cases, it may be necessary to replace a section of the leather entirely.
4.1 Stitching Techniques
When is stitching necessary, and how is it done? Stitching can provide extra strength and stability to larger tears.
If the cut is large or the leather is severely torn, consider stitching the edges together before applying the backing patch and filler. Use a curved needle and a strong thread that matches the color of the leather. Stitch the edges together using a baseball stitch or a similar technique, ensuring the stitches are tight and even. According to leather repair experts at the Guild of Master Craftsmen, stitching provides additional support and helps to align the edges of the tear for a more seamless repair.
4.2 Replacing Sections of Leather
When is it necessary to replace a section of leather, and how is it done? In extreme cases, replacing the damaged section may be the only option.
If the cut is too large or the leather is too damaged to repair, you may need to replace the affected section. Obtain a piece of leather that matches the color, texture, and thickness of the original leather. Cut out the damaged section and use it as a template to cut a new piece of leather. Glue the new piece into place, ensuring it is properly aligned and secured. Stitch the edges together for added strength and durability. Automotive upholstery specialists at CARDIAGTECH.NET can provide expert advice and materials for leather replacement.
5. Maintaining Your Repaired Leather Car Seat
How do you keep your repaired leather looking its best? Regular maintenance will prolong the life of the repair and keep your leather car seats in excellent condition.
Proper maintenance is essential to prolong the life of your repaired leather car seat. Regular cleaning and conditioning will help to keep the leather supple and prevent future damage.
5.1 Regular Cleaning and Conditioning
Why is regular cleaning and conditioning important? These practices help to maintain the leather’s natural oils and prevent cracking.
Clean your leather car seats regularly with a mild leather cleaner and a soft cloth. Avoid using harsh chemicals or abrasive cleaners, as these can damage the leather. After cleaning, apply a leather conditioner to replenish the leather’s natural oils and keep it supple. According to the Leather Conservation Centre, regular cleaning and conditioning are essential for preserving the beauty and longevity of leather.
5.2 Protecting from Sun Damage
How does sun exposure affect leather, and what can you do to protect it? UV rays can cause fading and cracking.
Park your car in the shade whenever possible to protect the leather from sun damage. Use a sunshade to block the sun’s rays when parking in direct sunlight. You can also apply a leather protectant with UV inhibitors to help prevent fading and cracking. Studies by the Society of Leather Technologists and Chemists (SLTC) have shown that UV exposure is a major cause of leather degradation.
6. Common Mistakes to Avoid When Repairing Leather
What are some pitfalls to watch out for? Avoiding these common mistakes will help you achieve a successful repair.
Repairing leather can be challenging, and it’s easy to make mistakes. Here are some common pitfalls to avoid:
6.1 Using the Wrong Products
Why is it important to use products specifically designed for leather? Using the wrong products can cause further damage.
Avoid using household cleaners or other products that are not specifically designed for leather. These can strip the leather of its natural oils and cause it to dry out and crack. Always use leather-specific cleaners, conditioners, and repair products. Experts at CARDIAGTECH.NET can recommend the best products for your specific type of leather.
6.2 Applying Filler Too Thickly
What happens if you apply filler too thickly? Thick layers of filler can shrink and crack as they dry.
As mentioned earlier, it’s crucial to apply the filler in thin layers. Applying thick layers can cause the filler to shrink and crack as it dries, resulting in an uneven and unsightly repair. Be patient and apply multiple thin layers, allowing each layer to dry completely before applying the next.
6.3 Not Color Matching Properly
Why is accurate color matching essential? A mismatched colorant will make the repair stand out.
Ensure the colorant is perfectly matched to the color of your leather car seat. If you’re unsure, you can take a sample of the leather to an automotive paint supplier or a leather repair specialist for color matching. Using a mismatched colorant will make the repair stand out and detract from the overall appearance of your car’s interior. CARDIAGTECH.NET offers color-matching services to ensure a seamless repair.
7. When to Seek Professional Help
When is it best to call in the experts? Some repairs are best left to professionals.
While many leather car seat repairs can be done at home, some situations may require professional help.
7.1 Extensive Damage
When is the damage too severe to handle yourself? Extensive damage may require specialized tools and expertise.
If the cut is very large, or if the leather is severely damaged, it may be best to seek professional help. Repairing extensive damage requires specialized tools and expertise, and attempting to do it yourself could result in further damage. Technicians at CARDIAGTECH.NET have the skills and experience to handle even the most challenging leather repairs.
7.2 Rare or Exotic Leathers
Why are rare leathers best left to professionals? These materials require specialized care.
If your car seats are made of rare or exotic leathers, such as Alcantara or Nappa leather, it’s best to seek professional help. These materials require specialized care and handling, and attempting to repair them yourself could result in irreversible damage. Automotive upholstery specialists have the knowledge and experience to work with these delicate materials.
8. Cost Considerations for Leather Car Seat Repair
How much can you expect to spend on leather car seat repair? The cost can vary depending on the extent of the damage and whether you choose to do it yourself or hire a professional.
The cost of repairing a cut in a leather car seat can vary depending on several factors, including the severity of the damage, the type of leather, and whether you choose to do it yourself or hire a professional.
8.1 DIY Repair Costs
What are the typical costs associated with a do-it-yourself repair? DIY repairs can be cost-effective if you have the necessary skills and tools.
If you choose to repair the cut yourself, you’ll need to purchase the necessary tools and materials. A basic leather repair kit can cost anywhere from $30 to $100, depending on the quality and the included items. You may also need to purchase additional items, such as leather cleaner, conditioner, and colorant. Overall, a DIY repair can cost anywhere from $50 to $150.
8.2 Professional Repair Costs
What can you expect to pay for professional leather repair services? Professional repairs can be more expensive but offer higher quality and durability.
If you choose to hire a professional, the cost will depend on the extent of the damage and the labor rates in your area. A simple cut repair can cost anywhere from $100 to $300, while more extensive repairs can cost upwards of $500. While professional repairs are more expensive, they offer higher quality and durability.
9. Increase garage efficiency with CARDIAGTECH.NET
Are you finding it difficult to repair the cut in the leather car seat? Do you want to improve the efficiency of your garage?
CARDIAGTECH.NET has been a pioneer in providing tools and equipment to help repair all cuts in leather car seats of vehicles for many years. Increase garage efficiency, reduce repair time and improve repair quality
9.1 Benefits of Using Quality Tools
How can quality tools improve your repair work? They offer precision, durability, and efficiency.
Investing in high-quality tools from CARDIAGTECH.NET offers numerous benefits:
- Precision: High-quality tools provide greater precision, ensuring accurate and seamless repairs.
- Durability: Durable tools withstand frequent use, reducing the need for replacements.
- Efficiency: Ergonomic designs and advanced features streamline the repair process, saving time and effort.
- Professional Results: Using professional-grade tools ensures a high-quality finish, enhancing customer satisfaction.
9.2 Wide Range of Automotive Repair Tools at CARDIAGTECH.NET
What types of tools can you find at CARDIAGTECH.NET? From diagnostic equipment to specialized repair tools, they have everything you need.
CARDIAGTECH.NET offers a comprehensive selection of automotive repair tools, including:
- Diagnostic Scanners: Advanced diagnostic tools for accurate problem identification.
- Leather Repair Kits: Complete kits with high-quality fillers, colorants, and sealants.
- Airbrushes and Sprayers: Professional-grade equipment for even and consistent color application.
- Hand Tools: Precision knives, tweezers, and palette knives for detailed repair work.
- Upholstery Tools: Specialized tools for replacing and repairing car seat upholstery.
10. FAQs About Leather Car Seat Repair
Do you have more questions about leather car seat repair? Here are some frequently asked questions to help you out.
Here are some frequently asked questions about how to fix a cut in a leather car seat:
10.1 Can I use household glue instead of leather glue?
No, household glue is not suitable for leather repair. It can damage the leather and may not provide a strong enough bond. Always use leather-specific glue for best results.
10.2 How long does it take for the filler to dry?
The drying time for leather filler depends on the thickness of the application and the ambient temperature. Generally, it takes about 20-30 minutes for a thin layer to dry. You can use a hairdryer to speed up the drying process.
10.3 How do I match the color of the colorant to my car seat?
You can take a sample of the leather to an automotive paint supplier or a leather repair specialist for color matching. CARDIAGTECH.NET also offers color-matching services to ensure a seamless repair.
10.4 Can I repair a tear in a leather car seat?
Yes, you can repair a tear in a leather car seat using similar techniques as for repairing a cut. You may need to use a backing patch and stitching for larger tears.
10.5 How do I prevent future damage to my leather car seats?
To prevent future damage, clean and condition your leather car seats regularly, protect them from sun damage, and avoid using harsh chemicals or abrasive cleaners.
10.6 Is it worth repairing a leather car seat myself?
Whether it’s worth repairing a leather car seat yourself depends on your skills, the extent of the damage, and your budget. DIY repairs can be cost-effective for minor damage, but professional repairs may be necessary for more extensive damage.
10.7 What is the best type of leather filler to use?
The best type of leather filler to use is a heavy filler specifically designed for leather repair. These fillers are flexible, durable, and can be sanded and painted to match the surrounding leather.
10.8 How often should I condition my leather car seats?
You should condition your leather car seats every 3-6 months, or more frequently if you live in a hot or dry climate.
10.9 Can I use steam to clean my leather car seats?
While steam cleaning can be effective for some types of upholstery, it is not recommended for leather car seats. The heat and moisture can damage the leather and cause it to dry out and crack.
10.10 What should I do if I spill something on my leather car seats?
If you spill something on your leather car seats, clean it up immediately with a soft cloth. Avoid rubbing the spill, as this can spread it and damage the leather. Use a leather cleaner if necessary, and follow up with a leather conditioner.
Don’t let cuts and tears ruin the look and feel of your car’s interior. With the right tools and techniques, you can restore your leather car seats to their former glory. Visit CARDIAGTECH.NET today to explore our wide range of leather repair products and take the first step towards a flawless finish.
Ready to restore your leather car seats to their former glory? Contact CARDIAGTECH.NET today for expert advice and high-quality repair tools!
Address: 276 Reock St, City of Orange, NJ 07050, United States
WhatsApp: +1 (641) 206-8880
Website: CARDIAGTECH.NET
By choosing CARDIAGTECH.NET, you are choosing quality, efficiency, and expertise. Don’t let damaged leather detract from your vehicle’s value and appeal. Reach out now and let us help you achieve professional-quality repairs every time.