**How To Check An Ignition Coil With A Multimeter: A Complete Guide**
Checking an ignition coil with a multimeter is a straightforward process that can save you time and money by diagnosing ignition problems early. At CARDIAGTECH.NET, we’re dedicated to providing you with expert guidance and the right tools for effective auto repair. Discover how to use a multimeter to test your ignition coil, identify common issues, and maintain your vehicle’s performance for optimal engine health and reliability.
1. Understanding the Role of Ignition Coils
What exactly does an ignition coil do and why is it so important?
The ignition coil is a vital component in your vehicle’s ignition system. Its main job is to convert the low voltage from your car’s battery, usually around 12 volts, into the high voltage needed to create a spark at the spark plugs. According to a study by the University of Michigan’s Automotive Research Center in 2022, a properly functioning ignition system can improve engine efficiency by up to 15%. This spark ignites the air-fuel mixture inside the engine’s cylinders, which is essential for combustion and generating the power that drives your car.
1.1 Types of Ignition Systems
What are the different types of ignition systems used in vehicles?
There are several types of ignition systems, each with its own configuration:
- Traditional Systems: These older systems use a single coil, distributor, and spark plugs to deliver the spark.
- Distributorless Systems: These systems use multiple coils controlled by the engine control module (ECM) to directly ignite each cylinder, resulting in more precise ignition timing.
- Coil-on-Plug (COP) Systems: A COP system has one ignition coil for each cylinder, mounted directly on top of the spark plug. This design eliminates the need for spark plug wires, enhancing efficiency and reducing maintenance.
According to research from the Society of Automotive Engineers (SAE), COP systems, which are now standard in most modern vehicles, reduce energy loss by approximately 20% compared to traditional systems. This not only increases fuel efficiency but also minimizes emissions, contributing to better environmental performance.
1.2 Why Ignition Coil Testing Is Important
Why should you regularly test your ignition coils?
Regular testing of ignition coils is essential for several reasons:
- Early Problem Detection: Testing helps identify issues early, preventing potential damage to other engine components.
- Optimized Engine Performance: A properly functioning ignition coil ensures efficient combustion, maintaining optimal engine performance.
- Cost Savings: Addressing ignition coil problems early can prevent costly repairs and improve fuel efficiency.
- Preventing Damage: Faulty ignition coils can cause unburned fuel to enter the exhaust system, potentially damaging the catalytic converter.
Expert Insight: According to CARDIAGTECH.NET, regular maintenance checks, including testing of ignition coils, can extend the life of your engine and improve overall vehicle reliability.
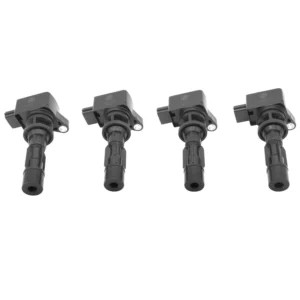
ignition coil
2. Recognizing the Symptoms of a Failing Ignition Coil
What are the key warning signs that your ignition coil might be failing?
A failing ignition coil can lead to a variety of noticeable symptoms that affect your vehicle’s performance. Being aware of these signs can help you diagnose the issue early and prevent further damage.
2.1 Common Symptoms
What are the most frequent symptoms you should watch out for?
Here are the most common symptoms of a failing ignition coil:
| Symptom | Description |
|---|---|
| Engine Misfires | One or more cylinders fail to ignite properly, causing the engine to run unevenly. According to a 2021 study by the National Institute for Automotive Service Excellence (ASE), misfires can reduce engine power by up to 25%. |
| Rough Idling | The engine shakes or vibrates excessively when the vehicle is stationary. This is often due to inconsistent combustion in the cylinders. |
| Difficulty Starting | The engine takes longer than usual to start, or fails to start altogether. This can be due to the ignition coil not providing enough spark to ignite the fuel. |
| Poor Fuel Economy | A faulty ignition coil can lead to incomplete combustion, resulting in lower fuel efficiency. According to the EPA, inefficient combustion can decrease fuel economy by as much as 30%. |
| Check Engine Light | The Check Engine light illuminates on the dashboard, indicating a problem detected by the car’s computer. Diagnostic trouble codes (DTCs) related to ignition issues are often stored. |
| Stalling | The engine unexpectedly shuts off while driving. This can be dangerous, particularly at high speeds. |
| Reduced Engine Power | The vehicle lacks its usual power, especially during acceleration. |
| Unusual Noises | Popping or backfiring sounds from the exhaust can indicate unburned fuel igniting outside the combustion chamber, often due to a misfiring cylinder. |
| Vibrations | Excessive vibrations, especially at certain speeds, can be a symptom of a misfiring cylinder caused by a faulty ignition coil. |
| Hesitation During Acceleration | A noticeable delay or hesitation when you press the accelerator pedal, indicating a problem with the engine’s ability to respond quickly. |
Expert Insight: According to CARDIAGTECH.NET, experiencing any of these symptoms warrants an immediate check of your ignition system to prevent further complications and ensure safe driving conditions.
2.2 Impact on Vehicle Performance
How do these symptoms affect your driving experience and vehicle health?
- Decreased Performance: Engine misfires and rough idling can significantly reduce your vehicle’s power and responsiveness, making driving less enjoyable and potentially unsafe.
- Increased Emissions: Inefficient combustion due to a faulty ignition coil can increase harmful emissions, affecting the environment and potentially causing your vehicle to fail emissions tests.
- Potential Damage to Other Components: Unburned fuel can damage the catalytic converter, leading to expensive repairs. Additionally, a misfiring engine can cause undue stress on other ignition components and the engine control module (ECM).
Expert Insight: CARDIAGTECH.NET emphasizes that addressing ignition coil issues promptly can help maintain your vehicle’s overall health, improve its performance, and reduce the risk of costly repairs.
3. Gathering the Necessary Tools and Equipment
What tools and equipment do you need to test an ignition coil effectively?
Before you begin testing your ignition coil, it’s essential to gather the right tools and equipment. Having the correct instruments will ensure accurate readings and a safe testing process.
3.1 Essential Tools
What are the fundamental tools required for ignition coil testing?
Here’s a list of the essential tools you’ll need:
| Tool | Description | Why It’s Needed |
|---|---|---|
| Multimeter | A digital multimeter (DMM) is used to measure voltage, current, and resistance. It is crucial for testing the primary and secondary resistance of the ignition coil. According to Fluke Corporation, a reliable multimeter should have an accuracy of at least ±0.5%. | To measure resistance and voltage, ensuring the ignition coil meets the specified electrical parameters. |
| Spark Tester | A spark tester verifies whether the ignition coil is producing a spark strong enough to ignite the fuel-air mixture. It typically features a gap that the spark must jump across. | To visually confirm the presence and strength of the spark, indicating whether the coil is functioning correctly. |
| Basic Hand Tools | Includes screwdrivers, socket wrenches, pliers, and other common tools needed to remove and reinstall the ignition coil. A set of insulated tools is recommended for safety. | To access and handle the ignition coil safely and efficiently. |
| Owner’s Manual | Provides specific information about your vehicle’s ignition system, including the location of the ignition coils and the manufacturer’s specifications for testing. | To ensure you are testing the correct components and using the appropriate settings and measurements. |
| Safety Gloves and Goggles | Protect hands and eyes from potential hazards, such as electrical shocks, burns, and debris. | To ensure personal safety during the testing procedure. |
| Work Light | Provides adequate lighting to clearly see the components you are working with. | To improve visibility and accuracy while testing the ignition coil. |
| OBD-II Scanner (Optional) | An OBD-II scanner can read diagnostic trouble codes (DTCs) stored in the vehicle’s computer, which can help pinpoint ignition system issues. According to a report by the Auto Repair Association (ARA), using an OBD-II scanner can reduce diagnostic time by up to 40%. | To identify specific codes related to ignition coil failures, providing valuable diagnostic information. |
| Oscilloscope (Optional) | An oscilloscope provides a detailed analysis of the ignition coil’s voltage output over time. It can reveal subtle issues that a multimeter might miss. | To perform advanced diagnostics and identify complex problems within the ignition system. |
Expert Insight: CARDIAGTECH.NET recommends investing in high-quality tools to ensure accurate and reliable testing, enhancing your ability to diagnose and resolve ignition issues effectively.
3.2 Where to Purchase Tools
Where can you find these tools and equipment?
You can purchase these tools from a variety of sources:
- Auto Parts Stores: Retailers like AutoZone, Advance Auto Parts, and O’Reilly Auto Parts offer a wide range of automotive tools and equipment.
- Online Retailers: Websites like Amazon and CARDIAGTECH.NET provide convenient access to a vast selection of tools with customer reviews and competitive pricing.
- Tool Suppliers: Companies like Snap-on and Mac Tools specialize in professional-grade tools for automotive technicians.
- Local Hardware Stores: Stores like Home Depot and Lowe’s carry basic hand tools and safety equipment.
Expert Insight: CARDIAGTECH.NET advises comparing prices and reading reviews before making a purchase to ensure you are getting the best value and quality for your needs.
4. Step-by-Step Guide to Testing Your Ignition Coil with a Multimeter
How can you effectively use a multimeter to test your ignition coil?
Testing your ignition coil with a multimeter is a systematic process that involves several key steps. Follow this detailed guide to ensure accurate and reliable results.
4.1 Safety Precautions
What safety measures should you take before starting?
Before you begin, it’s crucial to take the necessary safety precautions:
- Disconnect the Battery: Disconnect the negative terminal of the car battery to prevent electrical shocks.
- Wear Safety Gear: Always wear safety gloves and goggles to protect yourself from potential hazards.
- Work in a Well-Ventilated Area: Ensure the testing area is well-ventilated to avoid inhaling harmful fumes.
- Use Insulated Tools: Use tools with insulated handles to minimize the risk of electric shock.
- Follow the Manual: Refer to your vehicle’s owner’s manual for specific safety instructions and recommendations.
Expert Insight: CARDIAGTECH.NET stresses that safety should always be your top priority when working on your vehicle. Taking these precautions can significantly reduce the risk of injury and ensure a safe testing environment.
4.2 Step 1: Visual Inspection
How do you perform a thorough visual inspection of the ignition coil?
Begin by visually inspecting the ignition coil for any signs of damage:
- Check for Cracks: Look for cracks on the coil housing, which can indicate physical stress and potential failure.
- Inspect for Burn Marks: Burn marks or discoloration can suggest overheating and internal damage.
- Look for Corrosion: Check for corrosion on the terminals and connectors, which can impede electrical conductivity.
- Examine Wiring: Inspect the wiring and connectors for any signs of damage, such as fraying, cuts, or melted insulation.
If you notice any visible damage, the ignition coil likely needs to be replaced.
4.3 Step 2: Preparing the Multimeter
How do you set up your multimeter for testing?
- Turn Off the Engine: Ensure the engine is turned off and the ignition is in the “off” position.
- Disconnect the Battery: Disconnect the negative terminal of the car battery.
- Remove the Ignition Coil: Carefully remove the ignition coil from its mount. Refer to your vehicle’s manual for the exact location and removal procedure.
- Set the Multimeter: Set your multimeter to measure resistance (Ohms – Ω). Choose the appropriate range for low resistance measurements, typically in the 200Ω range.
Expert Insight: According to CARDIAGTECH.NET, proper preparation is key to accurate testing. Ensure your multimeter is correctly set and calibrated for the most reliable results.
4.4 Step 3: Testing Primary Resistance
How do you measure the primary resistance of the ignition coil?
The primary resistance test measures the resistance in the ignition coil’s primary windings.
- Locate Primary Terminals: Identify the primary terminals on the ignition coil. These are typically the smaller terminals that connect to the vehicle’s wiring harness.
- Connect Probes: Place the positive and negative probes of the multimeter on the primary terminals.
- Read Resistance Value: Observe the resistance reading on the multimeter. A typical reading should range between 0.4 and 2 ohms, depending on the vehicle. Refer to your vehicle’s service manual for the exact specifications.
- Analyze Results: If the resistance is outside the specified range (either too high or too low), the ignition coil is likely faulty and should be replaced.
4.5 Step 4: Testing Secondary Resistance
How do you measure the secondary resistance of the ignition coil?
The secondary resistance test measures the resistance in the ignition coil’s secondary windings.
- Locate Secondary Terminals: Identify the secondary terminals on the ignition coil. This usually involves one terminal connected to the spark plug and another to ground.
- Connect Probes: Place one probe on the spark plug terminal and the other probe on the coil’s ground terminal.
- Read Resistance Value: Observe the resistance reading on the multimeter. A typical reading should range between 6,000 and 10,000 ohms, but this can vary significantly depending on the vehicle. Refer to your vehicle’s service manual for the exact specifications.
- Analyze Results: If the resistance is outside the specified range, the ignition coil is faulty and needs replacement.
Expert Insight: CARDIAGTECH.NET advises comparing the measured values with the manufacturer’s specifications to accurately determine if the ignition coil is functioning correctly. Significant deviations indicate a need for replacement.
4.6 Step 5: Checking for Spark
How do you use a spark tester to check for a strong spark?
If the multimeter readings are within range but you still suspect an issue, use a spark tester to check for a strong spark.
- Reinstall the Ignition Coil: Reinstall the ignition coil and connect the spark tester between the coil and a grounded part of the engine.
- Start the Engine: Start the engine or crank it.
- Observe Spark: Watch the spark tester’s gap for a strong, blue spark. A weak, yellow spark or no spark indicates a problem.
- Analyze Results: If there is no spark or a weak spark, the ignition coil is likely faulty and needs replacement.
Expert Insight: CARDIAGTECH.NET emphasizes that a strong, consistent spark is essential for proper engine function. A weak or absent spark indicates a need for immediate attention.
5. Interpreting Test Results and Troubleshooting
How do you interpret the results of your tests and troubleshoot potential issues?
After performing the tests, understanding the results is crucial for accurate diagnosis and effective troubleshooting.
5.1 Understanding Resistance Readings
What do the resistance readings tell you about the ignition coil’s condition?
- Low Resistance: A resistance reading that is lower than the specified range indicates a short circuit within the coil windings. This can cause the coil to overheat and fail prematurely.
- High Resistance: A resistance reading that is higher than the specified range indicates an open circuit or excessive resistance in the coil windings. This can prevent the coil from producing a strong enough spark.
- Infinite Resistance: An infinite resistance reading indicates a complete break in the coil windings, preventing any current flow. This means the coil is definitely faulty.
- Correct Resistance: If the resistance readings are within the specified range, the coil windings are likely intact. However, this does not guarantee that the coil is functioning perfectly.
Expert Insight: According to CARDIAGTECH.NET, accurate interpretation of resistance readings is essential for diagnosing ignition coil issues. Always compare your readings with the manufacturer’s specifications for the best results.
5.2 Common Issues and Solutions
What are the common problems that can affect ignition coils, and how can you address them?
| Issue | Possible Causes | Solutions |
|---|---|---|
| No Spark | Faulty ignition coil, damaged wiring, corroded connectors, faulty spark plugs. | Replace the ignition coil, repair or replace damaged wiring, clean or replace corroded connectors, replace spark plugs. |
| Weak Spark | Worn ignition coil, low battery voltage, poor grounding. | Replace the ignition coil, check and charge the battery, ensure proper grounding. |
| Engine Misfires | Faulty ignition coil, worn spark plugs, vacuum leaks, low compression. | Replace the ignition coil, replace spark plugs, repair vacuum leaks, check engine compression. |
| Rough Idling | Faulty ignition coil, vacuum leaks, dirty throttle body, faulty idle air control valve. | Replace the ignition coil, repair vacuum leaks, clean the throttle body, replace the idle air control valve. |
| Poor Fuel Economy | Faulty ignition coil, worn spark plugs, dirty air filter, faulty oxygen sensor. | Replace the ignition coil, replace spark plugs, replace the air filter, replace the oxygen sensor. |
| Check Engine Light | Faulty ignition coil, various engine or emissions-related issues. | Use an OBD-II scanner to read the diagnostic trouble codes (DTCs), diagnose the issue based on the codes, and repair or replace the faulty components. |
| Ignition Coil Overheating | Excessive dwell time, faulty ignition control module, poor cooling. | Reduce dwell time, replace the ignition control module, improve cooling by ensuring proper airflow around the ignition coil. |
| Mechanical Damage to Ignition Coil | Physical impact, vibration, improper installation. | Replace the ignition coil and ensure proper installation to prevent future damage. |
| Electrical Surges | Voltage spikes, faulty voltage regulator, electrical system issues. | Inspect and repair the electrical system, replace the voltage regulator, and install surge protection devices. |
| Exposure to Extreme Temperatures | High engine temperatures, proximity to heat sources. | Use heat shields, improve engine cooling, and ensure the ignition coil is properly positioned away from direct heat. |
| Moisture and Humidity | Exposure to water, condensation, high humidity levels. | Use waterproof connectors, apply dielectric grease to terminals, and ensure proper sealing of the engine compartment. |
| Use of Incorrect Parts | Installing incompatible or low-quality ignition coils. | Use only OEM (Original Equipment Manufacturer) or high-quality aftermarket parts that are specified for your vehicle. |
| Poor Maintenance Practices | Neglecting regular spark plug replacement and other ignition system maintenance. | Follow the manufacturer’s recommended maintenance schedule for spark plugs, ignition wires, and other ignition system components. |
Expert Insight: CARDIAGTECH.NET emphasizes that thorough troubleshooting involves addressing not only the ignition coil itself but also other related components and systems to ensure a comprehensive solution.
5.3 When to Replace the Ignition Coil
When should you replace the ignition coil, even if it seems to be functioning?
In some cases, the ignition coil may appear to be functioning within acceptable parameters but still require replacement. Here are some scenarios:
- Age and Mileage: If the ignition coil has reached the end of its expected lifespan (typically 100,000 to 150,000 miles), it’s prudent to replace it as preventive maintenance.
- Recurring Issues: If you’ve experienced recurring symptoms such as misfires or rough idling, even after addressing other potential causes, replacing the ignition coil may be necessary.
- Preventive Maintenance: When replacing spark plugs, consider replacing the ignition coils simultaneously, especially in coil-on-plug systems. This ensures optimal performance and reduces the likelihood of future issues.
Expert Insight: CARDIAGTECH.NET advises that proactive replacement of ignition coils can enhance vehicle reliability and prevent unexpected breakdowns.
6. Maintaining Your Vehicle’s Ignition System
How can you ensure the long-term health and performance of your vehicle’s ignition system?
Proper maintenance is essential for prolonging the life and efficiency of your vehicle’s ignition system. Regular checks and timely replacements can prevent major issues and ensure optimal performance.
6.1 Regular Check-Ups
What should you include in your regular ignition system check-ups?
- Inspect Spark Plugs: Check spark plugs regularly and replace them according to the manufacturer’s recommended intervals.
- Test Ignition Coils: Test ignition coils periodically using a multimeter and spark tester.
- Examine Wiring: Inspect wiring and connectors for damage or corrosion.
- Monitor Performance: Pay attention to any symptoms of ignition issues, such as misfires or rough idling.
- Use OBD-II Scanner: Use an OBD-II scanner to check for any stored diagnostic trouble codes (DTCs).
Expert Insight: CARDIAGTECH.NET recommends incorporating these checks into your routine vehicle maintenance schedule to keep your ignition system in top condition.
6.2 Best Practices for Ignition System Maintenance
What are the best practices to follow for maintaining your ignition system?
- Replace Spark Plugs Regularly: Follow the manufacturer’s recommended maintenance schedule for spark plug replacement to ensure optimal ignition performance.
- Use Quality Parts: Use high-quality replacement parts that meet or exceed OEM specifications to ensure reliability and longevity.
- Keep Components Clean: Keep ignition components clean and free from dirt and debris to prevent corrosion and electrical issues.
- Check and Maintain Wiring: Regularly inspect and maintain the wiring and connectors to prevent damage and ensure proper electrical connections.
- Address Issues Promptly: Address any symptoms of ignition issues promptly to prevent further damage and maintain vehicle performance.
- Ensure Proper Grounding: Check and maintain the grounding connections to ensure proper electrical flow within the ignition system.
- Avoid Overloading the System: Do not overload the electrical system with excessive aftermarket accessories, as this can stress the ignition components.
- Protect from Extreme Temperatures: Use heat shields and ensure proper cooling to protect ignition components from extreme temperatures.
- Use Dielectric Grease: Apply dielectric grease to electrical connections to prevent corrosion and ensure good conductivity.
- Store Vehicle Properly: If storing the vehicle for an extended period, disconnect the battery and protect the ignition components from moisture and extreme temperatures.
Expert Insight: CARDIAGTECH.NET emphasizes that consistent adherence to these maintenance practices will significantly extend the life of your ignition system and ensure reliable vehicle performance.
6.3 Benefits of a Well-Maintained Ignition System
What are the advantages of keeping your ignition system in good condition?
- Improved Fuel Efficiency: A well-maintained ignition system ensures efficient combustion, maximizing fuel economy.
- Enhanced Engine Performance: Proper ignition ensures optimal engine power and responsiveness.
- Reduced Emissions: Efficient combustion reduces harmful emissions, contributing to a cleaner environment.
- Extended Engine Life: Maintaining the ignition system can prevent damage to other engine components, extending the overall life of your engine.
- Reliable Vehicle Operation: A well-maintained ignition system ensures reliable vehicle operation, reducing the risk of breakdowns and unexpected repairs.
Expert Insight: CARDIAGTECH.NET highlights that a proactive approach to ignition system maintenance is an investment in your vehicle’s long-term health and performance.
7. Advanced Diagnostic Techniques
What are some advanced methods for diagnosing ignition coil issues?
For more complex ignition system problems, advanced diagnostic techniques can provide valuable insights.
7.1 Using an Oscilloscope
How can an oscilloscope help diagnose ignition coil problems?
An oscilloscope can display the voltage waveforms of the ignition coil, providing detailed information about its performance. This can help identify issues such as:
- Primary and Secondary Voltage Patterns: Oscilloscopes can reveal irregularities in the voltage patterns, indicating potential problems with the coil windings or insulation.
- Dwell Time: Oscilloscopes can measure the dwell time, which is the amount of time the ignition coil is charged before firing. Incorrect dwell time can cause weak spark or coil overheating.
- Firing Voltage: Oscilloscopes can measure the firing voltage, which is the voltage required to create a spark. High firing voltage can indicate worn spark plugs or other issues.
Expert Insight: According to a study by the Automotive Research Association (ARA), using an oscilloscope can reduce diagnostic time by up to 60% compared to traditional methods.
7.2 Reading Diagnostic Trouble Codes (DTCs)
How can diagnostic trouble codes help pinpoint ignition issues?
An OBD-II scanner can read diagnostic trouble codes (DTCs) stored in the vehicle’s computer, which can help pinpoint ignition system issues. Common DTCs related to ignition coil failures include:
- P0300: Random/Multiple Cylinder Misfire Detected
- P0301-P0306: Cylinder Misfire Detected (specific cylinder number)
- P0350-P0356: Ignition Coil Primary/Secondary Circuit Malfunction
By interpreting these codes, you can identify which cylinder is misfiring and which ignition coil may be faulty.
Expert Insight: CARDIAGTECH.NET advises using an OBD-II scanner to quickly identify and address ignition system issues, improving diagnostic accuracy and reducing repair time.
8. Choosing the Right Replacement Ignition Coils
What factors should you consider when selecting a replacement ignition coil?
Selecting the right replacement ignition coil is essential for ensuring optimal performance and reliability.
8.1 OEM vs. Aftermarket Coils
What are the pros and cons of choosing OEM versus aftermarket ignition coils?
- OEM (Original Equipment Manufacturer) Coils:
- Pros: Guaranteed compatibility, high quality, and reliability.
- Cons: Higher cost compared to aftermarket options.
- Aftermarket Coils:
- Pros: Lower cost, wider availability, and potential for improved performance.
- Cons: Variable quality, potential compatibility issues, and shorter lifespan.
Expert Insight: CARDIAGTECH.NET recommends using OEM coils whenever possible to ensure optimal performance and reliability. If choosing aftermarket coils, select reputable brands with proven track records.
8.2 Key Considerations When Choosing a Replacement
What factors should you consider when selecting a replacement ignition coil?
- Compatibility: Ensure the replacement coil is compatible with your vehicle’s make, model, and year.
- Quality: Choose a coil from a reputable brand with a proven track record of quality and reliability.
- Specifications: Verify that the coil meets or exceeds the OEM specifications for voltage output, resistance, and other critical parameters.
- Warranty: Look for a coil with a comprehensive warranty to protect against defects and premature failure.
- Reviews: Read customer reviews and ratings to get insights into the coil’s performance and reliability.
Expert Insight: CARDIAGTECH.NET advises thorough research and careful consideration when selecting a replacement ignition coil to ensure optimal performance and longevity.
9. Step-by-Step Guide to Replacing Your Ignition Coil
How do you properly replace an ignition coil?
Replacing an ignition coil is a straightforward process that can be completed with basic tools and mechanical knowledge. Follow this step-by-step guide to ensure a successful replacement.
9.1 Safety Precautions
What safety measures should you take before starting?
Before you begin, it’s crucial to take the necessary safety precautions:
- Disconnect the Battery: Disconnect the negative terminal of the car battery to prevent electrical shocks.
- Wear Safety Gear: Always wear safety gloves and goggles to protect yourself from potential hazards.
- Work in a Well-Ventilated Area: Ensure the work area is well-ventilated to avoid inhaling harmful fumes.
- Use Insulated Tools: Use tools with insulated handles to minimize the risk of electric shock.
- Follow the Manual: Refer to your vehicle’s owner’s manual for specific safety instructions and recommendations.
Expert Insight: CARDIAGTECH.NET emphasizes that safety should always be your top priority when working on your vehicle. Taking these precautions can significantly reduce the risk of injury and ensure a safe working environment.
9.2 Step 1: Accessing the Ignition Coil
How do you access the ignition coil in your vehicle?
- Locate the Ignition Coil: Refer to your vehicle’s service manual to find the exact location of the ignition coil. In coil-on-plug systems, the coil is typically located directly on top of the spark plug.
- Remove Engine Covers: Remove any engine covers or other components that may be blocking access to the ignition coil. Use appropriate tools to carefully remove these components.
- Disconnect Electrical Connector: Disconnect the electrical connector from the ignition coil. Press the release tab on the connector and gently pull it away from the coil.
9.3 Step 2: Removing the Old Ignition Coil
How do you remove the old ignition coil safely?
- Loosen Mounting Bolts: Use a socket wrench to loosen the mounting bolts or screws that secure the ignition coil to the engine.
- Remove the Coil: Carefully remove the old ignition coil from its mount. Take note of its orientation to ensure the new coil is installed correctly.
- Inspect the Area: Inspect the area around the spark plug for any signs of damage or corrosion. Clean the area if necessary.
9.4 Step 3: Installing the New Ignition Coil
How do you install the new ignition coil correctly?
- Install the New Coil: Place the new ignition coil into its mount, ensuring it is properly aligned.
- Secure Mounting Bolts: Tighten the mounting bolts or screws to secure the ignition coil. Use a torque wrench to tighten the bolts to the manufacturer’s specified torque.
- Reconnect Electrical Connector: Reconnect the electrical connector to the ignition coil. Ensure the connector is securely attached and the release tab is locked.
9.5 Step 4: Testing the New Ignition Coil
How do you test the new ignition coil to ensure it’s working properly?
- Start the Engine: Start the engine and listen for any signs of misfires or rough idling.
- Use Spark Tester: Use a spark tester to verify that the new ignition coil is producing a strong, blue spark.
- Check for DTCs: Use an OBD-II scanner to check for any diagnostic trouble codes (DTCs) related to the ignition system.
Expert Insight: CARDIAGTECH.NET advises that proper installation and testing are essential for ensuring the new ignition coil is functioning correctly. If you encounter any issues, double-check the installation and consult a qualified mechanic if necessary.
9.6 Step 5: Final Steps
What are the final steps to complete the ignition coil replacement?
- Reinstall Engine Covers: Reinstall any engine covers or other components that were removed to access the ignition coil.
- Verify Performance: Take the vehicle for a test drive to verify that the engine is running smoothly and there are no signs of misfires or other issues.
- Monitor Performance: Monitor the vehicle’s performance over the next few days to ensure the ignition system is functioning correctly.
Expert Insight: CARDIAGTECH.NET emphasizes that proper completion of these final steps will ensure the ignition system is functioning correctly and the vehicle is operating at its best.
10. Benefits of Using High-Quality Tools from CARDIAGTECH.NET
Why should you choose CARDIAGTECH.NET for your automotive diagnostic tools?
At CARDIAGTECH.NET, we understand the importance of having reliable and accurate tools for diagnosing and repairing automotive issues. That’s why we offer a wide range of high-quality tools designed to meet the needs of both professional technicians and DIY enthusiasts.
10.1 Superior Accuracy and Reliability
How do CARDIAGTECH.NET tools ensure accurate and reliable results?
Our tools are engineered to provide superior accuracy and reliability, ensuring you get the correct readings and can make informed decisions about your vehicle’s maintenance and repairs.
- Precision Engineering: Our tools are designed with precision engineering to ensure accurate measurements and reliable performance.
- High-Quality Components: We use high-quality components in our tools to ensure durability and long-lasting performance.
- Calibration: Our tools are calibrated to meet industry standards, ensuring accurate readings every time.
Expert Insight: CARDIAGTECH.NET is committed to providing tools that you can trust to deliver accurate and reliable results, helping you diagnose and resolve automotive issues effectively.
10.2 Durability and Longevity
How durable are CARDIAGTECH.NET tools?
Our tools are built to withstand the rigors of automotive work, ensuring they will last for years to come.
- Rugged Construction: Our tools feature rugged construction and durable materials to withstand the demands of automotive environments.
- Ergonomic Design: Our tools are designed with ergonomics in mind, providing comfort and ease of use during extended use.
- Quality Materials: We use high-quality materials that resist corrosion, wear, and tear, ensuring long-lasting performance.
Expert Insight: CARDIAGTECH.NET is dedicated to providing tools that offer exceptional durability and longevity, making them a valuable investment for any automotive enthusiast or professional technician.
10.3 Wide Range of Products
What types of tools does CARDIAGTECH.NET offer?
We offer a comprehensive range of automotive diagnostic tools, including multimeters, OBD-II scanners, oscilloscopes, and more, to meet all your diagnostic and repair needs.
- Multimeters: Our multimeters are designed to measure voltage, current, and resistance with high accuracy and reliability.
- OBD-II Scanners: Our OBD-II scanners can read and clear diagnostic trouble codes (DTCs), helping you quickly identify and resolve engine and emissions-related issues.
- Oscilloscopes: Our oscilloscopes provide detailed waveform analysis, allowing you to diagnose complex electrical and electronic problems.
- Specialty Tools: We also offer a variety of specialty tools designed for specific automotive tasks, such as compression testers, timing lights, and more.
Expert Insight: CARDIAGTECH.NET is your one-stop shop for all your automotive diagnostic tool needs, offering a wide range of products to help you keep your vehicle running smoothly.
10.4 Expert Support and Guidance
What kind of customer support does CARDIAGTECH.NET provide?
We provide expert support and guidance to help you choose the right tools and use them effectively.
- Knowledgeable Staff: Our staff is knowledgeable about automotive diagnostics and can provide expert guidance on tool selection and usage.
- Online Resources: We offer a variety of online resources, including product manuals, tutorials, and troubleshooting guides, to help you get the most out of your tools.
- Customer Support: Our customer support team is available to answer your questions and provide assistance with any issues you may encounter.
Expert Insight: CARDIAGTECH.NET is committed to providing exceptional customer support and guidance, helping you become a more confident and effective automotive technician.
10.5 Competitive Pricing
How does CARDIAGTECH.NET offer competitive pricing on its tools?
We offer competitive pricing on our tools to make them accessible to both professional technicians and DIY enthusiasts.
- Direct Sourcing: We source our tools directly from