Full Restyling 2018MY RR: Elevate Your Range Rover
Full restyling in 2018MY RR, focusing on the front and side profiles, provides a transformative upgrade, enhancing both aesthetics and performance. At CARDIAGTECH.NET, we offer premium restyling solutions to revitalize your Range Rover, ensuring a perfect blend of luxury and modern design. With aftermarket options and genuine accessories, find the ideal enhancements for your vehicle’s front fascia, side skirts, and complete visual appeal.
1. Understanding the 2018MY Range Rover Restyling Trend
The 2018 model year Range Rover (2018MY RR) represents a pivotal point in automotive design and technology. Restyling this model involves more than just cosmetic changes; it’s about integrating modern aesthetics with performance enhancements. This section explores the increasing trend of restyling 2018MY Range Rovers, focusing on the front and side aspects, and why it resonates with Range Rover owners.
1.1. The Growing Popularity of Range Rover Restyling
Range Rover restyling has surged in popularity for several reasons:
- Modernization: Owners seek to update their vehicle’s appearance to match current design trends.
- Personalization: Restyling allows for customizing the vehicle to reflect individual tastes.
- Investment: Upgrading a Range Rover can enhance its resale value.
- Performance: Some restyling projects include aerodynamic improvements and enhanced functionality.
According to a 2023 report by Grand View Research, the automotive aftermarket, including restyling kits, is projected to reach $485.3 billion by 2030, growing at a CAGR of 4.0% from 2023 to 2030. This growth indicates a strong demand for vehicle customization and upgrades.
1.2. Why Focus on Front and Side Restyling?
The front and side profiles are crucial for a vehicle’s overall appearance. Restyling these areas can dramatically change the vehicle’s aesthetic:
- Front Profile: This includes the grille, headlights, bumper, and hood. Changes here immediately capture attention and define the vehicle’s character.
- Side Profile: This involves side skirts, door panels, and wheel arches. Upgrading these components can create a sleeker, more dynamic look.
1.3. Key Motivations for Restyling
- Aesthetic Enhancement: To give the vehicle a more aggressive or luxurious appearance.
- Performance Improvement: To improve aerodynamics and handling.
- Damage Repair: To replace damaged parts with upgraded versions.
- Exclusivity: To stand out from other Range Rovers on the road.
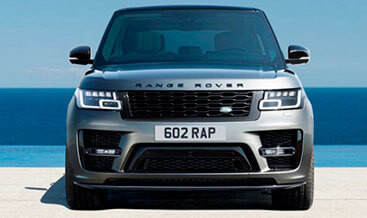
Range Rover Front Profile Enhancement
The front profile of the Range Rover showcases a significant transformation through restyling, integrating a new grille and bumper for an enhanced aesthetic.
2. Comprehensive Guide to Front Restyling
The front of a Range Rover is its most recognizable feature. Upgrading this area can significantly enhance the vehicle’s presence and appeal. This section details the various components involved in front restyling, providing a step-by-step guide and expert insights.
2.1. Key Components for Front Restyling
-
Grille Replacement:
- Purpose: Changes the visual identity of the vehicle.
- Options: Mesh grilles, honeycomb grilles, and custom designs.
- Materials: Stainless steel, ABS plastic, and carbon fiber.
-
Headlight Upgrades:
- Purpose: Improves visibility and adds a modern touch.
- Types: LED headlights, xenon headlights, and projector headlights.
- Features: Daytime running lights (DRL), sequential turn signals.
-
Bumper Replacement:
- Purpose: Enhances the vehicle’s aggressive look and provides better protection.
- Styles: Off-road bumpers, aerodynamic bumpers, and custom designs.
- Materials: Steel, aluminum, and reinforced plastic.
-
Hood Modifications:
- Purpose: Adds a unique design element and improves airflow.
- Types: Vented hoods, scooped hoods, and custom designs.
- Materials: Steel, aluminum, and carbon fiber.
-
Fog Light Installation:
- Purpose: Improves visibility in adverse weather conditions.
- Types: LED fog lights, halogen fog lights, and projector fog lights.
- Features: Integrated into the bumper or as standalone units.
2.2. Step-by-Step Guide to Front Restyling
-
Preparation:
- Gather all necessary tools: Wrenches, screwdrivers, sockets, and pliers.
- Park the Range Rover on a level surface and engage the parking brake.
- Disconnect the negative battery terminal to prevent electrical shorts.
-
Grille Replacement:
- Remove the existing grille by unscrewing or unclipping it from the front fascia.
- Install the new grille, ensuring it securely fits into the designated slots.
- Secure the grille with screws or clips.
-
Headlight Upgrade:
- Remove the front bumper to access the headlights.
- Disconnect the electrical connectors from the existing headlights.
- Unbolt the headlights from the housing and remove them.
- Install the new headlights, reconnect the electrical connectors, and bolt them in place.
- Reinstall the front bumper.
-
Bumper Replacement:
- Remove the existing bumper by unscrewing the mounting bolts.
- Disconnect any fog lights or sensors attached to the bumper.
- Install the new bumper, ensuring it aligns correctly with the vehicle’s frame.
- Reconnect the fog lights or sensors and secure the bumper with bolts.
-
Hood Modification:
- Open the hood and remove the existing hood by unscrewing the hinges.
- Install the new hood, aligning the hinges and securing them with bolts.
- Adjust the hood latch to ensure it closes properly.
-
Fog Light Installation:
- Locate the designated mounting points for the fog lights on the bumper.
- Install the fog lights, connecting the electrical wiring to the vehicle’s electrical system.
- Test the fog lights to ensure they are functioning correctly.
2.3. Expert Tips for Front Restyling
- Professional Installation: Consider professional installation for complex modifications.
- Quality Parts: Use high-quality aftermarket parts for durability and performance.
- OEM Compatibility: Ensure aftermarket parts are compatible with the Range Rover’s OEM systems.
- Wiring: Double-check all electrical connections to prevent issues.
- Alignment: Properly align all components to maintain the vehicle’s appearance.
3. Elevating the Side Profile: A Detailed Guide
The side profile of a Range Rover contributes significantly to its overall aesthetic. Enhancing this view involves several key modifications that can dramatically improve the vehicle’s style and aerodynamics.
3.1. Key Components for Side Restyling
-
Side Skirts:
- Purpose: Enhances the vehicle’s aerodynamic profile and adds a sporty look.
- Styles: Lip skirts, rocker panels, and custom designs.
- Materials: Fiberglass, carbon fiber, and ABS plastic.
-
Door Handle Upgrades:
- Purpose: Adds a touch of luxury and personalization.
- Types: Chrome handles, carbon fiber handles, and illuminated handles.
- Features: Keyless entry integration.
-
Mirror Cap Replacements:
- Purpose: Enhances the vehicle’s aesthetic and adds a unique touch.
- Materials: Carbon fiber, chrome, and painted finishes.
- Features: Integrated turn signals.
-
Fender Flares:
- Purpose: Provides a more aggressive look and accommodates larger wheels and tires.
- Styles: Bolt-on flares, smooth flares, and custom designs.
- Materials: ABS plastic, fiberglass, and carbon fiber.
-
Window Tinting:
- Purpose: Enhances privacy and reduces heat inside the vehicle.
- Types: Ceramic tint, metallic tint, and dyed tint.
- Benefits: UV protection, glare reduction, and improved aesthetics.
3.2. Step-by-Step Guide to Side Restyling
-
Preparation:
- Gather all necessary tools: Wrenches, screwdrivers, adhesive remover, and heat gun.
- Clean the side panels of the Range Rover to ensure proper adhesion.
- Park the Range Rover on a level surface and engage the parking brake.
-
Side Skirt Installation:
- Remove the existing side skirts by unscrewing or unclipping them from the vehicle.
- Clean the mounting surface to remove any dirt or debris.
- Apply adhesive to the new side skirts and attach them to the vehicle.
- Secure the side skirts with screws or clips.
-
Door Handle Upgrade:
- Remove the interior door panel to access the door handles.
- Disconnect the linkage from the existing door handles.
- Remove the existing door handles by unscrewing them from the door.
- Install the new door handles, reconnect the linkage, and secure them with screws.
- Reinstall the interior door panel.
-
Mirror Cap Replacement:
- Remove the existing mirror caps by prying them off the side mirrors.
- Clean the mirror surface to remove any dirt or debris.
- Attach the new mirror caps to the side mirrors, ensuring they snap securely into place.
-
Fender Flare Installation:
- Clean the fender surface to remove any dirt or debris.
- Attach the fender flares to the fenders using screws or adhesive.
- Ensure the fender flares are securely attached and aligned properly.
-
Window Tinting:
- Clean the windows thoroughly with glass cleaner.
- Cut the window tint film to the size of the windows, leaving a small border.
- Apply the window tint film to the windows, using a squeegee to remove any air bubbles.
- Trim the excess film with a razor blade and heat the edges with a heat gun to ensure adhesion.
3.3. Expert Tips for Side Restyling
- Proper Adhesion: Ensure proper adhesion for side skirts and fender flares.
- Professional Tinting: Consider professional window tinting for best results.
- Color Matching: Match the color of the side skirts and fender flares to the vehicle’s paint.
- Material Quality: Choose high-quality materials for durability.
- Aerodynamic Testing: Test the vehicle’s aerodynamics after installing side skirts to ensure performance improvements.
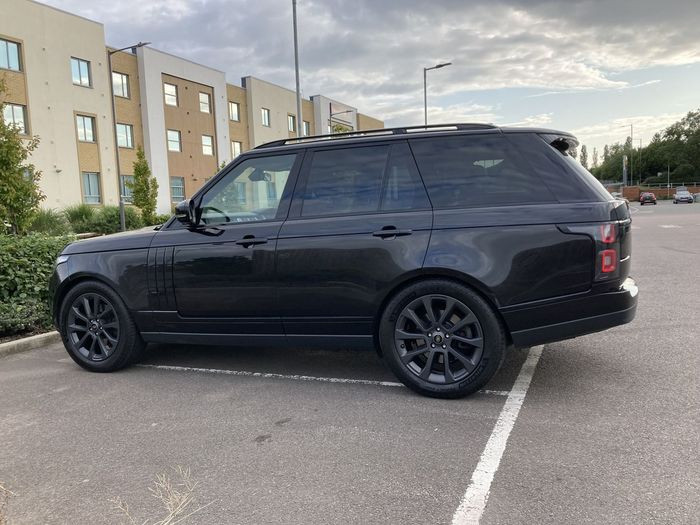
The side profile of the Range Rover Sport SVR highlights enhanced side skirts and aerodynamic lines, improving both aesthetics and performance.
4. SVO Design Pack: A Comprehensive Restyling Solution
For Range Rover enthusiasts seeking a comprehensive and cohesive restyling solution, the SVO (Special Vehicle Operations) Design Pack offers a premium option. This pack includes a range of enhancements designed to elevate the vehicle’s appearance and performance.
4.1. Overview of the SVO Design Pack
The SVO Design Pack is a comprehensive restyling package developed by Land Rover’s Special Vehicle Operations division. It includes a range of exterior enhancements designed to give the Range Rover a more aggressive and luxurious appearance.
4.2. Components Included in the SVO Design Pack
- Front Bumper: A redesigned front bumper with larger air intakes and a more aggressive splitter.
- Rear Bumper: A new rear bumper with integrated exhaust outlets and a diffuser.
- Side Sills: Enhanced side sills that complement the front and rear bumpers.
- Grille: A unique grille design with a distinctive mesh pattern.
- Exhaust System: A high-performance exhaust system that enhances the vehicle’s sound and performance.
- Wheels: A set of custom-designed wheels that complement the overall design of the pack.
4.3. Benefits of Choosing the SVO Design Pack
- Cohesive Design: The SVO Design Pack offers a cohesive and integrated design that enhances the vehicle’s overall appearance.
- Performance Enhancements: The pack includes components that improve the vehicle’s aerodynamic performance.
- High-Quality Materials: The components are made from high-quality materials, ensuring durability and longevity.
- OEM Integration: The SVO Design Pack is designed to seamlessly integrate with the Range Rover’s existing systems.
- Enhanced Resale Value: Adding the SVO Design Pack can increase the vehicle’s resale value.
4.4. Installation Considerations for the SVO Design Pack
- Professional Installation: Due to the complexity of the SVO Design Pack, professional installation is recommended.
- OEM Compatibility: Ensure the pack is compatible with the specific model year of the Range Rover.
- Warranty: Check if the installation of the SVO Design Pack affects the vehicle’s warranty.
- Cost: The SVO Design Pack is a premium option, so be prepared for a higher cost compared to aftermarket alternatives.
5. Aftermarket Alternatives: Balancing Cost and Quality
While the SVO Design Pack offers a premium restyling solution, several aftermarket alternatives provide a balance between cost and quality. This section explores some popular aftermarket options for restyling the front and side profiles of a 2018MY Range Rover.
5.1. Overview of Aftermarket Restyling Options
Aftermarket restyling options provide a wide range of choices for Range Rover owners looking to customize their vehicles. These options range from individual components to complete body kits, offering flexibility and affordability.
5.2. Popular Aftermarket Brands and Products
- Startech: Offers high-quality body kits and individual components for Range Rovers.
- Mansory: Known for its bold and aggressive designs, Mansory offers a range of restyling options for Range Rovers.
- Arden: Provides elegant and sophisticated restyling solutions for Range Rovers.
- Urban Automotive: Specializes in creating custom body kits and accessories for Range Rovers.
- Lumma Design: Offers a range of stylish and performance-oriented restyling options for Range Rovers.
5.3. Key Considerations When Choosing Aftermarket Parts
- Quality: Look for aftermarket parts made from high-quality materials, such as carbon fiber, fiberglass, and ABS plastic.
- Fitment: Ensure the aftermarket parts are designed to fit the specific model year of the Range Rover.
- Warranty: Check if the aftermarket parts come with a warranty to protect against defects.
- Installation: Consider whether professional installation is required for the aftermarket parts.
- Reviews: Read online reviews to get feedback from other Range Rover owners who have installed the aftermarket parts.
5.4. Balancing Cost and Quality
- Research: Conduct thorough research to compare different aftermarket brands and products.
- Budget: Set a budget for the restyling project and stick to it.
- Prioritize: Prioritize the components that are most important to you, such as the front bumper or side skirts.
- Read Reviews: Read online reviews to get an idea of the quality and fitment of the aftermarket parts.
- Consult Professionals: Consult with automotive professionals to get advice on the best aftermarket options for your Range Rover.
This Range Rover features aftermarket restyling, showcasing an enhanced front bumper and custom grille for a unique and aggressive look.
6. The Role of Professional Installation
While some restyling modifications can be done as DIY projects, professional installation is often recommended, especially for complex modifications. This section explores the benefits of professional installation and what to look for in a professional installer.
6.1. Benefits of Professional Installation
- Expertise: Professional installers have the knowledge and experience to properly install restyling components.
- Tools: Professional installers have access to specialized tools and equipment.
- Warranty: Professional installers often offer a warranty on their work.
- Quality: Professional installers ensure the restyling components are installed correctly and securely.
- Time Savings: Professional installation saves time and effort compared to DIY projects.
6.2. What to Look for in a Professional Installer
- Experience: Look for installers with experience in restyling Range Rovers.
- Reputation: Check online reviews and ask for referrals to gauge the installer’s reputation.
- Certification: Consider installers who are certified by industry organizations.
- Insurance: Ensure the installer has insurance to cover any damages that may occur during the installation process.
- Estimates: Get multiple estimates from different installers to compare prices.
6.3. DIY vs. Professional Installation: Making the Right Choice
- Complexity: Consider the complexity of the restyling project when deciding between DIY and professional installation.
- Skill Level: Assess your skill level and comfort level with automotive modifications.
- Tools: Determine if you have the necessary tools and equipment for the restyling project.
- Time: Consider how much time you are willing to invest in the restyling project.
- Budget: Compare the cost of DIY vs. professional installation to determine the best option for your budget.
6.4. Common Mistakes to Avoid During DIY Installation
- Incorrect Tools: Using the wrong tools can damage the restyling components or the vehicle.
- Improper Fitment: Failing to properly fit the restyling components can affect the vehicle’s appearance and performance.
- Damaged Wiring: Damaging the vehicle’s wiring can cause electrical problems.
- Inadequate Adhesion: Failing to properly adhere restyling components can cause them to fall off.
- Ignoring Instructions: Ignoring the manufacturer’s instructions can lead to installation errors.
7. Integrating Performance Enhancements with Restyling
Restyling is not just about aesthetics; it can also be an opportunity to integrate performance enhancements. This section explores how to combine restyling with performance upgrades for a holistic approach to vehicle modification.
7.1. Aerodynamic Upgrades
- Front Splitters: Improve downforce and reduce lift at high speeds.
- Side Skirts: Reduce drag and improve airflow along the sides of the vehicle.
- Rear Diffusers: Enhance airflow under the vehicle and increase downforce.
- Spoilers: Increase downforce and improve stability at high speeds.
7.2. Suspension Upgrades
- Lowering Springs: Lower the vehicle’s center of gravity and improve handling.
- Coilovers: Provide adjustable ride height and damping for customized performance.
- Sway Bars: Reduce body roll and improve cornering performance.
7.3. Exhaust System Upgrades
- Cat-Back Exhaust Systems: Improve exhaust flow and increase horsepower.
- Axle-Back Exhaust Systems: Provide a more aggressive exhaust note and improve performance.
- Headers: Increase exhaust flow and improve engine performance.
7.4. Brake Upgrades
- Big Brake Kits: Improve braking performance and reduce stopping distances.
- Performance Brake Pads: Provide better braking performance and resist brake fade.
- Stainless Steel Brake Lines: Improve brake pedal feel and reduce brake line expansion.
7.5. Engine Tuning
- ECU Tuning: Optimize engine performance and increase horsepower and torque.
- Performance Air Filters: Improve airflow to the engine and increase horsepower.
- Forced Induction: Add a turbocharger or supercharger to increase engine horsepower.
7.6. Balancing Aesthetics and Performance
- Prioritize Performance: Focus on performance upgrades that will improve the vehicle’s handling, braking, and acceleration.
- Complement Aesthetics: Choose restyling components that complement the performance upgrades.
- Consider Weight: Be mindful of the weight of the restyling components and performance upgrades, as added weight can negatively impact performance.
- Test and Adjust: Test the vehicle’s performance after installing the restyling components and performance upgrades, and make adjustments as needed.
8. Legal and Safety Considerations
Restyling a vehicle involves legal and safety considerations that must be taken into account. This section explores these considerations to ensure compliance and safety.
8.1. Compliance with Local Laws and Regulations
- Vehicle Codes: Familiarize yourself with local vehicle codes and regulations regarding vehicle modifications.
- Emissions Standards: Ensure that any engine modifications comply with local emissions standards.
- Lighting Requirements: Ensure that any lighting upgrades comply with local lighting requirements.
- Bumper Height Regulations: Be aware of bumper height regulations and ensure that any bumper modifications comply with these regulations.
8.2. Safety Standards
- Crash Testing: Be aware that modifying the vehicle’s structure can affect its crashworthiness.
- Airbag Systems: Ensure that any modifications do not interfere with the vehicle’s airbag systems.
- Braking Systems: Ensure that any braking system upgrades are properly installed and tested.
- Lighting Systems: Ensure that any lighting upgrades are properly installed and functioning correctly.
8.3. Insurance Implications
- Notify Insurer: Notify your insurance company of any significant modifications to the vehicle.
- Increased Premiums: Be aware that modifications can increase insurance premiums.
- Coverage Limitations: Understand that some insurance policies may not cover damage caused by modifications.
8.4. Warranty Considerations
- Aftermarket Parts: Be aware that installing aftermarket parts can void the vehicle’s warranty.
- OEM Parts: Using OEM parts for restyling can help preserve the vehicle’s warranty.
- Dealer Installation: Having the restyling components installed by a dealer can also help preserve the vehicle’s warranty.
8.5. Inspection Requirements
- State Inspections: Be aware of state inspection requirements and ensure that the vehicle passes inspection after restyling.
- Safety Inspections: Ensure that the vehicle passes safety inspections to ensure it is safe to drive.
- Emissions Inspections: Ensure that the vehicle passes emissions inspections to comply with environmental regulations.
9. Maintaining Your Restyled Range Rover
Maintaining a restyled Range Rover is crucial to preserve its appearance and performance. This section provides tips on how to care for your vehicle after restyling.
9.1. Regular Cleaning and Detailing
- Washing: Wash the vehicle regularly to remove dirt, debris, and road salt.
- Waxing: Wax the vehicle to protect the paint and enhance its shine.
- Detailing: Detail the vehicle to remove scratches, swirl marks, and other imperfections.
- Interior Cleaning: Clean the interior of the vehicle to remove dirt, dust, and stains.
9.2. Protecting Exterior Components
- Paint Protection Film: Apply paint protection film to protect the vehicle’s paint from scratches and chips.
- Ceramic Coating: Apply ceramic coating to protect the vehicle’s paint from UV rays, chemicals, and other environmental contaminants.
- Wheel Protection: Use wheel cleaner and sealant to protect the wheels from brake dust and corrosion.
- Tire Care: Use tire shine to protect the tires from UV rays and cracking.
9.3. Inspecting Restyling Components
- Regular Inspections: Regularly inspect the restyling components for damage, wear, and tear.
- Check Fasteners: Check the fasteners to ensure they are tight and secure.
- Look for Cracks: Look for cracks or damage to the restyling components.
- Repair Damage: Repair any damage to the restyling components promptly.
9.4. Addressing Wear and Tear
- Touch-Up Paint: Use touch-up paint to repair minor scratches and chips in the paint.
- Component Replacement: Replace worn or damaged restyling components as needed.
- Professional Repairs: Seek professional repairs for more significant damage.
9.5. Long-Term Care Tips
- Garage Storage: Store the vehicle in a garage to protect it from the elements.
- Covered Parking: Use covered parking when possible to protect the vehicle from sun and rain.
- Regular Maintenance: Follow the manufacturer’s recommended maintenance schedule to keep the vehicle in top condition.
- Professional Detailing: Have the vehicle professionally detailed on a regular basis to maintain its appearance.
10. Finding the Right Tools and Equipment at CARDIAGTECH.NET
Restyling a Range Rover, particularly the 2018MY RR, requires specialized tools and equipment to ensure precision and safety. CARDIAGTECH.NET offers a comprehensive range of high-quality tools designed to meet the needs of both professional mechanics and DIY enthusiasts.
10.1. Essential Tools for Front and Side Restyling
- Socket Sets: High-quality socket sets in various sizes are crucial for removing and installing bumpers, grilles, and other components.
- Wrench Sets: Wrenches are essential for tightening and loosening bolts and nuts in hard-to-reach areas.
- Screwdriver Sets: A variety of screwdrivers, including Phillips head and flathead, are needed for removing and installing screws.
- Pliers: Pliers are useful for gripping, bending, and cutting wires and other materials.
- Torque Wrenches: Torque wrenches are essential for tightening bolts and nuts to the correct specifications, preventing over-tightening and damage.
- Panel Removal Tools: These tools are designed to safely remove interior panels and trim without causing damage.
10.2. Diagnostic Equipment
- OBD-II Scanners: Essential for diagnosing and clearing error codes, ensuring all systems function correctly after modifications.
- Multimeters: Used for testing electrical circuits and components.
- Battery Testers: To ensure the battery is in good condition, especially after electrical modifications.
10.3. Safety Gear
- Safety Glasses: Protect your eyes from debris and chemicals.
- Gloves: Protect your hands from cuts, scrapes, and chemicals.
- Work Aprons: Keep your clothes clean and protected.
- Hearing Protection: Protect your ears from loud noises.
10.4. Why Choose CARDIAGTECH.NET for Your Tools?
- Quality Products: CARDIAGTECH.NET offers high-quality tools and equipment from reputable brands.
- Wide Selection: A comprehensive range of tools and equipment to meet all your restyling needs.
- Expert Advice: Knowledgeable staff who can provide expert advice on the right tools for your project.
- Competitive Prices: Competitive prices on all tools and equipment.
- Customer Satisfaction: A commitment to customer satisfaction.
Table: Essential Tools for 2018MY RR Restyling
| Tool | Description | Use | Price Range (USD) |
|---|---|---|---|
| Socket Set | Metric and SAE sizes, various drives (1/4″, 3/8″, 1/2″) | Removing and installing bolts and nuts | $50 – $300 |
| Wrench Set | Combination wrenches, open-end wrenches, box-end wrenches | Tightening and loosening bolts and nuts | $40 – $250 |
| Screwdriver Set | Phillips head, flathead, various sizes | Removing and installing screws | $20 – $100 |
| Pliers | Slip-joint pliers, needle-nose pliers, cutting pliers | Gripping, bending, and cutting materials | $15 – $75 |
| Torque Wrench | Adjustable torque wrench with metric and SAE scales | Tightening bolts and nuts to specific torque values | $80 – $400 |
| Panel Removal Tools | Non-marring plastic tools for removing interior panels and trim | Safely removing interior panels and trim without damage | $20 – $80 |
| OBD-II Scanner | Reads and clears diagnostic trouble codes (DTCs) | Diagnosing and clearing error codes after modifications | $50 – $500 |
| Multimeter | Measures voltage, current, and resistance | Testing electrical circuits and components | $30 – $200 |
| Safety Glasses | Protects eyes from debris and chemicals | Ensuring eye safety during work | $10 – $30 |
| Gloves | Protects hands from cuts, scrapes, and chemicals | Ensuring hand safety during work | $10 – $50 |
| Work Apron | Protects clothing from dirt and chemicals | Keeping clothes clean and protected | $15 – $60 |
Contact CARDIAGTECH.NET Today
Ready to start your 2018MY Range Rover restyling project? Contact CARDIAGTECH.NET today for expert advice and high-quality tools and equipment. Visit our website or call us at +1 (641) 206-8880. Our address is 276 Reock St, City of Orange, NJ 07050, United States.
11. Frequently Asked Questions (FAQ)
1. What is full restyling for a 2018MY Range Rover?
Full restyling involves upgrading the exterior and interior components of your Range Rover to enhance its appearance and performance. This can include replacing bumpers, grilles, headlights, side skirts, and more.
2. Why should I consider restyling my 2018MY Range Rover?
Restyling can modernize your vehicle’s appearance, improve its performance, increase its resale value, and allow you to personalize it to your tastes.
3. What are the key components for front restyling?
Key components include grille replacement, headlight upgrades, bumper replacement, hood modifications, and fog light installation.
4. What are the key components for side restyling?
Key components include side skirts, door handle upgrades, mirror cap replacements, fender flares, and window tinting.
5. What is the SVO Design Pack?
The SVO Design Pack is a comprehensive restyling package developed by Land Rover’s Special Vehicle Operations division, offering a cohesive and integrated design.
6. What are the benefits of professional installation?
Professional installation ensures expertise, access to specialized tools, warranty coverage, and quality workmanship.
7. How can I integrate performance enhancements with restyling?
You can integrate performance enhancements such as aerodynamic upgrades, suspension upgrades, exhaust system upgrades, and engine tuning.
8. What legal and safety considerations should I keep in mind?
Ensure compliance with local laws and regulations, adhere to safety standards, understand insurance implications, and consider warranty implications.
9. How do I maintain my restyled Range Rover?
Regular cleaning and detailing, protecting exterior components, inspecting restyling components, and addressing wear and tear are essential for maintenance.
10. Where can I find high-quality tools for restyling my Range Rover?
CARDIAGTECH.NET offers a comprehensive range of high-quality tools and equipment for all your restyling needs. Contact us today for expert advice and competitive prices.
Transform Your Range Rover Today
Don’t wait to transform your 2018MY Range Rover. Contact CARDIAGTECH.NET now and let our experts guide you through the best restyling options tailored to your needs. Call us at +1 (641) 206-8880 or visit our website at CARDIAGTECH.NET. Our address is 276 Reock St, City of Orange, NJ 07050, United States. Elevate your driving experience with CARDIAGTECH.NET.