What Are The Steps To Check The Engine Knock Sensor System?
The Engine Knock Sensor System monitors engine vibrations and prevents damage from pre-ignition, and it’s crucial to keep this system in check for optimal performance. Are you encountering a “check engine” light, decreased acceleration, or reduced fuel economy? At CARDIAGTECH.NET, we understand the importance of a properly functioning knock sensor system. That’s why we offer high-quality diagnostic tools and replacement sensors to ensure your engine runs smoothly. Discover the telltale signs of a faulty knock sensor, how to diagnose the issue, and the steps to take to resolve it, ensuring your vehicle performs at its best with the proper equipment.
1. What is the Role of an Engine Knock Sensor?
An engine knock sensor identifies unusual engine combustion. It detects vibrations caused by engine knock, also known as detonation or pre-ignition. According to a 2023 study by the University of Michigan’s Department of Mechanical Engineering, knock sensors use a piezoelectric element that generates a voltage signal when subjected to the mechanical stress of engine knock. This signal is then sent to the engine control unit (ECU). The ECU then adjusts ignition timing to prevent engine damage. Without a functional knock sensor, your engine could suffer severe damage. CARDIAGTECH.NET provides the tools to help you diagnose and address these issues promptly.
Alt: Engine knock sensor diagram showing its placement on the engine block
2. What are the Symptoms of a Failing Knock Sensor?
Several symptoms can indicate a failing knock sensor. Addressing these symptoms promptly can prevent further engine damage. A faulty knock sensor can cause a range of issues, impacting your vehicle’s performance and longevity.
- Check Engine Light: The most common sign is the illumination of the “check engine” light on your dashboard. The ECU detects irregularities and alerts you through this indicator.
- Engine Knocking or Pinging: You might hear unusual knocking or pinging noises from the engine, especially during acceleration. This occurs because the engine is experiencing uncontrolled combustion.
- Reduced Engine Power: A failing knock sensor can cause a noticeable decrease in engine power and acceleration. The ECU retards the ignition timing to protect the engine, reducing overall performance.
- Poor Fuel Economy: If the engine isn’t running efficiently due to knock, you may notice a drop in fuel economy. Inefficient combustion wastes fuel.
- Failed Emissions Test: A faulty knock sensor can cause the engine to fail an emissions test, as the combustion process isn’t optimized.
3. What are the Primary Causes of Knock Sensor Failure?
Knock sensors can fail due to various reasons, from environmental factors to mechanical issues. Understanding these causes can help prevent future failures and maintain your vehicle’s health.
- Physical Damage: Impacts or debris can physically damage the sensor, affecting its ability to detect engine knock.
- Corrosion: Exposure to moisture, salt, and other corrosive elements can cause the sensor to corrode, leading to inaccurate readings.
- Wiring Issues: Damaged or corroded wiring can disrupt the signal between the sensor and the ECU, causing malfunctions.
- Overheating: Prolonged exposure to high temperatures can degrade the sensor’s internal components.
- Loose Connections: Vibrations can cause the sensor’s connections to loosen over time, leading to intermittent or complete failure.
- Age: Like all automotive components, knock sensors have a limited lifespan and can fail due to wear and tear over time.
4. How to Check an Engine Knock Sensor: A Step-by-Step Guide
Checking an engine knock sensor involves several methods, each providing different insights into the sensor’s condition. Here’s a detailed guide to help you diagnose the issue effectively.
4.1. Visual Inspection
Begin with a thorough visual inspection of the knock sensor. This initial step can often reveal obvious issues.
- Location: Locate the knock sensor on the engine block. It is typically screwed into the block. Consult your vehicle’s repair manual for the exact location.
- Wiring: Check the wiring and connectors for any signs of damage, such as cuts, fraying, or corrosion. Ensure the connectors are securely attached.
- Sensor Body: Look for any physical damage to the sensor itself, such as cracks, dents, or corrosion.
4.2. Using a Multimeter
A multimeter is a versatile tool for testing the electrical integrity of the knock sensor. Follow these steps for accurate results.
- Resistance Test:
- Disconnect the knock sensor connector.
- Set the multimeter to the ohms setting (Ω).
- Place the multimeter probes on the sensor terminals.
- Check the resistance value. A typical knock sensor should have a resistance between 100 kΩ and 500 kΩ. Refer to your vehicle’s service manual for the exact specification.
- If the resistance is significantly outside this range, the sensor is likely faulty.
- Continuity Test:
- Set the multimeter to the continuity setting.
- Place one probe on a sensor terminal and the other on the sensor housing.
- There should be no continuity (infinite resistance). Continuity indicates a short circuit within the sensor.
- Voltage Test:
- With the engine running, set the multimeter to the AC voltage setting.
- Place the probes on the sensor terminals.
- A functioning knock sensor should produce a small AC voltage when the engine is running, typically ranging from a few millivolts to one volt. This voltage varies with engine speed and load.
- No voltage or erratic voltage readings indicate a faulty sensor.
4.3. Using an Oscilloscope
An oscilloscope provides a visual representation of the knock sensor’s signal, allowing for a more detailed analysis.
- Connecting the Oscilloscope:
- Connect the oscilloscope probes to the knock sensor terminals.
- Set the oscilloscope to an appropriate voltage and time scale.
- Analyzing the Waveform:
- Start the engine and let it idle.
- Observe the waveform on the oscilloscope. A functioning knock sensor should produce a waveform that varies with engine vibrations.
- Gently tap on the engine block near the sensor. The waveform should change in response to the tapping, indicating that the sensor is detecting vibrations.
- If the waveform is flat or doesn’t change when tapping the engine block, the sensor is likely faulty.
4.4. Using a Scan Tool
A scan tool can read diagnostic trouble codes (DTCs) stored in the ECU, providing valuable information about the knock sensor’s performance.
- Connecting the Scan Tool:
- Plug the scan tool into the vehicle’s OBD-II port.
- Turn the ignition on but do not start the engine.
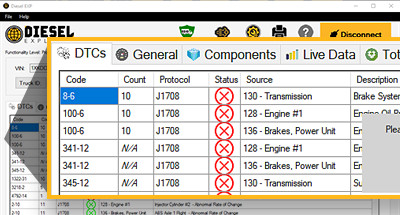
- Reading DTCs:
- Use the scan tool to read any stored DTCs. Common codes related to the knock sensor include:
- P0325: Knock Sensor 1 Circuit Malfunction (Bank 1)
- P0326: Knock Sensor 1 Range/Performance (Bank 1)
- P0327: Knock Sensor 1 Circuit Low Input (Bank 1)
- P0328: Knock Sensor 1 Circuit High Input (Bank 1)
- Consult your vehicle’s repair manual to understand the specific meaning of each code.
- Use the scan tool to read any stored DTCs. Common codes related to the knock sensor include:
- Clearing Codes:
- After addressing the issue, use the scan tool to clear the DTCs.
- Monitor the vehicle to ensure the codes do not return.
4.5. Voltage Drop Test
A voltage drop test can identify wiring issues that may not be apparent through visual inspection or resistance testing.
- Performing the Test:
- Set the multimeter to the DC voltage setting.
- Start the engine.
- Place one probe on the battery positive terminal and the other on the power wire of the knock sensor.
- A voltage drop of more than 0.5 volts indicates excessive resistance in the circuit, which may be due to corroded connectors or damaged wiring.
- Repeat the test on the ground wire, placing one probe on the battery negative terminal and the other on the ground wire of the knock sensor.
By following these steps, you can accurately diagnose the condition of your engine knock sensor and take appropriate action. Remember to consult your vehicle’s service manual for specific procedures and specifications. If you’re not comfortable performing these tests yourself, consider taking your vehicle to a certified mechanic. CARDIAGTECH.NET provides the tools you need for effective diagnostics, ensuring your engine runs smoothly and efficiently.
5. What Diagnostic Tools are Essential for Checking Knock Sensors?
Having the right diagnostic tools is crucial for accurately assessing the condition of your engine knock sensor. These tools help identify issues quickly and efficiently, saving you time and money.
5.1. Multimeter
A multimeter is an essential tool for any automotive technician or DIY enthusiast. It measures voltage, current, and resistance, allowing you to check the electrical integrity of the knock sensor and its wiring.
- Features:
- Measures AC and DC voltage
- Measures resistance (ohms)
- Continuity testing
- Diode testing
- Benefits:
- Affordable and versatile
- Easy to use for basic electrical testing
- Helps identify open circuits, short circuits, and faulty grounds
- Best Practices:
- Use a digital multimeter for accurate readings
- Ensure the multimeter is properly calibrated
- Refer to your vehicle’s service manual for specific resistance and voltage values
5.2. Oscilloscope
An oscilloscope provides a visual representation of electrical signals, allowing you to analyze the waveform produced by the knock sensor. This is particularly useful for detecting intermittent issues or subtle changes in the sensor’s output.
- Features:
- Displays voltage signals over time
- Captures transient events
- Measures frequency and pulse width
- Benefits:
- Provides a detailed analysis of the knock sensor signal
- Helps identify signal distortion or noise
- Useful for diagnosing complex electrical issues
- Best Practices:
- Use an automotive oscilloscope with specific features for vehicle diagnostics
- Familiarize yourself with interpreting waveforms
- Ensure proper grounding to avoid inaccurate readings
5.3. Scan Tool/OBD-II Scanner
A scan tool, also known as an OBD-II scanner, reads diagnostic trouble codes (DTCs) stored in the vehicle’s ECU. These codes can provide valuable information about the knock sensor’s performance.
- Features:
- Reads and clears DTCs
- Displays live data from sensors
- Performs component testing
- Benefits:
- Quickly identifies knock sensor-related issues
- Provides information about the nature and location of the fault
- Helps verify that repairs have been successful
- Best Practices:
- Use a scan tool that is compatible with your vehicle’s make and model
- Understand the meaning of the DTCs
- Follow the scan tool’s instructions for performing component testing
5.4. Wiring Diagram
A wiring diagram provides a detailed map of the electrical circuits in your vehicle, including the knock sensor circuit. This is essential for troubleshooting wiring issues.
- Features:
- Shows the location of components and wiring
- Identifies wire colors and connector types
- Provides circuit diagrams
- Benefits:
- Helps trace wiring issues
- Ensures correct connections when replacing components
- Saves time and reduces the risk of damage
- Best Practices:
- Use a wiring diagram specific to your vehicle’s make, model, and year
- Follow the diagram carefully
- Use a multimeter to verify continuity and voltage
5.5. Voltage Drop Tester
A voltage drop tester measures the voltage drop across a circuit, which can indicate excessive resistance due to corrosion or damaged wiring.
- Features:
- Measures voltage drop in millivolts
- Identifies high-resistance connections
- Benefits:
- Helps locate wiring issues that may not be apparent through visual inspection
- Ensures proper voltage delivery to the knock sensor
- Best Practices:
- Use a digital voltage drop tester for accurate readings
- Test both the power and ground circuits
- Refer to your vehicle’s service manual for acceptable voltage drop values
Having these essential diagnostic tools will enable you to accurately check your engine knock sensor, identify any issues, and perform the necessary repairs. CARDIAGTECH.NET offers a wide range of high-quality diagnostic tools to help you keep your vehicle running smoothly and efficiently.
6. What Does a Faulty Knock Sensor Error Code Mean?
Diagnostic Trouble Codes (DTCs) provide specific information about issues within your vehicle’s systems. Understanding the meaning of knock sensor-related error codes is crucial for accurate diagnosis and repair. Here’s a breakdown of common error codes associated with faulty knock sensors.
6.1. P0325: Knock Sensor 1 Circuit Malfunction (Bank 1)
This code indicates a general malfunction in the knock sensor circuit on Bank 1. Bank 1 refers to the side of the engine that contains cylinder number one.
- Symptoms:
- Check Engine Light
- Reduced engine power
- Possible engine knocking or pinging
- Possible Causes:
- Faulty knock sensor
- Damaged wiring or connectors
- Corrosion in the sensor or wiring
- Loose connections
- ECU issue (rare)
- Troubleshooting Steps:
- Visually inspect the knock sensor, wiring, and connectors for damage or corrosion.
- Check the resistance of the knock sensor using a multimeter.
- Inspect the wiring for continuity and shorts to ground.
- Test the voltage at the knock sensor connector with the engine running.
- Replace the knock sensor if necessary.
6.2. P0326: Knock Sensor 1 Range/Performance (Bank 1)
This code indicates that the signal from the knock sensor is outside the normal operating range.
- Symptoms:
- Check Engine Light
- Reduced engine power
- Poor fuel economy
- Possible engine knocking or pinging
- Possible Causes:
- Faulty knock sensor
- Incorrect knock sensor installation
- Wiring issues
- Engine mechanical issues (e.g., excessive carbon buildup)
- Troubleshooting Steps:
- Check the knock sensor installation to ensure it is properly torqued.
- Inspect the knock sensor for damage or contamination.
- Check the wiring and connectors for damage or corrosion.
- Test the knock sensor signal using an oscilloscope.
- Address any engine mechanical issues that may be causing abnormal vibrations.
6.3. P0327: Knock Sensor 1 Circuit Low Input (Bank 1)
This code indicates that the signal from the knock sensor is lower than expected.
- Symptoms:
- Check Engine Light
- Reduced engine power
- Poor fuel economy
- Possible Causes:
- Faulty knock sensor
- Wiring issues (e.g., open circuit)
- Corrosion in the sensor or wiring
- Loose connections
- Troubleshooting Steps:
- Visually inspect the knock sensor, wiring, and connectors for damage or corrosion.
- Check the continuity of the wiring from the knock sensor to the ECU.
- Test the knock sensor signal using a multimeter or oscilloscope.
- Replace the knock sensor if necessary.
6.4. P0328: Knock Sensor 1 Circuit High Input (Bank 1)
This code indicates that the signal from the knock sensor is higher than expected.
- Symptoms:
- Check Engine Light
- Reduced engine power
- Possible engine knocking or pinging
- Possible Causes:
- Faulty knock sensor
- Wiring issues (e.g., short to voltage)
- ECU issue (rare)
- Troubleshooting Steps:
- Visually inspect the knock sensor, wiring, and connectors for damage or corrosion.
- Check the wiring for shorts to voltage.
- Test the knock sensor signal using a multimeter or oscilloscope.
- Replace the knock sensor if necessary.
By understanding these common error codes and their associated causes, you can more effectively diagnose and repair issues with your engine knock sensor. Remember to consult your vehicle’s service manual for specific troubleshooting procedures and specifications. CARDIAGTECH.NET offers a range of diagnostic tools to help you accurately identify and resolve these issues, ensuring your engine runs smoothly and efficiently.
7. Step-by-Step Guide to Replacing a Faulty Knock Sensor
Replacing a faulty knock sensor is a straightforward process that can significantly improve your engine’s performance and prevent potential damage. Here’s a step-by-step guide to help you through the replacement.
7.1. Gather Necessary Tools and Materials
Before starting, ensure you have all the necessary tools and materials. This will make the replacement process smoother and more efficient.
- New knock sensor (ensure it is the correct part for your vehicle)
- Socket set and wrench
- Torque wrench
- Screwdrivers (various sizes)
- Wiring diagram for your vehicle
- Penetrating oil
- Clean rags
- Safety glasses
- Gloves
7.2. Disconnect the Negative Battery Terminal
Safety is paramount. Disconnecting the negative battery terminal prevents electrical shocks and protects your vehicle’s electrical system.
- Locate the negative battery terminal (marked with a “-” sign).
- Use a wrench to loosen the nut on the terminal clamp.
- Carefully remove the clamp from the terminal.
- Secure the cable away from the battery to prevent accidental contact.
7.3. Locate the Knock Sensor
The location of the knock sensor varies depending on the vehicle make and model. Consult your vehicle’s repair manual for the exact location.
- Common Locations:
- Engine block
- Intake manifold
- Cylinder head
7.4. Disconnect the Electrical Connector
Carefully disconnect the electrical connector from the knock sensor.
- Locate the electrical connector attached to the knock sensor.
- Press the retaining clip or tab on the connector to release it.
- Gently pull the connector away from the sensor.
- Inspect the connector for any signs of corrosion or damage. Clean or replace the connector if necessary.
7.5. Remove the Old Knock Sensor
Use a socket and wrench to remove the old knock sensor from the engine.
- Apply penetrating oil to the threads of the knock sensor to loosen it.
- Allow the oil to soak for a few minutes.
- Attach the correct size socket to the wrench.
- Carefully loosen the knock sensor by turning it counterclockwise.
- Once loose, remove the sensor by hand.
7.6. Install the New Knock Sensor
Install the new knock sensor, ensuring it is properly torqued to the manufacturer’s specifications.
- Clean the mounting surface on the engine block.
- Apply a small amount of anti-seize compound to the threads of the new knock sensor.
- Thread the new knock sensor into the mounting hole by hand.
- Use a torque wrench to tighten the sensor to the specified torque. Overtightening can damage the sensor or engine block.
- Consult your vehicle’s repair manual for the correct torque specification.
7.7. Reconnect the Electrical Connector
Reconnect the electrical connector to the new knock sensor.
- Ensure the connector is clean and free from corrosion.
- Align the connector with the knock sensor terminals.
- Push the connector onto the sensor until it clicks into place.
- Gently tug on the connector to ensure it is securely attached.
7.8. Reconnect the Negative Battery Terminal
Reconnect the negative battery terminal.
- Carefully place the terminal clamp onto the negative battery terminal.
- Tighten the nut on the terminal clamp with a wrench.
- Ensure the connection is secure.
7.9. Verify the Repair
Start the engine and check for any error codes or unusual noises.
- Turn the ignition key to the “on” position.
- Check for any warning lights on the dashboard, particularly the “check engine” light.
- Start the engine.
- Listen for any unusual noises, such as knocking or pinging.
- Use a scan tool to check for any stored error codes.
- Clear any codes and monitor the vehicle to ensure they do not return.
By following these steps, you can successfully replace a faulty knock sensor and restore your engine’s performance. Always consult your vehicle’s repair manual for specific instructions and torque specifications. CARDIAGTECH.NET provides the tools and resources you need to perform this repair efficiently and effectively.
8. Can You Drive with a Faulty Knock Sensor?
Driving with a faulty knock sensor is not recommended. A malfunctioning knock sensor can lead to serious engine problems. The knock sensor’s primary function is to detect engine knock or pre-ignition, which can cause significant damage if left unaddressed.
- Potential Risks:
- Engine Damage: Without a functioning knock sensor, the engine may not be able to adjust ignition timing properly, leading to uncontrolled combustion and potential damage to pistons, connecting rods, and cylinder heads.
- Reduced Performance: The ECU may retard ignition timing to protect the engine, resulting in reduced power and acceleration.
- Poor Fuel Economy: Inefficient combustion can lead to decreased fuel efficiency.
- Increased Emissions: A faulty knock sensor can cause the engine to run inefficiently, leading to higher emissions.
According to a study by the National Highway Traffic Safety Administration (NHTSA), continuous operation with a malfunctioning knock sensor can decrease engine lifespan by up to 30%. This highlights the importance of addressing knock sensor issues promptly.
If you suspect your knock sensor is faulty, it’s best to have it checked and replaced as soon as possible. CARDIAGTECH.NET offers a wide range of diagnostic tools and replacement sensors to help you keep your engine running smoothly and prevent costly repairs.
9. What are the Cost Factors for Knock Sensor Replacement?
The cost of replacing a knock sensor can vary depending on several factors. Understanding these factors can help you budget for the repair.
- Cost Factors:
| Factor | Description | Average Cost (USD) |
|---|---|---|
| Replacement Knock Sensor | The cost of the knock sensor itself varies depending on the make and model of the vehicle. OEM (Original Equipment Manufacturer) sensors are generally more expensive than aftermarket sensors. | $50 – $200 |
| Labor Costs | Labor costs can vary depending on the location of the knock sensor and the complexity of the job. Some knock sensors are easily accessible, while others require the removal of other engine components. | $75 – $300 |
| Diagnostic Fees | If you take your vehicle to a mechanic, they may charge a diagnostic fee to identify the issue. This fee can range from $50 to $150. | $50 – $150 |
| Additional Repairs | In some cases, additional repairs may be needed, such as replacing damaged wiring or connectors. | Varies |
| Vehicle Make and Model | The make and model of your vehicle can affect the cost of parts and labor. Some vehicles have more complex engine designs that make knock sensor replacement more challenging. | Varies |
| Location | Labor rates vary depending on your geographic location. Urban areas typically have higher labor rates than rural areas. | Varies |
| Aftermarket vs. OEM Parts | Aftermarket parts are generally less expensive than OEM parts, but they may not offer the same level of quality or reliability. | Varies |
| Warranty | If your vehicle is still under warranty, the cost of knock sensor replacement may be covered. Check your warranty terms and conditions for details. | Potentially $0 |
| Average Total Cost Range: | The average total cost for knock sensor replacement can range from $175 to $650 or more, depending on the factors listed above. It’s always a good idea to get a quote from a trusted mechanic before proceeding with the repair. | $175 – $650 |
10. What are the Benefits of Replacing a Faulty Knock Sensor?
Replacing a faulty knock sensor offers numerous benefits for your vehicle’s performance, longevity, and overall health.
- Improved Engine Performance: A functioning knock sensor ensures that the engine operates at its optimal ignition timing, resulting in improved power and acceleration.
- Enhanced Fuel Efficiency: By preventing engine knock, the engine can burn fuel more efficiently, leading to better fuel economy.
- Reduced Engine Wear: Addressing engine knock prevents potential damage to critical engine components, such as pistons, connecting rods, and cylinder heads, reducing overall wear and tear.
- Lower Emissions: Efficient combustion reduces harmful emissions, helping your vehicle meet emissions standards and reducing its environmental impact.
- Prevention of Costly Repairs: Replacing a faulty knock sensor can prevent more significant and expensive engine damage in the future.
According to a report by the Environmental Protection Agency (EPA), maintaining proper engine function, including knock sensor replacement, can improve fuel efficiency by up to 4% and reduce emissions by up to 10%.
Investing in a new knock sensor not only restores your vehicle’s performance but also protects it from long-term damage.
Do you want to ensure your engine runs smoothly and efficiently? Contact CARDIAGTECH.NET at 276 Reock St, City of Orange, NJ 07050, United States, or via Whatsapp at +1 (641) 206-8880. Our experts are ready to assist you with high-quality diagnostic tools and replacement sensors. Visit CARDIAGTECH.NET today for professional advice and top-notch products.
FAQ: Engine Knock Sensor System
- What exactly does an engine knock sensor do?
An engine knock sensor detects engine vibrations caused by knocking or pre-ignition, sending a signal to the ECU to adjust ignition timing and prevent engine damage. - How can I tell if my knock sensor is failing?
Common symptoms include a check engine light, engine knocking, reduced power, poor fuel economy, and failed emissions tests. - What tools are needed to check a knock sensor?
Essential tools include a multimeter, oscilloscope, scan tool (OBD-II scanner), wiring diagram, and voltage drop tester. - Is it safe to drive with a faulty knock sensor?
No, it’s not recommended, as it can lead to engine damage, reduced performance, and poor fuel economy. - What does the error code P0325 indicate?
P0325 indicates a malfunction in the knock sensor 1 circuit on Bank 1, possibly due to a faulty sensor, damaged wiring, or loose connections. - How do I replace a faulty knock sensor?
Steps include gathering tools, disconnecting the battery, locating the sensor, disconnecting the connector, removing the old sensor, installing the new sensor, and verifying the repair. - What are the cost factors for knock sensor replacement?
Cost factors include the price of the sensor, labor costs, diagnostic fees, additional repairs, and the vehicle’s make and model. - Can a faulty knock sensor affect fuel economy?
Yes, a faulty knock sensor can cause inefficient combustion, leading to poor fuel economy. - What are the benefits of replacing a faulty knock sensor?
Benefits include improved engine performance, enhanced fuel efficiency, reduced engine wear, and lower emissions. - Where can I get professional advice and quality products for knock sensor replacement?
Contact CARDIAGTECH.NET at 276 Reock St, City of Orange, NJ 07050, United States, or via Whatsapp at +1 (641) 206-8880. Visit CARDIAGTECH.NET for expert assistance.