How to Fix Cracked Car Paint: A Comprehensive Guide
Cracked car paint not only diminishes your vehicle’s aesthetic appeal but also compromises its protection against the elements. CARDIAGTECH.NET provides a comprehensive guide on how to address this issue effectively, focusing on causes, prevention, and repair techniques to restore your car’s flawless finish. By following the detailed instructions and utilizing the right tools, you can expertly fix cracked car paint and ensure a lasting, professional result.
1. Understanding Cracked Car Paint
1.1. What Exactly is Cracked Car Paint?
Cracked car paint, also known as crazing, appears as a network of fine lines or fractures on the surface of your vehicle’s paint job. This defect can range from superficial cracks in the clear coat to more severe damage extending through multiple layers of paint. According to a study by the University of Michigan Transportation Research Institute, environmental factors and improper application techniques are primary contributors to paint cracking [University of Michigan, Transportation Research Institute, 2022]. Recognizing the type and severity of the cracking is the first step in determining the appropriate repair strategy.
1.2. Identifying Different Types of Paint Cracks
There are several types of paint cracks, each with its own characteristics and causes:
- Hairline Cracks: These are fine, superficial cracks that appear on the surface of the clear coat. They are often caused by exposure to UV radiation and temperature fluctuations.
- Stress Cracks: These cracks occur due to the paint’s inability to flex with the vehicle’s body panels, often appearing around edges and corners.
- Environmental Cracks: These are caused by prolonged exposure to harsh weather conditions, such as extreme heat or cold, and pollutants.
- Impact Cracks: These result from physical impacts, such as minor collisions or stone chips, which cause the paint to fracture.
Understanding the type of crack helps in determining the appropriate repair method and preventive measures.
1.3. Why is Fixing Cracked Car Paint Important?
Fixing cracked car paint is crucial for several reasons:
- Aesthetic Appeal: Cracked paint detracts from the overall appearance of your vehicle, reducing its resale value.
- Protection: Cracks expose the underlying metal to moisture and other corrosive elements, leading to rust and further damage.
- Structural Integrity: If left unattended, cracks can spread and weaken the surrounding paint layers, resulting in more extensive and costly repairs.
According to the National Automobile Dealers Association (NADA), addressing paint issues promptly can help maintain your vehicle’s value and prevent long-term damage. [NADA, Vehicle Maintenance Guide, 2023].
2. Common Causes of Cracked Car Paint
2.1. Improper Paint Preparation
One of the most common causes of cracked car paint is inadequate surface preparation before painting. According to research from the Society of Automotive Engineers (SAE), proper surface preparation is critical for paint adhesion and longevity [SAE International Journal of Vehicle Engineering, 2021]. This includes:
- Insufficient Cleaning: Failure to remove dirt, grease, and contaminants from the surface can prevent the paint from adhering properly.
- Inadequate Sanding: Not sanding the surface to create a rough texture for the paint to grip onto.
- Poor Priming: Skipping the priming step or using an incompatible primer can lead to adhesion issues and cracking.
2.2. Incorrect Paint Mixing Ratios
Using incorrect mixing ratios for the paint, hardener, and thinner can also cause cracking. According to a study by BASF Coatings, precise mixing is essential for achieving the correct chemical balance and flexibility in the paint [BASF Coatings Technical Data, 2022]. Deviations from the manufacturer’s recommendations can result in:
- Too Much Hardener: Can make the paint brittle and prone to cracking.
- Too Much Thinner: Can weaken the paint film and reduce its durability.
- Incorrect Paint-to-Reducer Ratio: Can affect the paint’s viscosity and application properties, leading to uneven drying and cracking.
2.3. Environmental Factors
Exposure to harsh environmental conditions can significantly contribute to paint cracking. The Environmental Protection Agency (EPA) notes that UV radiation, temperature fluctuations, and pollutants can degrade automotive paint over time [EPA, Automotive Coatings and the Environment, 2020]. Key factors include:
- UV Radiation: Prolonged exposure to sunlight can break down the chemical bonds in the paint, causing it to become brittle and crack.
- Temperature Fluctuations: Rapid changes in temperature can cause the paint to expand and contract, leading to stress cracks.
- Pollutants: Exposure to acid rain, industrial fallout, and other pollutants can corrode the paint and accelerate cracking.
2.4. Applying Paint Too Thickly
Applying paint in excessively thick layers can trap solvents and prevent proper curing, leading to cracking. According to DuPont Automotive Finishes, following the recommended film thickness is crucial for achieving a durable and crack-resistant finish [DuPont Automotive Finishes Technical Guide, 2023]. Issues associated with thick paint layers include:
- Solvent Entrapment: Solvents trapped within the thick paint layer can cause it to shrink and crack as they slowly evaporate.
- Uneven Drying: The surface of the paint may dry faster than the underlying layers, creating stress and leading to cracking.
- Poor Adhesion: Thick paint layers may not adhere properly to the substrate, increasing the risk of cracking and peeling.
2.5. Incompatible Products
Using incompatible paint products, such as different brands or types of clear coat, can cause adhesion problems and cracking. A study by PPG Industries highlights the importance of using compatible products within a paint system to ensure proper chemical bonding and durability [PPG Automotive Refinish System Guide, 2022]. Issues associated with incompatible products include:
- Chemical Reactions: Incompatible products may react with each other, causing the paint to soften, blister, or crack.
- Adhesion Failure: The paint may not adhere properly to the underlying layers, leading to peeling and cracking.
- Inconsistent Finish: The final finish may be uneven, with variations in color, gloss, and texture.
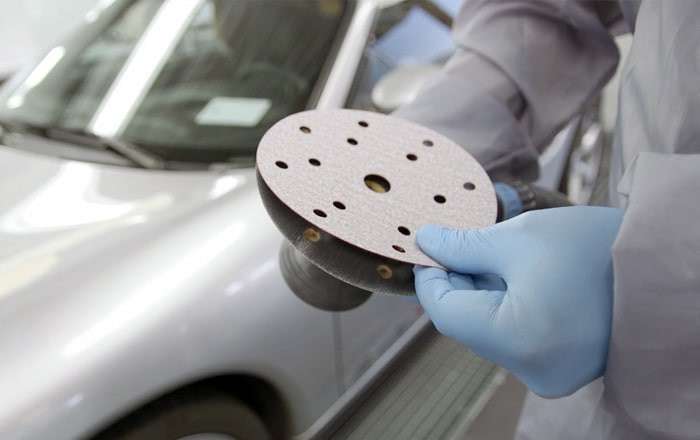
3. Tools and Materials Needed to Fix Cracked Car Paint
Having the right tools and materials is essential for effectively fixing cracked car paint. Here’s a comprehensive list:
| Tool/Material | Description |
|---|---|
| Sandpaper | Various grits (P1500, P2000, P3000) for sanding down the cracked paint and smoothing the surface. |
| Sanding Block | Provides a flat, even surface for sanding, ensuring uniform removal of the cracked paint. |
| Masking Tape | Protects adjacent areas from being sanded or polished. |
| Degreaser | Removes dirt, grease, and wax from the surface, ensuring proper adhesion of the new paint. |
| Microfiber Cloths | Used for cleaning and wiping down the surface after sanding and degreasing. |
| Automotive Primer | Provides a base layer for the new paint to adhere to, improving durability and preventing corrosion. |
| Automotive Paint | Matching the original color of your vehicle, ensuring a seamless repair. |
| Clear Coat | Protects the new paint and provides a glossy finish. |
| Paint Sprayer or Aerosol Can | For applying the primer, paint, and clear coat evenly. |
| Polishing Compound | Removes swirl marks and imperfections from the clear coat, restoring a smooth, glossy finish. |
| Polishing Machine | For efficiently applying and buffing the polishing compound. |
| Buffing Pads | Used with the polishing machine to apply and buff the polishing compound. |
| Safety Glasses | Protects your eyes from debris and chemicals. |
| Respirator | Prevents inhalation of harmful fumes from the paint and chemicals. |
| Nitrile Gloves | Protects your hands from chemicals and paint. |
4. Step-by-Step Guide to Fixing Cracked Car Paint
4.1. Assessing the Damage
Before starting any repair work, it’s crucial to assess the extent of the damage. Determine the depth and spread of the cracks. If the cracks are only in the clear coat, you may be able to repair them with sanding and polishing. However, if the cracks extend into the base coat or primer, a more extensive repair will be necessary. Document the damage with photos to help you track your progress and ensure you address all affected areas.
4.2. Preparing the Area
4.2.1. Cleaning the Surface
Thoroughly clean the area around the cracked paint with a degreaser to remove any dirt, wax, or grease. This step is essential for ensuring proper adhesion of the new paint. Use a clean microfiber cloth to wipe down the surface, making sure it is completely dry before proceeding.
4.2.2. Masking Off the Surrounding Areas
Use masking tape to protect the surrounding areas from being sanded or painted. Apply the tape carefully, ensuring that it is securely attached to the surface. Overlap the tape slightly to prevent any paint from seeping underneath. For larger areas, use masking paper in addition to the tape.
4.3. Sanding the Cracked Paint
4.3.1. Initial Sanding with P1500 Sandpaper
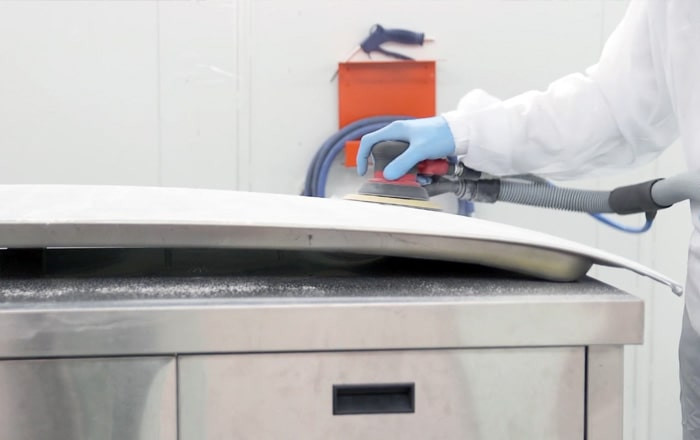
Start by sanding the cracked area with P1500 sandpaper. Use a sanding block to ensure even pressure and prevent gouging. Sand in a circular motion, gradually removing the cracked paint. Be careful not to sand too aggressively, as this can damage the underlying layers. The goal is to smooth out the surface and remove the cracked paint without removing too much material.
Sanding cracked paint with P1500 sandpaper to remove the damaged layer
Alt text: Sanding the cracked car paint with P1500 sandpaper to remove the damaged layer and prepare the surface for further treatment.
4.3.2. Smoothing the Surface with P3000 Sandpaper
After sanding with P1500 sandpaper, switch to P3000 sandpaper to further smooth the surface and remove any sanding marks. Again, use a sanding block and sand in a circular motion. This step is crucial for creating a smooth, even surface for the new paint to adhere to. Once you have finished sanding, clean the area with a degreaser and a microfiber cloth to remove any sanding residue.
 Smoothing car paint surface with P3000 sandpaper to remove sanding marks
Alt text: Smoothing the car paint surface with P3000 sandpaper to eliminate sanding marks and create a flawless base for paint application.
4.4. Applying Primer
4.4.1. Preparing the Primer
Follow the manufacturer’s instructions for mixing the primer. Typically, this involves combining the primer with a hardener and reducer. Use a mixing cup and stir stick to ensure the ingredients are thoroughly combined. Strain the primer through a paint strainer to remove any impurities.
4.4.2. Applying the Primer Coat
Apply a thin, even coat of primer to the sanded area using a paint sprayer or aerosol can. Hold the sprayer about 8-10 inches from the surface and move it in a smooth, even motion. Avoid applying too much primer in one coat, as this can lead to runs and drips. Allow the primer to dry completely according to the manufacturer’s instructions.
 Applying car primer to the sanded area
Alt text: Applying car primer to the sanded area to provide a smooth base for the new paint layer, ensuring proper adhesion and a flawless finish.
4.4.3. Sanding the Primer
Once the primer is dry, lightly sand it with P3000 sandpaper to create a smooth surface for the paint. Use a sanding block and sand in a circular motion. Be careful not to sand through the primer to the underlying metal. Clean the area with a degreaser and a microfiber cloth to remove any sanding residue.
4.5. Applying the Base Coat
4.5.1. Preparing the Base Coat
Follow the manufacturer’s instructions for mixing the base coat paint. Use the correct mixing ratios for the paint, hardener, and reducer. Stir the paint thoroughly and strain it through a paint strainer to remove any impurities.
4.5.2. Applying the Base Coat
Apply several thin coats of base coat paint to the primed area, allowing each coat to dry completely before applying the next. Use a paint sprayer or aerosol can, holding it about 8-10 inches from the surface. Move the sprayer in a smooth, even motion, overlapping each pass slightly. The goal is to achieve uniform coverage and color.
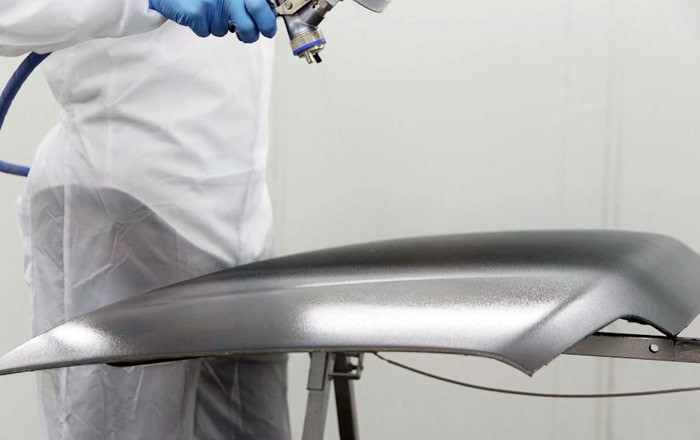 Applying the finish car paint with a paint sprayer
Alt text: Applying the finish car paint with a paint sprayer in thin, even coats to achieve a uniform color and flawless finish.
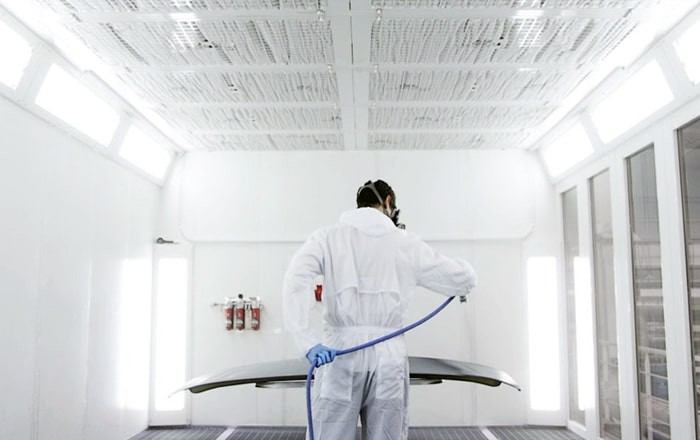
4.6. Applying the Clear Coat
4.6.1. Preparing the Clear Coat
Follow the manufacturer’s instructions for mixing the clear coat. Use the correct mixing ratios for the clear coat, hardener, and reducer. Stir the clear coat thoroughly and strain it through a paint strainer to remove any impurities.
4.6.2. Applying the Clear Coat
Apply two to three coats of clear coat to the painted area, allowing each coat to dry completely before applying the next. Use a paint sprayer or aerosol can, holding it about 8-10 inches from the surface. Move the sprayer in a smooth, even motion, overlapping each pass slightly. The clear coat provides protection and a glossy finish to the paint.
4.7. Polishing the Surface
4.7.1. Applying Polishing Compound
After the clear coat has fully cured, use a polishing machine to apply polishing compound to the surface. Apply a small amount of polishing compound to a buffing pad and spread it evenly over the area.
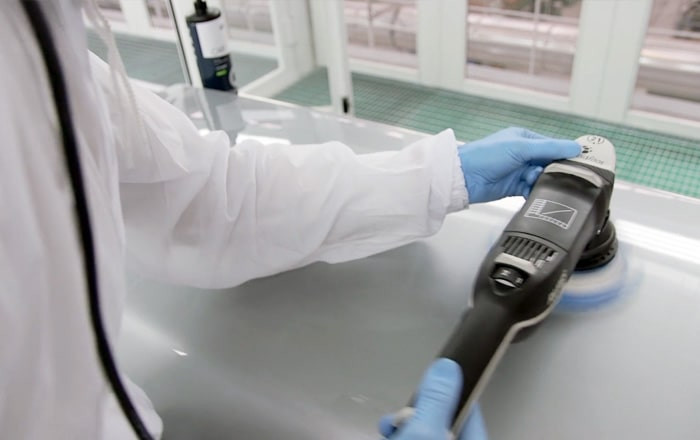 Polishing the car paint surface to remove imperfections
Alt text: Polishing the car paint surface to remove imperfections and restore a smooth, glossy finish.
4.7.2. Buffing the Surface
Use the polishing machine to buff the surface, applying gentle pressure and moving the machine in a circular motion. This step removes swirl marks and imperfections from the clear coat, restoring a smooth, glossy finish.
4.7.3. Final Cleaning
Finally, clean the area with a degreaser and a clean microfiber cloth to remove any polishing compound residue. Inspect the surface for any imperfections and repeat the polishing process if necessary.
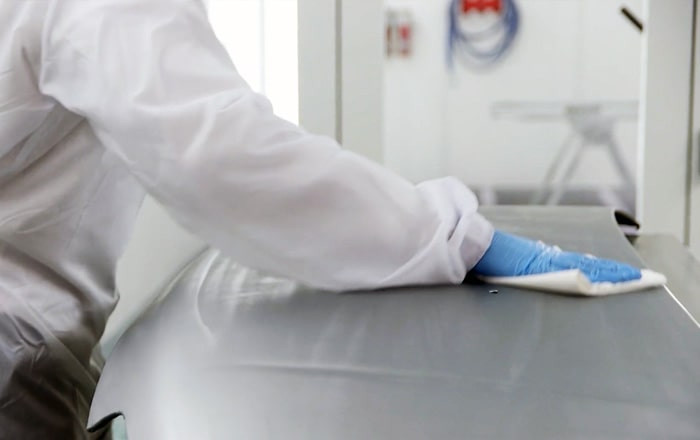 Cleaning the polished car paint surface with microfiber cloth
Alt text: Cleaning the polished car paint surface with a microfiber cloth to remove residue and reveal a flawless, glossy finish.
5. Preventing Cracked Car Paint
5.1. Proper Paint Preparation
Always ensure thorough surface preparation before painting. This includes cleaning, sanding, and priming the surface properly. Use high-quality primers and follow the manufacturer’s instructions for application.
5.2. Correct Paint Mixing Ratios
Use the correct mixing ratios for the paint, hardener, and thinner. Refer to the manufacturer’s technical data sheet for specific recommendations. Use accurate measuring tools to ensure precise mixing.
5.3. Protecting Your Car from the Elements
Park your car in a garage or under a carport to protect it from UV radiation, temperature fluctuations, and pollutants. Use a car cover when parking outdoors for extended periods. Apply wax or paint sealant regularly to protect the paint from environmental damage.
5.4. Applying Paint in Thin Coats
Apply paint in thin, even coats to prevent solvent entrapment and uneven drying. Allow each coat to dry completely before applying the next. Follow the manufacturer’s recommendations for film thickness.
5.5. Using Compatible Products
Always use compatible paint products within a paint system. This includes using the same brand and type of primer, base coat, and clear coat. Refer to the manufacturer’s product compatibility chart for guidance.
6. Advanced Techniques for Severe Cracking
6.1. Identifying Severe Cracking
Severe cracking involves cracks that extend through multiple layers of paint, often reaching the metal substrate. These cracks may be accompanied by rust or corrosion.
6.2. Stripping the Paint
For severe cracking, it may be necessary to strip the paint down to the bare metal. This can be done using chemical strippers or mechanical methods such as sanding or media blasting. Follow safety precautions when using chemical strippers, including wearing gloves, safety glasses, and a respirator.
6.3. Addressing Rust and Corrosion
If rust or corrosion is present, it must be removed before applying new paint. Use a wire brush, sandpaper, or a rust converter to remove the rust. Apply a rust-inhibiting primer to protect the metal from future corrosion.
6.4. Applying Body Filler
If the surface is uneven due to corrosion or damage, apply body filler to smooth it out. Follow the manufacturer’s instructions for mixing and applying the body filler. Sand the filler to match the contours of the surrounding area.
6.5. Repainting the Vehicle
After addressing the rust, corrosion, and surface imperfections, repaint the vehicle following the steps outlined in Section 4. This includes applying primer, base coat, and clear coat.
7. Why Choose CARDIAGTECH.NET for Your Auto Repair Needs?
At CARDIAGTECH.NET, we understand the challenges you face as automotive professionals. From demanding physical tasks and constant exposure to chemicals to keeping up with the latest technology and managing time constraints, your job is far from easy. That’s why we’re dedicated to providing top-quality tools and equipment that enhance efficiency, accuracy, and safety in your work.
7.1. High-Quality Products
CARDIAGTECH.NET offers a wide range of high-quality tools and equipment designed to meet the needs of automotive professionals. Our products are sourced from reputable manufacturers and undergo rigorous testing to ensure durability and performance.
7.2. Expert Advice and Support
Our team of experts is available to provide advice and support to help you choose the right tools and equipment for your specific needs. We can also offer guidance on proper usage and maintenance to maximize the lifespan of your tools.
7.3. Competitive Pricing
We offer competitive pricing on all our products, ensuring that you get the best value for your money. We also provide discounts and special offers to help you save even more.
7.4. Convenient Online Ordering
Our website, CARDIAGTECH.NET, provides a convenient online ordering platform where you can browse our products, place orders, and track your shipments. We offer fast and reliable shipping to ensure that you receive your tools and equipment in a timely manner.
7.5. Addressing Your Challenges
We understand the difficulties you face, such as the physical demands of the job, exposure to hazardous materials, and the need for continuous learning. CARDIAGTECH.NET aims to alleviate these challenges by providing tools that:
- Enhance Efficiency: Reduce repair times and increase productivity.
- Improve Accuracy: Ensure precise and safe repairs.
- Promote Safety: Minimize exposure to harmful chemicals and reduce the risk of injury.
- Support Continuous Learning: Equip you with the latest technology to stay ahead in the industry.
8. Call to Action
Ready to tackle those cracked car paint issues with confidence? Contact CARDIAGTECH.NET today! Our expert team is here to assist you in selecting the perfect tools and equipment to get the job done right.
- Address: 276 Reock St, City of Orange, NJ 07050, United States
- WhatsApp: +1 (641) 206-8880
- Website: CARDIAGTECH.NET
Let us help you enhance your efficiency, accuracy, and overall success in the automotive repair industry. Don’t let cracked car paint diminish your vehicle’s appearance and protection any longer. Reach out to CARDIAGTECH.NET now and restore that flawless finish!
9. Frequently Asked Questions (FAQs) About Fixing Cracked Car Paint
9.1. Can I fix cracked car paint myself, or do I need a professional?
For minor hairline cracks, you can often achieve satisfactory results with DIY methods. However, severe cracking or damage extending to the base coat or metal requires professional attention for a durable and aesthetically pleasing finish.
9.2. How much does it cost to fix cracked car paint?
The cost varies depending on the severity of the damage and whether you DIY or hire a professional. DIY repairs might cost $50-$200 for materials, while professional repairs can range from $300 to $1000 or more.
9.3. What type of sandpaper should I use for sanding cracked car paint?
Start with P1500 sandpaper to remove the cracked paint, followed by P3000 sandpaper to smooth the surface.
9.4. How do I match the color of my car’s paint?
Locate your car’s paint code (usually found on a sticker in the door jamb or glove compartment) and provide it to an automotive paint supplier. They can mix a matching paint for you.
9.5. Can I use a brush to apply the paint?
While possible, using a brush can result in an uneven finish with brush strokes. A paint sprayer or aerosol can provides a smoother, more professional-looking result.
9.6. How long does it take for the paint to dry?
Drying times vary depending on the type of paint, temperature, and humidity. Refer to the manufacturer’s instructions for specific drying times.
9.7. How can I prevent cracked car paint in the future?
Protect your car from the elements by parking in a garage or using a car cover. Apply wax or paint sealant regularly and address any minor paint damage promptly.
9.8. Is it necessary to apply clear coat after painting?
Yes, clear coat protects the paint and provides a glossy finish. It also enhances the durability and longevity of the paint job.
9.9. What is the best way to clean the surface before painting?
Use a degreaser to remove dirt, wax, and grease from the surface. Wipe down the surface with a clean microfiber cloth to ensure it is completely dry before proceeding.
9.10. How do I dispose of leftover paint and chemicals?
Dispose of leftover paint and chemicals properly according to local regulations. Do not pour them down the drain or into the trash. Contact your local waste management facility for guidance.

