**How to Fix a Leaking Gas Tank on a Car: A Complete Guide**
Fixing a gas tank leak involves several steps, from identifying the leak to applying a sealant or performing a replacement, ensuring safety and compliance with environmental regulations; CARDIAGTECH.NET can provide you with the right tools. This comprehensive guide covers leak detection, repair options, safety precautions, and long-term maintenance, providing valuable insights for DIY enthusiasts and professional mechanics alike, with information on fuel tank sealants, automotive repairs, and leak prevention.
1. Why Is My Car’s Gas Tank Leaking?
A car’s gas tank may leak due to rust, corrosion, impacts, or faulty connections. According to a study by the National Association of Corrosion Engineers (NACE), corrosion is a significant factor in fuel tank failures, costing the automotive industry billions annually; CARDIAGTECH.NET offers state-of-the-art leak detection tools to identify these issues accurately and safely.
1.1 What are the Common Causes of Fuel Tank Leaks?
Fuel tank leaks often stem from several key causes:
- Corrosion: Over time, moisture and road salts can corrode the metal of the fuel tank, leading to leaks. A study by the American Society for Testing and Materials (ASTM) found that tanks in colder climates with heavy road salt usage corrode at a significantly higher rate.
- Impact Damage: Road debris, accidents, or even driving over rough terrain can cause physical damage to the fuel tank.
- Rust: Older vehicles are particularly susceptible to rust, which weakens the tank’s structure. Research from the University of Michigan’s Transportation Research Institute indicates that vehicles over 12 years old are twice as likely to experience fuel tank rust issues.
- Faulty Connections: Loose or damaged fuel lines, filler necks, or drain plugs can lead to leaks.
- Wear and Tear: Constant exposure to the elements and the stresses of driving can weaken the tank material over time.
1.2 How Does Corrosion Contribute to Leaks?
Corrosion is a chemical process that degrades metal through oxidation. Fuel tanks, especially those made of steel, are susceptible to corrosion from both the inside and outside. According to a report by the Environmental Protection Agency (EPA), internal corrosion can occur due to water and contaminants in the fuel, while external corrosion is caused by exposure to moisture, road salts, and other environmental factors. The electrochemical reactions involved weaken the metal, creating pinholes and cracks that eventually lead to fuel leaks. Regular inspections and protective coatings can mitigate corrosion.
2. How to Identify a Leaking Gas Tank
Identifying a leaking gas tank involves visual inspections, smell tests, and pressure tests. A study by the National Institute for Automotive Service Excellence (ASE) highlights the importance of a systematic approach to diagnosing fuel system leaks to ensure accurate and safe repairs; CARDIAGTECH.NET provides a range of diagnostic tools to help identify and address these issues effectively.
2.1 What are the Signs of a Fuel Tank Leak?
Recognizing the signs of a fuel tank leak early can prevent further damage and potential hazards:
- Smell of Gasoline: A persistent gasoline odor, especially near the rear of the vehicle, is a strong indicator of a leak.
- Visible Fuel Leakage: Look for puddles of fuel under the vehicle, particularly after it has been parked for a while.
- Decreased Fuel Efficiency: If you notice that you’re filling up your tank more often than usual, a leak could be the cause.
- Check Engine Light: A leak can cause changes in fuel pressure, triggering the check engine light. Diagnostic codes like P0440 (Evaporative Emission Control System Leak Detected) may appear.
- Fuel Stains: Inspect the fuel tank and surrounding areas for wet spots or stains.
2.2 How Can a Visual Inspection Help?
A thorough visual inspection is crucial for identifying fuel tank leaks. Follow these steps:
- Safety First: Ensure the vehicle is parked on a level surface, the engine is off, and the parking brake is engaged. Wear safety glasses and gloves.
- Locate the Fuel Tank: Typically located at the rear of the vehicle, underneath.
- Inspect the Tank: Look for signs of rust, corrosion, dents, or punctures. Pay close attention to seams and welds.
- Check Fuel Lines and Connections: Examine the fuel lines, filler neck, and drain plug for cracks, loose connections, or fuel stains.
- Use a Flashlight: A flashlight can help you see into hard-to-reach areas and identify small leaks.
- Document Findings: Take photos of any visible damage or leaks to help with the repair process.
2.3 What Tools Are Needed for Leak Detection?
Having the right tools can make leak detection more efficient and accurate. Here’s a list of essential tools:
| Tool | Description | Use |
|---|---|---|
| Safety Glasses | Protects your eyes from debris and chemicals. | Essential for personal safety during inspection. |
| Gloves | Protects your hands from fuel and contaminants. | Keeps your hands clean and safe. |
| Flashlight | Provides light to inspect dark and hard-to-reach areas. | Helps in identifying small leaks and damages. |
| Jack and Jack Stands | Lifts the vehicle safely to provide better access to the fuel tank. | Allows for a comprehensive inspection of the fuel tank and related components. |
| Inspection Mirror | Helps to see around corners and tight spaces. | Useful for inspecting the top of the fuel tank and other inaccessible areas. |
| Pressure Tester Kit | Used to pressurize the fuel system and identify leaks. | Provides a reliable method for detecting leaks that may not be visible during a visual inspection. |
| UV Dye and UV Light | A special dye added to the fuel that glows under UV light, making leaks easier to spot. | Effective for locating hard-to-find leaks. |
| Multimeter | To diagnose electrical issues in fuel pump and associated components. | Ensure proper electrical function of fuel delivery system |
| OBD-II Scanner | Reads diagnostic codes to identify fuel system issues. | Helps to pinpoint specific problems related to the fuel system. |
| Wheel chocks | Safety device used to prevent vehicle from rolling while jacked up. | Ensures that the vehicle remains stationary and safe during the inspection process, reducing the risk of accidents or injuries. |
2.4 How to Perform a Pressure Test on the Fuel Tank?
A pressure test can confirm the presence and location of a leak by pressurizing the fuel system and monitoring for pressure drops. Follow these steps:
- Prepare the Vehicle: Ensure the vehicle is parked on a level surface, the engine is off, and the parking brake is engaged.
- Access the Fuel Tank: Locate the fuel tank and disconnect the fuel lines.
- Connect the Pressure Tester: Attach the pressure tester to the fuel tank’s vent or fuel line.
- Pressurize the System: Use the pressure tester to pressurize the fuel tank to the manufacturer’s recommended pressure (typically around 2-3 PSI).
- Monitor for Pressure Drop: Observe the pressure gauge for any drop in pressure. A drop indicates a leak.
- Locate the Leak: Use a soap-water solution to spray around the fuel tank, fuel lines, and connections. Bubbles will form at the leak location.
- Document Findings: Note the location and severity of the leak for repair.
3. Safety Precautions When Handling a Leaking Gas Tank
Handling a leaking gas tank requires strict adherence to safety protocols to prevent fire, explosion, and exposure to hazardous chemicals. The Occupational Safety and Health Administration (OSHA) provides detailed guidelines for working with flammable liquids, emphasizing the importance of proper ventilation, personal protective equipment, and fire suppression measures; CARDIAGTECH.NET prioritizes safety, offering equipment and guidance to ensure a secure working environment.
3.1 What are the Risks of Gasoline Exposure?
Gasoline exposure poses several health risks:
- Inhalation: Inhaling gasoline vapors can cause dizziness, headaches, nausea, and respiratory irritation. Prolonged exposure can lead to central nervous system depression.
- Skin Contact: Gasoline can cause skin irritation, dermatitis, and burns upon prolonged or repeated contact.
- Ingestion: Swallowing gasoline can cause severe internal damage, including chemical pneumonia, and can be fatal.
- Fire Hazard: Gasoline is highly flammable, and its vapors can easily ignite, leading to fires and explosions.
3.2 What Protective Gear Should I Wear?
When working with a leaking gas tank, wearing appropriate protective gear is essential:
- Safety Glasses: Protect your eyes from splashes and fumes.
- Gloves: Use chemical-resistant gloves (e.g., nitrile or neoprene) to protect your skin from gasoline exposure.
- Respirator: A respirator with an organic vapor cartridge can protect you from inhaling harmful gasoline fumes, especially in enclosed spaces.
- Flame-Resistant Clothing: Wear clothing that is resistant to flames to minimize the risk of burns in case of a fire.
- Safety Shoes: Wear shoes that provide protection against chemical spills and physical hazards.
3.3 How to Prevent Fires and Explosions?
Preventing fires and explosions is paramount when dealing with a leaking gas tank:
- Work in a Well-Ventilated Area: Ensure there is adequate ventilation to disperse gasoline vapors.
- Eliminate Ignition Sources: Keep away from open flames, sparks, and heat sources. This includes cigarettes, lighters, and electrical equipment that is not explosion-proof.
- Use Non-Sparking Tools: Use tools made of non-sparking materials (e.g., brass or aluminum) to avoid creating sparks that could ignite gasoline vapors.
- Have a Fire Extinguisher Nearby: Keep a Class B fire extinguisher (suitable for flammable liquids) within easy reach.
- Ground the Vehicle: Grounding the vehicle can help prevent static electricity buildup, which could cause a spark.
- Avoid Using Cell Phones: Cell phones and other electronic devices can produce sparks, so avoid using them near the fuel tank.
3.4 What to Do in Case of a Gasoline Spill?
In the event of a gasoline spill, take the following steps:
- Stop the Source: If possible, stop the leak without endangering yourself.
- Contain the Spill: Use absorbent materials like sand, soil, or absorbent pads to contain the spill and prevent it from spreading.
- Ventilate the Area: Increase ventilation to help dissipate gasoline vapors.
- Clean Up the Spill: Carefully collect the saturated absorbent materials and place them in a sealed container for proper disposal.
- Dispose of Materials Properly: Contact your local environmental agency for guidance on the proper disposal of gasoline-contaminated materials.
- Wash Contaminated Areas: Use a degreasing cleaner to wash down any surfaces that came into contact with gasoline.
4. Repair Options for a Leaking Gas Tank
Repairing a leaking gas tank can involve temporary fixes, sealant applications, or complete tank replacements. The best approach depends on the severity and location of the leak. According to automotive repair experts, small pinhole leaks can often be repaired with sealants, while larger cracks or rust damage may necessitate a full replacement; CARDIAGTECH.NET offers a variety of repair solutions, from sealants to replacement tanks, ensuring you have the right option for your situation.
4.1 Is It Possible to Repair a Gas Tank, or Does It Always Need Replacing?
Whether a gas tank can be repaired or needs replacing depends on the extent of the damage:
- Repairable Leaks: Small pinhole leaks, minor cracks, or leaks around fittings can often be repaired using sealants or patching techniques.
- Non-Repairable Damage: Extensive rust, large cracks, punctures, or damage near seams usually require a complete tank replacement.
4.2 How to Use a Fuel Tank Sealant?
Using a fuel tank sealant can be an effective way to repair small leaks. Here’s how to do it:
- Prepare the Tank: Drain the fuel tank completely and allow it to dry. Clean the area around the leak with a wire brush to remove rust and debris.
- Apply the Sealant: Apply the fuel tank sealant according to the manufacturer’s instructions. Most sealants require multiple coats and a specific curing time.
- Allow to Cure: Let the sealant cure completely before refilling the tank. This may take 24-72 hours, depending on the product.
- Test the Repair: After curing, refill the tank with a small amount of fuel and check for leaks before filling it completely.
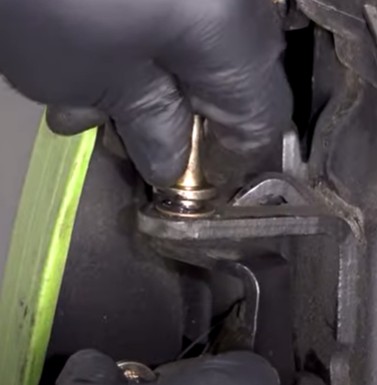
Here I have an aircraft grade fuel tank sealant. There are various quantities available, I purchased this online from an aircraft parts supplier. It’s a class b fuel tank sealant semkit which is able to withstand exposure to jet fuel and will cure with a flexible property.
This is a two-part product, the activator is in the long tube. Ensure that the center tube is pushed to the bottom of the container, using the supplied push stick, slowly inject the activator inside the tube. Pull it back slightly and inject more activator, do this a couple more times so it’s spread throughout the tube and this will make it easier to mix.
The tube must be twisted in a clockwise direction only. If you twist it in the opposite direction, the mixer side will disconnect and this should only be done when you’re ready to remove the inner tube. As you can see the product is slowly mixed seen by the streaking inside. This must be a uniform color. There are special machines to mix these tubes, it can also be done by hand, but instead I used an old hook from a pegboard and attached that to a drill.
Remove the center tube now by turning it counterclockwise to unscrew and then pull out.
Rubber gloves are a must, you’ll most likely end up working with your hands and it’s a bit easier to spread the product.
This is going on bare metal, a primer shouldn’t be on the leaking area as the fuel may soften the primer and cause the sealant to separate. Apply the sealant to a piece of cardboard and then apply. I’m using a mixing stick for now. This product is thick and extremely sticky so it takes some patience. Work times can vary depending on which tank sealant you get. The one I purchased does have a longer work time and will take slightly longer to cure. This one takes 36hrs to fully cure.
Make sure you’re far enough past the leaking areas to provide a strong bond and this will provide an excellent seal.
4.3 What Are the Steps for Replacing a Gas Tank?
Replacing a gas tank is a more involved process but is necessary for severely damaged tanks. Here’s a step-by-step guide:
- Safety First: Disconnect the negative battery cable, and ensure the vehicle is parked on a level surface. Wear safety glasses and gloves.
- Drain the Fuel: Use a siphon or pump to remove all fuel from the tank. Dispose of the fuel properly.
- Disconnect Fuel Lines and Electrical Connectors: Carefully disconnect all fuel lines, vapor lines, and electrical connectors attached to the fuel tank. Label each connection to ensure proper reassembly.
- Remove Straps and Mounting Hardware: Support the fuel tank with a jack and wood block. Remove the straps and mounting hardware that secure the tank to the vehicle.
- Lower and Remove the Tank: Slowly lower the tank using the jack. Once the tank is clear of the vehicle, inspect it for any remaining connections and disconnect them.
- Install the New Tank: Position the new tank under the vehicle and connect any remaining lines. Lift the tank into place using the jack, and secure it with the mounting straps and hardware.
- Reconnect Fuel Lines and Electrical Connectors: Reconnect all fuel lines, vapor lines, and electrical connectors, ensuring they are properly secured.
- Refill the Tank: Add a few gallons of fuel to check for leaks before filling the tank completely.
- Reconnect Battery: Reconnect the negative battery cable.
- Test the Vehicle: Start the engine and check for leaks. Drive the vehicle to ensure proper operation.
4.4 What Type of Sealant Should I Use?
Selecting the right type of sealant is crucial for a successful repair. Here are some common types:
- Epoxy Sealants: These are two-part sealants that provide a strong, durable bond and are resistant to fuel and chemicals.
- Polyurethane Sealants: These sealants are flexible and provide good adhesion to metal surfaces.
- Fuel Tank Repair Kits: These kits include sealant, patching material, and instructions specifically designed for fuel tank repairs.
- Aircraft-Grade Sealants: These sealants are designed to withstand extreme conditions and provide a long-lasting repair.
4.5 Can Welding Be Used to Repair a Gas Tank?
Welding a gas tank is extremely dangerous and should only be performed by a professional with specialized training and equipment. The tank must be completely purged of all fuel vapors to prevent explosions. Even with precautions, welding can weaken the tank and may not provide a long-lasting repair. It is generally safer and more reliable to use a sealant or replace the tank.
5. Preventing Future Gas Tank Leaks
Preventing future gas tank leaks involves regular maintenance, protective measures, and careful driving habits. Studies from automotive maintenance organizations emphasize the importance of proactive care to extend the life of fuel tanks and prevent costly repairs; CARDIAGTECH.NET offers products and advice to help you maintain your fuel tank in top condition.
5.1 What Maintenance Can Prevent Leaks?
Regular maintenance can significantly reduce the risk of fuel tank leaks:
- Regular Inspections: Inspect the fuel tank and fuel lines for signs of rust, corrosion, and damage during routine maintenance.
- Fuel System Cleaning: Use fuel system cleaners to remove contaminants that can cause corrosion.
- Protective Coatings: Apply rust-inhibiting coatings to the fuel tank to protect it from corrosion.
- Check Fuel Cap: Ensure the fuel cap is properly sealed to prevent moisture and contaminants from entering the tank.
- Address Minor Issues Promptly: Repair minor leaks or damage as soon as they are detected to prevent them from worsening.
This has already hardened, I left it for 48hrs. While it is rubberized, it can still be sanded to some extent to knock down the high spots and smoothen the finish. I used 220 grit to sand out the sealant, again I’m not trying to make this repair completely hidden but I also want it to look responsibly clean.
The rest of the tank will be sanded with 400 grit sandpaper to provide a bond for the new paint.
Those irregular shapes and edges are tough to get with sandpaper so I’m using 400 grit scuffing pads. These pads won’t take down orange peel, but they will get around those hard angles.
Remove any dust from the tank using compressed air.
Give the tank a wipe down using a wax and grease remover.
Over those etch primed areas, these will get a filler primer. This is needed as the etch primer can sometimes cause an issue with the final paint layer. The filler primer can help seal the surface, providing somewhat of a barrier against moisture and also smoothen out some of those rougher areas, giving a cleaner final finish. You’ll be looking at one light coat and one or two full wet coats, so a max of three coats. Wait for 5 to 10 minutes in between coats, they can vary depending on your climate.
Finally, sand down the tank again using 400 grit sandpaper and abrasive pads. This will help remove any overspray, smoothen out those newly primed areas. If you do happen to sand through the paint or primer to bare metal, apply more primer.
5.2 How Does Driving Habit Impact the Gas Tank?
Driving habits can significantly impact the longevity of your gas tank:
- Avoid Driving on Empty: Regularly driving with a nearly empty tank can lead to condensation inside the tank, promoting rust and corrosion.
- Drive Carefully on Rough Roads: Avoid driving over rough terrain or debris that could damage the fuel tank.
- Park in Safe Locations: Park in areas where the vehicle is less likely to be hit or damaged.
- Use Fuel Additives: Certain fuel additives can help prevent corrosion and keep the fuel system clean.
5.3 What Are the Best Products for Protecting a Gas Tank?
Several products can help protect your gas tank:
| Product | Description | Benefits |
|---|---|---|
| Rust Inhibitors | Chemical compounds that prevent rust formation on metal surfaces. | Extends the life of the fuel tank by preventing corrosion. |
| Protective Coatings | Sprays or paints that create a barrier between the tank and environmental elements. | Protects against rust, corrosion, and physical damage. |
| Fuel Stabilizers | Additives that prevent fuel degradation and keep the fuel system clean. | Prevents corrosion and buildup of deposits in the fuel tank and lines. |
| Fuel Tank Repair Kits | Comprehensive kits that include sealant, patching materials, and instructions for repairs. | Provides a convenient solution for repairing minor leaks and damage. |
| Skid Plates | Metal plates that protect the fuel tank from impacts and damage. | Offers a physical barrier against road debris and rough terrain. |
| Aftermarket Fuel Tanks | Direct replacements for a damaged or rusted tank with improved material & design. | Offers high-quality aftermarket fuel tanks made from materials such as stainless steel or reinforced plastic. |
5.4 How Often Should I Inspect My Fuel Tank?
Ideally, you should inspect your fuel tank at least once a year or during every oil change. Regular inspections can help you identify and address minor issues before they become major problems. If you live in an area with harsh winters or frequent road salt usage, more frequent inspections may be necessary.
6. Legal and Environmental Considerations
Repairing or replacing a leaking gas tank involves legal and environmental considerations to ensure compliance with regulations. The EPA has strict guidelines for handling and disposing of fuel and fuel-contaminated materials. Non-compliance can result in significant fines and penalties; CARDIAGTECH.NET is committed to environmental responsibility, providing information on safe disposal practices and eco-friendly repair options.
6.1 What Are the Environmental Regulations Regarding Fuel Leaks?
Environmental regulations regarding fuel leaks are designed to protect the environment from contamination:
- Reporting Requirements: Many states require that significant fuel leaks be reported to the appropriate environmental agency.
- Proper Disposal of Fuel: Used fuel and fuel-contaminated materials must be disposed of properly to prevent soil and water contamination.
- Leak Prevention Measures: Facilities that store fuel are required to implement leak prevention measures, such as regular inspections and tank monitoring.
6.2 How to Dispose of Old Fuel and Contaminated Materials?
Disposing of old fuel and contaminated materials properly is crucial to prevent environmental damage:
- Store Fuel Safely: Store old fuel in a sealed container labeled “Used Fuel.”
- Contact Local Recycling Centers: Contact your local recycling center or hazardous waste facility for guidance on proper disposal.
- Use Professional Services: Consider using a professional waste disposal service to ensure compliance with regulations.
- Dispose of Contaminated Materials: Dispose of contaminated materials like absorbent pads, rags, and soil as hazardous waste.
6.3 What Are the Penalties for Fuel Spills?
Penalties for fuel spills can be substantial, depending on the size and severity of the spill:
- Fines: Fines can range from hundreds to thousands of dollars, depending on the jurisdiction and the amount of fuel spilled.
- Cleanup Costs: Responsible parties may be required to pay for the cleanup of contaminated areas.
- Legal Action: In severe cases, legal action may be taken against those responsible for the spill.
7. Cost Analysis of Gas Tank Repair vs. Replacement
The cost of repairing a gas tank versus replacing it can vary widely depending on the extent of the damage, the type of vehicle, and labor costs. A thorough cost analysis can help you make the most economical decision; CARDIAGTECH.NET provides transparent pricing on all our products, helping you budget effectively for your repair needs.
7.1 What Is the Average Cost to Repair a Leaking Gas Tank?
The average cost to repair a leaking gas tank typically ranges from $200 to $600. This includes the cost of the sealant, labor, and any additional parts needed. Factors that can affect the cost include:
- Type of Sealant: High-quality sealants can be more expensive.
- Labor Rates: Labor rates vary depending on the mechanic and location.
- Accessibility: If the fuel tank is difficult to access, labor costs may increase.
7.2 What Is the Average Cost to Replace a Gas Tank?
The average cost to replace a gas tank ranges from $500 to $1500. This includes the cost of the new tank, labor, and any additional parts like fuel lines or straps. Factors that can affect the cost include:
- Vehicle Type: The cost of the tank can vary depending on the make and model of the vehicle.
- Tank Material: Tanks made of steel or specialized materials can be more expensive.
- Labor Rates: As with repairs, labor rates vary by location and mechanic.
7.3 How to Determine the Most Cost-Effective Option?
To determine the most cost-effective option, consider the following:
- Assess the Damage: Evaluate the extent of the damage to the fuel tank. Small leaks may be repairable, while significant damage may require replacement.
- Get Multiple Quotes: Obtain quotes from several mechanics to compare the costs of repair and replacement.
- Consider Long-Term Costs: While a repair may be cheaper in the short term, a replacement may be more cost-effective if the tank is likely to fail again soon.
- Evaluate the Vehicle’s Age: For older vehicles, a replacement may be a better option to ensure long-term reliability.
8. Troubleshooting Common Issues After Repair
After repairing or replacing a gas tank, it’s essential to monitor for common issues and address them promptly. Automotive forums and repair manuals offer valuable insights into post-repair troubleshooting; CARDIAGTECH.NET provides ongoing support and resources to help you resolve any issues that may arise.
8.1 What If the Leak Persists After Repair?
If the leak persists after repair, consider the following:
- Re-Inspect the Tank: Thoroughly inspect the repaired area to ensure the sealant was applied correctly.
- Check Fuel Lines and Connections: Ensure all fuel lines and connections are properly tightened and free from damage.
- Pressure Test Again: Perform another pressure test to pinpoint the exact location of the leak.
- Consider Replacement: If the leak persists despite repeated repair attempts, consider replacing the tank.
8.2 What If the Check Engine Light Comes On?
If the check engine light comes on after a gas tank repair, it could indicate a variety of issues:
- Loose Fuel Cap: Ensure the fuel cap is properly tightened. A loose fuel cap can trigger the check engine light.
- Evaporative Emission (EVAP) System Leak: A leak in the EVAP system can trigger the check engine light. Use an OBD-II scanner to check for codes related to the EVAP system.
- Fuel Pressure Issues: Issues with fuel pressure can also trigger the check engine light. Check the fuel pump and fuel filter for proper operation.