Where to Fix Leather Car Seats: Your Ultimate Guide
Are you wondering Where To Fix Leather Car Seats? CARDIAGTECH.NET offers expert solutions and advice to restore your car’s leather interior to its former glory. Discover how to find the best repair services, understand repair costs, and even attempt DIY fixes with the right tools and products. We provide insights on leather seat repair, leather upholstery restoration, and professional leather repair services ensuring you make informed decisions for your vehicle.
1. Understanding Leather Car Seat Damage
Leather car seats, while luxurious, are susceptible to various types of damage. Identifying the specific type of damage is the first step in determining the best course of action for repair.
1.1. Types of Leather Damage
- Scratches: Superficial marks on the leather surface.
- Scuffs: Minor abrasions that remove the top layer of color.
- Cracks: Deeper splits in the leather, often due to aging and lack of maintenance.
- Tears: Rips in the leather that require patching or replacement.
- Fading: Loss of color due to UV exposure.
- Stains: Discoloration from spills or dirt.
- Holes: Punctures or significant damage requiring substantial repair.
1.2. Factors Causing Damage
Several factors contribute to the wear and tear of leather car seats:
- UV Exposure: Sunlight can fade and dry out leather.
- Temperature Fluctuations: Extreme temperatures can cause cracking.
- Lack of Maintenance: Neglecting regular cleaning and conditioning.
- Friction: Constant rubbing from clothing can cause wear.
- Spills: Liquids can stain and damage the leather.
- Sharp Objects: Keys, tools, or other items can scratch or tear the leather.
1.3. Assessing the Damage
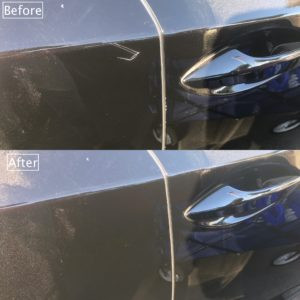
Before deciding where to fix leather car seats, thoroughly assess the extent of the damage. Minor scratches and scuffs might be easily addressed with DIY kits, while significant tears or holes may require professional intervention. Documenting the damage with photos can also help when seeking quotes from repair services.
2. Finding Professional Leather Car Seat Repair Services
When dealing with extensive damage or if you prefer a guaranteed professional finish, locating the right repair service is crucial.
2.1. Types of Repair Services
- Automotive Upholstery Shops: Specializing in car interiors, these shops offer comprehensive leather repair services.
- Leather Repair Specialists: Businesses focused solely on leather repair for various items, including car seats.
- Mobile Repair Services: Technicians who come to your location to perform repairs.
- Dealerships: Some dealerships offer leather repair services, often using certified technicians.
2.2. How to Find Reputable Services
- Online Reviews: Check Google, Yelp, and other review platforms for customer feedback.
- Ask for Recommendations: Seek referrals from friends, family, or online automotive communities.
- Check for Certifications: Look for services with certified technicians or affiliations with recognized industry organizations.
- Visit the Shop: Inspect the shop’s cleanliness, organization, and the quality of work on other vehicles.
2.3. Questions to Ask Before Hiring
- Experience: How long have you been repairing leather car seats?
- Specialization: Do you specialize in automotive leather repair?
- Warranty: Do you offer a warranty on your work?
- Materials: What type of leather and repair products do you use?
- References: Can you provide references from past clients?
- Cost Estimate: Can you provide a detailed cost estimate?
3. DIY Leather Car Seat Repair: A Step-by-Step Guide
For minor damage, DIY repair can be a cost-effective solution. Here’s a comprehensive guide to help you through the process.
3.1. Essential Tools and Materials
- Leather Cleaner: To remove dirt and grime.
- Leather Conditioner: To moisturize and protect the leather.
- Leather Repair Kit: Includes filler, colorant, and sealant.
- Leather Glue: For bonding patches.
- Sub-Patch Material: To provide a backing for repairs.
- Sandpaper (Fine Grit): To smooth out imperfections.
- Palette Knife or Spreader: For applying filler.
- Sponge or Applicator Pads: For applying cleaner, conditioner, and colorant.
- Heat Gun or Hair Dryer: To speed up drying times.
- Scissors or Scalpel: For trimming excess material.
- Tweezers: For positioning sub-patches.
- Masking Tape: To protect surrounding areas.
3.2. Step-by-Step Repair Process
Step 1: Cleaning the Leather
- Purpose: To remove dirt, oil, and contaminants that can interfere with the repair.
- Instructions: Apply a leather cleaner to a sponge or applicator pad and gently rub the surface of the leather. Wipe away the cleaner with a clean, damp cloth. Allow the leather to dry completely.
Step 2: Preparing the Area
- Purpose: To create a clean and stable surface for the repair.
- Instructions: Use fine-grit sandpaper to gently smooth out any rough edges or loose fibers around the damaged area. Be careful not to remove too much material. Wipe away any sanding dust with a clean cloth.
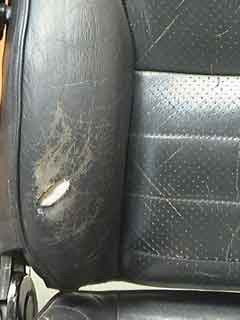
Step 3: Applying a Sub-Patch (For Tears and Holes)
Applying a sub-patch for a leather car seat tear repair, ensuring solid backing and seamless integration
- Purpose: To provide a backing for the filler and create a stable foundation for the repair.
- Instructions: Cut the sub-patch material slightly larger than the damaged area. Use tweezers or a spatula to insert the sub-patch under the leather, ensuring it covers the entire opening. Apply leather glue to the edges of the leather and press them onto the sub-patch. Allow the glue to dry completely.
Step 4: Filling the Damage
- Purpose: To fill the tear or hole and create a smooth, even surface.
- Instructions: Apply a small amount of leather filler to the damaged area using a palette knife or spreader. Apply the filler in thin layers, allowing each layer to dry completely before applying the next. This prevents shrinkage and ensures a strong bond. Use a heat gun or hair dryer to speed up drying times.
Step 5: Sanding the Filler
- Purpose: To smooth out the filler and blend it with the surrounding leather.
- Instructions: Once the filler is completely dry, use fine-grit sandpaper to gently sand the surface until it is smooth and even with the surrounding leather. Be careful not to sand too much, as this can damage the surrounding area. Wipe away any sanding dust with a clean cloth.
Step 6: Applying Colorant
- Purpose: To restore the color to the repaired area and blend it with the surrounding leather.
- Instructions: Choose a colorant that matches the color of your leather car seats. Apply the colorant to the repaired area using a sponge or applicator pad. Apply the colorant in thin layers, allowing each layer to dry completely before applying the next. Use a heat gun or hair dryer to speed up drying times.
Step 7: Applying Sealant
- Purpose: To protect the colorant and create a durable, long-lasting finish.
- Instructions: Apply a leather sealant to the repaired area using a sponge or applicator pad. Apply the sealant in thin layers, allowing each layer to dry completely before applying the next. Use a heat gun or hair dryer to speed up drying times.
Step 8: Conditioning the Leather
- Purpose: To moisturize and protect the leather, preventing future damage.
- Instructions: Apply a leather conditioner to the entire seat using a sponge or applicator pad. Allow the conditioner to soak into the leather for at least 30 minutes. Wipe away any excess conditioner with a clean cloth.
3.3. Tips for Successful DIY Repair
- Work in a Well-Ventilated Area: Ensure good ventilation when using cleaners, glues, and colorants.
- Test Products on a Hidden Area: Before applying any product to the damaged area, test it on an inconspicuous spot to ensure it doesn’t discolor or damage the leather.
- Take Your Time: Rushing the repair process can lead to mistakes. Allow ample drying time between each step.
- Use Thin Layers: Applying products in thin layers ensures better adhesion and prevents cracking or peeling.
- Follow the Manufacturer’s Instructions: Always read and follow the instructions provided with your repair products.
4. Cost of Leather Car Seat Repair
Understanding the costs involved can help you budget and decide whether to opt for professional or DIY repair.
4.1. Factors Affecting Repair Costs
- Type of Damage: Minor scratches are cheaper to fix than large tears or holes.
- Extent of Damage: The size and complexity of the repair influence the cost.
- Type of Leather: Different types of leather may require specific repair techniques and products.
- Service Provider: Dealerships may charge more than independent shops or mobile services.
- Location: Repair costs can vary by region.
- DIY vs. Professional: DIY repair is generally cheaper but requires your time and effort.
4.2. Average Repair Costs
- Minor Scratches and Scuffs: $50 – $150
- Small Tears and Holes: $150 – $300
- Large Tears and Holes: $300 – $600+
- Complete Seat Upholstery: $500 – $2000+
These are average estimates. Always get a detailed quote from a repair service before proceeding.
4.3. DIY Repair Kit Costs
DIY leather repair kits typically range from $20 to $100, depending on the quality and completeness of the kit. Higher-end kits may include a wider range of colorants and specialized tools.
5. Maintaining Leather Car Seats to Prevent Damage
Prevention is always better than cure. Regular maintenance can significantly extend the life of your leather car seats and prevent costly repairs.
5.1. Regular Cleaning
- Frequency: Clean your leather car seats every 1-3 months, or more often if they are heavily used.
- Products: Use a pH-balanced leather cleaner specifically designed for automotive use.
- Technique: Apply the cleaner to a soft cloth and gently wipe the leather surface. Avoid using excessive moisture. Wipe away the cleaner with a clean, damp cloth.
5.2. Conditioning
- Frequency: Condition your leather car seats every 3-6 months.
- Products: Use a high-quality leather conditioner to moisturize and protect the leather.
- Technique: Apply the conditioner to a soft cloth and gently massage it into the leather. Allow the conditioner to soak in for at least 30 minutes. Wipe away any excess conditioner with a clean cloth.
5.3. Protecting from UV Exposure
- Parking: Park in shaded areas or use a car cover to protect your leather car seats from direct sunlight.
- Window Tinting: Install window tinting to reduce UV exposure.
- UV Protectant: Use a leather conditioner with UV protectant properties.
5.4. Avoiding Spills and Stains
- Be Careful with Food and Drinks: Avoid eating and drinking in your car, or use spill-proof containers.
- Clean Spills Immediately: Wipe up any spills as soon as they occur to prevent staining.
- Use Leather Protectant: Apply a leather protectant to create a barrier against stains.
5.5. Preventing Friction Damage
- Avoid Sharp Objects: Be careful not to scratch or tear the leather with keys, tools, or other sharp objects.
- Use Seat Covers: Consider using seat covers to protect your leather car seats from wear and tear.
- Smooth Clothing: Avoid wearing clothing with rough textures or embellishments that can rub against the leather.
6. Choosing the Right Leather Repair Products
Selecting the appropriate products is crucial for achieving the best results in DIY leather car seat repair.
6.1. Types of Leather Cleaners
- pH-Balanced Cleaners: These are gentle and safe for all types of leather.
- Enzyme Cleaners: Effective for removing stubborn stains and odors.
- Saddle Soap: Traditional leather cleaner, best for heavily soiled leather.
- Avoid: Harsh chemicals, solvents, and abrasive cleaners.
6.2. Types of Leather Conditioners
- Cream Conditioners: Provide deep moisturization and protection.
- Oil Conditioners: Ideal for dry, cracked leather.
- Wax Conditioners: Offer water resistance and protection against wear.
- Avoid: Conditioners with silicone or petroleum-based ingredients.
6.3. Leather Repair Kits
- All-in-One Kits: Include cleaner, conditioner, filler, colorant, and sealant.
- Specialty Kits: Designed for specific types of damage, such as tears or scratches.
- Color-Matching Kits: Allow you to customize the colorant to match your leather.
6.4. Where to Buy Leather Repair Products
- Automotive Supply Stores: Offer a wide range of leather care products.
- Online Retailers: Provide a convenient way to shop for leather repair kits and supplies.
- Leather Specialty Shops: Carry high-quality leather care products and offer expert advice.
- CARDIAGTECH.NET: Your reliable source for professional-grade leather repair tools and products. Contact us at +1 (641) 206-8880 or visit our location at 276 Reock St, City of Orange, NJ 07050, United States.
7. Common Mistakes to Avoid in Leather Car Seat Repair
Even with the best intentions, mistakes can happen. Here are some common pitfalls to avoid:
7.1. Using the Wrong Products
Using harsh chemicals or abrasive cleaners can damage the leather and worsen the problem. Always use products specifically designed for leather car seats.
7.2. Applying Too Much Product
Applying too much cleaner, conditioner, or filler can leave a residue or cause the leather to become sticky. Use products sparingly and follow the manufacturer’s instructions.
7.3. Rushing the Drying Process
Rushing the drying process can prevent products from bonding properly and lead to cracking or peeling. Allow ample drying time between each step.
7.4. Neglecting Preparation
Failing to properly clean and prepare the area can compromise the quality of the repair. Always clean the leather and smooth out any rough edges before applying repair products.
7.5. Not Matching the Color
Using a colorant that doesn’t match the color of your leather can result in a noticeable and unsightly repair. Take the time to find a colorant that closely matches your leather.
8. When to Seek Professional Help
While DIY repair can be effective for minor damage, some situations require professional expertise.
8.1. Extensive Damage
If your leather car seats have large tears, holes, or extensive cracking, it’s best to seek professional help. Attempting to repair significant damage yourself can lead to further problems.
8.2. Complex Repairs
Repairs that require specialized tools or techniques, such as replacing entire panels of leather, should be left to professionals.
8.3. Lack of Experience
If you’re not comfortable working with leather or don’t have experience with DIY repairs, it’s best to hire a professional.
8.4. Valuable or Antique Cars
If you own a valuable or antique car, it’s especially important to entrust the leather repair to a qualified professional to preserve the value and integrity of the vehicle.
9. Understanding Leather Types and Their Specific Needs
Different types of leather require different care and repair techniques. Knowing the type of leather in your car seats can help you choose the right products and methods.
9.1. Types of Leather Used in Car Seats
- Aniline Leather: The most natural and luxurious type of leather, aniline leather is dyed through and retains its natural surface. It’s soft and supple but also more susceptible to staining and wear.
- Semi-Aniline Leather: Similar to aniline leather but with a light protective coating. This coating provides added stain resistance and durability while maintaining the leather’s natural appearance.
- Protected Leather (Also Known as Coated or Pigmented Leather): The most common type of leather used in car seats. It has a durable protective coating that makes it resistant to stains, scratches, and fading.
- Nappa Leather: A full-grain, unsplit leather known for its softness and smoothness. It’s often used in luxury vehicles.
- Suede and Nubuck: These leathers have a soft, velvety surface. Suede is made from the underside of the hide, while nubuck is made from the top grain and then sanded to create a similar texture.
9.2. Care Tips for Different Leather Types
- Aniline Leather: Requires gentle cleaning and conditioning with products specifically designed for aniline leather. Avoid harsh chemicals and abrasive cleaners.
- Semi-Aniline Leather: Can be cleaned with a mild leather cleaner and conditioned regularly to maintain its protective coating.
- Protected Leather: Easy to clean and maintain. Use a pH-balanced leather cleaner and conditioner designed for coated leather.
- Nappa Leather: Requires gentle care to maintain its softness and smoothness. Use a high-quality leather cleaner and conditioner.
- Suede and Nubuck: Use a suede brush to remove dirt and a specialized suede cleaner to remove stains. Protect with a suede protectant spray.
10. Exploring Alternative Materials for Car Seats
If you’re considering replacing your leather car seats, there are several alternative materials to choose from.
10.1. Common Alternatives to Leather
- Vinyl: A durable and affordable synthetic material that mimics the look and feel of leather.
- Fabric: Available in a wide range of colors and patterns, fabric is a comfortable and breathable option.
- Leatherette (Also Known as Faux Leather or Vegan Leather): A synthetic material made to resemble leather. It’s more affordable and easier to maintain than genuine leather.
- Alcantara: A synthetic suede-like material known for its soft texture and durability.
10.2. Pros and Cons of Each Material
| Material | Pros | Cons |
|---|---|---|
| Vinyl | Durable, affordable, easy to clean | Can be hot and sticky, doesn’t breathe well |
| Fabric | Comfortable, breathable, wide range of options | Can stain easily, may require more frequent cleaning |
| Leatherette | Affordable, easy to maintain, vegan-friendly | Doesn’t have the same luxurious feel as genuine leather |
| Alcantara | Soft, durable, slip-resistant | Can be expensive, requires specialized cleaning products |
10.3. Making the Right Choice for Your Needs
Consider your budget, lifestyle, and personal preferences when choosing an alternative material for your car seats. If you prioritize durability and affordability, vinyl or leatherette may be a good choice. If you value comfort and breathability, fabric or Alcantara may be a better option.
11. Understanding the Environmental Impact of Leather Repair and Replacement
Making informed decisions about leather repair and replacement can also involve considering the environmental impact.
11.1. Environmental Considerations
- Leather Production: Leather production can have significant environmental impacts, including deforestation, water pollution, and greenhouse gas emissions.
- Chemical Use: Tanning and dyeing processes often involve the use of harsh chemicals that can be harmful to the environment and human health.
- Waste Disposal: Disposing of damaged leather car seats can contribute to landfill waste.
11.2. Sustainable Alternatives
- Repairing Instead of Replacing: Repairing your leather car seats can extend their lifespan and reduce the need for new materials.
- Using Eco-Friendly Products: Choose leather cleaners and conditioners made with natural, biodegradable ingredients.
- Opting for Sustainable Materials: Consider alternative materials like recycled fabric or vegan leather made from plant-based sources.
11.3. Making Environmentally Conscious Choices
By making informed decisions about leather repair and replacement, you can minimize your environmental impact and contribute to a more sustainable future.
12. Staying Up-to-Date with Leather Car Seat Technology and Innovations
The world of leather car seat technology is constantly evolving, with new innovations emerging all the time.
12.1. Recent Advances in Leather Technology
- Self-Healing Leather: Some manufacturers are developing self-healing leather that can repair minor scratches and scuffs on its own.
- Breathable Leather: New tanning processes are creating leather that is more breathable and comfortable in hot weather.
- Sustainable Leather Alternatives: Companies are developing innovative leather alternatives made from materials like pineapple leaves, mushrooms, and cactus.
12.2. How These Innovations Can Impact Car Seat Care and Repair
These innovations could make leather car seats more durable, easier to maintain, and more environmentally friendly.
12.3. Future Trends in Leather Car Seats
- Increased Use of Sustainable Materials: Automakers are likely to increase their use of sustainable leather alternatives in the coming years.
- Integration of Smart Technology: Leather car seats may be integrated with smart technology, such as heating, cooling, and massage features.
- Customizable Leather Options: Consumers may have more options to customize the color, texture, and design of their leather car seats.
13. Financial Aspects of Leather Car Seat Repair and Maintenance
Effectively managing the financial aspects of leather car seat repair and maintenance can save you money in the long run.
13.1. Budgeting for Repairs
- Assess the Damage: Determine the extent of the damage and estimate the cost of repair.
- Get Multiple Quotes: Compare quotes from different repair services to find the best price.
- Consider DIY Options: If the damage is minor, consider DIY repair to save money.
- Set a Realistic Budget: Allocate funds for leather car seat repair and maintenance.
13.2. Cost-Effective Maintenance Tips
- Regular Cleaning and Conditioning: Prevent damage by regularly cleaning and conditioning your leather car seats.
- Protect from UV Exposure: Park in shaded areas or use a car cover to prevent fading and cracking.
- Address Minor Damage Promptly: Repair small scratches and scuffs before they become larger problems.
13.3. Long-Term Savings
Investing in proper leather car seat care and repair can extend the lifespan of your seats and save you money on costly replacements in the future.
14. Legal and Ethical Considerations in Leather Car Seat Repair
Navigating the legal and ethical considerations in leather car seat repair ensures you’re making responsible decisions.
14.1. Warranty Issues
- Check Your Warranty: Review your car’s warranty to see if leather car seat repair is covered.
- Use Authorized Repair Services: If your car is under warranty, use authorized repair services to avoid voiding the warranty.
- Document Repairs: Keep records of all leather car seat repairs, including receipts and invoices.
14.2. Disclosure Requirements
- Disclose Damage When Selling: If you’re selling a car with repaired leather car seats, disclose the damage and repair to potential buyers.
- Be Honest About the Condition: Provide an accurate description of the condition of the leather car seats.
14.3. Ethical Sourcing of Leather
- Choose Ethically Sourced Leather: Support companies that use ethically sourced leather from tanneries with responsible environmental practices.
- Consider Sustainable Alternatives: Explore sustainable leather alternatives like recycled fabric or vegan leather.
15. Community Resources and Support for Leather Car Seat Owners
Leveraging community resources and support can enhance your leather car seat ownership experience.
15.1. Online Forums and Communities
- Join Online Forums: Participate in online forums and communities dedicated to car enthusiasts and leather car seat owners.
- Share Experiences: Share your experiences, ask questions, and learn from other members.
- Get Recommendations: Get recommendations for repair services and products.
15.2. Local Car Clubs
- Join a Car Club: Connect with local car enthusiasts through a car club.
- Attend Events: Attend car shows, meets, and other events to network with other owners.
- Learn from Experts: Learn from experienced car owners and repair professionals.
15.3. Expert Advice and Consultations
- Consult with Professionals: Seek advice from leather repair specialists or automotive upholstery experts.
- Get Personalized Recommendations: Get personalized recommendations for care and repair products.
- Attend Workshops: Attend workshops and seminars on leather car seat care and repair.
FAQ: Where to Fix Leather Car Seats
-
How do I find a reputable leather car seat repair service?
- Check online reviews, ask for recommendations, and look for certifications.
-
What is the average cost to repair a tear in a leather car seat?
- The cost can range from $150 to $300, depending on the size and complexity of the tear.
-
Can I repair leather car seats myself?
- Yes, for minor damage like scratches and scuffs. DIY repair kits are available.
-
What tools do I need for DIY leather car seat repair?
- Leather cleaner, conditioner, repair kit, glue, sandpaper, and applicator pads.
-
How often should I clean and condition my leather car seats?
- Clean every 1-3 months and condition every 3-6 months.
-
What causes leather car seats to crack?
- UV exposure, temperature fluctuations, and lack of maintenance.
-
Is it better to repair or replace damaged leather car seats?
- Repair is often more cost-effective for minor to moderate damage.
-
What are the best products for cleaning leather car seats?
- Use pH-balanced leather cleaners specifically designed for automotive use.
-
How can I prevent my leather car seats from fading?
- Park in shaded areas, use window tinting, and apply a UV protectant.
-
What is the difference between aniline and protected leather?
- Aniline leather is natural and soft but more susceptible to damage, while protected leather has a coating for added durability.
Ready to take the next step in restoring your leather car seats? CARDIAGTECH.NET is here to help. We offer expert advice, top-quality tools, and comprehensive repair solutions. Whether you’re tackling a DIY project or seeking professional services, we have everything you need. Contact us today at +1 (641) 206-8880 or visit our location at 276 Reock St, City of Orange, NJ 07050, United States. Let us help you bring back the beauty and comfort of your car’s interior. Don’t wait—your perfect leather awaits.