L663 Rear Heated Seats: Retrofit Guide and Parts
The L663 Rear Heated Seats are a sought-after comfort feature, especially in colder climates, and CARDIAGTECH.NET is here to guide you through the process of retrofitting them into your Land Rover Defender. Upgrading your vehicle with rear heated seats enhances passenger comfort and adds a touch of luxury. This comprehensive guide provides detailed steps, part numbers, and essential tips for a successful installation. Equipping your Defender with this feature can greatly improve its appeal and functionality. Let’s explore the heated seat upgrade and elevate your driving experience.
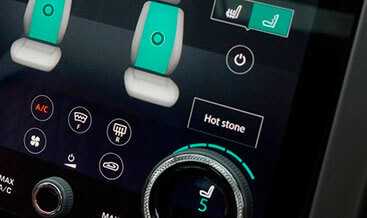
1. Understanding the L663 Rear Heated Seats System
The L663 Rear Heated Seats system is designed to provide warmth and comfort to rear passengers in Land Rover Defender models. It typically consists of heating pads integrated into the seat cushions, a control module, and switches or controls to adjust the heat level. Here’s what you need to know:
- Components: Heating pads for the seat base and backrest, a control module to regulate the temperature, and switches or dials for user control.
- Functionality: The system allows rear passengers to independently control the heat level of their seats, enhancing comfort during cold weather.
- Integration: The system integrates with the vehicle’s electrical system and climate control to provide a seamless and user-friendly experience.
2. Why Retrofit L663 Rear Heated Seats?
Retrofitting L663 Rear Heated Seats can significantly enhance the comfort and value of your Land Rover Defender. Here are several compelling reasons to consider this upgrade:
- Enhanced Comfort: Provides added warmth and comfort for rear passengers, especially during cold weather conditions.
- Increased Vehicle Value: Adding luxury features like heated seats can increase the resale value of your vehicle.
- Customization: Allows you to customize your Defender to meet your specific needs and preferences.
- Improved Passenger Experience: Makes long journeys more enjoyable for rear passengers.
- Modernization: Brings older models up to par with newer, more luxurious versions of the Defender.
3. Identifying the Correct Parts for Retrofitting
To successfully retrofit L663 Rear Heated Seats, it’s crucial to identify and source the correct parts. Here’s a detailed list of the components you’ll need:
- Heating Pads (Upper and Lower):
- Part Number (Upper Seat): LR132887 (x2, one for each side).
- Part Number (Lower Seat): LR132464 (x2, one for each side).
- Description: These pads are installed in the seat cushions to provide warmth. Ensure they are compatible with the 40/20/40 rear seat configuration.
- Heater Control Unit:
- Part Number: LR155819.
- Description: This control unit is essential for operating the rear heated seats. It is designed for models without rear seat cooling and features a three-dial unit.
- Wiring Harnesses:
- Description: Custom wiring harnesses may be required to connect the heating pads to the control unit and the vehicle’s electrical system. Check with CARDIAGTECH.NET for compatible harnesses.
- Rear Console Dials:
- Description: These dials allow rear passengers to control the heat level. Ensure they can be depressed to select the desired heating level.
- Fasteners and Clips:
- Description: Additional clips and fasteners might be needed to secure the heating pads and wiring.
Table of Essential Parts for L663 Rear Heated Seats Retrofit
| Part Name | Part Number | Description | Quantity | Approximate Price (USD) |
|---|---|---|---|---|
| Upper Seat Heater Pad | LR132887 | Heating pad for the upper part of the rear seats (40/20/40 configuration) | 2 | 160 each |
| Lower Seat Heater Pad | LR132464 | Heating pad for the lower part of the rear seats (40/20/40 configuration) | 2 | 160 each |
| Heater Control Unit | LR155819 | Electrical component with heated rear seat function, without cool rear seat function. Three dial unit. Auxiliary. | 1 | 300 |
| Wiring Harnesses | Custom | Connects the heating pads to the control unit and vehicle’s electrical system | 1 set | Varies |
| Rear Console Dials | OEM | Dials that can be depressed to select the desired heating level | 1 set | Varies |
| Fasteners and Clips | Generic | Secures heating pads and wiring | As needed | Varies |
Note: Prices are approximate and may vary based on the supplier and location.
4. Tools Required for the Retrofit Project
Having the right tools is essential for a successful L663 Rear Heated Seats retrofit. Here’s a comprehensive list of tools you’ll need:
- Socket Set:
- Description: Metric socket set for removing and installing bolts and nuts.
- Wrench Set:
- Description: Metric wrench set for various tightening tasks.
- Screwdriver Set:
- Description: Phillips head and flathead screwdrivers for removing panels and components.
- Trim Removal Tools:
- Description: Plastic trim removal tools to avoid damaging interior panels.
- Wire Strippers and Crimpers:
- Description: For modifying and connecting wiring harnesses.
- Multimeter:
- Description: To test electrical connections and ensure proper voltage.
- Electrical Tape:
- Description: For insulating and protecting wire connections.
- Hog Ring Pliers:
- Description: To reattach seat covers securely.
- Hog Rings:
- Description: To fasten the seat covers to the seat frame.
- Drill and Drill Bits:
- Description: For creating mounting points if necessary.
- Heat Gun:
- Description: For softening and molding seat covers during installation.
- Gloves and Safety Glasses:
- Description: For personal protection during the installation process.
- Torque Wrench:
- Description: To ensure bolts are tightened to the manufacturer’s specifications.
5. Step-by-Step Guide to Retrofitting L663 Rear Heated Seats
Follow these detailed steps to retrofit L663 Rear Heated Seats into your Land Rover Defender. Remember to consult the vehicle’s service manual for specific instructions and safety precautions.
Step 1: Preparation
- Gather Parts and Tools: Ensure you have all the necessary parts and tools listed above.
- Disconnect Battery: Disconnect the negative terminal of the battery to prevent electrical shorts.
- Prepare Work Area: Park the vehicle on a level surface and ensure you have adequate lighting.
Step 2: Remove Rear Seats
- Locate Seat Fasteners: Identify the bolts and clips securing the rear seats to the vehicle floor.
- Remove Bolts and Clips: Use the socket set and trim removal tools to carefully remove the fasteners.
- Disconnect Electrical Connectors: Disconnect any electrical connectors attached to the seats, such as those for seatbelt sensors.
- Remove Seats: Carefully lift the seats out of the vehicle.
Step 3: Disassemble Seat Cushions
- Remove Seat Covers: Use trim removal tools to detach the seat covers from the seat frame. Start at the edges and work your way around.
- Detach Hog Rings: Use hog ring pliers to remove the hog rings securing the seat covers to the foam cushions.
- Separate Cushions: Carefully separate the seat covers from the foam cushions.
Step 4: Install Heating Pads
- Position Heating Pads: Place the heating pads on the foam cushions, ensuring they are correctly aligned.
- Secure Heating Pads: Use adhesive or hog rings to secure the heating pads to the cushions.
- Route Wiring: Route the wiring for the heating pads through the seat frame, ensuring it is clear of any moving parts.
Step 5: Reassemble Seat Cushions
- Reattach Seat Covers: Place the seat covers back over the foam cushions, aligning them correctly.
- Secure Seat Covers: Use hog ring pliers and new hog rings to reattach the seat covers to the seat frame.
- Ensure Proper Fit: Check that the seat covers are properly aligned and secured. Use a heat gun to soften and mold the covers if necessary.
Step 6: Install Heater Control Unit and Dials
- Locate Mounting Point: Find a suitable location for the heater control unit, typically in the rear console.
- Install Control Unit: Secure the control unit to the mounting point using screws or clips.
- Install Dials: Replace the existing rear console dials with the new dials that allow you to push and select the heating level.
Step 7: Connect Wiring Harnesses
- Route Wiring Harnesses: Route the wiring harnesses from the heating pads to the control unit and the vehicle’s electrical system.
- Make Connections: Use wire strippers and crimpers to connect the wiring harnesses to the control unit and the vehicle’s wiring.
- Secure Connections: Use electrical tape to insulate and protect the wire connections.
Step 8: Reinstall Rear Seats
- Position Seats: Carefully place the rear seats back into the vehicle.
- Connect Electrical Connectors: Reconnect any electrical connectors to the seats.
- Secure Seats: Reinstall the bolts and clips to secure the seats to the vehicle floor.
- Torque Fasteners: Use a torque wrench to tighten the bolts to the manufacturer’s specifications.
Step 9: Test the System
- Reconnect Battery: Reconnect the negative terminal of the battery.
- Test Functionality: Turn on the vehicle and test the rear heated seats to ensure they are working correctly.
- Check for Errors: Use a diagnostic tool to check for any error codes related to the heated seat system.
Step 10: Final Adjustments
- Inspect Installation: Double-check all connections and ensure all components are properly installed.
- Clean Up: Clean the work area and dispose of any waste materials.
6. Wiring Considerations and Harness Customization
Proper wiring is crucial for the safe and effective operation of the L663 Rear Heated Seats. Here are some important considerations:
- Wiring Harness Compatibility: Ensure the wiring harnesses are compatible with your vehicle’s electrical system and the heater control unit.
- Custom Wiring: If custom wiring is needed, use high-quality automotive-grade wiring and connectors.
- Proper Grounding: Ensure the system is properly grounded to prevent electrical issues.
- Fuse Protection: Install a fuse in the wiring circuit to protect the system from overloads. Consult the vehicle’s wiring diagram for the appropriate fuse rating.
- Professional Installation: If you are not comfortable working with electrical systems, consider having a professional install the wiring.
7. Software Activation and Configuration
In some cases, retrofitting L663 Rear Heated Seats may require software activation or configuration to ensure the system functions correctly. Here’s what you need to know:
- Software Updates: The vehicle’s software may need to be updated to recognize the new heated seat system.
- Diagnostic Tools: Use a compatible diagnostic tool to access the vehicle’s computer and activate the heated seat function.
- Coding: Coding may be required to configure the system parameters, such as temperature settings and control options.
- Professional Assistance: If you are not familiar with software activation and coding, seek assistance from a qualified technician.
8. Troubleshooting Common Issues
After retrofitting L663 Rear Heated Seats, you may encounter some common issues. Here’s a troubleshooting guide to help you resolve them:
- Seats Not Heating:
- Check Power Supply: Ensure the system is receiving power. Check the fuse and wiring connections.
- Inspect Heating Pads: Check the heating pads for damage or wear.
- Test Control Unit: Test the control unit to ensure it is functioning correctly.
- Uneven Heating:
- Check Pad Placement: Ensure the heating pads are properly positioned in the seat cushions.
- Inspect Wiring: Check the wiring for loose connections or damage.
- Error Codes:
- Use Diagnostic Tool: Use a diagnostic tool to read the error codes and identify the problem.
- Consult Service Manual: Consult the vehicle’s service manual for troubleshooting steps.
- Control Dials Not Working:
- Check Connections: Ensure the control dials are properly connected to the control unit.
- Replace Dials: If the dials are faulty, replace them with new ones.
9. Benefits of Purchasing Parts from CARDIAGTECH.NET
When retrofitting L663 Rear Heated Seats, choosing the right supplier for your parts is crucial. Here are the benefits of purchasing parts from CARDIAGTECH.NET:
- Wide Selection: CARDIAGTECH.NET offers a wide range of OEM and aftermarket parts for Land Rover Defender models.
- Quality Assurance: All parts are thoroughly tested to ensure they meet or exceed OEM standards.
- Expert Support: CARDIAGTECH.NET provides expert technical support to assist you with your retrofit project.
- Competitive Pricing: CARDIAGTECH.NET offers competitive pricing on all parts, helping you save money on your upgrade.
- Fast Shipping: CARDIAGTECH.NET provides fast and reliable shipping to get your parts to you quickly.
10. Enhancing Comfort with Aftermarket Accessories
In addition to retrofitting L663 Rear Heated Seats, consider enhancing the comfort of your Land Rover Defender with these aftermarket accessories:
- Seat Covers:
- Description: High-quality seat covers can provide added comfort and protection for your seats.
- Benefits: Available in various materials and colors to match your interior.
- Lumbar Support:
- Description: Adjustable lumbar support systems can improve comfort and reduce back pain during long drives.
- Benefits: Easy to install and customize to your specific needs.
- Cushions and Pillows:
- Description: Add extra cushioning and support with seat cushions and pillows.
- Benefits: Available in various sizes and materials for maximum comfort.
- Heated Steering Wheel Cover:
- Description: Keep your hands warm during cold weather with a heated steering wheel cover.
- Benefits: Easy to install and provides instant warmth.
- Window Tinting:
- Description: Reduce glare and heat with window tinting.
- Benefits: Enhances comfort and protects your interior from UV damage.
11. Cost Analysis of Retrofitting L663 Rear Heated Seats
Understanding the costs involved in retrofitting L663 Rear Heated Seats can help you budget for the project. Here’s a cost analysis:
- Parts:
- Heating Pads (Upper): $160 each (x2 = $320)
- Heating Pads (Lower): $160 each (x2 = $320)
- Heater Control Unit: $300
- Wiring Harnesses: $100 – $200 (depending on customization)
- Rear Console Dials: $50 – $100
- Fasteners and Clips: $20
- Total Parts Cost: $1110 – $1260
- Labor (if professionally installed):
- Estimated Labor Cost: $500 – $1000 (depending on the complexity of the installation)
- Total Estimated Cost:
- DIY Installation: $1110 – $1260
- Professional Installation: $1610 – $2260
Table of Estimated Costs for L663 Rear Heated Seats Retrofit
| Item | Estimated Cost (USD) |
|---|---|
| Parts | $1110 – $1260 |
| Labor (if applicable) | $500 – $1000 |
| Total (DIY) | $1110 – $1260 |
| Total (Professional) | $1610 – $2260 |
Note: Costs are approximate and may vary based on the supplier, location, and complexity of the installation.
12. Maintaining Your L663 Rear Heated Seats
Proper maintenance can extend the life of your L663 Rear Heated Seats and ensure they continue to function effectively. Here are some maintenance tips:
- Regular Cleaning: Clean the seat cushions regularly to prevent dirt and debris from damaging the heating pads.
- Avoid Sharp Objects: Avoid placing sharp objects on the seats that could puncture or damage the heating pads.
- Check Wiring: Periodically check the wiring connections to ensure they are secure and free from corrosion.
- Professional Inspection: Have the system inspected by a qualified technician every few years to identify and address any potential issues.
13. Real-World Benefits: User Experiences
Many Land Rover Defender owners have successfully retrofitted L663 Rear Heated Seats and have reported significant improvements in comfort and convenience. Here are some real-world benefits based on user experiences:
- Improved Passenger Comfort: Rear passengers, especially during long trips, appreciate the added warmth and comfort provided by the heated seats.
- Increased Vehicle Value: The addition of heated seats has increased the resale value of many Defenders.
- Enhanced Driving Experience: Drivers report that the availability of heated seats makes their vehicles more enjoyable to drive in cold weather.
- Positive Feedback: Owners have received positive feedback from passengers who appreciate the added luxury.
- Customization Satisfaction: Retrofitting heated seats allows owners to customize their vehicles to meet their specific needs and preferences, leading to greater satisfaction.
14. Safety Precautions During Installation
Safety should always be a top priority when retrofitting L663 Rear Heated Seats. Here are some essential safety precautions to follow:
- Disconnect Battery: Always disconnect the negative terminal of the battery before working on the electrical system.
- Use Proper Tools: Use the correct tools for the job to avoid damaging components or injuring yourself.
- Wear Protective Gear: Wear gloves and safety glasses to protect yourself from electrical shocks and sharp objects.
- Follow Instructions: Follow the installation instructions carefully and consult the vehicle’s service manual for specific guidance.
- Seek Professional Help: If you are not comfortable performing the installation yourself, seek assistance from a qualified technician.
- Check for Airbag Sensors: Be extremely careful when working around the seats and check for any airbag sensors. Damaging these sensors could cause the airbags to deploy unexpectedly, resulting in serious injury.
- Avoid Water: Keep all electrical components dry during the installation. Water can cause short circuits and damage the system.
- Secure Wiring: Ensure all wiring is properly secured and routed away from moving parts to prevent damage or entanglement.
- Double-Check Connections: Before reconnecting the battery, double-check all wiring connections to ensure they are secure and correctly placed.
- Test Thoroughly: After installation, thoroughly test the heated seats to ensure they are functioning correctly and safely.
15. Legal and Regulatory Considerations
Before retrofitting L663 Rear Heated Seats, it’s important to consider any legal and regulatory requirements. Here are some key points:
- Compliance with Safety Standards: Ensure the retrofit complies with all applicable safety standards and regulations.
- Electrical Safety: Ensure the electrical system is properly installed and meets all safety requirements.
- Warranty Implications: Check whether the retrofit will affect the vehicle’s warranty.
- Professional Certification: Consider having the installation performed by a certified technician to ensure compliance with all regulations.
16. Future Trends in Automotive Comfort
The automotive industry is continuously evolving, with a growing emphasis on comfort and convenience features. Here are some future trends to watch for:
- Smart Seats: Seats with integrated sensors that automatically adjust to the occupant’s body shape and temperature preferences.
- Advanced Climate Control: Climate control systems that can individually regulate the temperature for each passenger.
- Massage Functions: Seats with integrated massage functions to reduce fatigue during long drives.
- Personalized Settings: Vehicles that can remember and automatically adjust to each driver’s preferred comfort settings.
- Sustainable Materials: Increased use of sustainable and eco-friendly materials in seat construction and design.
17. DIY vs. Professional Installation: Which is Right for You?
Deciding whether to perform a DIY installation or hire a professional for your L663 Rear Heated Seats retrofit depends on several factors. Here’s a comparison to help you make the right choice:
DIY Installation:
- Pros:
- Cost Savings: Save on labor costs.
- Flexibility: Work at your own pace and schedule.
- Personal Satisfaction: Gain satisfaction from completing the project yourself.
- Cons:
- Time Commitment: Requires a significant time investment.
- Technical Skills: Requires a good understanding of automotive electrical systems.
- Risk of Errors: Potential for errors that could damage the vehicle or system.
- Warranty Issues: May void the vehicle’s warranty.
Professional Installation:
- Pros:
- Expertise: Ensured the installation is performed correctly by experienced technicians.
- Warranty Protection: Professional installations are typically covered by a warranty.
- Time Savings: Saves you time and effort.
- Reduced Risk: Reduces the risk of errors and potential damage to the vehicle.
- Cons:
- Higher Cost: Higher overall cost due to labor charges.
- Scheduling: Requires scheduling an appointment with a professional installer.
Table: DIY vs. Professional Installation
| Feature | DIY Installation | Professional Installation |
|---|---|---|
| Cost | Lower (parts only) | Higher (parts + labor) |
| Time | More (significant time commitment) | Less (completed by professionals) |
| Skill Level | Requires technical skills and experience | Requires hiring qualified technicians |
| Risk | Higher (potential for errors and damage) | Lower (expertise reduces risk) |
| Warranty | May void vehicle warranty | Typically includes a warranty on the installation |
| Expertise | Requires thorough understanding of vehicle systems | Ensured by experienced professionals |
| Personal Satisfaction | High (sense of accomplishment) | Limited (project is handled by others) |
Recommendation:
- Choose DIY installation if you have experience with automotive electrical systems, are comfortable working on your vehicle, and have the necessary tools.
- Choose professional installation if you lack experience, want to ensure the job is done correctly, and are willing to pay for the convenience and expertise.
18. Alternative Heating Solutions for Your Defender
If retrofitting L663 Rear Heated Seats is not feasible or desired, there are alternative heating solutions you can consider:
- Portable Heated Seat Cushions:
- Description: These cushions plug into the vehicle’s cigarette lighter and provide instant warmth.
- Benefits: Easy to install and remove, and can be used in any vehicle.
- Heated Blankets:
- Description: Battery-powered or plug-in heated blankets for added warmth.
- Benefits: Portable and versatile, ideal for keeping passengers warm on long trips.
- Remote Start Systems:
- Description: Start your vehicle remotely to warm it up before you get in.
- Benefits: Ensures the vehicle is warm and comfortable when you enter.
- Upgraded Climate Control System:
- Description: Upgrade your vehicle’s climate control system for improved heating performance.
- Benefits: Provides more efficient and consistent heating throughout the cabin.
- Heated Clothing:
- Description: Battery-powered heated jackets, vests, and gloves for personal warmth.
- Benefits: Ideal for staying warm outside the vehicle and can be used in any situation.
19. Conclusion: Enhancing Your Defender with L663 Rear Heated Seats
Retrofitting L663 Rear Heated Seats is a worthwhile upgrade that can significantly enhance the comfort and value of your Land Rover Defender. By following this comprehensive guide, you can ensure a successful installation and enjoy the benefits of heated seats in your vehicle. Remember to source high-quality parts from trusted suppliers like CARDIAGTECH.NET to ensure the best results. Whether you choose to perform the installation yourself or hire a professional, the added comfort and convenience of heated seats will make your Defender a more enjoyable and luxurious vehicle to drive.
Ready to enhance your Land Rover Defender with L663 Rear Heated Seats? Contact CARDIAGTECH.NET today for expert advice and top-quality parts. Our team is here to assist you with every step of the retrofit process. Reach out to us at 276 Reock St, City of Orange, NJ 07050, United States, or call us on Whatsapp at +1 (641) 206-8880. Visit our website at CARDIAGTECH.NET for more information and to place your order. Let us help you transform your Defender into the ultimate comfort machine!
20. FAQ About L663 Rear Heated Seats
-
What are L663 Rear Heated Seats?
L663 Rear Heated Seats are a comfort feature in Land Rover Defender models that provide warmth to rear passengers through heating pads integrated into the seat cushions.
-
Why should I retrofit rear heated seats in my Defender?
Retrofitting enhances comfort for rear passengers, increases vehicle value, allows customization, and improves the overall passenger experience, especially in cold weather.
-
What parts are needed for retrofitting L663 Rear Heated Seats?
You’ll need upper and lower seat heating pads (LR132887 and LR132464), a heater control unit (LR155819), wiring harnesses, rear console dials, and fasteners.
-
Can I install rear heated seats myself, or do I need a professional?
It depends on your technical skills. DIY is possible with experience, but professional installation ensures accuracy and safety.
-
How much does it cost to retrofit L663 Rear Heated Seats?
Costs range from $1110-$1260 for DIY and $1610-$2260 for professional installation, including parts and labor.
-
Where can I buy the parts for L663 Rear Heated Seats?
You can purchase parts from CARDIAGTECH.NET, which offers a wide selection of OEM and aftermarket parts with expert support and competitive pricing.
-
Will retrofitting heated seats affect my vehicle’s warranty?
It’s important to check whether the retrofit will affect the vehicle’s warranty. Professional installations may offer their own warranty protection.
-
What safety precautions should I take during installation?
Disconnect the battery, use proper tools, wear protective gear, follow instructions carefully, and be cautious around airbag sensors.
-
How do I maintain my L663 Rear Heated Seats?
Clean seat cushions regularly, avoid sharp objects, check wiring periodically, and have the system inspected by a technician every few years.
-
What are some alternative heating solutions if I don’t want to retrofit heated seats?
Consider portable heated seat cushions, heated blankets, remote start systems, upgraded climate control, or heated clothing.